


 本文详细介绍了在EVE-NG环境中进行链路聚合的配置步骤,包括设置主机名、配置VLAN接口IP地址、定义并配置聚合组、加入接口到聚合组及查看聚合状态。此外,还提供了交换机的SSH登录配置流程,如设置密码、生成密钥对、调整认证次数和超时时间等。
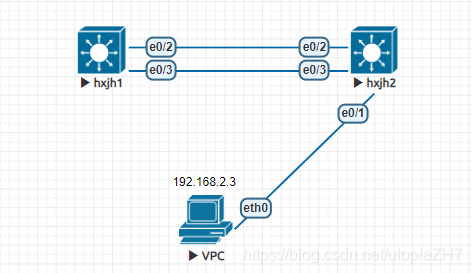
配置环境:EVE-NG
拓扑:
///
#配置链路聚合
#设置主机名
Switch(config)#hostname hxjh1
#配置vlan接口ip地址
hxjh1(config)#interface vlan 1
hxjh1(config-if)#ip address 192.168.0.1 255.255.255.0
hxjh1(config)#interface vlan 2
hxjh1(config-if)#ip address 192.168.2.1 255.255.255.0
hxjh1(config-if)#no shutdown
#定义聚合组,配置聚合组
hxjh1(config)#interface port-channel 10
hxjh1(config-if)#description test
hxjh1(config-if)#switchport mode trunk
Command rejected: Po10 not a switching port.
hxjh1(config-if)#switchport trunk encapsulation dot1q
hxjh1(config-if)#switchport mode trunk
hxjh1(config-if)#switchport trunk allowed vlan all
hxjh1(config-if)#no shutdown
#接口加入聚合组
hxjh1(config)#interface e0/2
hxjh1(config-if)#no shutdown
hxjh1(config-if)#channel-group 10 mode active
#接口加入聚合组
hxjh1(config-if)#interface e0/3
hxjh1(config-if)#no shutdown
hxjh1(config-if)#channel-group 10 mode active
#查看聚合组状态
hxjh1# show etherchannel detail
///
///
#登录配置
#配置console口密码
hxjh1(config)#line console 0
hxjh1(config-line)#login
% Login disabled on line 0, until ‘password’ is set
hxjh1(config-line)#password admin
#配置enable密码
hxjh1(config)#enable secret admin
#配置本地用户登录方式
hxjh1(config)#line vty 0 4
hxjh1(config-line)#login local
#配置登录用户
hxjh1(config)#username admin privilege 15 secret admin
#配置本地域名
hxjh1(config)#ip domain-name test.com
#生成秘钥对
hxjh1(config)#crypto key generate rsa
#配置ssh登录认证次数
hxjh1(config)#ip ssh authentication-retries 3
#配置认证超时时间
hxjh1(config)#ip ssh time-out 120
#查看SSH状态信息
hxjh1#show ip ssh
SSH Enabled - version 1.5
Authentication timeout: 120 secs; Authentication retries: 3
///
///
#交换机1完整配置
hxjh1#show running-config
Building configuration...

Current configuration : 1269 bytes
!
version 15.0
service timestamps debug datetime msec
service timestamps log datetime msec
no service password-encryption
!
hostname hxjh1
!
boot-start-marker
boot-end-marker
!
!
enable secret 5 $1$N2IH$EJ46qTQz2G5PP1r834fr2.
!
username admin privilege 15 secret 5 $1$k3NR$tvKHhIm.5NY2yHOJ13IXB.
no aaa new-model
clock timezone EET 2
!
ip cef
ip domain-name test.com
!
no ipv6 cef
!
!
!
spanning-tree mode pvst
spanning-tree extend system-id
!
vlan internal allocation policy ascending
!
ip ssh version 1
!
!
!
!
!
!
interface Port-channel10
 description test
 switchport
 switchport trunk encapsulation dot1q
 switchport mode trunk
!
interface Ethernet0/0
 duplex auto
!
interface Ethernet0/1
 duplex auto
!
interface Ethernet0/2
 switchport trunk encapsulation dot1q
 switchport mode trunk
 duplex auto
 channel-group 10 mode active
!
interface Ethernet0/3
 switchport trunk encapsulation dot1q
 switchport mode trunk
 duplex auto
 channel-group 10 mode active
!
interface Vlan1
 ip address 192.168.0.1 255.255.255.0
!
interface Vlan2
 ip address 192.168.2.1 255.255.255.0
!
!
ip forward-protocol nd
no ip http server
!
!
!
!
!
control-plane
!
!
line con 0
 password admin
 logging synchronous
 login
line aux 0
line vty 0 4
 login local
 transport input all
!
end
///
///
#交换机2完整配置
hxjh2#show running-config
Building configuration...

Current configuration : 1257 bytes
!
version 15.0
service timestamps debug datetime msec
service timestamps log datetime msec
no service password-encryption
!
hostname hxjh2
!
boot-start-marker
boot-end-marker
!
!
enable secret 5 $1$aPzQ$M7suR.LH9sTDB/dyr1TT8/
!
username admin privilege 15 secret 5 $1$KZID$jtdZKHRjhfEsn1diUXidQ.
no aaa new-model
clock timezone EET 2
!
ip cef
ip domain-name test.com
!
no ipv6 cef
!
!
!
spanning-tree mode pvst
spanning-tree extend system-id
!
vlan internal allocation policy ascending
!
ip ssh version 1
!
!
!
!
!
!
interface Port-channel10
 description test
 switchport
 switchport trunk encapsulation dot1q
 switchport mode trunk
!
interface Ethernet0/0
 duplex auto
!
interface Ethernet0/1
 switchport access vlan 2
 switchport mode access
 duplex auto
!
interface Ethernet0/2
 switchport trunk encapsulation dot1q
 switchport mode trunk
 duplex auto
 channel-group 10 mode active
!
interface Ethernet0/3
 switchport trunk encapsulation dot1q
 switchport mode trunk
 duplex auto
 channel-group 10 mode active
!
interface Vlan1
 ip address 192.168.0.2 255.255.255.0
!
!
ip forward-protocol nd
no ip http server
!
!
!
!
!
control-plane
!
!
line con 0
 password admin
 logging synchronous
 login
line aux 0
line vty 0 4
 login
 transport input all
!
end
///
查看链路聚合:
hxjh2#show etherchannel summary
Flags:  D - down        P - bundled in port-channel
        I - stand-alone s - suspended
        H - Hot-standby (LACP only)
        R - Layer3      S - Layer2
        U - in use      N - not in use, no aggregation
        f - failed to allocate aggregator

        M - not in use, no aggregation due to minimum links not met
        m - not in use, port not aggregated due to minimum links not met
        u - unsuitable for bundling
        d - default port

        w - waiting to be aggregated
Number of channel-groups in use: 1
Number of aggregators:           1

Group  Port-channel  Protocol    Ports
------+-------------+-----------+-----------------------------------------------
10     Po10(SU)        LACP      Et0/2(P)       Et0/3(P)
验证ssh登录:
hxjh2#ssh -l admin 192.168.0.1
Password:
验证连通性:
VPCS> ping 192.168.0.1

84 bytes from 192.168.0.1 icmp_seq=1 ttl=255 time=0.335 ms
84 bytes from 192.168.0.1 icmp_seq=2 ttl=255 time=0.516 ms
84 bytes from 192.168.0.1 icmp_seq=3 ttl=255 time=4.029 ms
84 bytes from 192.168.0.1 icmp_seq=4 ttl=255 time=0.445 ms
84 bytes from 192.168.0.1 icmp_seq=5 ttl=255 time=1.579 ms


 3421
3421

 被折叠的 条评论
为什么被折叠?
被折叠的 条评论
为什么被折叠?
 到【灌水乐园】发言


