


 因项目需要实现截图小功能,博主汇总调研信息。介绍了截图常用方式,如全屏、Texture2D、相机截图,调用系统API,给出核心代码及设置方法;还说明了生成指定内容带透明背景通道截图的步骤,最后提供GitHub项目工程地址供深度学习。
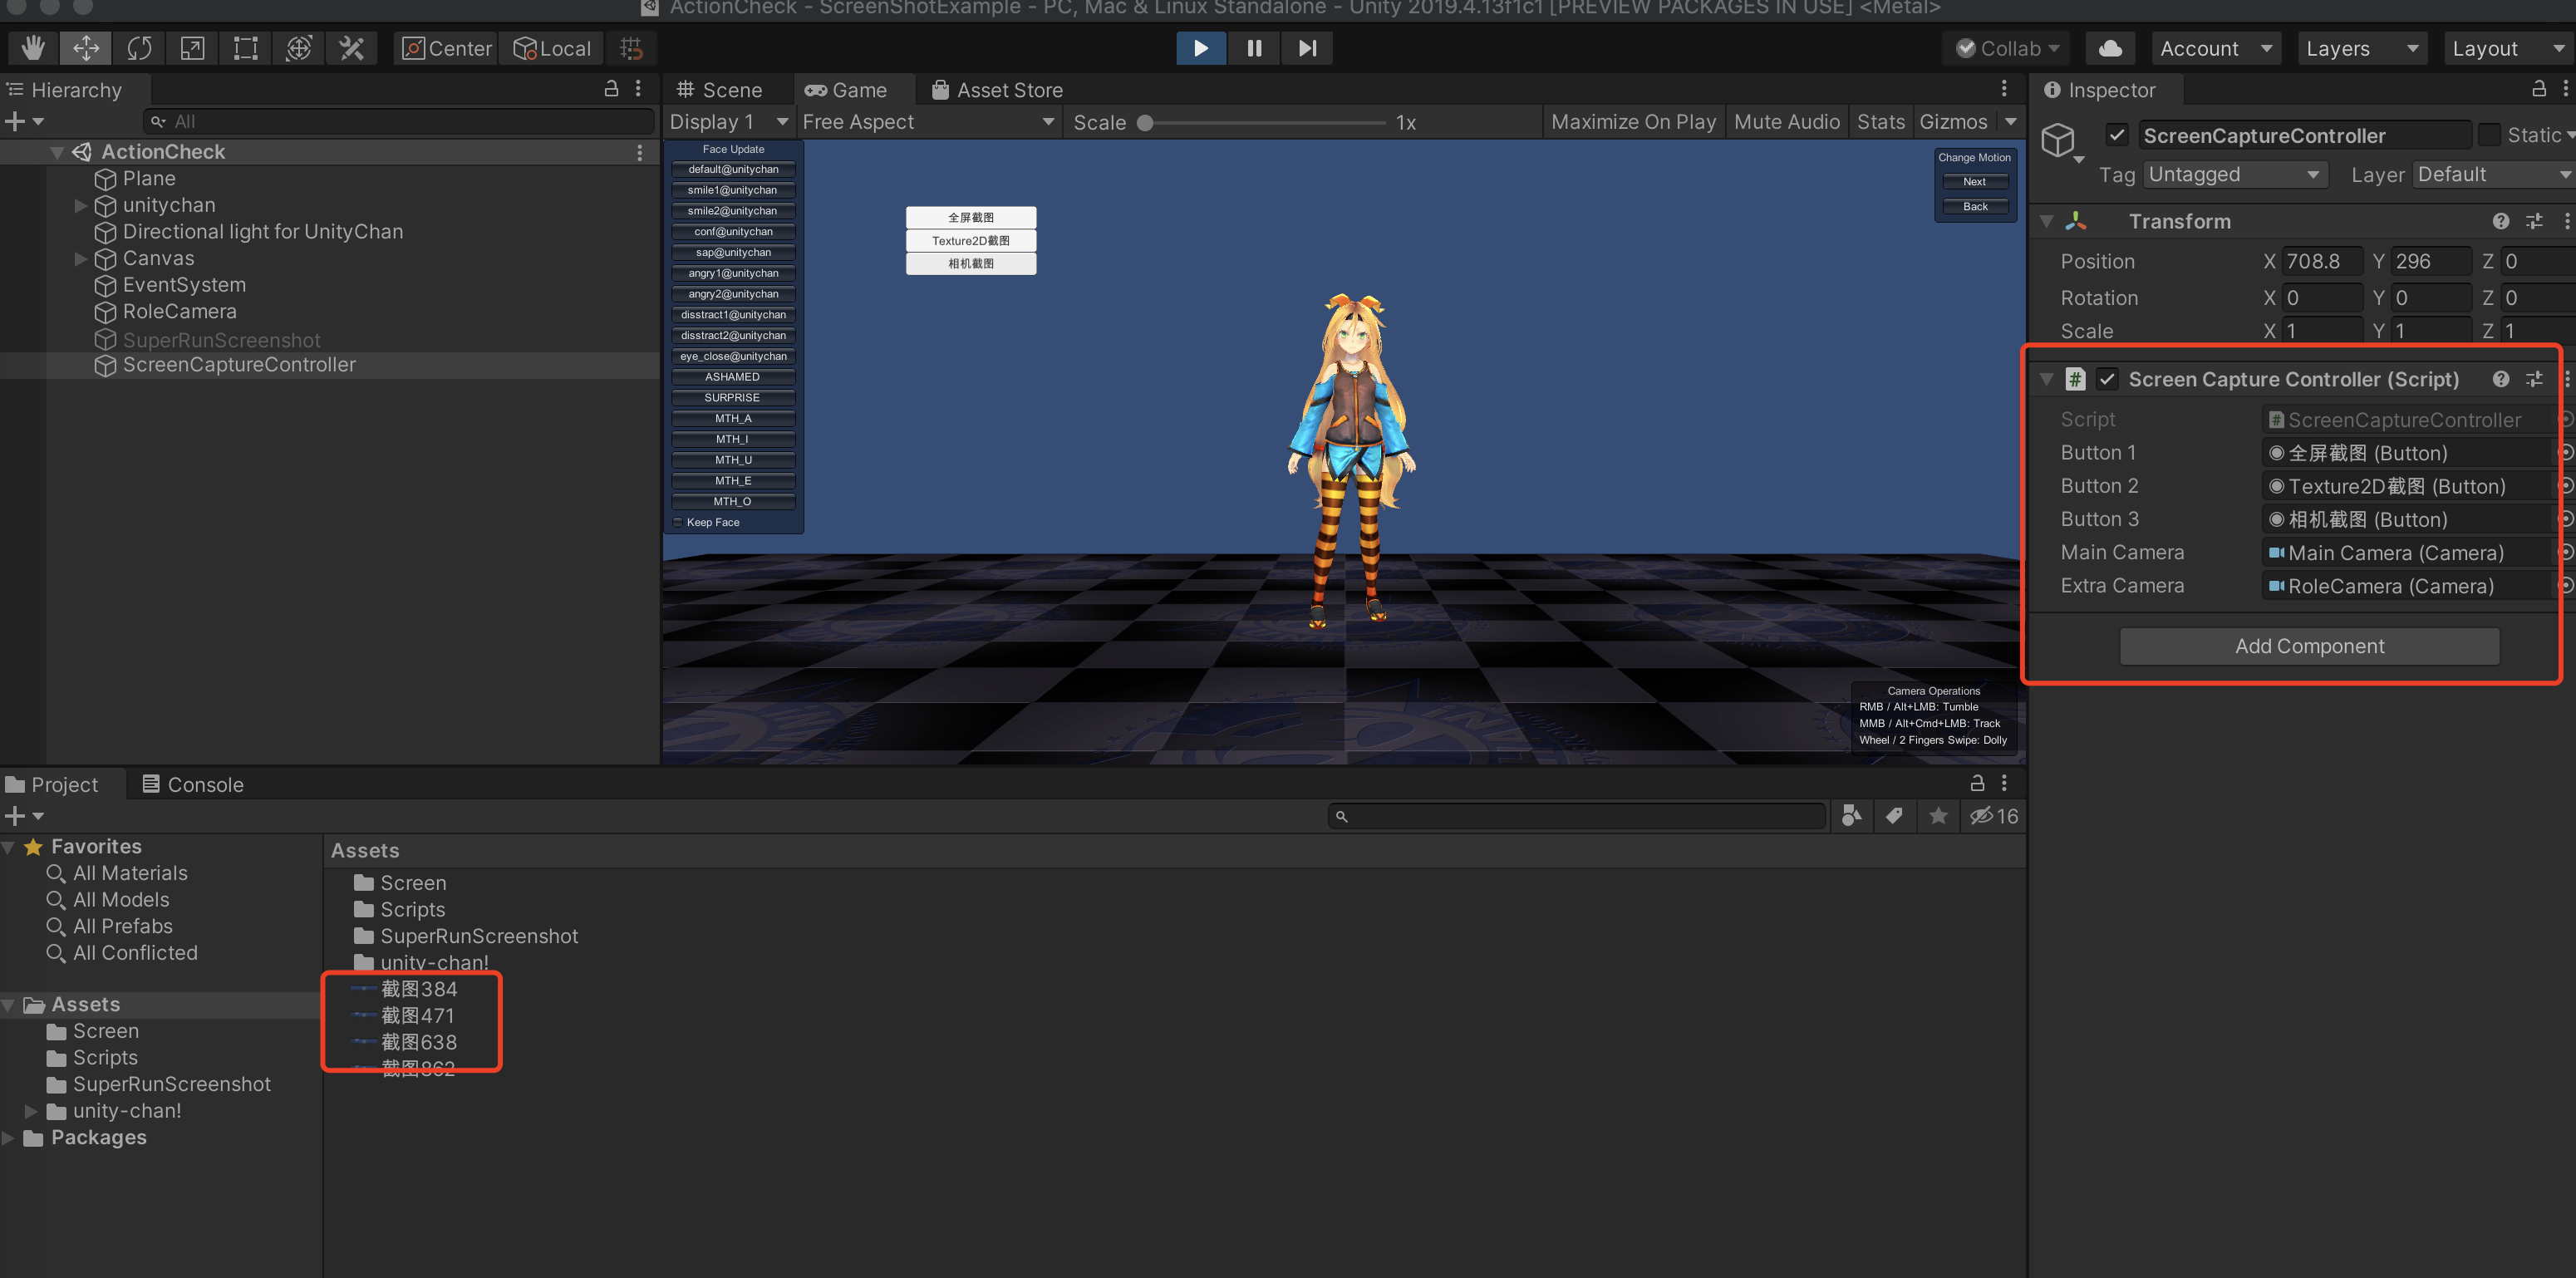
最近由于项目的需要,实现截图的小功能,实践中发现可达到效果的方式还是蛮多的,所以小编把调研过程中的信息汇总起来,与大家共同学习哈! 第一部分:截图的常用方式 - 全屏截图、Texture2D截图、相机截图方式 1、虽然实现方式比较多,但是里面的代码确实是比较简洁,都是调用系统自带的API。小编这边直接就上核心代码。ScreenCaptureController.cs 组件
     using

     System
     ;


     using

     System
     .
     Collections
     ;


     using

     System
     .
     Collections
     .
     Generic
     ;


     using

     System
     .
     IO
     ;


     using

     UnityEngine
     ;


     using

     UnityEngine
     .
     UI
     ;


     public

     class

     ScreenCaptureController

     :

     MonoBehaviour

     {


     public

     Button
      button1
     ;


     public

     Button
      button2
     ;


     public

     Button
      button3
     ;


     public

     Camera
      mainCamera
     ;


     public

     Camera
      extraCamera
     ;


     void

     Start
     (
     )


     {

        button1
     .
     onClick
     .
     AddListener
     (
     delegate

     {

     CaptureFunc
     (
     GetPath
     (
     )
     )
     ;

     }
     )
     ;

        button2
     .
     onClick
     .
     AddListener
     (
     delegate

     {

     StartCoroutine
     (
     Texture2DCapture
     (
     GetPath
     (
     )
     )
     )
     ;

     }
     )
     ;

        button3
     .
     onClick
     .
     AddListener
     (
     delegate

     {

     CameraCapture
     (
     GetPath
     (
     )
     )
     ;

     }
     )
     ;


     }


     /// <summary>


     /// Unity自带的截屏功能,保存当前画面


     /// </summary>


     /// <param name="filePath"></param>


     public

     void

     CaptureFunc
     (
     string
      filePath
     )


     {

        ScreenCapture
     .
     CaptureScreenshot
     (
     filePath
     )
     ;

        Debug
     .
     Log
     (
     "全屏截图文件路径保存在"

     +
      filePath
     )
     ;


     //刷新unity目录


     RefreshResource
     (
     )
     ;


     }


     /// <summary>


     /// 普通截屏


     /// </summary>


     /// <param name="filePath"></param>


     /// <returns></returns>


     public

     IEnumerator

     Texture2DCapture
     (
     string
      filePath
     )


     {


     yield

     return

     new

     WaitForEndOfFrame
     (
     )
     ;


     //1.起始的X坐标,Y坐标,宽、高


     var
      rect
     =

     new

     Rect
     (
     0
     ,

     0
     ,
      Screen
     .
     width
     ,
      Screen
     .
     height
     )
     ;


     Texture2D
      tex
     =

     new

     Texture2D
     (
     (
     int
     )
     rect
     .
     width
     ,

     (
     int
     )
     rect
     .
     height
     )
     ;


     //2.读取像素、后面两个参数分别是X轴的偏移量,Y轴偏移量

        tex
     .
     ReadPixels
     (
     rect
     ,

     0
     ,

     0
     )
     ;


     //3.保存数据

        tex
     .
     Apply
     (
     )
     ;


     //4.将数据转换成PNG数据


     byte
     [
     ]
      bytes
     =
      tex
     .
     EncodeToPNG
     (
     )
     ;


     //5.将数据写成文件

        File
     .
     WriteAllBytes
     (
     filePath
     ,
      bytes
     )
     ;

        Debug
     .
     Log
     (
     "Texture2D截图文件路径保存在"

     +
      filePath
     )
     ;


     //6.刷新unity目录


     RefreshResource
     (
     )
     ;


     }


     /// <summary>


     /// 刷新Unity的目录


     /// </summary>


     private

     static

     void

     RefreshResource
     (
     )


     {


     #
     if

     UNITY_EDITOR

        UnityEditor
     .
     AssetDatabase
     .
     Refresh
     (
     )
     ;


     #
     endif


     }


     /// <summary>


     /// Texture2D生成图片


     /// </summary>


     /// <param name="filePath"></param>


     public

     void

     CameraCapture
     (
     string
      filePath
     )


     {


     var
      camera
     =
      mainCamera
     ;

     //设置截图相机


     var
      rect
     =

     new

     Rect
     (
     0
     ,

     0
     ,
      Screen
     .
     width
     ,
      Screen
     .
     height
     )
     ;


     RenderTexture
      renderTexture
     =

     new

     RenderTexture
     (
     (
     int
     )
     rect
     .
     width
     ,

     (
     int
     )
     rect
     .
     height
     ,
     32
     )
     ;

        camera
     .
     targetTexture
     =
      renderTexture
     ;

     //设置相机的renderTexture

        camera
     .
     Render
     (
     )
     ;

     //手机开启相机的渲染

        RenderTexture
     .
     active
     =
      renderTexture
     ;

     //当前活动的渲染纹理


     Texture2D
      tex
     =

     new

     Texture2D
     (
     (
     int
     )
     rect
     .
     width
     ,

     (
     int
     )
     rect
     .
     height
     )
     ;

        tex
     .
     ReadPixels
     (
     rect
     ,

     0
     ,

     0
     )
     ;

        tex
     .
     Apply
     (
     )
     ;

        RenderTexture
     .
     active
     =

     null
     ;

     //重置当前活动的渲染纹理

        camera
     .
     targetTexture
     =

     null
     ;

     //重置相机的targetTexture


     //设置第二个截图相机

        camera
     =
      extraCamera
     ;

        camera
     .
     targetTexture
     =
      renderTexture
     ;

        camera
     .
     Render
     (
     )
     ;

        RenderTexture
     .
     active
     =
      renderTexture
     ;

        tex
     .
     ReadPixels
     (
     rect
     ,

     0
     ,

     0
     )
     ;

        tex
     .
     Apply
     (
     )
     ;


     //重置当前活动的渲染纹理

        camera
     .
     targetTexture
     =

     null
     ;

        camera
     =

     null
     ;

        RenderTexture
     .
     active
     =

     null
     ;


     //删除RenderTexture对象


     Destroy
     (
     renderTexture
     )
     ;


     //写成图片文件


     byte
     [
     ]
      bytes
     =
      tex
     .
     EncodeToPNG
     (
     )
     ;

        File
     .
     WriteAllBytes
     (
     filePath
     ,
      bytes
     )
     ;

        Debug
     .
     Log
     (
     "多相机截图文件路径保存在"

     +
      filePath
     )
     ;


     //刷新unity目录


     RefreshResource
     (
     )
     ;


     //回收垃圾

        Resources
     .
     UnloadUnusedAssets
     (
     )
     ;

        GC
     .
     Collect
     (
     )
     ;


     }


     public

     string

     GetPath
     (
     )


     {


     return
      Application
     .
     dataPath
     +

     "/截图"

     +
      UnityEngine
     .
     Random
     .
     Range
     (
     0
     ,

     1000
     )

     +

     ".Png"
     ;


     }


     }
2、设置生成路径,与对应的设置。根据以下截图所示。操作界面中的按钮,生成所需要的截图文件。
第二部分:生成指定内容(带透明背景通道)的截图 1、第一步,创建工程项目后,直接接上功能的核心代码。SuperRunScreenshot.cs 组件
using
System
.
Collections
;
using
System
.
Collections
.
Generic
;
using
UnityEngine
;
using
System
.
IO
;
using
System
.
Reflection
;
using
System
;
public
class
SuperRunScreenshot
:
MonoBehaviour
{
public
enum
Extension
{
EXR
,
JPG
,
PNG
,
TGA
}
public
int
CaptureWidth
=
0
;
public
int
CaptureHeight
=
0
;
public
Camera
CaptureCamera
=
null
;
public
bool
CaptureTransparent
=
true
;
public
string
CapturePath
=
null
;
public
string
CaptureLast
=
null
;
public
Extension
CaptureExtension
=
Extension
.
PNG
;
public
bool
FilenameCustomToggle
=
false
;
public
string
FilenameCustomValue
=
null
;
private
void
OnGUI
(
)
{
if
(
GUI
.
Button
(
new
Rect
(
200
,
100
,
100
,
100
)
,
"截取透明图片"
)
)
{
CaptureAction
(
)
;
}
}
private
void
CaptureAction
(
)
{
// HDRP - HDAdditionalCameraData
Type
HDRPCameraTypeA
=
Type
.
GetType
(
"UnityEngine.Rendering.HighDefinition.HDAdditionalCameraData, "
+
"Unity.RenderPipelines.HighDefinition.Runtime"
,
false
,
true
)
;
Type
HDRPCameraTypeB
=
Type
.
GetType
(
"UnityEngine.Experimental.Rendering.HDPipeline.HDAdditionalCameraData, "
+
"Unity.RenderPipelines.HighDefinition.Runtime"
,
false
,
true
)
;
Type
HDRPCameraType
=
HDRPCameraTypeA
??
HDRPCameraTypeB
;
Component
HDRPCameraInstance
=
HDRPCameraType
==
null
?
null
:
CaptureCamera
.
gameObject
.
GetComponent
(
HDRPCameraType
)
;
FieldInfo
HDRPCameraBackgroundColorHDR
=
HDRPCameraType
==
null
?
null
:
HDRPCameraType
.
GetField
(
"backgroundColorHDR"
)
;
FieldInfo
HDRPCameraClearMode
=
HDRPCameraType
==
null
?
null
:
HDRPCameraType
.
GetField
(
"clearColorMode"
)
;
// HDRP - HDAdditionalCameraData.ClearColorMode
Type
HDRPClearModeEnumA
=
Type
.
GetType
(
"UnityEngine.Rendering.HighDefinition.HDAdditionalCameraData+ClearColorMode, "
+
"Unity.RenderPipelines.HighDefinition.Runtime"
,
false
,
true
)
;
Type
HDRPClearModeEnumB
=
Type
.
GetType
(
"UnityEngine.Experimental.Rendering.HDPipeline.HDAdditionalCameraData+ClearColorMode, "
+
"Unity.RenderPipelines.HighDefinition.Runtime"
,
false
,
true
)
;
Type
HDRPClearModeEnum
=
HDRPClearModeEnumA
??
HDRPClearModeEnumB
;
object
HDRPClearModeColor
=
null
;
if
(
HDRPClearModeEnum
!=
null
&&
HDRPClearModeEnum
!=
null
)
{
try
{
HDRPClearModeColor
=
Enum
.
Parse
(
HDRPClearModeEnum
,
"Color"
)
;
}
catch
(
Exception
)
{
}
if
(
HDRPClearModeColor
==
null
)
{
try
{
HDRPClearModeColor
=
Enum
.
Parse
(
HDRPClearModeEnum
,
"BackgroundColor"
)
;
}
catch
(
Exception
)
{
}
}
}
// Temporary objects
TextureFormat
formatRGB
=
CaptureExtension
==
Extension
.
EXR
?
TextureFormat
.
RGBAFloat
:
TextureFormat
.
RGB24
;
TextureFormat
formatRGBA
=
CaptureExtension
==
Extension
.
EXR
?
TextureFormat
.
RGBAFloat
:
TextureFormat
.
ARGB32
;
RenderTexture
target
=
RenderTexture
.
GetTemporary
(
CaptureWidth
,
CaptureHeight
,
24
)
;
Texture2D
capture
=
null
;
if
(
CaptureTransparent
)
{
// Remember current settings
object
preHDRPClearColorMode
=
HDRPCameraInstance
==
null
?
null
:
HDRPCameraClearMode
==
null
?
null
:
HDRPCameraClearMode
.
GetValue
(
HDRPCameraInstance
)
;
object
preHDRPBackgroundColorHDR
=
HDRPCameraInstance
==
null
?
null
:
HDRPCameraBackgroundColorHDR
==
null
?
null
:
HDRPCameraBackgroundColorHDR
.
GetValue
(
HDRPCameraInstance
)
;
CameraClearFlags
preClearFlags
=
CaptureCamera
.
clearFlags
;
RenderTexture
preTargetTexture
=
CaptureCamera
.
targetTexture
;
RenderTexture
preActiveTexture
=
RenderTexture
.
active
;
Color
preBackgroundColor
=
CaptureCamera
.
backgroundColor
;
// Modify current settings
if
(
HDRPCameraInstance
!=
null
&&
HDRPCameraClearMode
!=
null
)
HDRPCameraClearMode
.
SetValue
(
HDRPCameraInstance
,
HDRPClearModeColor
)
;
CaptureCamera
.
clearFlags
=
CameraClearFlags
.
Color
;
CaptureCamera
.
targetTexture
=
target
;
RenderTexture
.
active
=
target
;
// Capture screenshot with black background
if
(
HDRPCameraInstance
!=
null
&&
HDRPCameraBackgroundColorHDR
!=
null
)
HDRPCameraBackgroundColorHDR
.
SetValue
(
HDRPCameraInstance
,
Color
.
black
)
;
CaptureCamera
.
backgroundColor
=
Color
.
black
;
CaptureCamera
.
Render
(
)
;
Texture2D
captureBlack
=
new
Texture2D
(
CaptureWidth
,
CaptureHeight
,
formatRGB
,
false
)
;
captureBlack
.
ReadPixels
(
new
Rect
(
0f
,
0f
,
CaptureWidth
,
CaptureHeight
)
,
0
,
0
,
false
)
;
captureBlack
.
Apply
(
)
;
// Capture screenshot with white background
if
(
HDRPCameraInstance
!=
null
&&
HDRPCameraBackgroundColorHDR
!=
null
)
HDRPCameraBackgroundColorHDR
.
SetValue
(
HDRPCameraInstance
,
Color
.
white
)
;
CaptureCamera
.
backgroundColor
=
Color
.
white
;
CaptureCamera
.
Render
(
)
;
Texture2D
captureWhite
=
new
Texture2D
(
CaptureWidth
,
CaptureHeight
,
formatRGB
,
false
)
;
captureWhite
.
ReadPixels
(
new
Rect
(
0f
,
0f
,
CaptureWidth
,
CaptureHeight
)
,
0
,
0
,
false
)
;
captureWhite
.
Apply
(
)
;
// Create capture with transparency
capture
=
new
Texture2D
(
CaptureWidth
,
CaptureHeight
,
formatRGBA
,
false
)
;
for
(
int
x
=
0
;
x
<
CaptureWidth
;
++
x
)
{
for
(
int
y
=
0
;
y
<
CaptureHeight
;
++
y
)
{
Color
lColorWhenBlack
=
captureBlack
.
GetPixel
(
x
,
y
)
;
Color
lColorWhenWhite
=
captureWhite
.
GetPixel
(
x
,
y
)
;
float
alpha
=
1
+
lColorWhenBlack
.
r
-
lColorWhenWhite
.
r
;
Color
color
=
new
Color
(
lColorWhenBlack
.
r
/
alpha
,
lColorWhenBlack
.
g
/
alpha
,
lColorWhenBlack
.
b
/
alpha
,
alpha
)
;
capture
.
SetPixel
(
x
,
y
,
color
)
;
}
}
capture
.
Apply
(
)
;
// Cleanup
DestroyImmediate
(
captureBlack
)
;
DestroyImmediate
(
captureWhite
)
;
// Revert settings
if
(
HDRPCameraInstance
!=
null
&&
HDRPCameraBackgroundColorHDR
!=
null
)
HDRPCameraBackgroundColorHDR
.
SetValue
(
HDRPCameraInstance
,
preHDRPBackgroundColorHDR
)
;
if
(
HDRPCameraInstance
!=
null
&&
HDRPCameraClearMode
!=
null
)
HDRPCameraClearMode
.
SetValue
(
HDRPCameraInstance
,
preHDRPClearColorMode
)
;
RenderTexture
.
active
=
preActiveTexture
;
CaptureCamera
.
targetTexture
=
preTargetTexture
;
CaptureCamera
.
backgroundColor
=
preBackgroundColor
;
CaptureCamera
.
clearFlags
=
preClearFlags
;
}
else
{
// Remember current settings
RenderTexture
preTargetTexture
=
CaptureCamera
.
targetTexture
;
RenderTexture
preActiveTexture
=
RenderTexture
.
active
;
// Modify current settings
CaptureCamera
.
targetTexture
=
target
;
RenderTexture
.
active
=
target
;
// Capture screenshot without transparency
CaptureCamera
.
Render
(
)
;
capture
=
new
Texture2D
(
CaptureWidth
,
CaptureHeight
,
formatRGB
,
false
)
;
capture
.
ReadPixels
(
new
Rect
(
0f
,
0f
,
CaptureWidth
,
CaptureHeight
)
,
0
,
0
,
false
)
;
capture
.
Apply
(
)
;
// Revert settings
RenderTexture
.
active
=
preActiveTexture
;
CaptureCamera
.
targetTexture
=
preTargetTexture
;
}
// Encode texture to data
byte
[
]
data
=
Encode
(
capture
,
CaptureExtension
)
;
if
(
data
!=
null
)
{
// Create filename path
CaptureLast
=
GetRenamedFilename
(
Path
.
Combine
(
CapturePath
,
GetFilename
(
)
)
)
;
string
filename
=
Path
.
GetFileName
(
CaptureLast
)
;
// Write data to path
using
(
FileStream
stream
=
new
FileStream
(
CaptureLast
,
FileMode
.
Create
)
)
{
BinaryWriter
writer
=
new
BinaryWriter
(
stream
)
;
writer
.
Write
(
data
)
;
}
// Log
Debug
.
Log
(
"Screenshot '"
+
filename
+
"' saved to '"
+
CapturePath
+
"'"
,
this
)
;
}
// Cleanup
DestroyImmediate
(
capture
)
;
RenderTexture
.
ReleaseTemporary
(
target
)
;
}
private
string
GetRenamedFilename
(
string
filename
)
{
int
count
=
1
;
string
file
=
Path
.
GetFileNameWithoutExtension
(
filename
)
;
string
extension
=
Path
.
GetExtension
(
filename
)
;
string
path
=
Path
.
GetDirectoryName
(
filename
)
;
string
renamed
=
filename
;
while
(
File
.
Exists
(
renamed
)
)
{
string
temp
=
string
.
Format
(
"{0} ({1})"
,
file
,
count
++
)
;
renamed
=
Path
.
Combine
(
path
,
temp
+
extension
)
;
}
return
renamed
;
}
private
string
GetFilename
(
)
{
string
extension
=
"."
+
CaptureExtension
.
ToString
(
)
.
ToLower
(
)
;
if
(
FilenameCustomToggle
&&
!
string
.
IsNullOrEmpty
(
FilenameCustomValue
)
)
{
if
(
FilenameCustomValue
.
ToLower
(
)
.
EndsWith
(
extension
)
)
{
return
FilenameCustomValue
;
}
else
{
return
FilenameCustomValue
+
extension
;
}
}
else
{
return
DateTime
.
Now
.
ToString
(
"yyyy-MM-dd-HH-mm-ss"
)
+
extension
;
}
}
private
static
byte
[
]
Encode
(
Texture2D
texture
,
Extension
extension
)
{
if
(
extension
==
Extension
.
TGA
)
{
MethodInfo
EncodeToTGA
=
typeof
(
ImageConversion
)
.
GetMethod
(
"EncodeToTGA"
,
BindingFlags
.
Static
|
BindingFlags
.
Public
)
;
if
(
EncodeToTGA
==
null
)
{
Debug
.
LogError
(
"TGA Encoder not found."
)
;
return
null
;
}
else
{
return
(
byte
[
]
)
EncodeToTGA
.
Invoke
(
null
,
new
object
[
]
{
texture
}
)
;
}
}
else
{
switch
(
extension
)
{
default
:
case
Extension
.
PNG
:
return
texture
.
EncodeToPNG
(
)
;
case
Extension
.
EXR
:
return
texture
.
EncodeToEXR
(
Texture2D
.
EXRFlags
.
CompressZIP
)
;
case
Extension
.
JPG
:
return
texture
.
EncodeToJPG
(
)
;
}
}
}
}
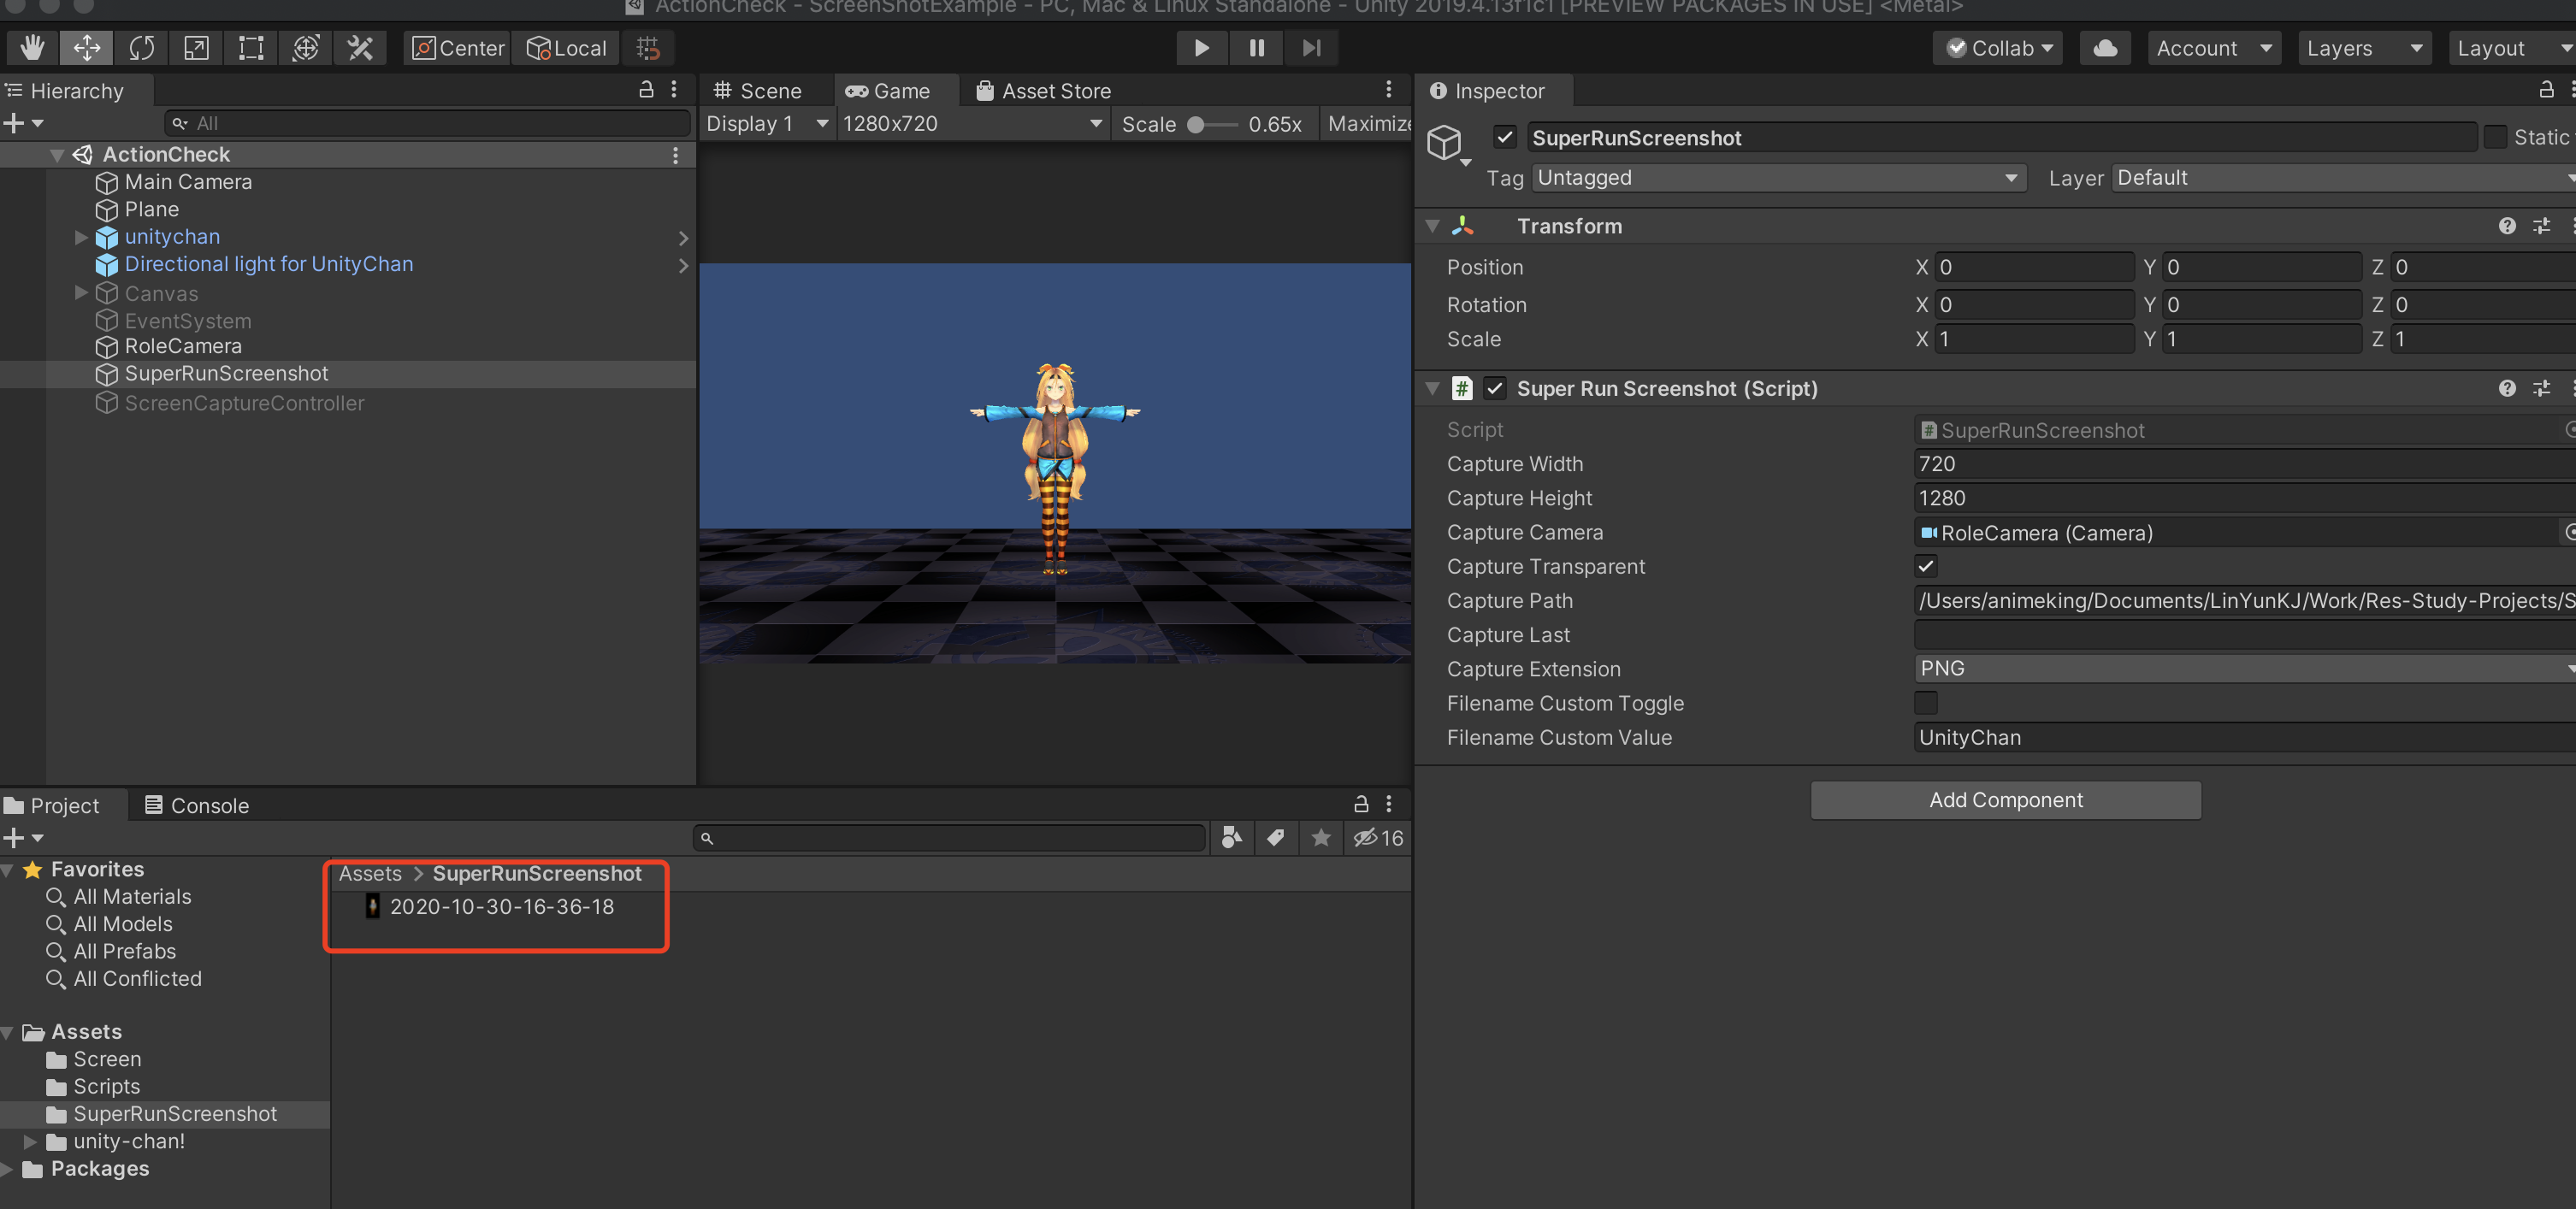
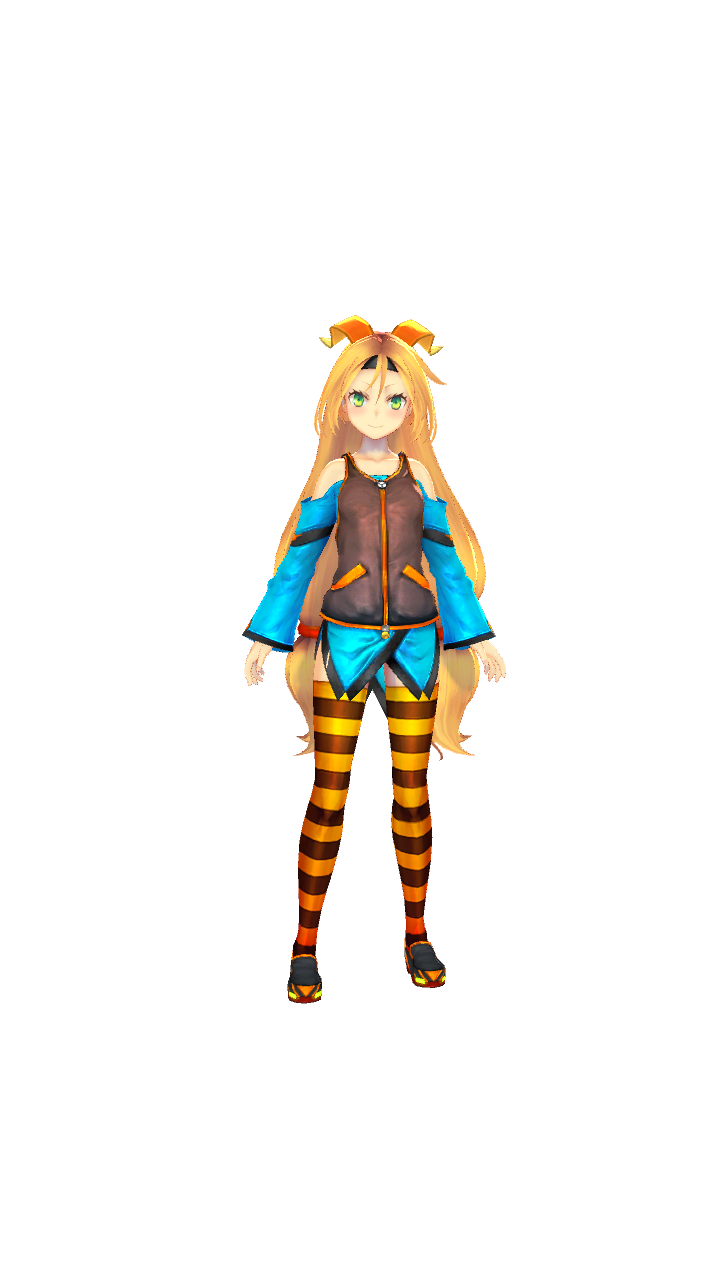
2、第二步,我们如果需要渲染成图的内容,只要设置单独相机渲染。其他的设置按照图中设置即可。以Unity-Chan 角色为例。 3、运行项目,最终得到效果图。 最后,如果想深度学习的同伴,可以直接下载项目工程学习哈!GitHub项目工程地址:
https://github.com/haili1234/ScreenShotExample


 被折叠的 条评论
为什么被折叠?
被折叠的 条评论
为什么被折叠?
 到【灌水乐园】发言


