


1. MCP Server介绍
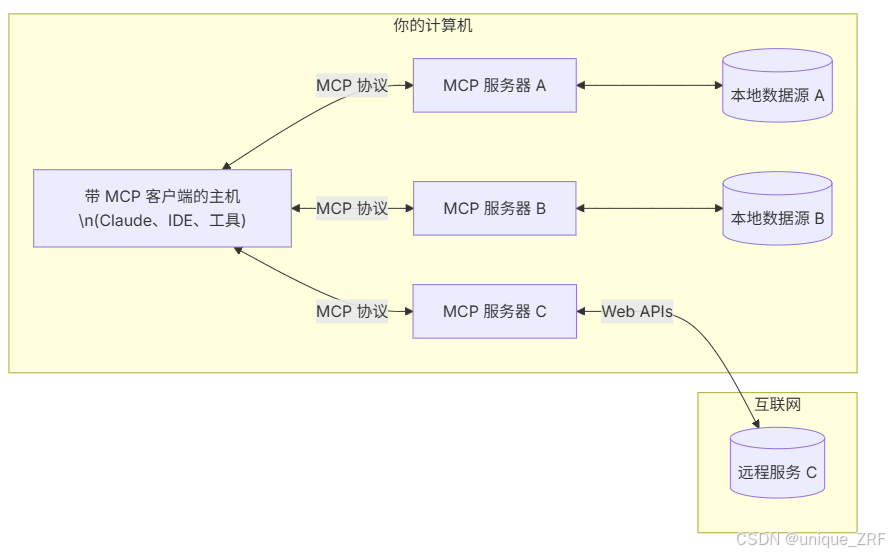
MCP Server 是实现模型上下文协议(MCP)的服务器,旨在为 AI 模型提供一个标准化接口,连接外部数据源和工具,例如文件系统、数据库或 API。
相比之下,在MCP出现前,AI调用工具基本上是通过Function Call 完成的,通过Function Call 调取相关Function 或 API 调用相关工具,AI 模型根据用户提示生成函数调用指令,这些指令随后由系统执行,例如查询天气或管理文件。但是存在两个问题:
- 不同的大模型厂商 Function Call 的格式不一致
- 大量的 api 工具的输入和输出格式不一致,封装管理起来繁琐不方便
而 MCP 相当于是一个统一的 USB-C,不仅统一了不同大模型厂商的 Function Call 格式,也对相关工具的封装进行了统一。
今天 MCP 的价值也得到了越来越多的人的认可。
目前 MCP 支持两种主要的传输协议:
- **Stdio 传输协议:**主要针对本地,需要在用户本地安装命令行工具,对运行环境有特定要求
- **SSE(Server-Sent Events)传输协议:**主要针对云服务部署,基于 HTTP 长连接实现
目前市面上支持MCP的客户端主要有如Claude desktop,Cline,Cursor 等,由于claude封禁较严重,我们主要基于自建 Client,Cursor 和 Cline进行构建。
2. 基于FastMCP的简单server-client交互示例(http方式调用)
2.1 server端代码
安装依赖包:
pip install fastmcp httpx
服务端代码(server.py)
from fastmcp import FastMCP
# 1. 创建 MCP 实例
mcp = FastMCP("demo-server")
# 2. 用装饰器注册工具
@mcp.tool()
def greet(name: str) -> str:
"""Say hello to someone."""
return f"Hello, {name}!"
@mcp.tool()
def calculate(a:float,b:float,op:str) -> float:
"""数学计算器(支持加减乘除)"""
ops = {
'+': a + b,
'-': a - b,
'*': a * b,
'/': a / b if b != 0 else float('nan')
}
result = ops.get(op, float('nan'))
return result
# 3. 启动服务
if __name__ == "__main__":
# transport 默认是 stdio,也可以换成 "http" 或 "sse"
# 让服务器监听在 0.0.0.0,允许其他机器访问
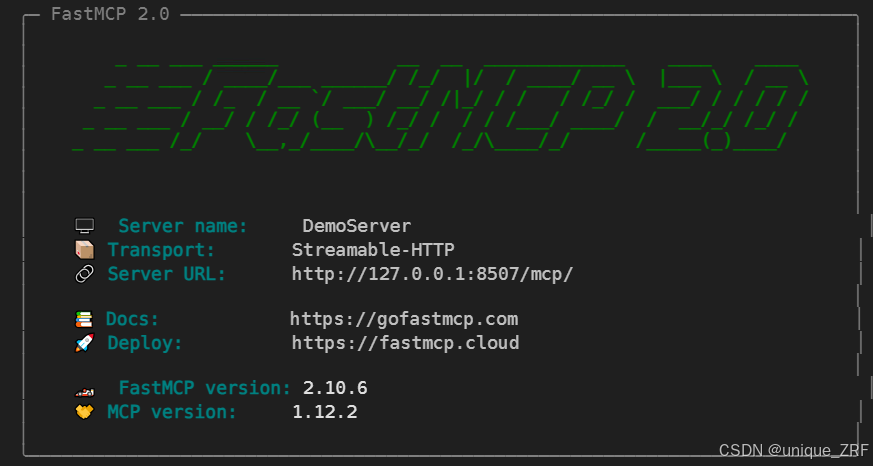
mcp.run(transport="http", host="0.0.0.0", port=9000)
在Terminal运行,注意要切换到对应的conda环境中:
python server.py
注意:如果使用jupyter运行,则需要将mcp.run(transport="http",host="127.0.0.1", port=9000)
改为
await mcp.run_async(transport="http", host="127.0.0.1", port=9000)
2.2. client端代码示例
客户端代码(client.py):
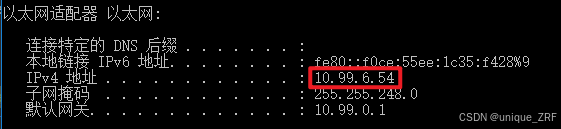
查看server端的ip地址:
windows:打开cmd命令窗口,输入ipconfig
import asyncio
from fastmcp import Client

# 1. 指定 MCP 服务器地址
config = {
    "mcpServers": {
        "demo": {
            "url": "http://10.99.6.54:9000/mcp", # 其中10.99.6.54为对应server服务器上ipconfig中的地址
            "transport": "streamable-http"
        }
    }
}

async def main():
    client = Client(config)
    async with client:
        # 2. 调用工具
        result1 = await client.call_tool("greet", {"name": "world"})
        result2 = await client.call_tool("calculate", {"a":12,"b":15,"op": "*"})
        calculate_result = result2.content[0].text
        name_result2 = result1.content[0].text
        print("计算结果:", calculate_result)
        print("输出结果:", name_result2)

if __name__ == "__main__":
    asyncio.run(main())
在Terminal运行,注意要切换到对应的conda环境中:
python client.py
运行结果:

3. 基于FastMCP的简单server-client交互示例(stdio方式调用)
3.1 server端代码
from fastmcp import FastMCP
# 1. 创建 MCP 实例
mcp = FastMCP("demo-server")
# 2. 用装饰器注册工具
@mcp.tool()
def greet(name: str) -> str:
"""Say hello to someone."""
return f"Hello, {name}!"
# 3. 启动服务(改为 stdio)
if __name__ == "__main__":
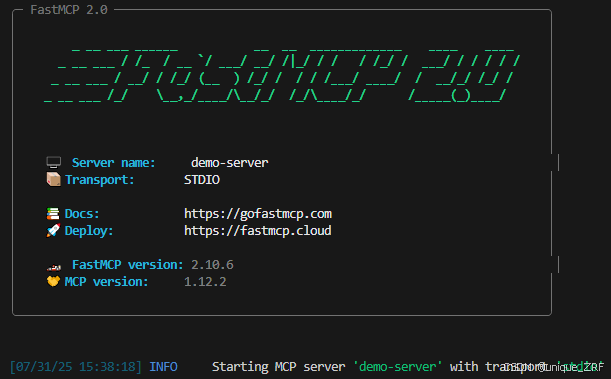
mcp.run(transport="stdio")
运行:
python server.py
3.2. client端代码
import asyncio
from mcp import ClientSession, StdioServerParameters
from mcp.client.stdio import stdio_client

async def main():
    # 1. 告诉客户端如何启动 server.py
    server_params = StdioServerParameters(
        command="python",
        args=["server.py"],
        env=None
    )

    # 2. 建立连接并拿到 session
    async with stdio_client(server_params) as (read, write):
        async with ClientSession(read, write) as session:
            await session.initialize()

            # 3. 调用 greet 工具
            result = await session.call_tool("greet", arguments={"name": "Bob"})
            print("结果 ->", result.content[0].text)   # Hello, Bob!

if __name__ == "__main__":
    asyncio.run(main())
运行:
python client.py
运行结果

4. 参考链接:
MCP Server & Client教程
FastMcp简介
Python FastMCP中文文档
MCP 通信消息格式之 JSON-RPC 2.0 协议
MCP简介


 343
343

 被折叠的 条评论
为什么被折叠?
被折叠的 条评论
为什么被折叠?
 到【灌水乐园】发言


