


 这篇博客详细介绍了在微服务架构下购物车的渲染过程,包括购物车渲染服务的搭建、feign调用、前端页面处理、商品数量变更、删除商品、订单服务对接OAuth认证、微服务间认证实现、动态获取当前登录人以及页面配置等关键步骤。通过这些步骤,实现了用户友好的购物车功能。
3.购物车渲染
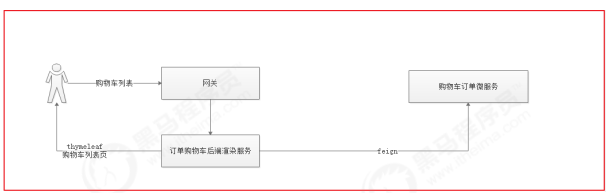
如上图所示,用户每次将商品加入购物车,或者点击购物车列表的时候,先经过订单购物车后端渲染服务,再通过feign调用购物车订单微服务来实现购物车的操作,例如:加入购物车、购物车列表。
3.1购物车渲染服务搭建
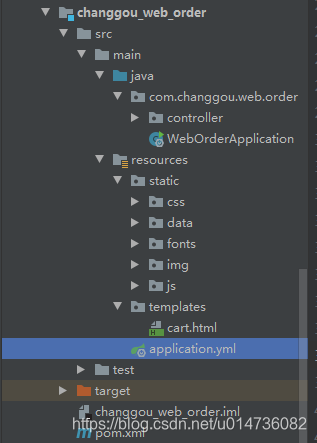
在changgou_web中搭建订单购物车微服务工程 changgou_web_order ,该工程主要实现购物车和订单的渲染操作。
(1) pom.xml依赖
<dependencies>
	<dependency>
		<groupId>com.changgou</groupId>
		<artifactId>changgou_service_order_api</artifactId>
		<version>1.0-SNAPSHOT</version>
	</dependency>
	<dependency>
		<groupId>com.changgou</groupId>
		<artifactId>changgou_common</artifactId>
		<version>1.0-SNAPSHOT</version>
	</dependency>
	<dependency>
		<groupId>org.springframework.boot</groupId>
   		<artifactId>spring-boot-starter-thymeleaf</artifactId>
	</dependency>
</dependencies>
(2)application.yml配置
server:
  port: 9011
spring:
  application:
    name: order-web
  main:
    allow-bean-definition-overriding: true   #当遇到同样名字的时候,是否允许覆盖注册
  thymeleaf:
    cache: false
eureka:
  client:
    service-url:
      defaultZone: http://127.0.0.1:6868/eureka
  instance:
    prefer-ip-address: true
feign:
  hystrix:
    enabled: true
  client:
    config:
      default:   #配置全局的feign的调用超时时间  如果 有指定的服务配置 默认的配置不会生效
        connectTimeout: 60000 # 指定的是 消费者 连接服务提供者的连接超时时间 是否能连接  单位是毫秒
        readTimeout: 80000  # 指定的是调用服务提供者的 服务 的超时时间()  单位是毫秒
#hystrix 配置
hystrix:
  command:
    default:
      execution:
        timeout:
          #如果enabled设置为false,则请求超时交给ribbon控制
          enabled: true
        isolation:
          strategy: SEMAPHORE
          thread:
            # 熔断器超时时间,默认:1000/毫秒
            timeoutInMilliseconds: 80000
#请求处理的超时时间
ribbon:
  ReadTimeout: 4000
  #请求连接的超时时间
  ConnectTimeout: 3000
(3)创建启动类
创建com.changgou.OrderApplication启动类,代码如下:
package com.changgou.web.order;

import com.changgou.interceptor.FeignInterceptor;
import org.springframework.boot.SpringApplication;
import org.springframework.boot.autoconfigure.SpringBootApplication;
import org.springframework.cloud.netflix.eureka.EnableEurekaClient;
import org.springframework.cloud.openfeign.EnableFeignClients;
import org.springframework.context.annotation.Bean;

@SpringBootApplication
@EnableEurekaClient
@EnableFeignClients(basePackages = {

   "com.changgou.order.feign"})
public class WebOrderApplication {


    public static void main(String[] args) {


        SpringApplication.run(WebOrderApplication.class,args);
    }

    @Bean
    public FeignInterceptor feignInterceptor(){


        return  new FeignInterceptor();
    }
}
(4)静态资源拷贝
资源\成品页面\cart.html页面拷贝到工程中,如下图:
3.2购物车列表渲染
3.2.1feign创建
在changgou_service_order_api中添加CartFeign接口,并在接口中创建添加购物车和查询购物车列表,代码如下:
package com.changgou.order.feign;

import com.changgou.entity.Result;
import org.springframework.cloud.openfeign.FeignClient;
import org.springframework.web.bind.annotation.GetMapping;
import org.springframework.web.bind.annotation.RequestParam;

import java.util.Map;

@FeignClient(name = "order")
public interface CartFeign {


    @GetMapping("/cart/addCart")
    public Result addCart(@RequestParam("skuId") String skuId, @RequestParam("num") Integer num);

    @GetMapping("/cart/list")
    public Map list();
}
在changgou_web_order中创建com.changgou.order.controller.CartController,并添加查询购物车集合方法和添加购物车方法,代码如下:
package com.changgou.web.order.controller;

import com.changgou.entity.Result;
import com.changgou.entity.StatusCode;
import com.changgou.order.feign.CartFeign;
import org.springframework.beans.factory.annotation.Autowired;
import org.springframework.stereotype.Controller;
import org.springframework.ui.Model;
import org.springframework.web.bind.annotation.GetMapping
最低0.47元/天 解锁文章


 990
990

 被折叠的 条评论
为什么被折叠?
被折叠的 条评论
为什么被折叠?
 到【灌水乐园】发言


