


创建一个工程
cd 到要创建工程的文件夹下,执行命令:
django-admin startproject my_project- 1
创建第一个页面
my_project/my_project文件夹中创建文件:
views.py
from django.http import HttpResponse

def first_page(request):
return HttpResponse("Cool snow!")- 1
- 2
- 3
- 4
创建URL和函数之间的映射,编辑urls.py文件:
from django.conf.urls import url,include
from django.contrib import admin
from views import first_page#引入对应的函数

urlpatterns = [
    url(r'^admin/', admin.site.urls),
    url(r'^$', first_page),#添加映射
]- 1
- 2
- 3
- 4
- 5
- 6
- 7
- 8
这个时候启动服务器,
python manage.py runserver- 1
结果: 
创建一个app
tip:Django只有在app里面才能引用数据库,所以必须创建app
在外层my_project文件夹下,terminal执行:
python manage.py startapp app1- 1
配置settings.py:
INSTALLED_APPS = [
    'django.contrib.admin',
    'django.contrib.auth',
    'django.contrib.contenttypes',
    'django.contrib.sessions',
    'django.contrib.messages',
    'django.contrib.staticfiles',
    'app1',#添加我们自己的app
]- 1
- 2
- 3
- 4
- 5
- 6
- 7
- 8
- 9
配置应用对应的urls.py
(注意这里是在my_project/my_project/urls.py,不是app1文件夹中的urls.py)
from django.conf.urls import url,include
from django.contrib import admin
from views import first_page

urlpatterns = [
    url(r'^admin/', admin.site.urls),
    url(r'^$', first_page),
    url(r'^app1/', include('app1.urls')),#添加这句
]- 1
- 2
- 3
- 4
- 5
- 6
- 7
- 8
- 9
修改app1视图文件:
app1/views.py
from django.http import HttpResponse
def first_page(request):
return HttpResponse("happy snow!")- 1
- 2
- 3
配置app1内部URL映射:
app1/urls.py
from django.conf.urls import url,include
from django.contrib import admin
from views import first_page# add

urlpatterns = [
    url(r'^$', first_page)
]- 1
- 2
- 3
- 4
- 5
- 6
- 7

上面的结果就对了,注意体会链接的形式
配置数据库
my_project/my_project/settings.py
# DATABASES = {
#     'default': {
#         'ENGINE': 'django.db.backends.sqlite3',
#         'NAME': os.path.join(BASE_DIR, 'db.sqlite3'),
#     }
# }
# 注释掉原来的数据库,添加我们的Mysql
DATABASES = {
    'default': {
        'ENGINE': 'django.db.backends.mysql',
        'NAME': 'snowtest0106', #我们数据库名称
        'USER': 'root',
        'PASSWORD': '******', #填写你的密码
        'HOST': '127.0.0.1',
        'PORT': '3306',
    }
}- 1
- 2
- 3
- 4
- 5
- 6
- 7
- 8
- 9
- 10
- 11
- 12
- 13
- 14
- 15
- 16
- 17
my_project/my_project/_init_.py
import pymysql
pymysql.install_as_MySQLdb()- 1
- 2
检查是否连接成功:
python manage.py shell
>>>from django.db import connection
>>>cursor = connection.cursor()- 1
- 2
- 3

不报错就对了
使用数据库
编辑models.py
from __future__ import unicode_literals

from django.db import models

# Create your models here.

class myStudent(models.Model):
    def __str__(self):
        return self.name
name = models.CharField(max_length=20)- 1
- 2
- 3
- 4
- 5
- 6
- 7
- 8
- 9
- 10
terminal执行
python manage.py makemigrations app1
python manage.py migrate- 1
- 2
这个时候,再去看我们的数据库,就有刚刚创建的表了,我是用navicat来管理数据库的: 
这里,我在数据库里面添加了一条记录,snowy,一会儿访问数据库的时候要用到
数据库中的id字段是django在创建数据库的时候自动添加的
让数据库的内容显示到网页中
app1/views.py
from django.http import HttpResponse
from models import myStudent

def first_page(request):
    student_list = myStudent.objects.all()
    student_str = map(str, student_list)
return HttpResponse("<p>" + ''.join(student_str) + "</p>")- 1
- 2
- 3
- 4
- 5
- 6
- 7
启动服务器,运行: 
这时候,数据库里面的snowy被显示出来
到此,我们的目标已经大致完成了,但是可以看出来,这种方式,虽然实现了结果,但是并不符合django的MVC编程思想。我们要把模板和数据分开来,怎么办呢?
my_project目录下创建template文件,并添加我们的模板html,这里是hello.html 
hello.html
<!DOCTYPE html>
<html lang="en">
<head>
    <meta charset="UTF-8">
    <title>Title</title>
</head>
<body>
{{hello}}
</body>
</html>- 1
- 2
- 3
- 4
- 5
- 6
- 7
- 8
- 9
- 10
修改settings.py:’DIRS’: [BASE_DIR+”/templates”,],
TEMPLATES = [
    {
        'BACKEND': 'django.template.backends.django.DjangoTemplates',
        'DIRS': [BASE_DIR+"/templates",],
        'APP_DIRS': True,
        'OPTIONS': {
            'context_processors': [
                'django.template.context_processors.debug',
                'django.template.context_processors.request',
                'django.contrib.auth.context_processors.auth',
                'django.contrib.messages.context_processors.messages',
            ],
        },
    },
]- 1
- 2
- 3
- 4
- 5
- 6
- 7
- 8
- 9
- 10
- 11
- 12
- 13
- 14
- 15
app1/views.py
from models import myStudent
from django.shortcuts import render

def first_page(request):
    student_list = myStudent.objects.all()
    student_str = map(str, student_list)
    context = {}
    context['hello'] = ''.join(student_str)
    # context['hello'] = 'hello yibo'
return render(request, 'hello.html',context)- 1
- 2
- 3
- 4
- 5
- 6
- 7
- 8
- 9
- 10
这个时候启动服务器,运行:

引入js库
我们写页面很多时候需要外部js库的支持,那么这些文件应该放在哪里呢?又该如何配置呢?
- 建立static文件夹:
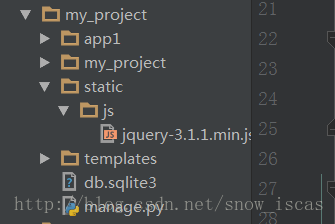
注意上图里面static文件夹的路径,再在里面添加js文件夹,js文件夹里面就可以放我们需要的js文件了。 - 配置相关文件
接下来,想要使用这些js我们还需要进行一些配置:
settings.py
STATIC_URL = '/static/'

STATICFILES_DIRS = (
    os.path.join(BASE_DIR, 'static'),
)- 1
- 2
- 3
- 4
- 5
templates/hello.html
{% load staticfiles %}#这句添加在html文件的最上面
<script src="{% static "js/jquery-3.1.1.min.js" %}" type="text/javascript"></script>
#注意看这里面的script标签和我们之前的script标签之间的不同- 1
- 2
- 3
到这基本上我们的配置就结束了。
其实我也不是很懂jQuery,昨天看师兄操作看的我眼花缭乱,估计还是得以后自己用的时候慢慢体会,我先把过程记录下来。
先说一下我们想要实现什么。
我们在后台建立了一个字典(当然这个是demo,我们以后上线的时候肯定是要在数据库里面调用这些数据的):
{'1':1234,"2":4321}- 1
在前端页面放了一个下拉框,想要在选1的时候,页面显示1234,在选2的显示4321。
hello.html
{% load staticfiles %}
<!DOCTYPE html>
<html lang="en">
<head>
    <meta charset="UTF-8">
    <title>Title</title>
    <script src="{% static "js/jquery-3.1.1.min.js" %}" type="text/javascript"></script>
</head>
<body>
{{hello}}
<select id="lineno">
    <option>1</option>
    <option>2</option>
</select>
</body>
<div id="div">

</div>
<script type="text/javascript">
    $("#lineno").change(function(){        alert("You have changed the option!");

        })
    });
</script>
</html>- 1
- 2
- 3
- 4
- 5
- 6
- 7
- 8
- 9
- 10
- 11
- 12
- 13
- 14
- 15
- 16
- 17
- 18
- 19
- 20
- 21
- 22
- 23
- 24
- 25
- 26
- 27
我对这段代码的理解:
<select>建立一个下拉框,两个选项
<div>建立一个显示结果的div

下面这段script:
就是在下拉框被改变的时候,我们获取用户选择的下拉框中的值,之后拼接一个链接:"/app1/api?lineno=" + lineno,并用get方法得到这个链接里面的结果,返回到我们的div中显示- 1
- 2
- 3
- 4
- 5
上面拼接的链接就是我们接下来要说的内容,先上一个结果的截图: 
我们在这个页面,改变lineno的值,就可以根据这个key找到对应的后台数据中的value
那么这个链接我们是怎么处理的呢?
首先得有视图V,修改app1/views.py
from django.http import HttpResponse
from models import myStudent
from django.shortcuts import render


def first_page(request):
    student_list = myStudent.objects.all()
    student_str = map(str, student_list)
    context = {}
    context['hello'] = ''.join(student_str)
    # context['hello'] = 'hello yibo'
    return render(request, 'hello.html', context)


def api(request):
    mmap = {'1': 1234, "2": 4321}
    lineno = request.GET.get('lineno', '1')
    return HttpResponse('{volume:' + str(mmap[lineno]) + '}')
- 1
- 2
- 3
- 4
- 5
- 6
- 7
- 8
- 9
- 10
- 11
- 12
- 13
- 14
- 15
- 16
- 17
- 18
- 19
注意到我们在上面的页面上添加了api函数,我理解的是通过request.GET.get函数,得到用户输入的参数,也就是?后面的参数,之后用HttpResponse返回一个页面的结果
那么根据我们django框架的设计理念,还需要一个URL和api函数之间的映射:
app1/urls.py
from django.conf.urls import url,include
from django.contrib import admin
from views import first_page
from views import api

urlpatterns = [
    url(r'^$', first_page),
    url(r'api/', api)
]- 1
- 2
- 3
- 4
- 5
- 6
- 7
- 8
- 9
到这里就结束了,贴一下结果: 
我们在下拉框里面选择2的时候,显示的是4321


 1457
1457

 被折叠的 条评论
为什么被折叠?
被折叠的 条评论
为什么被折叠?
 到【灌水乐园】发言


