


 本文介绍如何使用SpringCloud Config实现微服务配置管理。通过构建中心配置服务,解决微服务架构中配置文件繁多的问题。文章详细说明了ConfigServer与ConfigClient的搭建过程。
Spring Cloud Config 分布式配置管理系统
我们在实现微服务架构时,每个微服务都有自己的配置文件,配置诸如端口,服务名称,数据库连接等。在微服务数量比较多时,维护就会变得很困难,因此我们需要一个中心配置服务。
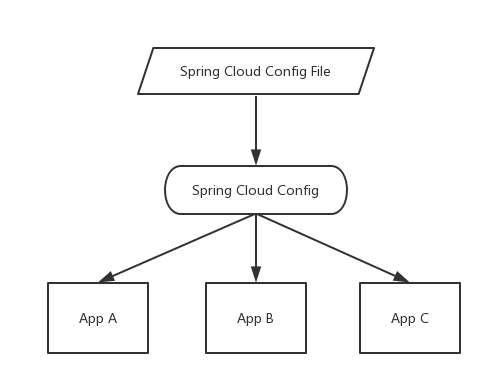
Spring Cloud Config 主要由两部分组成,Spring Cloud Config Server作为服务端进程,Spring Cloud Config Client作为客户端进程。
下图中的Config File是配置文件,通过统一的一个中心配置服务,为其他应用同步配置信息。
构建Config Server
配置pom文件,只需加上
		<dependency>
			<groupId>org.springframework.cloud</groupId>
			<artifactId>spring-cloud-config-server</artifactId>
		</dependency>
另外需要支持消息总线
        <dependency>
            <groupId>org.springframework.cloud</groupId>
            <artifactId>spring-cloud-starter-bus-amqp</artifactId>
        </dependency>
否则会报错:
org.springframework.beans.factory.UnsatisfiedDependencyException: Error creating bean with name 'bindingService' defined in class path resource
[org/springframework/cloud/stream/config/BindingServiceConfiguration.class]:
Unsatisfied dependency expressed through method 'bindingService' parameter 1;
因为是基于多模块开发,在父项目中已经导入了其他springboot微服务需要的依赖,所以这里只需加上上面一个依赖就可以了。
在主程序的上面加上@EnableConfigServer注解,即开启配置服务器功能。
@SpringCloudApplication
@EnableConfigServer
public class SpringCloudConfigServerApplication
{
    public static void main( String[] args )
    {
        SpringApplication.run(SpringCloudConfigServerApplication.class, args);
    }
}
然后在配置文件中application.yml进行如下配置:
spring:
  application:
    name: config-server
  profiles:
    active:
      - native
  cloud:
    config:
      label: master
      server:
        git:
          uri: https://github.com/shirehappy/SpringCloudConfig
          search-paths:
            -

server:
  port: 8900

eureka:
  client:
    service-url:
      defaultZone: http://localhost:8761/eureka/
spring.cloud.config.server.git.uri:配置git仓库地址
spring.cloud.config.server.git.searchPaths:配置仓库路径
spring.cloud.config.label:配置仓库的分支
启动程序,访问 http://localhost:8900/bean/properties
{"name":"bean","profiles":["properties"],"label":null,"version":null,"state":null,"propertySources":[]}构建Config Client
与上面类似,创建一个子module.其pom文件引入
		<dependency>
			<groupId>org.springframework.cloud</groupId>
			<artifactId>spring-cloud-starter-config</artifactId>
		</dependency>
其配置文件application.xml如下:
spring.cloud.config.lable:指明远程路径的分支
spring.cloud.config.profile:指明是哪个环境
其中:
dev 开发环境配置文件
test 测试环境配置文件
pro 正式环境配置文件
spring.cloud.config.uri:指明配置服务中心的地址


 1578
1578

 被折叠的 条评论
为什么被折叠?
被折叠的 条评论
为什么被折叠?
 到【灌水乐园】发言


