


注:本文为 “Windows 10/11 系统黑屏” 相关译文合辑。
图片清晰度受引文原图所限。
略作重排,未整理去重。
如有内容异常,请看原文。
How to Fix Windows 10 Black Screen with Cursor Issue?
如何修复 Windows 10 系统仅显示鼠标指针的黑屏问题?
By Kevin Arrows Updated on April 25, 2024
The black screen with cursor issue occurs when Explorer.exe does not load at startup. Although the issue can be resolved quickly, it may not be fixed if the Explorer.exe entry is removed from the shell in the registry editor.
当 Explorer.exe 程序在开机时未加载,就会出现仅显示鼠标指针的黑屏问题。尽管该问题通常可以快速解决,但如果注册表编辑器中 shell 项对应的 Explorer.exe 条目被删除,该问题则可能无法轻易修复。

Corrupted graphics drivers and system files are some of the main contributors that cause this issue. However, there are numerous ways to troubleshoot the Black Screen with Cursor without making major changes to the system. Below, we have outlined some of the main reasons that can be considered as culprits.
显卡驱动程序损坏与系统文件损坏是引发该问题的部分主要原因。不过,存在多种无需对系统进行重大修改即可排查此黑屏问题的方法。下文列出了该问题的部分主要诱因。
-
Corrupted Graphics Driver:This type of issue usually occurs when there are corrupted files in the device drivers. Therefore, you may need to reinstall the drivers to fix this issue.
显卡驱动程序损坏:当设备驱动程序中存在损坏文件时,通常会引发此类问题。因此,你可能需要重新安装驱动程序以解决该问题。 -
Corrupted System Files:System files are crucial for operating systems, and they can also become easily corrupted, which can cause Windows to crash. If that’s the case, you must repair the system files by executing some commands to address this issue.
系统文件损坏:系统文件对于操作系统的运行至关重要,且这类文件极易损坏,进而导致 Windows 系统崩溃。若出现该情况,你必须通过执行相关命令修复系统文件,以此解决问题。 -
Outdated Bios:As it turns out, an outdated BIOS can be one of the main reasons for connection issues, as it plays a significant role in connecting the hardware to the computer. For that reason, check for available updates on the manufacturer’s website.
BIOS 版本过时:事实证明,过时的 BIOS 可能是引发硬件连接问题的主要原因之一,因为 BIOS 在硬件与计算机的连接过程中发挥着关键作用。基于此,你需要前往硬件制造商的官方网站查看是否有可用的 BIOS 更新程序。 -
Conflict Of Services:According to the affected users, the problem may be caused by a conflict between services. To fix this, you need to end the problematic service’s task or perform a clean boot.
服务冲突:据受该问题影响的用户反馈,此黑屏问题可能由系统服务之间的冲突引发。要解决该问题,你需要结束出现异常的服务进程,或执行系统干净启动操作。 -
Corrupt Windows Update:Sometimes, the Windows update becomes corrupt, and you may encounter a black screen with a cursor. Therefore, uninstall a recent Windows update or restore Windows to a previous state.
Windows 更新程序损坏:部分情况下,Windows 更新程序可能会损坏,进而导致仅显示鼠标指针的黑屏问题。此时,你需要卸载近期安装的 Windows 更新程序,或将系统恢复至更新前的状态。
1. Basic fixes.
1. 基础修复方法
Some technical issues can cause problems. According to affected users, if you use a dual-monitor screen, pressing Win + P and then pressing the arrow down key four times in a row to select the second screen can fix the issue. Although you can also choose the 1st option, which is the PC Only screen, it may not resolve the issue. However, if you disconnect the 2nd monitor and then restart the computer, it may aid in fixing the black screen with the cursor. Additionally, you can check cables and ensure they are properly connected to the computer, as this can also cause the issue.
部分技术故障可能会引发此问题。据受影响用户反馈,若你使用双显示器设备,按下 Win + P 组合键,随后连续按 4 次向下箭头键以选择第二块显示器,即可解决该问题。尽管你也可以选择第一个选项(仅电脑屏幕显示),但该选项可能无法解决此黑屏问题。不过,若你断开第二块显示器的连接,再重启计算机,则有可能修复仅显示鼠标指针的黑屏问题。此外,你需要检查显示器与计算机之间的连接线,确保所有线缆均连接牢固,因为线缆松动同样可能导致该问题。
2. Restart Explorer.exe.
2. 重启 Explorer.exe 进程
Another solution that helps to fix this issue is to restart Explorer.exe, a process that takes responsibility for starting the apps, taskbar, Start Menu, desktop, and more. In simple words, it renders most of the User Interface (UI). Therefore, restarting the Explorer.exe will fix this issue if it is not indicating to the corrupted Windows or drivers.
另一种可解决此问题的方法是重启 Explorer.exe 进程。该进程负责管理应用程序启动、任务栏、开始菜单、桌面等功能的正常运行。简单来说,系统的大部分用户界面(UI)均由该进程渲染。因此,若黑屏问题并非由 Windows 系统文件或驱动程序损坏导致,重启 Explorer.exe 进程即可解决此问题。
There are two ways to restart explorer.exe. If neither of these fixes the issue, you will need to boot your Windows in Safe Mode for some basic troubleshooting operations. Below are the steps:
重启 Explorer.exe 进程共有两种方法。若这两种方法均无法解决问题,你需要以安全模式启动 Windows 系统,并执行基础故障排查操作。具体步骤如下:
-
Press Ctrl + Shift + Esc at the same time to launch Task Manager
同时按下 Ctrl + Shift + Esc 组合键,打开任务管理器 -
Under Process, find and right-click on Windows Explorer, and then select Restart.
在“进程”选项卡中找到 Windows Explorer 进程,右键单击该进程并选择重启选项。 -
In case Windows Explorer is not showing, click on File at the top, then click Run New Task.
若未找到 Windows Explorer 进程,点击任务管理器顶部的文件选项,随后选择运行新任务。
Running a New Task
运行新任务 -
Type ‘Explorer.exe’ and click ‘OK’.
输入“Explorer.exe”并点击确定按钮。
Restarting Windows Explorer
重启 Windows 资源管理器
3. Restart the graphics driver.
3. 重启显卡驱动程序
The easy and quick fix for the black screen with cursor issue is to restart the graphics driver. To do this, press Win + Ctrl + Shift + B simultaneously to restart your graphics driver.
修复仅显示鼠标指针黑屏问题的快捷方法是重启显卡驱动程序。你只需同时按下 Win + Ctrl + Shift + B 组合键,即可完成显卡驱动程序的重启操作。
4. Access the Registry Editor.
4. 打开注册表编辑器进行检查
A Trojan program is designed to take complete control of your computer by removing the entry of Explorer.exe from the shell in the registry editor. Therefore, you need to access the registry editor to ensure the Value data of the shell is Explorer.exe. If it has been changed, then remove the incorrect entry and enter Explorer.exe. Below are the steps:
部分木马程序会通过删除注册表编辑器中 shell 项对应的 Explorer.exe 条目,实现对计算机的完全控制。因此,你需要打开注册表编辑器,确认 shell 项的数值数据是否为 Explorer.exe。若该数值数据已被篡改,需删除错误条目并重新输入 Explorer.exe。具体步骤如下:
-
Open Task Manager. To do that, press Ctrl + Shift + Esc simultaneously.
同时按下 Ctrl + Shift + Esc 组合键,打开任务管理器。 -
For the file, click “Run New Task” and type “regedit”.
点击任务管理器中的文件选项,选择运行新任务,输入“regedit”。 -
Select ‘Create This Task with Administrator Privileges’.
勾选以管理员身份创建此任务选项。 -
Then, press Enter to launch the Registry Editor.
按下回车键,启动注册表编辑器。
Accessing Registry Editor
打开注册表编辑器 -
Now, navigate to the following path:
导航至以下注册表路径:Computer\HKEY_LOCAL_MACHINE\SOFTWARE\Microsoft\Windows NT\CurrentVersion\Winlogon
Navigating to the Shell from Registry Editor
在注册表编辑器中定位到 Shell 项 -
In the right pane, click on Shell and check its value data. If it is not explorer.exe, then change it to explorer.exe.
在注册表编辑器右侧窗格中找到 Shell 项,查看其数值数据。若该数据不为 explorer.exe,则将其修改为 explorer.exe。
Change Entry to Explorer.exe
将条目修改为 Explorer.exe -
Once completed, click “OK” and restart.
修改完成后,点击确定按钮并重启计算机。
5. Disable the App Readiness Service.
5. 禁用应用就绪服务
App Readiness is a default service that prepares Windows apps for use when users sign in to the PC. However, it has been discovered that disabling App Readiness resolves slow boot and other issues, including the Black Screen with Cursor problem. Follow these steps to disable the App Readiness service:
应用就绪服务(App Readiness)是一项系统默认服务,其功能是在用户登录计算机时,完成 Windows 应用程序的启动准备工作。但实践发现,禁用该服务可解决系统启动缓慢问题,同时也能修复包括仅显示鼠标指针黑屏在内的其他故障。禁用应用就绪服务的步骤如下:
-
Press Ctrl + Alt + Delete to select Task Manager from the listed options.
按下 Ctrl + Alt + Delete 组合键,在弹出的选项列表中选择任务管理器。 -
Once the Task Manager is opened, click on File > Run New Task.
打开任务管理器后,点击文件 > 运行新任务选项。
Click to Run a New Task
点击运行新任务 -
Type ‘services.msc’ and hit ‘Enter’.
输入“services.msc”并按下回车键。
Launching Services Window
打开服务窗口 -
Locate and right-click on “App Readiness,” and then click “Properties”.
在服务列表中找到“应用就绪服务(App Readiness)”,右键单击该服务并选择属性选项。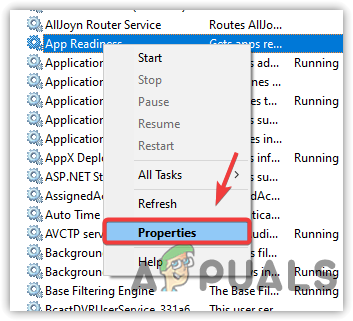
Click to Navigate into Properties
点击进入属性设置界面 -
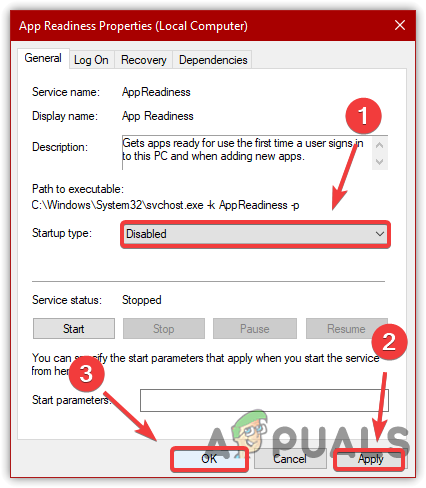
Change the startup type to ‘Disabled’.
将服务的启动类型修改为禁用。 -
Click “Apply,” and then click “OK” for the changes to take effect.
点击应用按钮,再点击确定按钮,使修改生效。
Restarting Windows Service
重启 Windows 服务 -
Restart your computer and see if the issue is fixed.
重启计算机,检查黑屏问题是否已修复。
6. Restore registry files.
6. 恢复注册表文件
A black screen with a cursor can be caused by corrupted registry files. If the registry files are corrupted, you may encounter issues, such as this and similar to BSOD errors. Restoring the registry files can potentially fix the BSOD error, and according to several affected users, this method may also apply to a black screen with a cursor issue. Below are the steps to restore default registry files:
注册表文件损坏也可能导致仅显示鼠标指针的黑屏问题。若注册表文件受损,除该黑屏问题外,你还可能遭遇蓝屏死机(BSOD)等类似故障。恢复注册表文件可有效修复蓝屏死机问题,且据部分受影响用户反馈,该方法同样适用于解决此黑屏故障。恢复默认注册表文件的步骤如下:
-
Switch off your computer and restart it three times to initiate the automatic repair.
关闭计算机电源,随后重复开机、关机操作三次,触发系统自动修复功能。 -
To restart, wait for the Windows logo screen to appear, and then hold the power button for 8 seconds to turn off.
每次重启时,等待 Windows 启动徽标出现后,长按电源键 8 秒关闭计算机。 -
After restarting for the 4th time, you will be directed to the automatic repair screen.
第四次开机后,系统将进入自动修复界面。 -
Click on Advanced Options, then navigate to Advanced Options > Troubleshoot > Advanced Options > Command Prompt.
点击高级选项,随后依次选择高级选项 > 疑难解答 > 高级选项 > 命令提示符。
Launching Command Prompt From Advanced Options
从高级选项中打开命令提示符 -
Once you launch the terminal, type “C:” and hit Enter.
打开命令提示符窗口后,输入“C:”并按下回车键。 -
Note: If you have installed Windows on a different drive, replace ‘C’ with the appropriate drive letter.
注意:若你的 Windows 系统安装在其他磁盘分区,请将命令中的“C”替换为对应的盘符。 -
Type “dir” and hit enter.
输入“dir”命令并按下回车键。 -
Then, type the following commands and hit enter to start the process.
输入以下命令并按下回车键,启动注册表文件恢复流程。xcopy c:\windows\system32\config\regback c:\windows\system32\config -
Once done, type “exit” and press enter.
命令执行完成后,输入“exit”并按下回车键,关闭命令提示符窗口。 -
Restart your computer and see if it fixes the black screen with a cursor.
重启计算机,检查仅显示鼠标指针的黑屏问题是否已修复。
7. Perform a clean boot.
7. 执行系统干净启动操作
A conflict involving third-party services can cause a black screen with a cursor. This issue can occur at any time, and as a result, you may encounter various problems like this one. Performing a clean boot disables all unnecessary services and third-party programs that load at startup. This process enables Windows to operate with a minimum number of drivers and services. Therefore, performing a clean boot may resolve this issue.
第三方服务冲突可能会导致仅显示鼠标指针的黑屏问题。此类冲突可随时发生,并引发多种类似故障。执行系统干净启动操作,可禁用开机时自动加载的所有非必要服务与第三方程序,使 Windows 系统仅依靠最基础的驱动程序和服务运行。因此,执行干净启动操作可能会解决此黑屏问题。
-
To perform a clean boot, open the Task Manager by pressing Ctrl + Shift + Esc.
按下 Ctrl + Shift + Esc 组合键打开任务管理器,准备执行干净启动操作。 -
Click “File” from the top, and then select “Run New Task”.
点击任务管理器顶部的文件选项,选择运行新任务。
Run a New Task
运行新任务 -
Type “MSConfig” and click “OK”.
输入“MSConfig”并点击确定按钮。
Open System Configuration
打开系统配置工具 -
A short window will appear; click on Selective Startup and proceed to the Services tab.
系统配置窗口弹出后,选择选择性启动选项,随后切换至服务选项卡。
Click to Choose Selective Startup
选择选择性启动选项 -
Tick the ‘Hide All Microsoft Services’ option, and then click ‘Disable All.’
勾选隐藏所有 Microsoft 服务选项,随后点击全部禁用按钮。 -
Click “Apply”, then click “OK”, and restart your computer to see if the issue persists.
点击应用按钮,再点击确定按钮,重启计算机后检查黑屏问题是否仍然存在。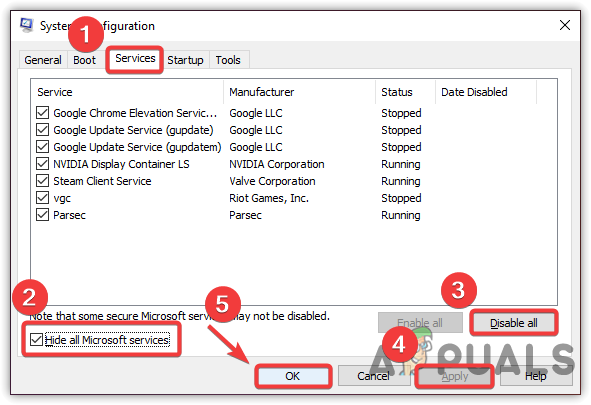
Executing a Clean Boot Process
执行干净启动操作
8. Run the DISM and SFC commands.
8. 运行 DISM 与 SFC 命令
If the issue persists, try repairing Windows images by running DISM and SFC commands. These commands are used to restore corrupted files such as DLL and system files. If you are able to open Task Manager, then run these commands in the terminal by following the instructions below.
若黑屏问题仍未解决,可尝试运行 DISM 与 SFC 命令 修复 Windows 系统映像。这两条命令可用于恢复损坏的 DLL 文件及系统文件。若你能够正常打开任务管理器,可按照以下步骤在命令提示符窗口中执行这些命令。
PRO TIP: If the issue is with your computer or a laptop/notebook you should try using Fortect Repair which can scan the repositories and replace corrupt and missing files. This works in most cases, where the issue is originated due to a system corruption. You can download Fortect by Clicking Here
专业提示: 若你的台式机或笔记本电脑出现此问题,可尝试使用 Fortect 修复工具。该工具能够扫描系统文件仓库,替换损坏或丢失的文件。对于大多数由系统损坏引发的故障,该工具均能有效解决。你可通过点击此处下载 Fortect 修复工具。
-
To run repair commands, open the Task Manager by pressing Ctrl + Shift + Esc.
按下 Ctrl + Shift + Esc 组合键打开任务管理器,准备执行修复命令。 -
Click File > Run New Task.
点击文件 > 运行新任务选项。
Click File to Run a New Task
点击文件以运行新任务 -
Type ‘cmd’ and check the option ‘Create This Task with Administrator Privileges.’
输入“cmd”,并勾选以管理员身份创建此任务选项。
Launch CMD Through Run Program
通过运行程序打开命令提示符 -
A terminal will open; please copy and paste the following command into the terminal, and then wait for the process to finish.
命令提示符窗口打开后,将以下命令复制粘贴至窗口中,等待命令执行完成。DISM /Online /Cleanup-Image /RestoreHealth sfc /scannow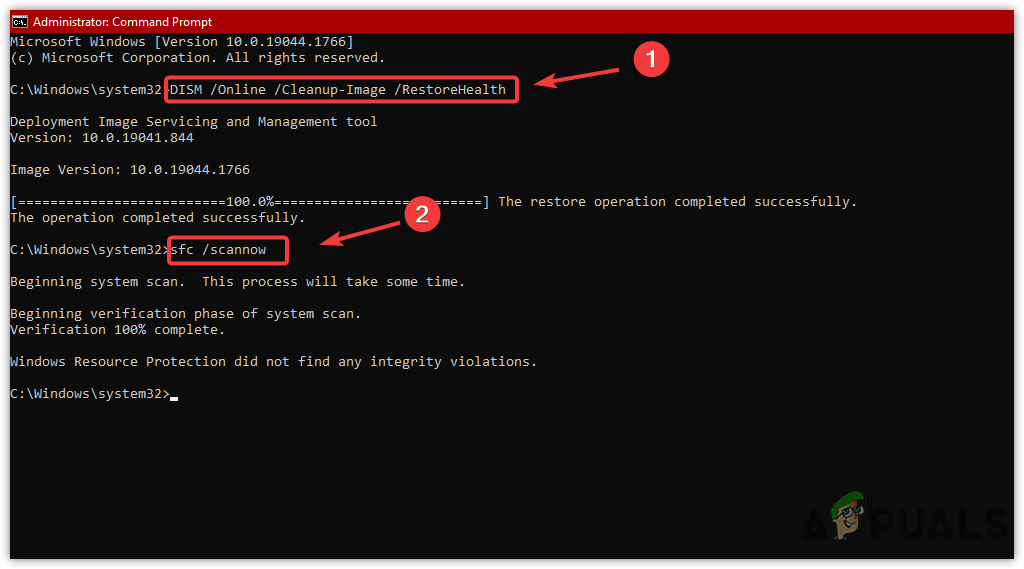
Executing Repair Commands
执行修复命令 -
Once done, restart your computer and see if it fixes the issue.
命令执行完毕后,重启计算机,检查黑屏问题是否已修复。
9. Add a new user account.
9. 创建新用户账户
Another solution that can fix this issue is to add a new user account. After adding a new user account, you will need to update all your drivers and transfer your data to the new user account.
创建新用户账户是另一种可解决此问题的方法。新用户账户创建完成后,你需要更新所有硬件驱动程序,并将旧账户中的数据迁移至新账户。
-
To add a new user account, press Ctrl + Shift + Enter or Ctrl + Alt + Delete to open the Task Manager.
按下 Ctrl + Shift + Enter 组合键或 Ctrl + Alt + Delete 组合键,打开任务管理器,准备创建新用户账户。 -
From the File menu, select Run New Task.
点击任务管理器中的文件菜单,选择运行新任务选项。 -
Type “netplwiz” and press Enter.
输入“netplwiz”并按下回车键。
Type Command To Add New User
输入命令以创建新用户 -
Click ‘Add‘ to create a new user account.
点击添加按钮,开始创建新用户账户。 -
Click ‘Sign in without a Microsoft Account.’
选择不使用 Microsoft 账户登录选项。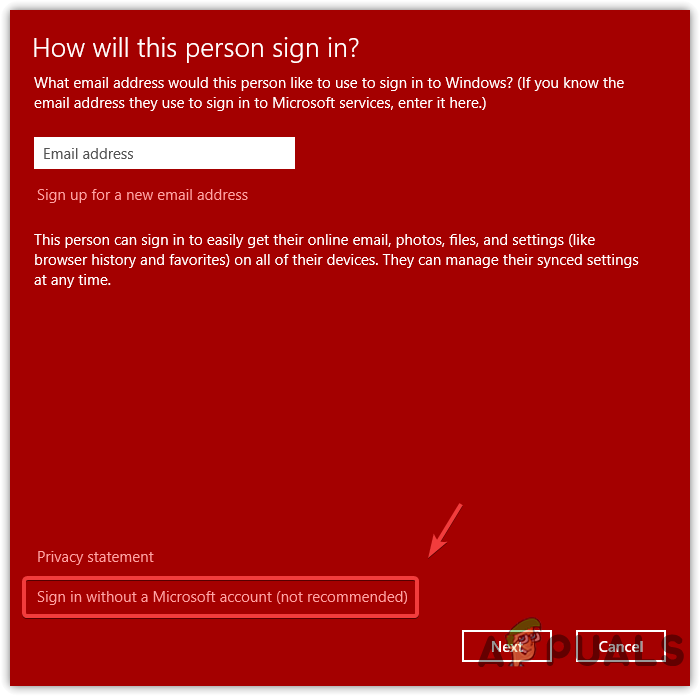
Click To Continue
点击继续 -
Click on ‘Local Account‘, fill out the details, then click ‘Next‘, and finally click ‘Finish‘.
选择本地账户选项,填写账户相关信息后点击下一步,最后点击完成按钮。
Click To Finish
点击完成 -
Once you have created a new local account, go to the user account page, select ‘Create a Local Account,’ and then click ‘Properties.’
新本地账户创建完成后,返回用户账户管理页面,选中该新账户并点击属性选项。
Click Add to Create User Account
点击添加以创建用户账户 -
Please go to Group Membership and select Administrator.
切换至组成员选项卡,将该账户的权限设置为管理员。 -
Once done, click “Apply” and then click “OK”.
设置完成后,点击应用按钮,再点击确定按钮。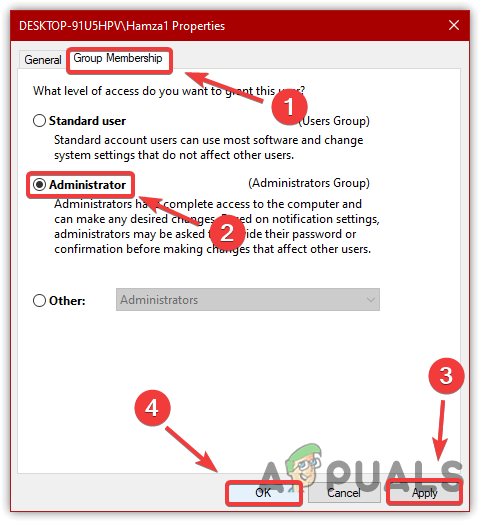
Add administrator permissions to the account
为账户添加管理员权限 -
Now, press Ctrl + Alt + Delete and choose “Sign Out”.
按下 Ctrl + Alt + Delete 组合键,选择注销选项,退出当前账户。 -
Once you have signed out, now select a different account to sign in again and see if it fixes the issue.
注销完成后,使用新建的用户账户登录系统,检查黑屏问题是否已修复。
10. Use the System Restore feature.
10. 使用系统还原功能
If you created a restore point before encountering this issue, we expect that you are familiar with System Restore. If you don’t know about System Restore, you can proceed to the other steps, but we recommend visiting this article so you can be prepared for future situations by creating a restore point.
若你在遭遇此黑屏问题前已创建系统还原点,那么你大概率已了解系统还原功能的使用方法。若你不熟悉系统还原功能,可跳过此步骤尝试其他方法,但我们建议你查阅相关教程,学习创建系统还原点的方法,为应对未来可能出现的系统故障做好准备。
-
To use a restore point, open the Task Manager. To do that, press Ctrl + Shift + Esc.
按下 Ctrl + Shift + Esc 组合键打开任务管理器,准备使用系统还原功能。 -
Click “File,” then select “Run New Task”.
点击文件选项,选择运行新任务。 -
Type “rstrui” and click “OK”.
输入“rstrui”并点击确定按钮。
Open System Restore Settings
打开系统还原设置界面 -
Click ‘Next‘ to select a restore point.
点击下一步按钮,进入还原点选择界面。
Select Restore Point
选择系统还原点 -
Once you have selected a restore point, click Next and then click Finish.
选中需要使用的系统还原点后,点击下一步按钮,最后点击完成按钮,启动系统还原流程。 -
Once completed, check if the issue is resolved.
系统还原完成后,检查黑屏问题是否已解决。
11. Uninstall the recent update.
11. 卸载近期安装的更新程序
A corrupt Windows update can also contribute to causing a black screen with a cursor issue. However, there are fewer chances of a corrupt Windows update being the cause, but it is good to give it a try, as sometimes users install a corrupt update due to insufficient internet speed or other reasons.
损坏的 Windows 更新程序同样可能引发仅显示鼠标指针的黑屏问题。尽管该诱因的发生概率相对较低,但仍值得尝试解决,因为部分用户可能会因网络速度不足或其他原因,安装到损坏的更新程序。
-
To uninstall a recent Windows update, open the Task Manager by pressing Ctrl + Alt + Esc simultaneously.
按下 Ctrl + Alt + Esc 组合键打开任务管理器,准备卸载近期安装的 Windows 更新程序。 -
Click File > Run New Task.
点击文件 > 运行新任务选项。 -
Type “Appwiz.CPL” and press Enter.
输入“Appwiz.CPL”并按下回车键。
Navigating to Uninstall Program & Features
进入程序和功能卸载界面 -
Click “View Installed Updates” from the left pane.
点击界面左侧的查看已安装的更新选项。
Click to View Installed Updates
点击查看已安装的更新程序 -
Select the recent Windows update and click ‘Uninstall‘ at the top.
在更新列表中选中近期安装的 Windows 更新程序,点击界面顶部的卸载按钮。
Uninstalling Windows Update
卸载 Windows 更新程序 -
Once completed, restart your computer and see if it resolves the issue.
卸载完成后,重启计算机,检查黑屏问题是否已解决。
12. Run the Startup Repair.
12. 运行启动修复功能
Startup Repair is an inbuilt Windows feature that resolves issues with the files required for normal Windows booting. It addresses problems that prevent Windows from loading properly. Follow the steps below to run Startup Repair:
启动修复是 Windows 系统的内置功能,其作用是修复系统正常启动所需的文件,解决导致 Windows 无法正常加载的各类故障。运行启动修复功能的步骤如下:
-
First, turn off your computer and then turn it on again.
关闭计算机电源后重新开机。 -
Once you see the Windows logo, press the power button to switch off the computer.
当 Windows 启动徽标出现时,按下电源键关闭计算机。 -
Please repeat this process two more times to trigger the Advanced Startup options.
重复上述开机、关机操作两次,触发系统高级启动选项。 -
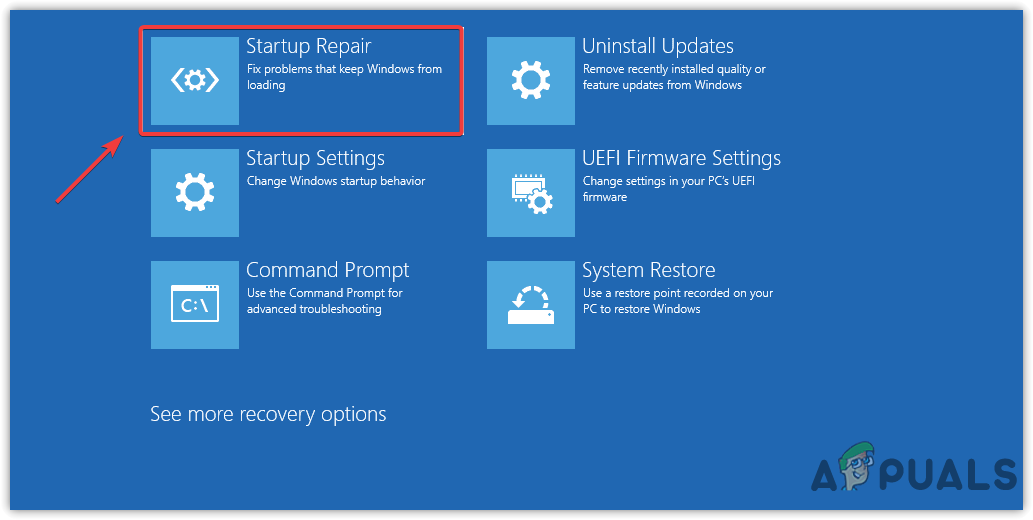
Navigate to Troubleshoot > Advanced Options.
进入疑难解答 > 高级选项界面。 -
Click on “Startup Repair” to begin the repair process.
点击启动修复选项,开始系统启动修复流程。
Run Startup Repair
运行启动修复功能 -
Once done, check whether the issue is fixed.
修复流程结束后,检查黑屏问题是否已解决。
13. Disable the Fast Startup option.
13. 禁用快速启动功能
Fast Startup is a utility added to Windows by Microsoft. It reduces the time Windows takes to boot up from sleep mode or shutdown. However, according to several users, it creates compatibility issues while booting up Windows. For that reason, we advise you to disable the Fast Startup option.
快速启动是微软为 Windows 系统添加的一项功能,其作用是缩短系统从睡眠或关机状态下的启动时间。但据部分用户反馈,该功能可能会导致系统启动时出现兼容性问题。基于此,我们建议你禁用快速启动功能。
-
To disable Fast Startup, open the Task Manager by pressing Ctrl + Alt + Esc simultaneously.
按下 Ctrl + Alt + Esc 组合键打开任务管理器,准备禁用快速启动功能。 -
Click “File” from the top, and then click “Run New Task” to open the “Run Program”.
点击任务管理器顶部的文件选项,选择运行新任务,打开运行程序窗口。 -
Type “powercfg.cpl” and press Enter.
输入“powercfg.cpl”并按下回车键。
Launching Fast Startup Settings
打开快速启动设置界面 -
Click “Choose What the Power Button Does”.
点击选择电源按钮的功能选项。
Navigating to the Power Settings
进入电源设置界面 -
Click on “Change Settings That Are Currently Unavailable”.
点击更改当前不可用的设置选项。 -
Uncheck “Turn On Fast Startup” and then click “Save Changes”.
取消勾选启用快速启动选项,随后点击保存修改按钮。
Untick Turn Of Fast Startup
取消勾选启用快速启动选项 -
Once finished, restart your computer.
设置完成后,重启计算机。
14. Boot Windows in Safe Mode.
14. 以安全模式启动 Windows 系统
If the above method fails to fix this issue, and neither your Windows is displaying Task Manager nor running programs, then it is most likely due to corrupted drivers, system files, conflicts of services, or corrupt Windows updates. These are some of the factors that we need to troubleshoot in Safe Mode in order to use Windows. Below are the steps:
若上述所有方法均无法解决问题,且你的 Windows 系统既无法显示任务管理器,也无法运行任何程序,那么该问题很可能由驱动程序损坏、系统文件损坏、服务冲突或 Windows 更新程序损坏导致。要解决这些问题,你需要以安全模式启动系统并执行故障排查操作。具体步骤如下:
-
Press Ctrl + Shift + Esc, and then click the Power button in the bottom right corner.
按下 Ctrl + Shift + Esc 组合键,点击任务管理器右下角的电源按钮。 -
Hold the Shift key and click Restart.
按住 Shift 键的同时点击重启选项。 -
Once you saw the advanced startup options.
等待系统进入高级启动选项界面。 -
Navigate to Troubleshoot > Advanced Options > Startup Settings, and restart.
依次选择疑难解答 > 高级选项 > 启动设置,点击重启按钮。
Restart to select in Safe Mode
重启以选择安全模式 -
After rebooting, you will see numerous startup options; press F5 to access Safe Mode with networking. Note: If you are unable to access safe mode, turn off your computer three times in a row by pressing the power button. Ensure that you wait for a Windows logo screen before turning it off.
系统重启后,屏幕将显示多个启动选项,按下 F5 键即可进入带网络连接的安全模式。 注意:若你无法通过上述方法进入安全模式,可连续三次长按电源键关闭计算机(每次需等待 Windows 启动徽标出现后再关机),系统将自动进入高级启动界面。 -
Once you access safe mode, follow the methods below.
进入安全模式后,按照以下方法进行操作。
14.1: Reinstall the Graphics Driver.
14.1 重新安装显卡驱动程序
Corrupted graphics drivers can be the sole reason for this issue, as they can prevent Windows from loading. If your graphics driver is corrupted, either disable or reinstall the graphics driver.
显卡驱动程序损坏可能是引发此黑屏问题的唯一原因,因为损坏的驱动程序会导致 Windows 系统无法正常加载。若你的显卡驱动程序已损坏,可选择禁用或重新安装该驱动程序。
14.2 Uninstall the Graphics Driver
14.2 卸载显卡驱动程序
There is an application called Display Driver Uninstaller, which is used to entirely uninstall drivers from the computer. Sometimes, the device manager does not remove the drivers completely, leaving some files behind. These leftover files can cause serious problems, such as driver conflicts and BSOD errors.
Display Driver Uninstaller(DDU)是一款专用驱动卸载工具,可彻底清除计算机中的显卡驱动程序。部分情况下,通过设备管理器卸载驱动程序无法做到完全清除,会残留部分驱动文件。这些残留文件可能会引发驱动冲突、蓝屏死机等严重故障。
-
To uninstall the driver, download the Display Driver Uninstaller.
访问 Display Driver Uninstaller 官方下载页面,下载该驱动卸载工具。 -
Once you have downloaded it, right-click on it and select “Extract to DDU”.
下载完成后,右键单击该压缩包,选择解压到 DDU 文件夹选项。
Extract to DDU Folder
解压到 DDU 文件夹 -
Once it’s done, navigate to the folder and open the Display Driver Uninstaller.
解压完成后,进入解压文件夹,运行 Display Driver Uninstaller 程序。 -
A shortcut window will appear; click “Extract”.
程序运行后会弹出快捷方式解压窗口,点击解压按钮。
Extracting DDU Application
解压 DDU 应用程序 -
Go to the extracted folder and finally launch Display Driver Uninstaller
进入解压后的文件夹,再次启动 Display Driver Uninstaller 程序。 -
Select your GPU vendor and device type from the top.
在程序界面顶部选择你的显卡厂商及设备类型。 -
Then, click Clean And Restart.
点击清理并重启按钮,完成显卡驱动程序的卸载。
Choosing Graphics Card Vendor
选择显卡厂商
14.3 Install the Graphics Driver.
14.3 安装显卡驱动程序
-
To install the latest driver, visit the manufacturer’s website for your graphics card.
访问你的显卡厂商官方网站,准备下载并安装最新版本的显卡驱动程序。 -
Navigate to the Drivers & Support section.
进入网站的驱动程序与支持板块。 -
Choose your graphics card and click on “Search”.
选择对应的显卡型号并点击搜索按钮。
Search For Driver
搜索显卡驱动程序 -
If the website asks for the operating system, select your OS.
若网站要求选择操作系统版本,请选择对应的 Windows 版本。 -
Then, download the latest driver.
下载最新版本的显卡驱动程序安装包。 -
Once completed, open the installer and follow the subsequent instructions to install the driver.
下载完成后,运行驱动安装程序,按照提示完成安装操作。 -
After installing the driver, reboot your computer and see if the issue is fixed.
驱动程序安装完成后,重启计算机,检查黑屏问题是否已修复。
If neither of the solutions worked, then your Windows may be affected by malware or third-party programs. To fix this, either try repairing or reinstalling Windows with the help of a USB.
若上述所有方法均无法解决你的问题,则你的 Windows 系统可能已遭受恶意软件感染或第三方程序破坏。要解决该问题,你需要借助 U 盘启动盘修复或重新安装 Windows 系统。
How to Fix Windows 10 Not Waking Up from Sleep Mode
如何解决 Windows 10 从睡眠模式无法唤醒的问题
By Kevin Arrows Updated on April 26, 2024
People recently started reporting that their computers were not waking up after sleep mode. The light turns on that the computer is turned on but the screen remains black. We have listed a series of steps on how you can troubleshoot what is causing the problem and fix it accordingly. As you already know, this can really be a big issue for some users especially if they were working on something important they will have to lose all the work and restart the computer to even apply the fixes provided.
最近有用户反馈,其电脑进入睡眠模式后无法唤醒。电脑电源指示灯亮起显示已开机,但屏幕始终保持黑屏状态。本文列出了一系列故障排除步骤,帮助用户定位问题原因并进行相应修复。如你所知,这对部分用户来说可能是一个严重问题——尤其是当他们正在处理重要工作时,可能会导致所有未保存的工作丢失,甚至需要重启电脑才能应用修复方案。
But before moving on, try checking out these handy tips before moving on to more technical solutions:
但在进行更复杂的技术解决方案之前,建议先尝试以下实用技巧:
-
Use the power button on your system to wake it up from sleep, not from a keyboard or mouse. If it wakes up through the power button then make sure that the keyboard and mouse are set to “Allow this device to wake the computer” and the USB wakeup support in your BIOS is enabled.
尝试使用电脑主机上的电源按钮唤醒睡眠状态的电脑,而非键盘或鼠标。如果通过电源按钮可以成功唤醒,请确保键盘和鼠标的设置中已勾选“允许此设备唤醒计算机”,且 BIOS 中的 USB 唤醒功能已启用。 -
Unplug any external graphics card and then startup the system to check if the Graphics Card is faulty.
拔掉所有外接显卡,然后启动电脑,检查是否为显卡故障导致该问题。 -
Try Clean boot Windows to check if any other program or driver is creating the issue.
尝试干净启动 Windows,排查是否为其他程序或驱动程序引发的问题。 -
Check RAM settings/components and make sure they are working as expected.
检查内存(RAM)的设置和硬件组件,确保其正常运行。
1. Replace Sleep with Hibernate
用休眠功能替代睡眠功能
It seems the case for many users that their computer couldn’t function the operation of sleep properly. One workaround is to replace the function of sleep with hibernate functionality so whenever you close the lid or press the power button, the computer hibernates instead of sleeping. This solution solved the problem in the majority of cases.
许多用户反馈其电脑的睡眠功能无法正常工作。一种替代方案是将睡眠功能替换为休眠功能,这样当你合上笔记本电脑盖子或按下电源按钮时,电脑会进入休眠状态而非睡眠状态。该方案在大多数情况下能够解决此问题。
-
Press and hold the Windows key then press the I key to open the Settings app.
按住 Windows 键,然后按下 I 键,打开“设置”应用。 -
Once in the Settings, select the menu of System present as the first entry at the top left side of the screen.
进入设置后,选择屏幕左上角第一个选项“系统”。
Open System
打开“系统” -
Choose the menu of Power and Sleep from the list of options at the left pane on the screen.
在屏幕左侧面板的选项列表中,选择“电源和睡眠”。

Open Power & Sleep Options
打开“电源和睡眠选项” -
Now at the top right side, you will find an option as Advanced power settings. Click it.
在屏幕右上角,找到“其他电源设置”选项并点击。

Open Additional Power Settings
打开“其他电源设置” -
Choose the option “Choose what the power buttons do” from the list of options available on the left side of the screen.
在屏幕左侧的选项列表中,选择“选择电源按钮的功能”。
Choose what the power buttons do
选择电源按钮的功能 -
Now you will be seeing a menu like this. Make sure that you apply these changes to both the options (On battery and Plugged in).
此时会显示如下菜单。请确保对两个选项(使用电池和接通电源)均应用以下设置。When I press the power button: Hibernate
当我按下电源按钮时:休眠
When I press the sleep button: Turn off the display
当我按下睡眠按钮时:关闭显示器
When I close the lid: Sleep
当我合上盖子时:睡眠Click on “Save Changes” at the bottom of the screen and navigate back to the previous page.
点击屏幕底部的“保存更改”,然后返回上一页。
Change Power Options
更改电源选项 -
Now click the option “Choose what closing the lid does”.
点击“选择合上盖子的功能”选项。
Choose what closing the lid does
选择合上盖子的功能 -
Make sure that you apply these changes to both the options (On battery and Plugged in).
确保对两个选项(使用电池和接通电源)均应用以下设置。When I press the power button: Hibernate
当我按下电源按钮时:休眠
When I press the sleep button: Turn off the display
当我按下睡眠按钮时:关闭显示器
When I close the lid: Sleep
当我合上盖子时:睡眠Click on “Save Changes” at the bottom of the screen and navigate back to the previous page.
点击屏幕底部的“保存更改”,然后返回上一页。 -
Now navigate to the main Power Options menu. Here you will see different plans available on your computer (Balanced, High Performance and Power saver, etc.). Select the one you are using and click on “Change plan settings” present in front of it.
返回“电源选项”主菜单。此处会显示电脑上可用的不同电源计划(如平衡、高性能、节能等)。选择你当前正在使用的电源计划,点击其对应的“更改计划设置”。 -
A new window will appear. Navigate to the near bottom and click on “Change advanced power settings”.
弹出新窗口后,滚动至底部,点击“更改高级电源设置”。
Change advanced power settings
更改高级电源设置 -
A small new window will appear in front of you. Navigate to the near bottom and select “Power buttons and lid”. Apply these changes to both the conditions (On battery and Plugged in).
弹出新的小窗口后,滚动至底部,选择“电源按钮和盖子”。对两个场景(使用电池和接通电源)应用以下设置。Lid close action: Sleep
盖子关闭操作:睡眠
Power button action: Hibernate
电源按钮操作:休眠
Sleep button action: Turn off the display
睡眠按钮操作:关闭显示器Press Ok to save changes and exit. Restart your computer for the changes to take place and check if the problem has been solved.
点击“确定”保存设置并退出。重启电脑使设置生效,然后检查问题是否已解决。
Power Button and Lid Options
电源按钮和盖子选项
2. Downgrade the Version of Intel Management Engine Components Driver
降级 Intel 管理引擎组件驱动程序版本
We will download the Intel Management Engine Interface Driver (version 9 or 10) and exploit the show or hide the updates package to stop the system from installing version 11 again. We will have to pause the update service of your computer using the services menu to ensure that Windows doesn’t automatically install the version 11 itself.
我们将下载 Intel 管理引擎接口驱动程序(版本 9 或 10),并使用“显示或隐藏更新”工具阻止系统再次安装版本 11。需通过“服务”菜单暂停电脑的更新服务,确保 Windows 不会自动安装版本 11。
-
Type “services.msc” to launch the services window where all the services present in your machine are listed.
输入“services.msc”,打开显示电脑所有服务的“服务”窗口。 -
Once in services, navigate to the near bottom of the screen and locate Windows Update. Right-click it and select Properties.
进入“服务”窗口后,滚动至底部,找到“Windows Update”服务。右键单击该服务,选择“属性”。

Windows Update Service
Windows Update 服务 -
After stopping the process, click on the Startup Type option and select Manual from the list of options available.
停止该服务后,点击“启动类型”下拉菜单,选择“手动”。

Set Service Startup Type as Manual
将服务启动类型设置为“手动” -
Press OK to save changes and exit. Restart your computer for the changes to take place.
点击“确定”保存设置并退出。重启电脑使设置生效。 -
Navigate to HP’s official drivers’ download site and enter the model of your machine.
访问 惠普官方驱动下载网站,输入你的电脑型号。 -
Once you have selected your machine and are redirected to the drivers’ page, expand the option of “Driver-Chipset” and download “Intel Management Engine Components Driver”.
选择电脑型号并跳转至驱动下载页面后,展开“驱动程序-芯片组”选项,下载“Intel 管理引擎组件驱动程序”。
Intel Management Engine Components Driver
Intel 管理引擎组件驱动程序 -
Now install the downloaded software.
安装下载的驱动程序软件。 -
Once you have installed it, download the Windows 10 Show or Hide updates package from Microsoft.
安装完成后,从微软官网下载 Windows 10 显示或隐藏更新工具。 -
Now run the downloaded package. After Windows scans your computer, you will be given two options. Select the one which says “Hide updates”.
运行下载的工具包。Windows 扫描电脑后,会提供两个选项,选择“隐藏更新”。
Hide Updates
隐藏更新 -
In the next window select Intel Management Engine Components Driver and hide it. This will ensure that you don’t update the 11th edition.
在接下来的窗口中,选择“Intel 管理引擎组件驱动程序”并隐藏该更新。此举将防止系统更新至版本 11。 -
Type “services.msc” to launch the services window where all the services present in your machine are listed.
输入“services.msc”,打开“服务”窗口。 -
Once in services, navigate to the near bottom of the screen and locate Windows Update. Right-click it and select Properties.
进入“服务”窗口后,滚动至底部,找到“Windows Update”服务。右键单击该服务,选择“属性”。
Open Properties of Windows Update Service
打开 Windows Update 服务属性 -
Click on the Startup Type option and select Automatic from the list of options available.
点击“启动类型”下拉菜单,选择“自动”。
Change Service Startup Type to Automatic
将服务启动类型更改为“自动” -
Restart your computer and check if your computer goes to sleep correctly.
重启电脑,检查睡眠功能是否恢复正常。
Note: You don’t need to uninstall version 11 before installing version 9 or 10. The presence of some version of the driver is required to downgrade it.
注意:安装版本 9 或 10 之前,无需卸载版本 11。降级驱动程序需要系统中已存在该驱动的某个版本。
3. Check Compatibility of Attached Devices
3. 检查外接设备的兼容性
If you are experiencing this problem after upgrading to Windows 10, it can be because of non-compatible devices connected to your computer. Many manufacturers take time before rolling out the required updates for their equipment to be completely compatible with the newer version of Windows.
如果升级至 Windows 10 后出现该问题,可能是由于外接设备与系统不兼容。许多制造商需要一定时间为其设备推出兼容新版本 Windows 的更新程序。
The devices can include your printer, or gaming consoles, etc. Head over to the manufacturer’s website and confirm the compatibility of the device. If it isn’t, disconnect the device from your computer and check if the sleep problem persists.
此类设备可能包括打印机、游戏主机等。请访问设备制造商的官方网站,确认设备是否与 Windows 10 兼容。如果不兼容,断开该设备与电脑的连接,检查睡眠问题是否仍然存在。
4. Change Sleep settings
修改睡眠设置
We can try changing the wake-up timer settings from your power settings and check if this does the trick. This setting will ensure that your computer wakes up whenever it goes into sleep mode and the option is enabled.
我们可以尝试修改电源设置中的唤醒计时器选项,查看是否能解决问题。启用该设置后,电脑进入睡眠模式时将能按预设时间唤醒。
PRO TIP: If the issue is with your computer or a laptop/notebook you should try using Fortect Repair which can scan the repositories and replace corrupt and missing files. This works in most cases, where the issue is originated due to a system corruption. You can download Fortect by Clicking Here
专业提示:如果问题源于电脑系统损坏(如文件损坏或缺失),建议使用 Fortect Repair 工具。该工具可扫描系统文件库,替换损坏或缺失的文件,在多数系统 corruption 相关问题中均能生效。可通过 点击此处 下载 Fortect。
-
Right-click on the Windows icon present at the bottom left side of the screen and select Settings.
右键单击屏幕左下角的 Windows 图标,选择“设置”。 -
Once in the Settings, select the menu of System present as the first entry at the top left side of the screen.
进入设置后,选择屏幕左上角第一个选项“系统”。 -
Choose the menu of Power and Sleep from the list of options at the left pane on the screen.
在屏幕左侧面板的选项列表中,选择“电源和睡眠”。 -
Now at the top right side, you will find an option as Additional power settings. Click it.
在屏幕右上角,找到“其他电源设置”选项并点击。
Open Additional Power Settings
打开“其他电源设置” -
Here you will see different plans available on your computer (Balanced, High Performance and Power saver, etc.). Select the one you are using and click on “Change plan settings” present in front of it.
此处会显示电脑上可用的不同电源计划(如平衡、高性能、节能等)。选择你当前正在使用的电源计划,点击其对应的“更改计划设置”。 -
A new window will appear. Navigate to the near bottom and click on “Change advanced power settings”.
弹出新窗口后,滚动至底部,点击“更改高级电源设置”。
Change advanced power settings
更改高级电源设置 -
A small new window will appear in front of you. Navigate to the near bottom and select “Sleep”. Now expand the category of “Allow wake timers”. Set it to enabled for both the options (On battery and Plugged in).
弹出新的小窗口后,滚动至底部,选择“睡眠”选项。展开“允许唤醒计时器”分类,将两个选项(使用电池和接通电源)均设置为“启用”。
Allow wake timers
允许唤醒计时器 -
Save changes and exit. After restarting your computer, check if the problem got solved.
保存设置并退出。重启电脑后,检查问题是否已解决。
5. Change Deep Sleep Function
5. 修改深度睡眠功能
Windows 10 has a feature of deep sleep. The computer saves all the data before sleeping so when it starts up, it can directly load it and start much faster. The CPU will also be not running in the process hence increasing your battery life and performance.
Windows 10 具备深度睡眠功能。电脑进入深度睡眠前会保存所有数据,启动时可直接加载这些数据,从而实现快速启动。此过程中 CPU 不会运行,有助于延长电池续航时间并提升性能。
Maybe your machine doesn’t support the deep sleep function. You can check the compatibility using your computer manufacturer website. If it doesn’t, you can disable it using your BIOS settings. Enter your BIOS settings upon the start of the computer and navigate to Setup > Config > Power > Intel Rapid Start Technology. Change this setting to Disabled and save changes before exiting. You may use S3 power settings to solve this issue. Also, make sure that hybrid sleep is set to disabled in the BIOS.
你的电脑可能不支持深度睡眠功能。可通过电脑制造商官网查询兼容性信息。如果不支持,可通过 BIOS 设置禁用该功能:电脑启动时进入 BIOS 设置,导航至“Setup > Config > Power > Intel Rapid Start Technology”,将该选项设置为“Disabled”(禁用),保存设置后退出。你也可以尝试使用 S3 电源设置解决此问题,并确保 BIOS 中的混合睡眠功能已禁用。

S3 Power Setting in BIOS
BIOS 中的 S3 电源设置
We can also change the Fast startup option from the power management settings available on your computer.
此外,还可通过电脑的电源管理设置修改“快速启动”选项。
-
Navigate to the Power Plans settings (like we did in the earlier steps).
进入“电源计划设置”(操作步骤与前文一致)。 -
Once in the Power Plans window, select “Choose what the power buttons do” present at the left side of the screen.
在“电源计划”窗口中,选择屏幕左侧的“选择电源按钮的功能”。 -
Click the option which says “Change settings that are currently unavailable”.
点击“更改当前不可用的设置”选项。
Change settings that are currently unavailable
更改当前不可用的设置 -
After clicking, you will notice that the shutdown settings will become available to you present at the bottom of the screen. Uncheck the “Turn on fast startup” option and click save changes at the bottom of the screen.
点击后,屏幕底部的关机设置将变为可用状态。取消勾选“启用快速启动”选项,点击屏幕底部的“保存更改”。
Uncheck the “Turn on fast startup”
取消勾选“启用快速启动” -
Navigate back to the power options menu and select “Choose what closing the lid does”. Repeat steps 3 and 4 and save changes.
返回电源选项菜单,选择“选择合上盖子的功能”。重复步骤 3 和 4 的操作,保存更改。 -
A restart might be required so all the changes can be implemented.
可能需要重启电脑,使所有设置生效。
6. Update Your Display Drivers
更新显示驱动程序
When Windows loads from sleep mode, it uses the graphics hardware to load the computer and provide the required GUI. If the graphics drivers are not installed correctly or are corrupt, this can cause a problem. We will start your computer in Safe Mode and delete the currently installed drivers of your display card. Upon the restart, the default display drivers would automatically be installed upon the detection of your display hardware.
Windows 从睡眠模式唤醒时,会通过图形硬件加载系统并提供所需的图形用户界面(GUI)。如果显示驱动程序安装不正确或已损坏,可能会导致唤醒失败。我们将在安全模式下启动电脑,删除当前安装的显示卡驱动程序;重启后,系统检测到显示硬件时会自动安装默认显示驱动程序。
-
Follow the instructions on our article on how to boot your computer in safe mode.
按照文章《如何在安全模式下启动电脑》[见下文]中的说明操作。 -
Once booted in the safe mode, right-click on Windows key and select Device Manager from the list of options available.
进入安全模式后,右键单击 Windows 键,从可用选项列表中选择“设备管理器”。
Open Device Manager
打开设备管理器Another way to launch the device manager is by pressing Windows + R to launch the Run application and typing “devmgmt.msc”.
另一种打开设备管理器的方法:按下 Windows + R 键打开“运行”窗口,输入“devmgmt.msc”并回车。 -
Once in the device manager, expand the Display adapters section and right-click on your display hardware. Select the option of Uninstall device. Windows will pop a dialogue box to confirm your actions, press Ok and proceed.
进入设备管理器后,展开“显示适配器”分类,右键单击你的显示硬件,选择“卸载设备”。Windows 会弹出确认对话框,点击“确定”继续。
ninstall Device in Device Manager
在设备管理器中卸载设备 -
Restart your PC. Press the Windows + S button to launch your start menu’s search bar. In the dialogue box type “Windows update”. Click the first search result which comes forward.
重启电脑。按下 Windows + S 键打开开始菜单的搜索栏,输入“Windows 更新”,点击第一个搜索结果。 -
Once in the update settings, click on the button which says “Check for updates”. Now Windows will automatically check for updates available and install them. It may even prompt you for a restart.
进入更新设置后,点击“检查更新”按钮。Windows 将自动检查可用更新并进行安装,期间可能会提示重启电脑。
Check For Updates
检查更新 -
After updating, check if your issue got fixed.
更新完成后,检查问题是否已解决。
Windows Update always tries its best to deliver the latest drivers available for your hardware. But it also doesn’t mean that they are the latest ones available. Alternatively to the Windows Update, you can also head over to your graphics card’s manufacturer website and download the latest drivers manually.
Windows 更新会尽力提供适用于你的硬件的最新驱动程序,但这并不意味着这些驱动程序是制造商发布的最新版本。除了通过 Windows 更新,你也可以访问显卡制造商的官方网站,手动下载最新驱动程序。
If the latest drivers also don’t solve the problem in question, you can try downloading and installing an older driver for your hardware. Manufacturers have all the drivers listed according to date and you can try installing them manually. Follow the instructions below to install the drivers manually.
如果最新版本的驱动程序仍无法解决问题,可尝试下载并安装该硬件的旧版本驱动程序。制造商通常会按日期列出所有驱动程序版本,你可以手动选择安装。手动安装驱动程序的步骤如下:
-
Open your Device Manager as explained above in the solution and right-click on your driver and select “Update Driver”.
按照前文步骤打开设备管理器,右键单击你的显示适配器驱动程序,选择“更新驱动程序”。
Update Driver of the Device in Device Manager
在设备管理器中更新设备驱动程序 -
Now a new window will pop up asking you whether to update the driver manually or automatically. Select “Browse my computer for driver software”.
弹出新窗口,询问是否自动或手动更新驱动程序,选择“浏览我的计算机以查找驱动程序软件”。
Browse my computer for driver software
浏览我的计算机以查找驱动程序软件 -
Now browse through the folders to where you downloaded the drivers. Select it and Windows will install the required drivers. Restart your computer and check if the problem got solved.
浏览至你下载驱动程序的文件夹,选择该文件夹,Windows 将安装所需的驱动程序。重启电脑后,检查问题是否已解决。
Browse to the location of the drivers
浏览至驱动程序所在位置
Note: You should also update all your other drivers (mouse, keyboard, sound, etc.)
注意:建议同时更新其他所有设备的驱动程序(如鼠标、键盘、声音设备等)。
7. Use CMD to Disable Windows Sleep
使用命令提示符(CMD)禁用 Windows 睡眠功能
As a last resort, we can try disabling your Windows sleep function using the command prompt. If this method doesn’t work for you, you can easily revert the changes by changing “off” with “on”.
作为最后的解决方法,可尝试通过命令提示符禁用 Windows 睡眠功能。如果该方法无效,只需将命令中的“off”改为“on”,即可恢复原有设置。
-
Press Windows + S to launch the search bar of your start menu. Type “command prompt” in the dialogue box. Right-click on the first result which comes forth and select “Run as administrator”.
按下 Windows + S 键打开开始菜单的搜索栏,输入“命令提示符”。右键单击第一个搜索结果,选择“以管理员身份运行”。 -
Once in the command prompt type the following command and press enter:
在命令提示符窗口中输入以下命令并回车:Powercfg –h off
Run Powercfg –h off in Command Prompt
在命令提示符中运行 Powercfg –h off 命令 -
Restart your computer and check if the problem got solved.
重启电脑,检查问题是否已解决。
8. Run the Power-Troubleshooter
运行电源故障排除程序
We can try running the power troubleshooter on your Windows. It is a utility developed by Microsoft to check the power settings and locate discrepancies. If the troubleshooter finds some settings which are causing the issue, it will automatically fix them and inform you.
可尝试运行 Windows 自带的电源故障排除程序。这是微软开发的一款实用工具,用于检查电源设置并定位异常。如果故障排除程序发现导致问题的设置,会自动修复并通知用户。
-
Press Windows + S to launch the start menu’s search bar. Type “troubleshoot” in the dialogue box and click on the first result which comes forth.
按下 Windows + S 键打开开始菜单的搜索栏,输入“故障排除”,点击第一个搜索结果。
-
Once in the troubleshoot menu, select “Power” and click the button “Run the troubleshooter”.
进入故障排除菜单后,选择“电源”,点击“运行故障排除程序”按钮。
Run the Power Troubleshooter
运行电源故障排除程序 -
Now Windows will scan your computer and detect problems (if any). Wait for the process to complete as this can consume some time.
Windows 将扫描电脑并检测问题(如有)。该过程可能需要一定时间,请耐心等待完成。
Result of Troubleshooter
故障排除程序结果 -
Restart your computer for the changes to take place.
重启电脑,使更改生效。
9. Run the Power Troubleshooter
运行电源故障排除程序
To troubleshoot, Windows has many built-in troubleshooters. As we are having issues with the power settings of the system, we can try running the Power troubleshooter and see if this does the trick for us. When you run the power troubleshooter, it will automatically check the registry, the hardware, and the interacting software components and make sure everything is in place. If any discrepancy is found, it will be restarted/reset automatically and fixed.
Windows 内置了多个故障排除程序,用于解决各类系统问题。由于我们遇到的是电源设置相关问题,可尝试运行电源故障排除程序。该程序会自动检查注册表、硬件及相关软件组件,确保所有设置正常;如果发现异常,会自动重启或重置相关组件以修复问题。
-
Click on the Windows button and in the search bar type Troubleshoot. Now in the results, click on Troubleshoot Settings.
点击 Windows 按钮,在搜索栏中输入“故障排除”。在搜索结果中,点击“故障排除设置”。
Open Troubleshoot Settings
打开故障排除设置 -
In the right pane of the Settings window, scroll down to find Power (in the Find and fix other problems section). Now click on Power and then click on Run this Troubleshooter.
在设置窗口的右侧面板中,向下滚动找到“电源”(位于“查找并解决其他问题”部分)。点击“电源”,然后点击“运行此故障排除程序”。
Run the Power Troubleshooter
)运行电源故障排除程序 -
Now follow the instructions displayed on the screen to complete the troubleshooter.
按照屏幕上的提示完成故障排除程序。 -
After completion of the troubleshooting process, check if the system is waking up from sleep without any issue.
故障排除完成后,检查系统从睡眠模式唤醒是否正常。
10. Update BIOS
更新 BIOS
There is a misconception that sleep functionality is just an OS feature; BIOS plays a critical role in the sleep functionality of your system. An outdated BIOS can become incompatible with the OS and thus cause the non-waking of the system from sleep. In that case, updating the BIOS to the latest version may solve the problem.
有一种误解认为睡眠功能仅是操作系统(OS)的特性,但 BIOS 在系统睡眠功能中起着关键作用。过时的 BIOS 可能与操作系统不兼容,从而导致系统无法从睡眠模式唤醒。这种情况下,将 BIOS 更新至最新版本可能会解决问题。
Warning: Proceed at your own risk, as updating your BIOS is a more technical step and if done wrong, you may brick your system and cause everlasting damage to your system. Here are some tutorials on how to update the BIOS of different manufacturers:
警告:请自行承担操作风险。更新 BIOS 是一项技术性较强的操作,若操作不当,可能导致系统变砖(无法启动),造成永久性损坏。以下是不同品牌电脑的 BIOS 更新教程:
11. Try Registry Fix
尝试注册表修复
In some cases, certain registry settings need to be altered to get this feature to work properly. Therefore, in this step, we will be reconfiguring the “Connected Standby” settings. In order to do so:
在部分情况下,需要修改特定的注册表设置才能使睡眠功能正常工作。因此,本步骤将重新配置“Connected Standby”(连接待机)设置,操作如下:
-
Press “Windows” + “R” to open the Run prompt.
按下“Windows” + “R”键,打开“运行”对话框。 -
Type in “Regedit” and press “Enter”.
输入“Regedit”,按下“Enter”键。
Running the Registry Editor
运行注册表编辑器 -
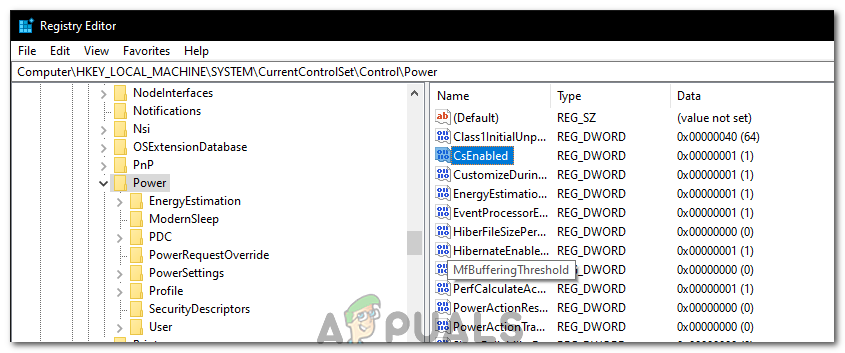
Navigate to the following address.
导航至以下路径:HKEY_LOCAL_MACHINE\SYSTEM\CurrentControlSet\Control\Power -
Double click on the “CsEnabled” option and change the “Value Data” to “0”.
双击“CsEnabled”选项,将“数值数据”改为“0”。
Selecting “CsEnabled”
选择“CsEnabled”选项
- Check to see if the issue persists.
检查问题是否仍然存在。
How to: Start Windows 10 in Safe Mode
如何在 Windows 10 中启动安全模式
By Kevin Arrows Updated on April 27, 2024
Microsoft is the world’s leading desktop OS development firm with a market share greater than all other desktop OS in the world. The latest release of Windows OS by Microsoft is Windows 10 and it has definitely made its way into a competitive market with distinction. Windows 10 is the successor of the previous version of Windows i.e. Windows 8 and includes some major changes in GUI.
微软(Microsoft) 是全球领先的桌面操作系统开发公司,其市场份额超过全球其他所有桌面操作系统。微软最新发布的 Windows 操作系统是 Windows 10,该系统凭借独特优势在竞争激烈的市场中占据一席之地。Windows 10 是前一版本 Windows(即 Windows 8)的继任者,在图形用户界面(GUI)方面进行了多项重大改进。
Entering the Safe Mode in previous versions of Windows excluding Windows 8 was a lot easier as compared to the later builds i.e. Windows 8 and Windows 10. By pressing the F8 button at the start-up on previous versions of Windows, users could enter the Safe Mode without any problem but with fast booting feature inside Windows 8 and Windows 10, it is practically impossible to interrupt the booting process and F8 is no more helpful.
除 Windows 8 之外,早期版本的 Windows 进入安全模式的操作相对简单(Windows 11 安全模式启动方法参考 [见下文])。在早期 Windows 版本中,用户只需在启动时按下 F8 键即可进入安全模式;但由于 Windows 8 和 Windows 10 引入了快速启动功能,启动过程几乎无法被中断,F8 键不再有效。
So, this guide will assist you through towards entering the safe mode inside Windows 10.
因此,本文将详细介绍 Windows 10 中进入安全模式的多种方法。
Method # 1: Using “Shift (Button) + Restart (Option)” Combination
方法 1:使用“Shift 键 + 重启选项”组合
This method is a lot easier as compared to others. Using a combination can let you enter into the Safe Mode. Follow the steps below to enter the Safe Mode using a combination.
该方法相对其他方法更为简便,通过快捷键组合即可进入安全模式。具体步骤如下:
-
Go to Start Menu and click on the Power button located on the bottom left pane.
打开开始菜单,点击左下角的电源按钮。
-
While pressing the Shift key on the keyboard, click on the Restart option using the left mouse button. It would interrupt the normal start of PC by displaying a list of options to select from. Select Troubleshoot from the options and it would take you to the next screen.
按住键盘上的 Shift 键,同时用鼠标左键点击重启选项。此举将中断电脑的正常启动流程,显示选项列表。选择故障排除,进入下一界面。
-
On the next screen, click on Advanced Options highlighted in the image below.
在下一界面中,点击下图中高亮显示的高级选项。

-
Inside the Advanced options screen, select the Startup Settings and restart your PC using the button below.
在高级选项界面中,选择启动设置,然后点击下方的按钮重启电脑。
-
After the PC is rebooted, you will find a number of options to select from a list using F1 – F9 function keys. If you want to boot the computer into Safe Mode, press the F4, F5 or F6 function keys depending on your requirements. Now, your PC will boot in Safe Mode.
电脑重启后,会显示多个选项,可通过 F1 - F9 功能键选择。如需启动安全模式,根据需求按下 F4(安全模式)、F5(带网络连接的安全模式)或 F6(带命令提示符的安全模式)键。此时,电脑将进入安全模式。
Method # 2: Using System Configuration Tool
方法 2:使用系统配置工具
This is the easiest of all methods. The system configuration tool is provided inside Windows 10 to help the users to change the configuration of Windows according to their requirements. In order to boot your Windows in Safe Mode using SCT, follow the steps below.
这是所有方法中最简单的一种。Windows 10 内置的系统配置工具(SCT)允许用户根据需求修改系统配置。通过该工具启动安全模式的步骤如下(Windows 11 安全模式启动方法参考 [见下文]):
-
Open the Run window by pressing Win + R on the keyboard and type msconfig inside the text field. Press the Enter key to execute the program. You can also open it by searching System Configuration Tool inside cortana.
按下键盘上的 Win + R 键打开运行窗口,在文本框中输入 msconfig,按下 Enter 键运行程序。也可以在 Cortana 中搜索“系统配置工具”打开该程序。
-
Navigate to the Boot tab and check the box labeled as Safe boot inside Boot options. Click on Apply and OK button afterwards. Click on the Restart button if you want to restart your PC at the same exact time. You can also restart your PC manually by clicking on Exit without restart.
切换至引导选项卡,在“引导选项”区域勾选安全引导复选框。点击应用和确定按钮。如需立即重启电脑,点击重启按钮;也可点击退出而不重启,之后手动重启电脑。
Method # 3: Using a Recovery Drive to Boot Windows
方法 3:使用恢复驱动器启动 Windows
A recovery drive is a resource that helps the users to boot their PCs if something bad happens to the Windows. Windows 10 has introduced a unique app called Recovery Drive app that lets the users create a recovery inside a USB. This recovery USB is then used to boot the Windows into Safe Mode. To create a USB recovery drive, follow the instructions below.
恢复驱动器是一种系统修复工具,当 Windows 出现故障时,用户可通过该驱动器启动电脑。Windows 10 内置了“恢复驱动器”应用程序,允许用户在 USB 设备中创建恢复介质,进而通过该 USB 恢复驱动器启动 Windows 进入安全模式。创建 USB 恢复驱动器的步骤如下(创建失败解决方案参考 链接):
PRO TIP: If the issue is with your computer or a laptop/notebook you should try using Fortect Repair which can scan the repositories and replace corrupt and missing files. This works in most cases, where the issue is originated due to a system corruption. You can download Fortect by Clicking Here
专业提示:如果问题源于电脑系统损坏(如文件损坏或缺失),建议使用 Fortect Repair 工具。该工具可扫描系统文件库,替换损坏或缺失的文件,在多数系统损坏相关问题中均能生效。可通过 点击此处 下载 Fortect。
-
Search for Recovery Drive using Cortana and run it as an administrator. Connect the USB dongle and click Next button in order to create a recovery drive.
在 Cortana 中搜索“恢复驱动器”,以管理员身份运行该应用。连接 USB 设备后,点击下一步按钮开始创建恢复驱动器。
-
Boot your computer with this recovery drive and follow the instructions of Method #1 in order to boot the system in Safe Mode.
使用该恢复驱动器启动电脑,然后按照方法 1 中的步骤操作,即可进入安全模式。
Method # 4: Starting Safe Mode at Startup Using Command Prompt
方法 4:启动时通过命令提示符进入安全模式
If you can’t start the safe mode using above methods as your PC doesn’t let you boot Windows, then you might need to start it up in safe mode using Command Prompt. Follow the steps below to enter into safe mode at startup using command prompt.
如果电脑无法正常启动 Windows,导致上述方法均无法进入安全模式,则可通过命令提示符在启动时进入安全模式。具体步骤如下:
-
Open an elevated command prompt by using a Windows 10 Installation Media. Boot the PC using Windows 10 bootable USB and inside the Setup, choose Repair your computer.
使用 Windows 10 安装介质打开管理员命令提示符。通过 Windows 10 可引导 USB 启动电脑,在安装界面中选择修复计算机。
-
On the next screen, follow the instructions mentioned in Method # 1 to open the Advanced Options. Click on Command Prompt and enter your password credentials in order to boot PC using a command prompt.
在下一界面中,按照方法 1 的步骤打开高级选项,点击命令提示符,输入密码验证后即可进入命令提示符环境。 -
When inside the Command prompt, type bcdedit followed by the Enter key.
在命令提示符窗口中输入 bcdedit 命令,按下 Enter 键。
-
After hitting Enter key, it would display a minimal list of options organized into sections. At the top, you will see [Windows Boot Manager] Check for the Default option and note of its identifier that will be located to the right. In my case, it is set to {current}.
按下 Enter 键后,屏幕将显示结构化的系统引导配置信息。在顶部“[Windows Boot Manager]”(Windows 启动管理器)部分,找到“Default”(默认)选项,记录其右侧的标识符(示例中标识符为 {current})。
-
To boot Windows 10 in safe mode, type the following line inside the command prompt and hit Enter.
如需启动 Windows 10 安全模式,在命令提示符中输入以下命令并按下 Enter 键:bcdedit /set {current} safeboot minimalNote: In the above command, {current} is an identifier which you noted before.
注意:上述命令中的 {current} 为步骤 4 中记录的标识符,请根据实际情况替换。If you want to start Windows 10 in Safe Mode with Networking, just replace the safeboot minimal with safeboot network in the above command.
若需启动“带网络连接的安全模式”,只需将命令中的 safeboot minimal 替换为 safeboot network,命令如下:bcdedit /set {current} safeboot network
-
Restart your computer. It will automatically boot into the selected Safe Mode. To exit Safe Mode later, run the following command in elevated Command Prompt and restart:
重启电脑,系统将自动进入所选的安全模式。后续如需退出安全模式,需在管理员命令提示符中运行以下命令并重启:bcdedit /deletevalue {current} safeboot
Method # 5: Enable legacy Advanced Boot Options to Use “F8” Key
方法 5:启用传统高级启动选项以使用“F8”键
You can set the old F8 key method that was used to interrupt the normal startup of Windows. So, follow the instructions to enable legacy Advanced Boot Options.
你可以启用 Windows 早期版本中通过 F8 键中断正常启动的传统方法。启用传统高级启动选项的步骤如下:
-
Open the command prompt by following instructions inside Method # 4. Type C: inside the command prompt and hit Enter key.
按照方法 4 的步骤打开命令提示符,输入 C: 并按下 Enter 键,切换至系统安装盘符(通常为 C 盘)。
-
Inside the command prompt, copy and paste the following command to execute. Press Enter.
在命令提示符中复制粘贴以下命令,按下 Enter 键执行:bcdedit /set {default} bootmenupolicy legacy
-
Now, make sure your Hard Drive is set at first position inside Boot order (BIOS) to load the Windows from Hard Drive.
进入电脑 BIOS 设置,确保硬盘在启动顺序中处于第一位,以从硬盘加载 Windows 系统。 -
Restart your PC and press F8 key repeatedly until it boots you inside Advanced Options. Select the Safe Mode using the arrow keys on your keyboard and that’s all you need to do.
重启电脑,在启动过程中反复按下 F8 键,直至进入高级启动选项界面。使用键盘上的方向键选择安全模式,即可进入。
How to Boot Windows 11 in Safe Mode
如何在 Windows 11 中启动安全模式
By Kamil Anwar Updated on July 18, 2025
Windows 11 might crash, freeze, or keep restarting when you turn it on, which makes it hard to get to the desktop. Safe Mode is a special way to start Windows with only the most important drivers and services. This helps you find and fix the problem.
Windows 11 启动时可能会出现崩溃、冻结或持续重启的情况,导致无法正常进入桌面。安全模式是一种特殊的 Windows 启动方式,仅加载最关键的驱动程序和服务,有助于用户定位并修复问题。

Boot Windows 11 in Safe Mode
在 Windows 11 中启动安全模式
Most of the time, issues are caused by a new driver, a broken system file, or software that doesn’t work well with Windows. On newer computers, the old F8 key doesn’t work to start Safe Mode because Windows starts up too quickly. Instead, you need to use recovery options or hold Shift while clicking Restart.
大多数情况下,这类问题由新安装的驱动程序、损坏的系统文件或与 Windows 不兼容的软件导致。在较新的电脑上,传统的 F8 键无法启动安全模式(因 Windows 启动速度过快),需通过恢复选项或按住 Shift 键点击“重启”来操作。
How to Boot Your Windows 11 Computer in Safe Mode
如何在 Windows 11 电脑中启动安全模式
There are four different ways you can start your Windows 11 computer in Safe Mode, Safe Mode with Networking, or Safe Mode with Command Prompt:
以下四种方法可用于启动 Windows 11 的安全模式、带网络连接的安全模式或带命令提示符的安全模式:
PRO TIP: If the issue is with your computer or a laptop/notebook you should try using Fortect Repair which can scan the repositories and replace corrupt and missing files. This works in most cases, where the issue is originated due to a system corruption. You can download Fortect by Clicking Here
专业提示:如果问题源于电脑系统损坏(如文件损坏或缺失),建议使用 Fortect Repair 工具。该工具可扫描系统文件库,替换损坏或缺失的文件,在多数系统损坏相关问题中均能生效。可通过 点击此处 下载 Fortect。
-
Boot Windows 11 in Safe Mode via Advanced Startup (WinRE)
通过高级启动(WinRE)启动 Windows 11 安全模式 -
Boot Windows 11 in Safe Mode via System Configuration (msconfig)
通过系统配置(msconfig)启动 Windows 11 安全模式 -
Boot Windows 11 in Safe Mode via Command Prompt (CMD)
通过命令提示符(CMD)启动 Windows 11 安全模式 -
Boot Windows 11 in Safe Mode via Command Prompt during Boot
启动时通过命令提示符启动 Windows 11 安全模式
1. Boot Windows 11 in Safe Mode from Startup (WinRE)
从启动界面通过高级启动(WinRE)启动 Windows 11 安全模式
-
Press the Start key or click the Start icon to open the Start menu.
按下 开始 键或点击 开始 图标,打开 开始 菜单。 -
Click the power icon, then hold the SHIFT key while clicking on Restart.
点击电源图标,按住 SHIFT 键的同时点击 重启。
Boot to the Advanced Startup menu
启动至高级启动菜单
Note: This will restart Windows 11 directly into the Advanced Startup (WinRE) menu.
注意:此操作将使 Windows 11 直接重启并进入 高级启动(WinRE)菜单。
-
After your PC restarts into the Advanced Startup menu, click on Troubleshoot.
电脑重启进入 高级启动 菜单后,点击 故障排除。
Accessing the Troubleshoot tab
进入故障排除选项卡
-
Inside the Troubleshoot menu, click on Advanced Options.
在 故障排除 菜单中,点击 高级选项。 -
From the Advanced Options menu, click on Startup Settings.
在 高级选项 菜单中,点击 启动设置。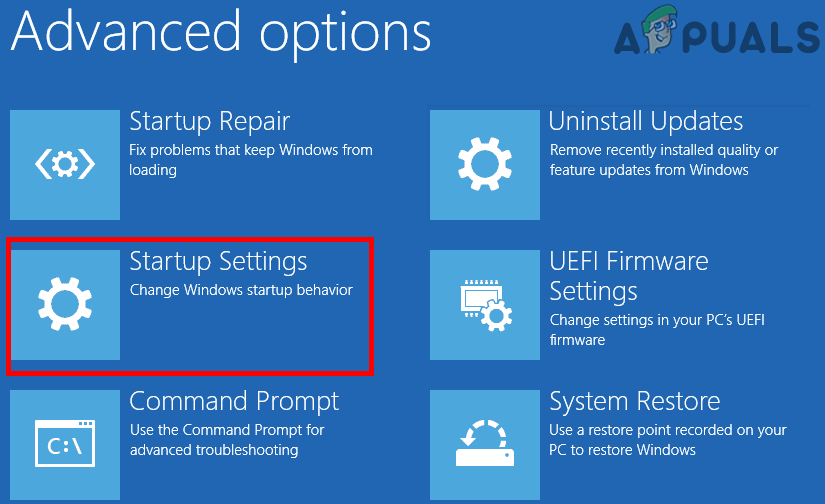
Accessing the Startup Settings
进入启动设置 -
On the next screen, click on the Restart button and wait for your PC to restart again.
在下一界面中,点击 重启 按钮,等待电脑再次重启。 -
Once you’re on the Startup Settings screen, press one of the following keys depending on which Safe Mode you want to use:
进入启动设置界面后,根据需要启动的安全模式类型,按下以下对应按键:4 - Enable Safe Mode
启用安全模式
5 - Enable Safe Mode with Networking
启用带网络连接的安全模式
6 - Enable Safe Mode with Command Prompt
启用带命令提示符的安全模式 -
After a moment, Windows 11 will start in the Safe Mode you chose.
片刻后,Windows 11 将以你选择的安全模式启动。
2. Boot Windows 11 in Safe Mode from System Configuration (msconfig)
通过系统配置(msconfig)启动 Windows 11 安全模式
-
Press Windows key + R to open the Run dialog box. Type ‘msconfig’ and press Enter to open the System Configuration window. If prompted by User Account Control, click Yes.
按下 Windows 键 + R 打开 运行 对话框,输入“msconfig”并按下 Enter 键,打开 系统配置 窗口。若弹出 用户账户控制 提示,点击 是。
Accessing the System Configuration utility
打开系统配置工具 -
Click the Boot tab at the top.
点击顶部的 引导 选项卡。
Booting in Safe Mode from System Configuration
通过系统配置启动安全模式 -
Change the Boot Options according to what type of Safe Mode you want:
根据需要的 安全模式类型,修改 引导选项:Safe Mode: Check Safe Boot, select Minimal, and leave everything else unchecked.
安全模式:勾选“安全引导”,选择“最小”,其余选项保持未勾选状态。
Safe Mode with Networking: Check Safe Boot, select Network, and leave everything else unchecked.
带网络连接的安全模式:勾选“安全引导”,选择“网络”,其余选项保持未勾选状态。
Safe Mode with Command Prompt: Check Safe Boot, select Alternate shell, and leave everything else unchecked.
带命令提示符的安全模式:勾选“安全引导”,选择“备用外壳”,其余选项保持未勾选状态。 -
Click Apply, then restart your computer to enter Safe Mode.
点击 应用,然后重启电脑即可进入安全模式。
3. Boot Windows 11 in Safe Mode via Command Prompt (CMD)
通过命令提示符(CMD)启动 Windows 11 安全模式
-
Press Windows key + R to open the Run dialog box. Type ‘cmd’ then press Ctrl + Shift + Enter to open Command Prompt as an administrator.
按下 Windows 键 + R 打开 运行 对话框,输入“cmd”,然后按下 Ctrl + Shift + Enter 键,以管理员身份打开命令提示符。
Open a CMD prompt
打开命令提示符
Note: If you see UAC (User Account Control), click Yes to allow administrative access.
注意:若弹出 用户账户控制(UAC) 提示,点击 是 以获取管理员权限。
-
In the elevated Command Prompt window, type one of the following commands and press Enter after each, depending on the Safe Mode you want to use:
在管理员命令提示符窗口中,根据需要的安全模式类型,输入以下命令之一并按下 Enter 键:Safe Mode:
安全模式:
bcdedit /set {current} safeboot minimal
Safe Mode with Networking:
带网络连接的安全模式:
bcdedit /set {current} safeboot network
Safe Mode with Command Prompt:
带命令提示符的安全模式:
bcdedit /set {current} safeboot minimal
bcdedit /set {current} safebootalternateshell yes -
Restart your computer to boot into the Safe Mode option you set up.
重启电脑,即可启动至你设置的安全模式。
4. Boot Windows 11 in Safe Mode via Command Prompt during Boot
启动时通过命令提示符启动 Windows 11 安全模式
-
Insert your Windows 11 installation media and boot your PC from it.
插入 Windows 11 安装介质,从该介质启动电脑。 -
When you reach the first Windows Setup screen, press Shift + F10 to open Command Prompt.
进入第一个 Windows 安装 界面后,按下 Shift + F10 键打开命令提示符。
Opening CMD prompt from the Windows Setup screen
从 Windows 安装界面打开命令提示符 -
Type one of the following commands and press Enter to set up your Windows 11 installation to boot in the selected Safe Mode:
输入以下命令之一并按下 Enter 键,将 Windows 11 安装系统设置为以所选安全模式启动:Safe Mode:
安全模式:bcdedit /set {default} safeboot minimal
Safe Mode with Networking:
带网络连接的安全模式:
bcdedit /set {default} safeboot network
Safe Mode with Command Prompt:
带命令提示符的安全模式:
bcdedit /set {default} safeboot minimal
bcdedit /set {default} safebootalternateshell yes
Note: {default} is a placeholder. If needed, replace it with the actual identifier for your system (for example, “Windows 11”).
注意:{default} 为占位符。如需替换,请使用系统的实际标识符(例如“Windows 11”)。
via:
- How to Fix Windows 10 Not Waking Up from Sleep Mode
https://appuals.com/how-to-fix-windows-10-not-waking-up-from-sleep-mode/ - How to Fix Windows 10 Black Screen with Cursor Issue?
https://appuals.com/fix-black-screen-with-cursor-windows-10/ - How to: Start Windows 10 in Safe Mode
https://appuals.com/how-to-start-windows-10-in-safe-mode/ - How to Boot Windows 11 in Safe Mode
https://appuals.com/boot-windows-11-safe-mode/


 1270
1270

 被折叠的 条评论
为什么被折叠?
被折叠的 条评论
为什么被折叠?
 到【灌水乐园】发言


