


注:本文为 “Linux | 特殊文件权限” 相关文章合辑。
英文引文,机翻未校。
中文引文,未整理去重。
Special File Permissions in Linux: SUID, SGID and Sticky Bit
Sep 15, 2022 — Abhishek Prakash
You see an
sinstead ofxin the file permissions? Linux has some special file permissions calledSUID,SUIDandSticky Bit. Know more about them.
在文件权限中看到s而不是x?Linux 有一些特殊的文件权限,称为 SUID、SGID(原文为 GUID,此处已修正)和 Sticky Bit。来进一步了解它们。
- SUID(Set User ID)
- SGID(Set Group ID)
- SBIT(Sticky Bit)
File permissions and ownership are the basic and yet essential security concepts in Linux. You probably are already familiar with these terms already. It typically looks like this:
文件权限和所有权是 Linux 中基本且至关重要的安全概念。你可能已经对这些术语很熟悉了。它通常是这样显示的:

Regular file permissions
Apart from these regular permissions, there are a few special file permissions and not many Linux users are aware of it.
除了这些常规权限之外,还有一些特殊的文件权限,而且知道这些特殊权限的 Linux 用户并不多。

Linux Special Permissions: SUID, SGID and Sticky Bit
To start talking about of special permissions, I am going to presume that you have some knowledge of the basic file permissions. If not, please read our excellent guide explaining Linux file permission.
在开始讨论特殊权限之前,我假定你对基本的文件权限有一定的了解。如果没有,请阅读我们关于 Linux 文件权限的优秀指南。
Now I’m gonna show you some special permissions with new letters on the Linux file system.
现在我将向你展示 Linux 文件系统上一些带有新字母的特殊权限。
In this example, the passwd command, responsible to change the password of a user, has the letter s on the same place we expect to see x or -, for user permissions. It’s important to notice that this file belongs to the root user and root group.
在此示例中,负责更改用户密码的 passwd 命令,在用户权限位中,原本我们期望看到 x 或 - 的位置上出现了字母 s。需要注意的是,这个文件属于 root 用户和 root 组。
With this permission, you don’t need to give sudo access to a specific user when you want him to run some root script.
通过这种权限设置,当你希望某个特定用户运行一些需要以 root 权限执行的脚本时,就无需授予该用户 sudo 访问权限了。
What is SUID?
When the SUID bit is set on an executable file, this means that the file will be executed with the same permissions as the owner of the executable file.
当在一个可执行文件上设置了 SUID 位时,这意味着该文件将以与可执行文件所有者相同的权限来执行。

Let’s take a practical example. If you look at the binary executable file of the passwd command, it has the SUID bit set.
让我们举一个实际的例子。如果你查看 passwd 命令的二进制可执行文件,会发现它设置了 SUID 位。
linux:~$ ls -l /usr/bin/passwd
-rwsr-xr-x 1 root root 59640 Mar 22 2019 /usr/bin/passwd
This means that any user running the passwd command will be running it with the same permission as root.
这意味着任何运行 passwd 命令的用户都将以与 root 相同的权限来运行它。
What’s the benefit? The passwd command needs to edit files like /etc/passwd, /etc/shadow to change the password. These files are owned by root and can only be modified by root. But thanks to the setuid flag (SUID bit), a regular user will also be able to modify these files (that are owned by root) and change his/her password.
这样做有什么好处呢?passwd 命令需要编辑像 /etc/passwd、/etc/shadow 这样的文件来更改密码。这些文件归 root 所有,并且只能由 root 修改。但是由于设置了 setuid 标志(即 SUID 位),普通用户也能够修改这些归 root 所有的文件,并更改自己的密码。
This is the reason why you can use the passwd command to change your own password despite of the fact that the files this command modifies are owned by root.
这就是为什么尽管 passwd 命令所修改的文件归 root 所有,但你仍然可以使用 passwd 命令来更改自己密码的原因。
Why can a normal user not change the password of other users?
Note that a normal user can’t change passwords for other users, only for himself/herself. But why? If you can run the passwd command as a regular user with the same permissions as root and modify the files like /etc/passwd, why can you not change the password of other users?
请注意,普通用户不能为其他用户更改密码,只能为自己更改密码。但这是为什么呢?如果普通用户可以以与 root 相同的权限运行 passwd 命令,并修改像 /etc/passwd 这样的文件,那为什么不能更改其他用户的密码呢?
If you check the code for the passwd command, you’ll find that it checks the UID of the user whose password is being modified with the UID of the user that ran the command. If it doesn’t match and if the command wasn’t run by root, it throws an error.
如果你查看 passwd 命令的代码,就会发现它会检查正在修改密码的用户的 UID(用户标识符)与运行该命令的用户的 UID 是否一致。如果不一致,并且该命令不是由 root 运行的,就会抛出一个错误。
The setuid/SUID concept is tricky and should be used with utmost cautious otherwise you’ll leave security gaps in your system. It’s an essential security concept and many commands (like ping command and programs (like sudo) utilize it.
setuid/SUID 这个概念比较复杂,使用时必须格外小心,否则会在系统中留下安全漏洞。它是一个基本的安全概念,许多命令(比如 ping 命令)和程序(比如 sudo)都用到了它。
Now that you understand the concept SUID, let’s see how to set the SUID bit.
现在你已经理解了 SUID 的概念,让我们来看看如何设置 SUID 位。
How to set SUID bit?
I find the symbolic way easier while setting SUID bit. You can use the chmod command in this way:
我发现在设置 SUID 位时,使用符号方式更为简便。你可以像这样使用 chmod 命令:
chmod u+s file_name
Here’s an example: 下面是一个示例:
linux:~$ ls -l test.txt
-rwxrw-rw- 1 linuxhandbook linuxhandbook 0 Apr 12 17:51 test.txt
linux:~$ chmod u+s test.txt
linux:~$ ls -l test.txt
-rwsrw-rw- 1 linuxhandbook linuxhandbook 0 Apr 12 17:52 test.txt
You can also use the numeric way. You just need to add a fourth digit to the normal permissions. The octal number used to set SUID is always 4.
你也可以使用数字方式。你只需要在常规权限的基础上添加第四位数字即可。用于设置 SUID 的八进制数始终是 4。
linux:~$ ls -l test2.txt
-rwxrw-rw- 1 linuxhandbook linuxhandbook 0 Apr 12 17:53 test2.txt
linux:~$ chmod 4766 test2.txt
linux:~$ ls -l test2.txt
-rwsrw-rw- 1 linuxhandbook linuxhandbook 0 Apr 12 17:54 test2.txt
How to remove SUID?
You can use either the symbolic mode in chmod command like this:
你可以像下面这样,在 chmod 命令中使用符号模式来移除 SUID 位:
chmod u-s test.txt
Or, use the numeric way with 0 instead of 4 with the permissions you want to set:
或者,使用数字方式,在你想要设置的权限中,用 0 代替 4:
chmod 0766 test2.txt
Difference between small s and capital S as SUID bit
Remember the definition of SUID? It allows a file to be executed with the same permissions as the owner of the file.
还记得 SUID 的定义吗?它允许一个文件以与文件所有者相同的权限来 执行。
But what if the file doesn’t have execute bit set in the first place? Like this:
但是如果文件一开始就没有设置执行位呢?就像这样:
linux:~$ ls -l test.txt
-rw-rw-rw- 1 linuxhandbook linuxhandbook 0 Apr 12 17:51 test.txt
If you set the SUID bit, it will show a capital S, not small s:
如果你设置了 SUID 位,它将显示大写的 S,而不是小写的 s:
linux:~$ chmod u+s test.txt
linux:~$ ls -l test.txt
-rwSrw-rw- 1 linuxhandbook linuxhandbook 0 Apr 12 17:52 test.txt
The S as SUID flag means there is an error that you should look into. You want the file to be executed with the same permission as the owner but there is no executable permission on the file. Which means that not even the owner is allowed to execute the file and if file cannot be executed, you won’t get the permission as the owner. This fails the entire point of setting the SUID bit.
当 SUID 标志显示为 S 时,意味着存在一个你需要检查的错误。你希望文件以与所有者相同的权限来执行,但该文件却没有可执行权限。这意味着即使是文件所有者也不被允许执行该文件,并且如果文件无法执行,你就无法获得与所有者相同的权限。这就使得设置 SUID 位的意义完全丧失了。
How to find all files with SUID set?
If you want to search files with this permission, use find command in the terminal with option -perm.
如果你想要搜索具有这种权限的文件,可以在终端中使用带有 -perm 选项的 find 命令。
find / -perm /4000
What is SGID?
SGID is similar to SUID. With the SGID bit set, any user executing the file will have same permissions as the group owner of the file.
SGID 与 SUID 类似。当设置了 SGID 位时,任何执行该文件的用户都将拥有与文件所属组所有者相同的权限。
It’s benefit is in handling the directory. When SGID permission is applied to a directory, all sub directories and files created inside this directory will get the same group ownership as main directory (not the group ownership of the user that created the files and directories).
它的好处体现在处理目录方面。当将 SGID 权限应用于一个目录时,在该目录中创建的所有子目录和文件都将获得与主目录相同的组所有权(而不是创建这些文件和目录的用户所属的组所有权)。

Open your terminal and check the permission on the file /var/local:
打开你的终端,并检查 /var/local 文件的权限:
linux:~$ ls -ld /var/local
drwxrwsr-x 1 root staff 512 Apr 24 2018 /var/local
This folder /var/local has the letter s on the same place you expect to see x or - for group permissions.
这个 /var/local 文件夹,在组权限位中,你期望看到 x 或 - 的位置上出现了字母 s。
A practical example of SGID is with Samba server for sharing files on your local network. It’s guaranteed that all new files will not lose the permissions desired, no matter who created it.
SGID 的一个实际应用例子是在 Samba 服务器 上用于在本地网络中共享文件。这样可以保证,无论由谁创建,所有新文件都不会丢失所需的权限。
How to set SGID?
You can set the SGID bit in symbolic mode like this:
你可以像下面这样在符号模式下设置 SGID 位:
chmod g+s directory_name
Here’s an example: 下面是一个示例:
linux:~$ ls -ld folder/
drwxrwxr-x 2 linuxhandbook linuxhandbook 4096 Apr 12 19:32 folder/
linux:~$ chmod g+s folder
linux:~$ ls -ld folder/
drwxrwsr-x 2 linuxhandbook linuxhandbook 4096 Apr 12 19:32 folder/
You may also use the numeric way. You just need to add a fourth digit to the normal permissions. The octal number used to SGID is always 2.
你也可以使用数字方式。你只需要在常规权限的基础上添加第四位数字即可。用于设置 SGID 的八进制数始终是 2。
linux:~$ ls -ld folder2/
drwxrwxr-x 2 linuxhandbook linuxhandbook 4096 Apr 12 19:33 folder2/
linux:~$ chmod 2775 folder2
linux:~$ ls -ld folder2/
drwxrwsr-x 2 linuxhandbook linuxhandbook 4096 Apr 12 19:33 folder2/
How to remove SGID bit?
Just use the -s instead of +s like this:
只需像下面这样,使用 -s 代替 +s 即可:
chmod g-s folder
Removing SGID is the same as removing SGID. Use the additional 0 before the permissions you want to set:
移除 SGID 位的方法与移除 SUID 位类似。在你想要设置的权限前面加上 0 即可:
chmod 0755 folder
How to find files with SGID set in Linux
To find all the files with SGID bit set, use this command:
要在 Linux 中查找所有设置了 SGID 位的文件,可以使用以下命令:
find . -perm /2000
What is a Sticky Bit?
什么是粘滞位
The sticky bit works on the directory. With sticky bit set on a directory, all the files in the directory can only be deleted or renamed by the file owners only or the root.
粘滞位作用于目录。当在一个目录上设置了粘滞位时,该目录中的所有文件只能由文件所有者或 root 用户删除或重命名。

This is typically used in the /tmp directory that works as the trash can of temporary files.
这通常应用于 /tmp 目录,该目录就像是临时文件的垃圾桶。
linux:~$ ls -ld /tmp
drwxrwxrwt 1 root root 512 Apr 12 13:24 /tmp
As you can see, the folder /tmp, has the letter t on the same place we expect to see x or – for others permissions. This means that a user (except root) cannot delete the temporary files created by other users in the /tmp directory.
如你所见,/tmp 文件夹在其他用户权限位中,我们期望看到 x 或 – 的位置上出现了字母 t。这意味着除了 root 用户之外,其他用户不能删除在 /tmp 目录中由其他用户创建的临时文件。
How to set the sticky bit?
如何设置粘滞位?
As always, you can use both symbolic and numeric mode to set the sticky bit in Linux.
与往常一样,在 Linux 中你可以使用符号模式和数字模式来设置粘滞位。
chmod +t my_dir
Here’s an example:
下面是一个示例:
linux:~$ ls -ld my_dir/
drwxrwxr-x 2 linuxhandbook linuxhandbook 4096 Apr 12 19:54 my_dir/
linux:~$ chmod +t my_dir/
linux:~$ ls -ld my_dir/
drwxrwxr-t 2 linuxhandbook linuxhandbook 4096 Apr 12 19:54 my_dir/
The numeric way is to add a fourth digit to the normal permissions. The octal number used for sticky bit is always 1.
数字方式是在常规权限上添加第四位数字。用于设置粘滞位的八进制数始终是 1。
linux:~$ ls -ld my_dir/
drwxrwxr-x 2 linuxhandbook linuxhandbook 4096 Apr 12 19:55 my_dir/
linux:~$ chmod 1775 tmp2/
linux:~$ ls -ld tmp2/
drwxrwxr-t 2 linuxhandbook linuxhandbook 4096 Apr 12 19:55 my_dir/
How to remove the sticky bit:
如何去除粘滞位:
You can use the symbolic mode:
你可以使用符号模式:
chmod -t my_dir
Or the numeric mode with 0 before the regular permissions:
或者在常规权限前加上 0 的数字模式:
chmod 0775 tmp2
How to find files with sticky bit set in Linux
如何在 Linux 中查找设置了粘滞位的文件
This command will return all files/directories in with sticky bit set:
这个命令将返回所有设置了粘滞位的文件/目录:
linux:~$ find. -perm /1000
If the directory doesn’t have the execute permission set for all, setting a sticky bit will result in showing T instead of t. An indication that things are not entirely correct with the sticky bit.
如果该目录没有为所有用户设置执行权限,设置粘滞位将会显示大写的 T 而不是小写的 t。这表明粘滞位的设置存在一些不正确的地方。
Conclusion 结论
I’ll put this picture here to recall what you have just learned:
我把这张图片放在这里,以便你回顾刚刚学到的内容:

This flexibility to manage folders, files and all their permissions are so important in the daily work of a sysadmin. You could see that all those special permissions are not so difficult to understand but they must be used with utmost caution.
这种管理文件夹、文件及其所有权限的灵活性在系统管理员的日常工作中是非常重要的。你可以看到,所有这些特殊权限并不是很难理解,但在使用时必须极其谨慎。
Linux permissions: SUID, SGID, and sticky bit
October 15, 2020 Tyler Carrigan
Linux permissions are a concept that every intimately familiar with early user becomes on in their development. We need to execute scripts, modify files, and run processes in order to administer systems effectively, but what happens when we see Permission denied? Do you know why we see this message? If you know the cause of the problem, do you know how to implement the solution?
在开发过程中,每个用户很早就会深入了解 Linux 权限这一概念。为了有效地管理系统,我们需要执行脚本、修改文件和运行进程。但当我们看到 “Permission denied”(权限被拒绝)时会怎样呢?你知道为什么会看到这个消息吗?如果你知道问题的原因,你知道如何实施解决方案吗?
I will give a quick explanation of the various ways to calculate permissions, and then we will focus on the special permissions within Linux.
我将快速解释计算权限的各种方法,然后我们将重点关注 Linux 中的特殊权限。
The TL;DR[.](https://www.howtogeek.com/435266/what-does-tldr-mean-and-how-do-you-use-it/#:~:text=TLDR (or TL%3BDR) is a common internet acronym,and TLDR is no exception.) is that there are two main ways of assigning permissions.
简而言之(TL;DR),有两种主要的权限分配方法。
TLDR(或 TL;DR)是互联网上常见的 “Too Long; Didn’t Read,太长;不读。”
从表面上看,这句话似乎很容易理解。但是单词和短语会根据上下文而变化,TLDR 也不例外。
Symbolic method
符号方法
The symbolic method uses the following syntax:
符号方法使用以下语法:
[tcarrigan@server ~]$ chmod WhoWhatWhich file | directory
Where:
- Who- represents identities: u,g,o,a (user, group, other, all)
- What- represents actions: +, -, = (add, remove, set exact)
- Which- represents access levels: r, w, x (read, write, execute)
其中:
- Who- 表示身份:u, g, o, a(用户、组、其他、所有)
- What- 表示操作:+, -, =(添加、移除、精确设置)
- Which- 表示访问级别:r, w, x(读取、写入、执行)
An example of this is if I want to add the read and write permissions to a file named test.txt for user and group, I use the following command:
例如,如果我想为名为 test.txt 的文件的 用户 和 组 添加 读取 和 写入 权限,我使用以下命令:
[tcarrigan@server ~]$ chmod ug+rw test.txt
Full disclosure, this is not my preferred method of assigning permissions, and if you would like more information around this method, I recommend your nearest search engine.
坦白说,这不是我首选的权限分配方法。如果你想了解更多关于这种方法的信息,我建议你使用搜索引擎。
Numeric method
数字方法
The numeric method is, in my experience, the best way to learn and practice permissions. It is based on the following syntax:
根据我的经验,数字方法是学习和实践权限的最佳方式。它基于以下语法:
[tcarrigan@server ~]$ chmod ### file | directory
Here, from left to right, the character # represents an access level. There are three access levels—user, group, and others. To determine what each digit is, we use the following:
这里,从左到右,字符 # 表示一个访问级别。有三个访问级别 —— 用户、组和其他。要确定每个数字的值,我们使用以下规则:
-
Start at 0
-
If the read permission should be set, add 4
-
If the write permission should be set, add 2
-
If the execute permission should be set, add 1
-
从 0 开始
-
如果应设置 读取 权限,则加 4
-
如果应设置 写入 权限,则加 2
-
如果应设置 执行 权限,则加 1
This is calculated on a per access level basis. Let’s interpret this permissions example:
这是按每个访问级别进行计算的。让我们来解读这个权限示例:
-rw-r-x---
The permissions are represented as 650. How did I arrive at those numbers?
这些权限用 650 表示。我是如何得出这些数字的呢?
-
The user’s permissions are:rw- or 4+2=6
-
The group’s permissions are:r-x or 4+1=5
-
The others’s permissions are:— or 0
-
用户的权限是:rw- 即 4 + 2 = 6
-
组的权限是:r-x 即 4 + 1 = 5
-
其他的权限是:— 即 0
To put this into the command syntax, it looks like this:
将其应用到命令语法中,如下所示:
[tcarrigan@server ~]$ chmod 650 test.txt
Now that you understand the basics of permission calculation in Linux, let’s look at the special permissions included in the OS.
现在你已经了解了 Linux 中权限计算的基础知识,让我们来看看操作系统中包含的 特殊权限。
Special permission explained
特殊权限解释
Special permissions make up a fourth access level in addition to user,group, and other. Special permissions allow for additional privileges over the standard permission sets (as the name suggests). There is a special permission option for each access level discussed previously. Let’s take a look at each one individually, beginning with Set UID:
除了用户、组和其他之外,特殊权限构成了第四个访问级别。特殊权限允许在标准权限集之上拥有额外的特权(正如其名称所示)。对于前面讨论的每个访问级别,都有一个特殊权限选项。让我们逐个来看,从设置用户 ID(Set UID)开始:
user + s (pecial)
用户 + s(特殊)
Commonly noted as SUID, the special permission for the user access level has a single function: A file with SUID always executes as the user who owns the file, regardless of the user passing the command. If the file owner doesn’t have execute permissions, then use an uppercaseShere.
通常记为 SUID,用户访问级别的特殊权限只有一个功能:具有 SUID 的文件总是以文件所有者的身份执行,无论传递命令的用户是谁。如果文件所有者没有执行权限,则在此处使用大写的 S。
Now, to see this in a practical light, let’s look at the /usr/bin/passwd command. This command, by default, has the SUID permission set:
现在,为了更直观地了解这一点,让我们看看 /usr/bin/passwd 命令。默认情况下,此命令设置了 SUID 权限:
[tcarrigan@server ~]$ ls -l /usr/bin/passwd
-rwsr-xr-x. 1 root root 33544 Dec 13 2019 /usr/bin/passwd
Note theswherexwould usually indicate execute permissions for the user.
注意,在通常用 x 表示用户执行权限的位置出现了 s。
group + s (pecial)
组 + s(特殊)
Commonly noted as SGID, this special permission has a couple of functions:
通常记为 SGID,这个特殊权限有几个功能:
-
If set on a file, it allows the file to be executed as the group that owns the file (similar to SUID)
-
If set on a directory, any files created in the directory will have their group ownership set to that of the directory owner
-
如果设置在文件上,它允许文件以文件所属组的身份执行(类似于 SUID)
-
如果设置在目录上,在该目录中创建的任何文件的组所有权将设置为目录所有者的组
[tcarrigan@server article_submissions]$ ls -l
total 0
drwxrws---. 2 tcarrigan tcarrigan 69 Apr 7 11:31 my_articles
This permission set is noted by a lowercase s where the x would normally indicate execute privileges for the group. It is also especially useful for directories that are often used in collaborative efforts between members of a group. Any member of the group can access any new file. This applies to the execution of files, as well.SGID is very powerful when utilized properly.
这个权限集用小写的 s 表示,在通常用 x 表示组的执行权限的位置。对于经常用于组内成员协作的目录来说,它特别有用。组内的任何成员都可以访问任何新文件。这也适用于文件的执行。如果使用得当,SGID 非常强大。
As noted previously forSUID, if the owning group does not have execute permissions, then an uppercase S is used.
正如前面提到的 SUID,如果所属组没有执行权限,则使用大写的S。
other + t (sticky)
其他 + t(粘性位)
The last special permission has been dubbed the “sticky bit”. This permission does not affect individual files. However, at the directory level, it restricts file deletion. Only the owner (and root) of a file can remove the file within that directory. A common example of this is the /tmp directory:
最后一个特殊权限被称为 “粘性位”。这个权限不会影响单个文件。然而,在目录级别,它会限制文件的删除。只有文件的所有者(和 root 用户)可以在该目录中删除文件。一个常见的例子是 /tmp 目录:
[tcarrigan@server article_submissions]$ ls -ld /tmp/
drwxrwxrwt. 15 root root 4096 Sep 22 15:28 /tmp/
The permission set is noted by the lowercase t, where the x would normally indicate the execute privilege.
这个权限集用小写的 t 表示,在通常用 x 表示执行权限的位置。
Setting special permissions
设置特殊权限
To set special permissions on a file or directory, you can utilize either of the two methods outlined for standard permissions above: Symbolic or numerical.
要为文件或目录设置特殊权限,你可以使用上述标准权限设置方法中的任意一种:符号方法或数字方法。
Let’s assume that we want to set SGID on the directory community_content.
假设我们想为目录 community_content 设置 SGID 权限。
To do this using the symbolic method, we do the following:
使用符号方法,我们可以这样做:
[tcarrigan@server article_submissions]$ chmod g+s community_content/
Using the numerical method, we need to pass a fourth, preceding digit in our chmod command. The digit used is calculated similarly to the standard permission digits:
使用数字方法,我们需要在 chmod 命令中传递一个前置的第四位数字。这个数字的计算方法与标准权限数字类似:
- Start at 0
- SUID = 4
- SGID = 2
- Sticky = 1
The syntax is:
语法如下:
[tcarrigan@server ~]$ chmod X### file | directory
Where X is the special permissions digit.
其中 X 是特殊权限数字。
Here is the command to set SGID on community_content using the numerical method:
以下是使用数字方法为 community_content 设置 SGID 权限的命令:
[tcarrigan@server article_submissions]$ chmod 2770 community_content/
[tcarrigan@server article_submissions]$ ls -ld community_content/
drwxrws---. 2 tcarrigan tcarrigan 113 Apr 7 11:32 community_content/
Summary
总结
In closing, permissions are fundamentally important to being an effective Linux administrator. There are two defined ways to set permissions using the chmod command: Symbolic and numerical.
总之,对于成为一名高效的 Linux 管理员来说,权限至关重要。使用 chmod 命令设置权限有两种明确的方法:符号方法和数字方法。
We examined the syntax and calculations required for both methods. We also considered the special permissions and their role in the system. Now that you understand permissions and the underlying concepts, you can solve the ever-annoying Permission denied error when it tries to impede your work.
我们研究了这两种方法所需的语法和计算。我们还考虑了特殊权限及其在系统中的作用。现在你已经理解了权限和相关的底层概念,当恼人的 “Permission denied” 错误试图阻碍你的工作时,你就可以解决它了。
Linux 一文带你彻底搞懂特殊权限位 SUID,SGID,Sticky
大雷编程 于 2022-01-08 21:42:32 发布
SUID
在 Linux 系统中,存在 9 位基本权限位。然而,除了这 9 位基础权限外,还有额外 3 位权限位,总计 12 位权限。这额外的 3 位权限分别为:SUID、SGID、Sticky。
SUID(Set User ID)位通过S字标识。- 它存在于基本权限的用户权限位
x权限对应的位置。 - 若用户权限位对应的
x权限位上有x权限,则SUID用小写s标识。 SUID的s对应数字权限位 4。- 完整权限用八进制数 4000 表示。
6.设置数字权限示例:

7.取消 SUID 权限:- 数字取消:
chmod 644 1.txt - 字符取消:
chmod u-s 1.txt

- 数字取消:
为什么会有 SUID?
以普通用户修改密码为例。
- 修改密码的
passwd命令实际上是修改了/etc/shadow文件。
[dada@dada /]$ ls -l /etc/shadow
---------- 1 root root 1419 Dec 24 20:41 /etc/shadow
从传统权限分析,dada 作为其他用户,对 /etc/shadow 的修改权限是 ---,即没有权限修改。但实际上普通用户却可以修改密码。
SUID的特殊作用在于可以绕过基础权限体系,基于二进制命令对原本没有权限的文件进行修改。- 当给一个命令设置
SUID后,所有使用这个命令的用户都拥有该命令所属用户的权限。 - 例如,
dada用户按基础权限无法修改密码,但由于passwd命令设置了SUID,dada用户在执行该命令时就拥有了passwd命令所属用户(即root用户)的权限,在修改过程中是以root权限进行操作。

SUID 核心小结
SUID功能仅针对二进制命令或程序,不能用于shell等类似脚本文件。- 在用户或属主对应的前三位权限的
x位上,如果出现s(或S),则表示具有SUID权限。 SUID的作用是让普通用户在执行设置了SUID位的命令或程序时,拥有与该命令所属主(一般为root管理员)相同的身份和权限(默认情况)。- 二进制命令程序需要具备可执行权限
x,否则会提示Permission denied。 SUID对应的身份和权限仅在程序执行过程中有效。SUID是一个具有一定危险性的功能,对系统安全存在威胁,企业用户授权时建议使用sudo替代SUID,切勿对危险命令(如rm命令)设置SUID。
SGID
- 对于二进制命令或程序而言,
SGID的功能与SUID基本相似,唯一的区别在于SUID使执行者获得命令所属用户的身份和权限,而SGID使执行者获得命令所属用户组的身份和权限。 - 与
SUID不同,SGID既可以针对文件设置,也可以针对目录设置。 SGID的权限是针对用户组权限位的。- 对于文件,
SGID功能如下:- 二进制命令或程序同样需要可执行权限
x配合。 - 执行命令的任意用户在该命令程序执行期间可获得其所属组的身份和权限。
- 以
locate命令为例,它通过读取/var/lib/mlocate/mlocate.db查询命令二进制文件位置,该文件对于其他用户的权限是---,按常理其他用户无法使用locate命令,但实际可以使用,原因是locate被设置了SGID。


- 二进制命令或程序同样需要可执行权限
粘滞位 Sticky Bit (SBit)
粘滞位的功能在当前使用场景较少。例如 /tmp 目录,它作为整个系统用户的临时文件存放地,该目录开放了所有权限,同时设置了粘滞位。在此情况下,除了属主和 root 用户有权限删除该目录下的文件,其他用户无法删除。粘滞位一般用于共享文件场景,虽提供了便利,但也带来一定安全隐患,在生产环境中通常禁止设置粘滞位。
特殊权限位说明表格
| 类别 | SUID | SGID | Sticky |
|---|---|---|---|
| 字符标识 | S | S | T |
| 占据位置 | 基本权限前 3 位的 x 位 | 基本权限中 3 位的 x 位 | 基本权限后 3 位的 x 位 |
| 基本权限位 x | s | s | t |
| 数字表示 | 4 | 2 | 1 |
| 八进制表示 | 4000 | 2000 | 1000 |
| 特殊权限作用 | 针对用户位 | 针对用户组 | 其他用户 |
注表(原文没有,新增)
| 类别 | SUID (Set User ID) | SGID (Set Group ID) | SBIT (Sticky Bit) |
|---|---|---|---|
| 字符标识 | s (用户位 x 设为 s) | s (用户组位 x 设为 s) | t (其他用户位 x 设为 t) |
| 占据位置 | 用户位权限 (rwx) 的执行位 (x) | 用户组权限 (rwx) 的执行位 (x) | 其他用户权限 (rwx) 的执行位 (x) |
基本权限位 x 上的表现 | s (如果有执行权限), S (如果没有执行权限) | s (如果有执行权限), S (如果没有执行权限) | t (如果有执行权限),T (如果没有执行权限) |
| 数字表示 | 4 | 2 | 1 |
| 八进制表示 | 4000 | 2000 | 1000 |
| 作用对象 | 执行程序的用户 | 执行程序的组 | 目录下的文件和子目录 |
| 具体作用 | 使执行程序的用户临时获得文件所有者的权限。 | 赋予执行程序的用户临时获得文件所属组的权限,并且新建的文件或目录会继承该目录的所属组。 | 限制只有文件所有者、目录所有者和 root 用户才能删除或重命名目录中的文件。 |
| 适用对象 | 可执行文件 | 可执行文件、目录 | 目录 |
注表说明:
-
大写的
S和T代表没有执行权限。 -
SUID(Set User ID):当一个可执行文件设置了 SUID 位,用户执行该文件时,进程将以文件所有者的身份运行,而不是执行用户的身份。 这通常用于需要提升权限才能执行特定操作的程序,例如
passwd命令。 -
SGID(Set Group ID):当一个可执行文件设置了 SGID 位,用户执行该文件时,进程将以文件所属组的身份运行。 如果 SGID 位设置在一个目录上,那么在该目录下创建的新文件和目录,其所属组将自动设置为该目录的所属组,而不是创建者的所属组。 这对于协作开发非常有用。
-
Sticky Bit:当一个目录设置了 Sticky Bit,只有文件所有者、目录所有者和 root 用户才能删除或重命名该目录下的文件。 这通常用于共享目录,如
/tmp,以防止用户删除其他用户的文件。
Linux 的特殊权限(Suid、Sgid、Sbit 详解)
yu.deqiang 已于 2022-05-17 12:22:37 修改
一、Linux 系统特殊权限概述
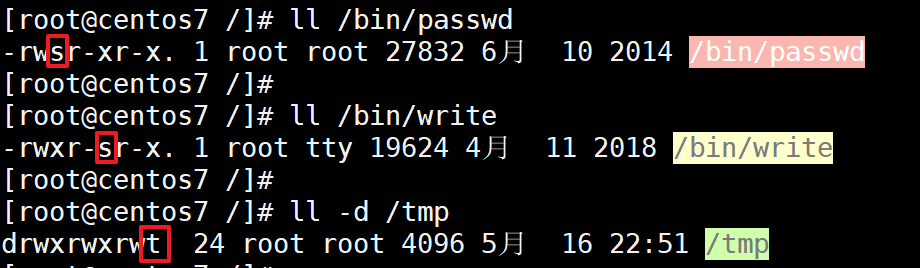
在 Linux 系统中,我们熟知普通权限有 r(读)、w(写)、x(执行)这三种。然而,在查看一些文件时,会发现存在其他权限字母,例如 s、t 等。
以查看以下三个文件的权限为例,不同用户权限位上呈现出不同字母。
二、suid
1、相关问题解析
在介绍 suid 权限前,需先明晰以下问题:
- 普通用户能否修改密码?
普通用户可以修改自身密码。 - /etc/shadow 文件的作用是什么?
/etc/shadow 文件用于存储用户密码。 - /etc/shadow 文件的权限如何?
其权限为----------. 1 root root 1627 5 月 17 00:10 /etc/shadow。 - 普通用户能否修改 /etc/shadow 文件?
普通用户无法修改 /etc/shadow 文件,因为该文件对普通用户无任何权限,既不能读取也不能写入。 - 普通用户为何可以修改密码?
- 普通用户修改密码借助了 passwd 命令。
- passwd 命令的属主权限位原本的 x 权限变为了 s 权限。
- s 权限处于属主权限位时,称为 SetUID 权限,简称 SUID。
- 作用原理:当执行具有 SUID 权限的文件或命令时,会以该文件的属主身份执行此命令。
2、SUID 作用详解
概念:当一个命令文件的属主权限位上的 x 变为 s 时,其他用户执行该命令文件,将以该命令文件的属主用户身份运行。
-
若属主权限位有执行权限,显示为小写 s;
-
若属主权限位无执行权限,则显示为大写 S。
[root@centos7 ~]# useradd hello   #创建一个用户
[root@centos7 ~]# passwd hello    #设置用户密码
更改用户 hello 的密码 。
新的 密码:
重新输入新的 密码:
passwd:所有的身份验证令牌已经成功更新。
[root@centos7 ~]# ll /bin/passwd    #查看 passwd 命令权限
-rwsr-xr-x. 1 root root 27832 6 月 10 2014 /bin/passwd
[root@centos7 ~]# su hello     #切换到 hello 用户
[hello@centos7 root]$ passwd    #修改密码
更改用户 hello 的密码 。
为 hello 更改 STRESS 密码。
(当前)UNIX 密码:
新的 密码:
重新输入新的密码:
passwd:所有的身份验证令牌已经成功更新。   #可以成功修改
[hello@centos7 root]$ su root    #返回 root 用户
密码:
[root@centos7 ~]# chmod u-s /bin/passwd   #修改 passwd 的权限,去掉 suid 权限
[root@centos7 ~]# ll /bin/passwd
-rwxr-xr-x. 1 root root 27832 6 月 10 2014 /bin/passwd   #发现 s 变成了 x
[root@centos7 ~]# su hello   #再切换到 hello 用户
[hello@centos7 root]$ passwd   #修改密码
更改用户 hello 的密码 。
为 hello 更改 STRESS 密码。
(当前)UNIX 密码:
新的 密码:
重新输入新的 密码:
passwd: 鉴定令牌操作错误    #密码无法进行修改
此时引入一个问题:若普通用户使用 passwd 命令时以 root 用户身份执行,那普通用户能否修改其他用户的密码?
答案是否定的。
因为在 passwd 命令中存在判断机制,执行 passwd 命令时会判断执行用户是 root 还是普通用户。
-
若是普通用户,只能直接使用 passwd 命令,不可添加参数;
-
若是 root 用户,则可在后面添加其他参数(参数即用户名)。
所以普通用户无法修改其他用户的密码。
3、授权 SUID
授权方式:
chmod   u+s     filename
chmod   4xxx    filename
实例:
[root@centos7 opt]# touch filename   #创建一个文件
[root@centos7 opt]# ll   #查看详细信息
总用量 0
-rw-r--r--. 1 root root 0 5 月 16 23:40 filename  #没有属主权限位没有执行权限
[root@centos7 opt]# chmod u+s filename   #在属主权限位上加上 s
[root@centos7 opt]# ll   #查看详细信息
总用量 0
-rwSr--r--. 1 root root 0 5 月 16 23:40 filename   #因为没有执行权限,所以就显示 (大写) S
[root@centos7 opt]# chmod u+x filename   #再添加执行权限
[root@centos7 opt]# ll   #查看
总用量 0
-rwsr--r--. 1 root root 0 5 月 16 23:40 filename   #大写 S 变为小写 s,增加了执行权限
或者以下方式:
[root@centos7 opt]# touch filename2  #创建一个文件
[root@centos7 opt]# ll   #查看信息
总用量 0
-rwsr--r--. 1 root root 0 5 月 16 23:40 filename
-rw-r--r--. 1 root root 0 5 月 16 23:46 filename2   #正常创建的权限:644
[root@centos7 opt]# chmod 4744 filename2   #增加 SUID 权限,并且增加属主的执行权限
[root@centos7 opt]# ll
总用量 0
-rwsr--r--. 1 root root 0 5 月 16 23:40 filename
-rwsr--r--. 1 root root 0 5 月 16 23:46 filename2   #属主中变成小写 s
4、SUID 总结
- 使普通用户对可执行的二进制文件,临时拥有二进制文件的属主权限。
- 若设置的二进制文件没有执行权限,SUID 的权限显示为 S(大写)。
- 特殊权限 suid 仅对二进制可执行程序有效,对其他文件或目录无效。
注意:suid 存在安全风险。若普通用户可使用属主用户的权限,那么普通用户执行对应命令文件时,可能任意查看或修改文件内容。例如修改了 /etc/sudoers 文件,普通用户将相当于超级用户的复制品。
三、Sgid
1、Sgid 作用详解
概念:Sgid 一般设置给目录,主要目的是防止其他用户删除其他用户创建的文件或目录。
若属组权限位有执行权限,显示为小写 s;若属组权限位无执行权限,则显示为大写 S。
实例:
[root@centos7 opt]# mkdir ydq   #创建目录
[root@centos7 opt]# ll
总用量 0
drwxr-xr-x. 2 root root 6 5 月 17 00:23 ydq   #查看权限
[root@centos7 opt]# chmod 777 ydq   #查看权限为 777
[root@centos7 opt]# ll
总用量 0
drwxrwxrwx. 2 root root 6 5 月 17 00:23 ydq   #权限已修改
[root@centos7 opt]# cd ydq   #进入到 cd 目录
[root@centos7 ydq]# mkdir aaa  #创建 aaa 文件
[root@centos7 ydq]# ll
总用量 0
drwxr-xr-x. 2 root root 6 5 月 17 00:23 aaa  #可以看到 aaa 文件的属主和数组都是 root
[root@centos7 ydq]# su hello    #切换 hello 用户
[hello@centos7 ydq]$ mkdir bbb   #创建 bbb 目录
[hello@centos7 ydq]$ ll
总用量 0
drwxr-xr-x. 2 root  root  6 5 月 17 00:23 aaa
drwxrwxr-x. 2 hello hello 6 5 月 17 00:24 bbb  #可以看到 bbb 文件的属主和属组都是 hello 文件
[hello@centos7 ydq]$ exit  #返回 root 用户
exit
[root@centos7 ydq]# cd ../   #返回上一级
[root@centos7 opt]# chmod g+s ydq   #将 ydq 目录增加 sgid
[root@centos7 opt]# ll
总用量 0
drwxrwsrwx. 4 root root 28 5 月 17 00:24 ydq   #属组的权限已增加了 s
[root@centos7 opt]# cd ydq   #进入 ydq 目录
[root@centos7 ydq]# su hello   #切换 hello 用户
[hello@centos7 ydq]$ mkdir ccc    #创建目录 ccc
[hello@centos7 ydq]$ ll
总用量 0
drwxr-xr-x. 2 root  root  6 5 月 17 00:23 aaa
drwxrwxr-x. 2 hello hello 6 5 月 17 00:24 bbb
drwxrwsr-x. 2 hello root  6 5 月 17 00:25 ccc   #ccc 的属组用户已变为跟 ydq 目录一致的用户
2、授权 Sgid
授权方式:
chmod   g+s     filename
chmod   2xxx    filename
3、Sgid 总结
- 针对用户组权限位进行修改,用户创建的目录或文件所属组与该目录的所属组一致。
- 当某个目录设置了 Sgid 后,在该目录中新建的文件不再是创建该文件的默认所属组。
- 使用 Sgid 可使多个用户共享一个目录的所有文件变得更为简便。
四、sticky bit(粘滞位)
1、sticky bit 详解
若其他用户权限位有执行权限,显示为小写 t;若其他用户权限位无执行权限,则显示为大写 T。
概念:sticky bit 仅作用于目录。当一个目录未设置 sticky bit 权限,且该目录对所有用户都有读、写、执行权限时,普通用户在该目录下创建的文件或目录可被其他用户删除。
[root@centos7 opt]# mkdir yude    #创建目录 yude
[root@centos7 opt]# ll   #查看权限
总用量 0
drwxr-xr-x. 2 root root 6 5 月 17 09:26 yude   #权限为 755
[root@centos7 opt]# chmod 777 yude   #修改权限为 777
[root@centos7 opt]# ll
总用量 0
drwxrwxrwx. 2 root root 6 5 月 17 09:26 yude  #权限为 777
[root@centos7 opt]# cd yude     #进入所创建的目录
[root@centos7 yude]# su hello     #切换到 hello 用户
[hello@centos7 yude]$ touch aaa   在目录下创建文件 aaa
[hello@centos7 yude]$ ll
总用量 0
-rw-rw-r--. 1 hello hello 0 5 月 17 09:26 aaa   #文件 aaa 创建成功
[hello@centos7 yude]$ exit    #返回上一级目录
exit
[root@centos7 yude]# su ydq   #切换到 ydq 用户
[ydq@centos7 yude]$ ll
总用量 0
-rw-rw-r--. 1 hello hello 0 5 月 17 09:26 aaa   #可以看到 hello 用户所创建文件 aaa
[ydq@centos7 yude]$ rm -rf ./aaa   #进行删除 aaa 文件
[ydq@centos7 yude]$ ll    #文件已被删除
总用量 0
概念:当一个目录设置了 sticky bit 权限时,普通用户在该目录下创建的文件或目录,仅能被该文件或目录的属主用户或 root 用户删除,其他用户无法删除别的用户创建的目录或文件。
[root@centos7 opt]# ll    #查看权限
总用量 0
drwxrwxrwx. 2 root root 6 5 月 17 09:27 yude   #权限为 777
[root@centos7 opt]# chmod o+t yude   #增加 sticky bit 权限
[root@centos7 opt]# ll   #查看权限
总用量 0
drwxrwxrwt. 2 root root 6 5 月 17 09:27 yude   #其它用户上权限多了 sticky bit 权限
[root@centos7 opt]# cd yude  #进入到 yude 目录下面
[root@centos7 yude]# su hello    #切换 hello 用户
[hello@centos7 yude]$ touch bbb    #创建一个文件
[hello@centos7 yude]$ ll    #查看文件,文件正常创建
总用量 0
-rw-rw-r--. 1 hello hello 0 5 月 17 09:39 bbb
[hello@centos7 yude]$ exit   #退出当前用户
exit
[root@centos7 yude]# su ydq    #切换到 ydq 用户
[ydq@centos7 yude]$ ll
总用量 0
-rw-rw-r--. 1 hello hello 0 5 月 17 09:39 bbb   #可以查看到 hello 用户创建的文件
[ydq@centos7 yude]$ rm -rf ./bbb   #进行删除 bbb 文件
rm: 无法删除 "./bbb": 不允许的操作     #无法进行删除
2、授权 Sticky bit
授权方式:
chmod   o+t     filename
chmod   1xxx    filename
3、Sticky bit 总结
- 使多个用户都具有写权限,且每个用户仅能删除自己的文件。
- 粘滞位体现在 others 的 x 位,有执行权限时用小写 t 表示,无执行权限时用大写 T 表示。
- 一个目录即便权限为 “777”,若设置了粘滞位,除目录的属主和 “root” 用户有权限删除外,其他用户均不允许删除。
五、总结
1、SUID
主要针对命令或二进制文件。设置了 SUID 后,其他用户执行该文件时,将以该文件的属主权限执行。
2、SGID
主要针对目录授权。设置了 SGID 的共享目录,其他任意用户在该目录下创建的文件或目录,其属组用户均与父目录相同。
3、SBIT(粘滞位)
主要针对目录。设置了 SBIT 后,即便该目录对所有用户都有写权限,除 root 用户外,其他用户仅能对自己创建的文件进行删除或移动操作。
权限对应数值总结:
| 权限标识 | 权限含义 | 对应数值 |
|---|---|---|
| r | 读 | 4 |
| w | 写 | 2 |
| x | 执行 | 1 |
| Suid | 特殊用户权限 | 4000 |
| Sgid | 特殊组权限 | 2000 |
| Sbit | 粘性位权限 | 1000 |
Linux 中文件特殊权限 suid、sgid、sticky
MssGuo 已于 2022-09-10 23:58:20 修改
环境:centos 7.9
Linux 文件普通权限 rwx
在 Linux 系统中,文件的普通权限通常为 rwx,对应的数字表示为 421。
此外,文件还有三种特殊权限,这便是本文要介绍的内容。
Linux 文件特殊权限 suid、sgid、sticky
Linux 文件的三种特殊权限分别为 suid 权限、sgid 权限和 sticky 权限。其中,suid 权限作用于文件属主,sgid 权限作用于属组,sticky 权限作用于 other(其他用户)。
suid 权限
1.作用:赋予普通用户临时拥有该文件属主的执行权限。suid 权限仅适用于二进制可执行文件(命令),且只能设置在属主位置。
2.表示方法:suid 权限用 s 表示,增加权限使用 u+s,移除权限使用 u-s。
3.数字表示:0 表示去除 suid 权限,4 表示添加 suid 权限,在原权限的数字表达形式开头加 0 或 4。例如,0755 表示移除 suid 权限,4755 表示添加 suid 权限。
4.示例:普通用户执行 passwd 命令时,需要修改 /etc/shadow 等文件。但通过 ll /etc/shadow 查看发现该文件无任何权限,即普通用户对 /etc/shadow 文件没有写入权限。实际上,普通用户能成功修改自己的密码,是因为临时拥有了 root 权限(root 超级管理员可对任何文件进行修改),这正是 suid 权限的作用。suid 权限只能应用在二进制可执行文件上。
[root@localhost ~]# ll /etc/shadow										# 这个文件没有任何权限,只有 root 超级管理员才能修改
---------- 1 root root 1575 Oct  5 22:48 /etc/shadow
[root@localhost ~]# ll /usr/bin/passwd
-rwsr-xr-x. 1 root root 27832 Jun 10  2014 /usr/bin/passwd				# 有个 suid 权限,这就说明了普通用户执行 passwd 命令时临时提权到 root 权限了,所以才有 root 权限才写到 shadow 文件
去除 suid 权限
suid 权限可通过数字或字母形式去除。若使用数字,0 表示去除权限,4 表示添加权限,在原权限的数字表达形式开头加 0 或 4,示例如下:
[root@localhost ~]# ll /bin/passwd 								# 查看 passwd 命令的权限,有 suid 权限
-rwsr-xr-x. 1 root root 27832 Jun 10  2014 /bin/passwd			# 查看 passwd 命令的权限,有 suid 权限
[root@localhost ~]# chmod 0755 /usr/bin/passwd					# 在原数字表达权限前加 0 就表示去除 suid 权限(命令等价于 chmod u-s /usr/bin/passwd)
[root@localhost ~]# ll /usr/bin/passwd							# 查看 passwd 命令的权限,没有了 suid 权限,但这时任何普通用户都修改不了密码,如前面介绍的那样,因为任何普通用户都对 shadow 文件没有写入权限
-rwxr-xr-x. 1 root root 27832 Jun 10  2014 /usr/bin/passwd
[root@localhost ~]#
增加 suid 权限
[root@localhost ~]# chmod 4755 /usr/bin/passwd					# 在原数字表达权限前加 4 就表示添加 suid 权限(命令等价于 chmod u+s /usr/bin/passwd)
[root@localhost ~]# ll  /usr/bin/passwd
-rwsr-xr-x. 1 root root 27832 Jun 10  2014 /usr/bin/passwd		#suid 权限已经添加成功,普通用户可以正常修改他们的密码
[root@localhost ~]#
sgid 权限
1.作用:sgid 权限通常应用于目录。当一个目录拥有 sgid 权限时,任何用户在该目录下创建的文件的属组都会继承该目录的属组。
2.表示方法:sgid 权限也用 s 表示,增加权限使用 g+s,移除权限使用 g-s。
3.数字表示:0 表示去除 sgid 权限,2 表示添加 sgid 权限,在原权限的数字表达形式开头加 0 或 2。例如,0755 表示移除 sgid 权限,2755 表示添加 sgid 权限。
增加 sgid 权限
演示示例如下:
[zhangsan@localhost ~]$ ll -d Test/
drwxrwxr-x 2 zhangsan nginx 6 Oct 13 20:44 Test/					# 查看目录的权限,都是普通权限,属主是 zhangsan,属组是 nginx
[zhangsan@localhost ~]$ touch Test/file1							# 创建一个 file1 文件
[zhangsan@localhost ~]$ ll Test/file1
-rw-rw-r-- 1 zhangsan zhangsan 0 Oct 13 20:47 Test/file1			#file1 的的属主属组都是 zhangsan
[zhangsan@localhost ~]$ rm -rf Test/file1 							# 先删除 file1
[zhangsan@localhost ~]$ chmod 2755 Test/							# 增加 sgid 权限
[zhangsan@localhost ~]$ ll -d Test/
drwxr-sr-x 2 zhangsan nginx 19 Oct 13 20:47 Test/					#sgid 权限已经增加了,属组位置上有了一个 s
[zhangsan@localhost ~]$ touch Test/file2							# 重新创建一个 file2 文件
[zhangsan@localhost ~]$ mkdir Test/test								# 也创建一个目录
[zhangsan@localhost ~]$ ll Test/									# 查看创建的文件和目录
total 0
-rw-rw-r-- 1 zhangsan nginx    0 Oct 13 20:59 file2					# 属组都与 Test 目录的属组一样,这是因为 Test 目录具有 sgid 权限
drwxrwsr-x 2 zhangsan nginx    6 Oct 13 20:59 test
[zhangsan@localhost ~]$
移除 sgid 权限
演示示例如下:
[zhangsan@localhost ~]$  chmod g-s Test/							# 使用字母形式移除 sgid 权限
[zhangsan@localhost ~]$ ll -d Test/
drwxr-xr-x 3 zhangsan nginx 44 Oct 13 20:59 Test/					#sgid 权限已被移除
[zhangsan@localhost ~]$
sticky 权限
1.作用:sticky 权限一般针对目录设置,其作用是仅允许该目录下文件的创建者删除自己创建的文件,不允许其他人删除文件(root 用户除外,因为 root 用户是超级管理员)。sticky 权限只能设置在 other 位置。
2.表示方法:sticky 权限用 t 表示,增加权限使用 o+t,移除权限使用 o-t。
3.数字表示:0 表示去除权限,1 表示添加权限,在原权限的数字表达形式开头加 0 或 1。例如,0755 表示移除 sticky 权限,1755 表示添加 sticky 权限。
4.演示示例:
[root@localhost /]# mkdir /test_tmp								# 创建目录
[root@localhost /]# chmod 777 test_tmp/							# 设置权限
[zhangsan@localhost /]$ ll test_tmp/-d							# 查看 test_tmp 的权限
drwxrwxrwx 2 root root 6 Oct  6 17:28 test_tmp/
[zhangsan@localhost test_tmp]$ echo "fsdsdsd" >> zhangsan.txt	# 张三用户登录并创建一个 zhangsan.txt 文件
[lisi@localhost test_tmp]$ echo "fsdsdsd" >> lisi.txt			# 李四用户登录并创建一个 lisi.txt 文件
[zhangsan@localhost test_tmp]$ rm -rf lisi.txt					# 张三用户删除李四的 lisi.txt 文件,正常删除
[lisi@localhost test_tmp]$ rm -rf  zhangsan.txt 				# 李四用户删除张三的 zhangsan.txt 文件,正常删除
以上的删除操作是不合理的,因为 test_tmp 的权限是 777 权限。因此,需要使用 sticky 权限来限制用户只能删除自己创建的文件,不能删除别人的文件。
[root@localhost /]$ ll tmp/-d									# 查看系统默认的 tmp 目录权限,发现 tmp 目录就有 sticky 权限
drwxrwxrwt. 12 root root 4096 Oct  6 17:37 tmp/
[zhangsan@localhost /]$ echo "fsdsdsd" >> zhangsan.txt			# 张三用户登录并在 tmp 目录创建一个 zhangsan.txt 文件
[lisi@localhost /]$ echo "fsdsdfdfdsd" >> lisi.txt				# 张三用户登录并在 tmp 目录创建一个 lisi.txt 文件
[zhangsan@localhost tmp]$ ll  zhangsan.txt lisi.txt 			# 查看我们创建的文件
-rw-rw-r-- 1 lisi     lisi     7 Oct  6 17:23 lisi.txt
-rw-rw-r-- 1 zhangsan zhangsan 9 Oct  6 17:25 zhangsan.txt
[zhangsan@localhost tmp]$ rm -rf lisi.txt						# 张三删除李四的 lisi.txt,权限报错,删除使用,这就是因为 tmp 目录的沾滞位权限 t 起的作用
rm: cannot remove ‘lisi.txt’: Operation not permitted
[lisi@localhost tmp]$ rm -rf zhangsan.txt						# 李四删除张三的 zhangsan.txt,权限报错,删除使用,这就是因为 tmp 目录的 sticky 权限起的作用
rm: cannot remove ‘zhangsan.txt	’: Operation not permitted
移除 sticky 权限
sticky 权限使用 t 表示,增加权限 o+t,移除权限 o-t。sticky 权限也可以使用数字形式表示,0 表示去除权限,1 表示添加权限,在原权限的数字表达形式开头加 0 或 1。演示示例如下:
[root@localhost /]# chmod -R o-t /test_tmp/						# 移除 sticky 权限,加 - R 表示对目录递归
[root@localhost /]# chmod -R 0777 /test_tmp/					# 移除 sticky 权限,加 - R 表示对目录递归
增加 sticky 权限
[root@localhost /]# chmod -R 1777 /test_tmp/					# 等价于 chmod -R o+t /test_tmp/, 加 - R 表示对目录递归
[root@localhost /]# ll -d test_tmp/
drwxrwxrwt 2 root root 6 Oct  6 17:28 test_tmp/
[root@localhost /]#
via:
-
What is SUID, GUID and Sticky Bit in Linux? How to Use Them? Sep 15, 2022 — Abhishek Prakash
https://linuxhandbook.com/suid-sgid-sticky-bit/ -
Linux permissions: SUID, SGID, and sticky bit
https://www.redhat.com/en/blog/suid-sgid-sticky-bit -
linux 一文带你彻底搞懂特殊权限位suid,sgid,sticky_suid位-优快云博客
https://blog.youkuaiyun.com/csdn_leidada/article/details/122223958 -
Linux 的特殊权限(Suid、Sgid、Sbit 详解)_linux特殊权限-优快云博客
https://blog.youkuaiyun.com/m0_57515995/article/details/124817049 -
Linux 中文件特殊权限 suid、sgid、sticky(有图详细讲解)-优快云博客
https://blog.youkuaiyun.com/MssGuo/article/details/120754324


 1456
1456

 被折叠的 条评论
为什么被折叠?
被折叠的 条评论
为什么被折叠?
 到【灌水乐园】发言


