


前言
go 开发中使用好工具可以极大方便规范化开发,最开始需要做到的就是规范和单测。
- 一般而言,使用习惯是一键 gofmt goimports 必用。go vet golangci-lint辅助检查语义并订正。
- 完成必要的基础用例,基于表格的单测 go test,如果涉及对外还需要使用gomonkey
在以上两点都完成后,才能说做好了基本的规范要求。
基础
# standard doc look up
go doc cmd/gofmt

# go版本更新
go get -u
brew upgrade go
格式与代码规范
// 基础格式更新
// gofmt,大部分的格式问题可以通过gofmt解决, gofmt 自动格式化代码,保证所有的 go 代码与官方推荐的格式保持一致,于是所有格式有关问题,都以 gofmt 的结果为准。
go fmt .
go help fmt

// 包含 fmt 不过会优化引用包格式,必须应用
// goimports ,此工具在 gofmt 的基础上增加了自动删除和引入包。
goimports -w .

// go vet ,vet工具可以帮我们静态分析我们的源码存在的各种问题,例如多余的代码,提前return的逻辑,struct的tag是否符合标准等。编译前先执行代码静态分析。
go vet .

// golint ,类似javascript中的jslint的工具,主要功能就是检测代码中不规范的地方。
// https://github.com/golangci/golangci-lint
golangci-lint run -c ~/.golangci.yaml .

golangci-lint version
golangci-lint --help
golangci-lint run .
golangci-lint run -c ~/.golangci.yaml $ProjectFileDir$/...
单测
base test
- 例子(实际使用可用ide 右键 goland test for function package)
go test -v
如 calc.go 的代码如下:
package main

func Add(a int, b int) int {
    return a + b
}

func Mul(a int, b int) int {
    return a * b
}
那么 calc_test.go 中的测试用例可以这么写:
package main

import "testing"

func TestAdd(t *testing.T) {
	if ans := Add(1, 2); ans != 3 {
		t.Errorf("1 + 2 expected be 3, but %d got", ans)
	}
	assert.Equal(t, add(1, 2), 3, "Add Error!")

	if ans := Add(-10, -20); ans != -30 {
		t.Errorf("-10 + -20 expected be -30, but %d got", ans)
	}
}
- 测试用例名称一般命名为
Test加上待测试的方法名。 - 测试用的参数有且只有一个,在这里是
t *testing.T。 - 基准测试(benchmark)的参数是
*testing.B,TestMain 的参数是*testing.M类型。
go test -v,-v 参数会显示每个用例的测试结果,另外 -cover 参数可以查看覆盖率。
如果只想运行其中的一个用例,例如 TestAdd,可以用 -run 参数指定,该参数支持通配符 *,和部分正则表达式,例如 ^、$。
$ go test -run TestAdd -v
=== RUN   TestAdd
--- PASS: TestAdd (0.00s)
PASS
ok      example 0.007s
setup 和 teardown
如果在同一个测试文件中,每一个测试用例运行前后的逻辑是相同的,一般会写在 setup 和 teardown 函数中。例如执行前需要实例化待测试的对象,如果这个对象比较复杂,很适合将这一部分逻辑提取出来;执行后,可能会做一些资源回收类的工作,例如关闭网络连接,释放文件等。标准库 testing 提供了这样的机制:
func setup() {
	fmt.Println("Before all tests")
}

func teardown() {
	fmt.Println("After all tests")
}

func Test1(t *testing.T) {
	fmt.Println("I'm test1")
}

func Test2(t *testing.T) {
	fmt.Println("I'm test2")
}

func TestMain(m *testing.M) {
	setup()
	code := m.Run()
	teardown()
	os.Exit(code)
}
- 在这个测试文件中,包含有2个测试用例,
Test1和Test2。 - 如果测试文件中包含函数
TestMain,那么生成的测试将调用 TestMain(m),而不是直接运行测试。 - 调用
m.Run()触发所有测试用例的执行,并使用os.Exit()处理返回的状态码,如果不为0,说明有用例失败。 - 因此可以在调用
m.Run()前后做一些额外的准备(setup)和回收(teardown)工作。
执行 go test,将会输出
$ go test
Before all tests
I'm test1
I'm test2
PASS
After all tests
ok      example 0.006s
come from https://geektutu.com/post/quick-go-test.html
go monkey
介绍
monkey是一个Go单元测试中十分常用的打桩工具,它在运行时通过汇编语言重写可执行文件,将目标函数或方法的实现跳转到桩实现,其原理类似于热补丁。
monkey库很强大,但是使用时需注意以下事项:
- monkey不支持内联函数,在测试的时候需要通过命令行参数
-gcflags=-l关闭Go语言的内联优化。 - monkey不是线程安全的,所以不要把它用到并发的单元测试中。
例子中所有的代码都在这:https://github.com/fishingfly/gomonkey_examples
执行单元测试:
注意:这里为防止内联优化添加了
-gcflags=-l参数。
go test -run=TestMyFunc -v -gcflags=-l
go test -gcflags=all=-l
可以使用convey
convey.Convey("case的名字", t, func() {
  具体测试case
  convey.So(...) //断言
})
mock方法和成员方法
// 方法patch
patchDeleteKey := gomonkey.ApplyMethod(reflect.TypeOf(&clients.RedisClientImpl{}), "DeleteKey",
		func(c *clients.RedisClientImpl, ctx context.Context, key string) (int, error) {
			return 1, nil
		})
	defer patchDeleteKey.Reset()

	patchConfig := gomonkey.ApplyFunc(config.GetJSON,
		func(key string, val interface{}) error {
			log.Error("lalalalala")
			return nil
		})
	defer patchConfig.Reset()

// 接口方法patch
	patchBatchGetAppInfo := gomonkey.ApplyMethod(reflect.TypeOf(&clients.GameClientImpl{}), "BatchGetAppInfo",
		func(c *clients.GameClientImpl, ctx context.Context, appids []string) (map[string]*pb.StAppInfoResult, error) {
			return map[string]*pb.StAppInfoResult{
				"11059723": &pb.StAppInfoResult{
					AppInfo: &pb.StAppInfo{
						Appid:    "11059307",
						Platform: &wrappers.Int32Value{Value: 0},
					},
				},
			}, nil
		})
	defer patchBatchGetAppInfo.Reset()

	gameManager := NewGameManager()
	ctx := context.TODO()
	req := &pb.GetGameHotListReq{
		PlatformId:     "1002",
		DevicePlatform: &wrappers.Int32Value{Value: 1},
	}
	result, err := gameManager.GetGameHotList(ctx, req, 3)
	assert.Equal(t, 6, len(result))
	assert.Nil(t, err)
mock全局变量 ApplyGlobalVar
// @param[in] target 全局变量的地址
// @param[in] double 全局变量的桩
func ApplyGlobalVar(target, double interface{}) *Patches
func (this *Patches) ApplyGlobalVar(target, double interface{}) *Patches
全局变量的mock很简单,直接看代码吧:
var num = 10

func TestApplyGlobalVar(t *testing.T) {
    Convey("TestApplyGlobalVar", t, func() {

        Convey("change", func() {
            patches := ApplyGlobalVar(&num, 150)
            defer patches.Reset()
            So(num, ShouldEqual, 150)
        })

        Convey("recover", func() {
            So(num, ShouldEqual, 10)
        })
    })
}
mock函数变量 ApplyFuncVar
// @param[in] target 函数变量的地址
// @param[in] double 桩函数的定义
func ApplyFuncVar(target, double interface{}) *Patches
func (this *Patches) ApplyFuncVar(target, double interface{}) *Patches
var funcVar = func(a,b int) (int,error) {
    if a < 0 && b < 0 {
        errmsg := "a<0 && b<0"
        return 0, fmt.Errorf("%v",errmsg)
    }
    return a+b, nil
}

func TestMockFuncVar(t *testing.T) {
    Convey("TestMockFuncVar", t, func() {
        gomonkey.ApplyFuncVar(&funcVar, func(a,b int)(int,error) {
            return a-b, nil
        })

        v, err := funcVar(20, 5)
        So(v, ShouldEqual, 15)
        So(err, ShouldBeNil)

    })
}
作者:123archu
链接:https://www.jianshu.com/p/adb8493f44e1
附件
golangci-lint安装
curl -sSfL https://raw.githubusercontent.com/golangci/golangci-lint/master/install.sh | sh -s -- -b $(go env GOPATH)/bin v1.43.0

https://golangci-lint.run/usage/install/

curl -sSfL https://raw.githubusercontent.com/golangci/golangci-lint/master/install.sh | sh -s -- -b $(go env GOPATH)/bin v1.40.0

go get -u github.com/golangci/golangci-lint/cmd/golangci-lint@v1.44.0


# 注意版本问题
# 可以使用 brew 安装
https://github.com/golangci/golangci-lint
goland配置golinter
-
安装go linter
![[外链图片转存失败,源站可能有防盗链机制,建议将图片保存下来直接上传(img-u0dvc6ZW-1644252197034)(_image/image-20220207214302220.png)]](https://i-blog.csdnimg.cn/blog_migrate/3dfadcca18ff6b16af4ac377f8720064.png)
-
配置go linter
![[外链图片转存失败,源站可能有防盗链机制,建议将图片保存下来直接上传(img-UHwtX1CZ-1644252197035)(_image/image-20220207214322317.png)]](https://i-blog.csdnimg.cn/blog_migrate/69bb7129ef7d4cbc92ae5fe3582f93f1.png)
-
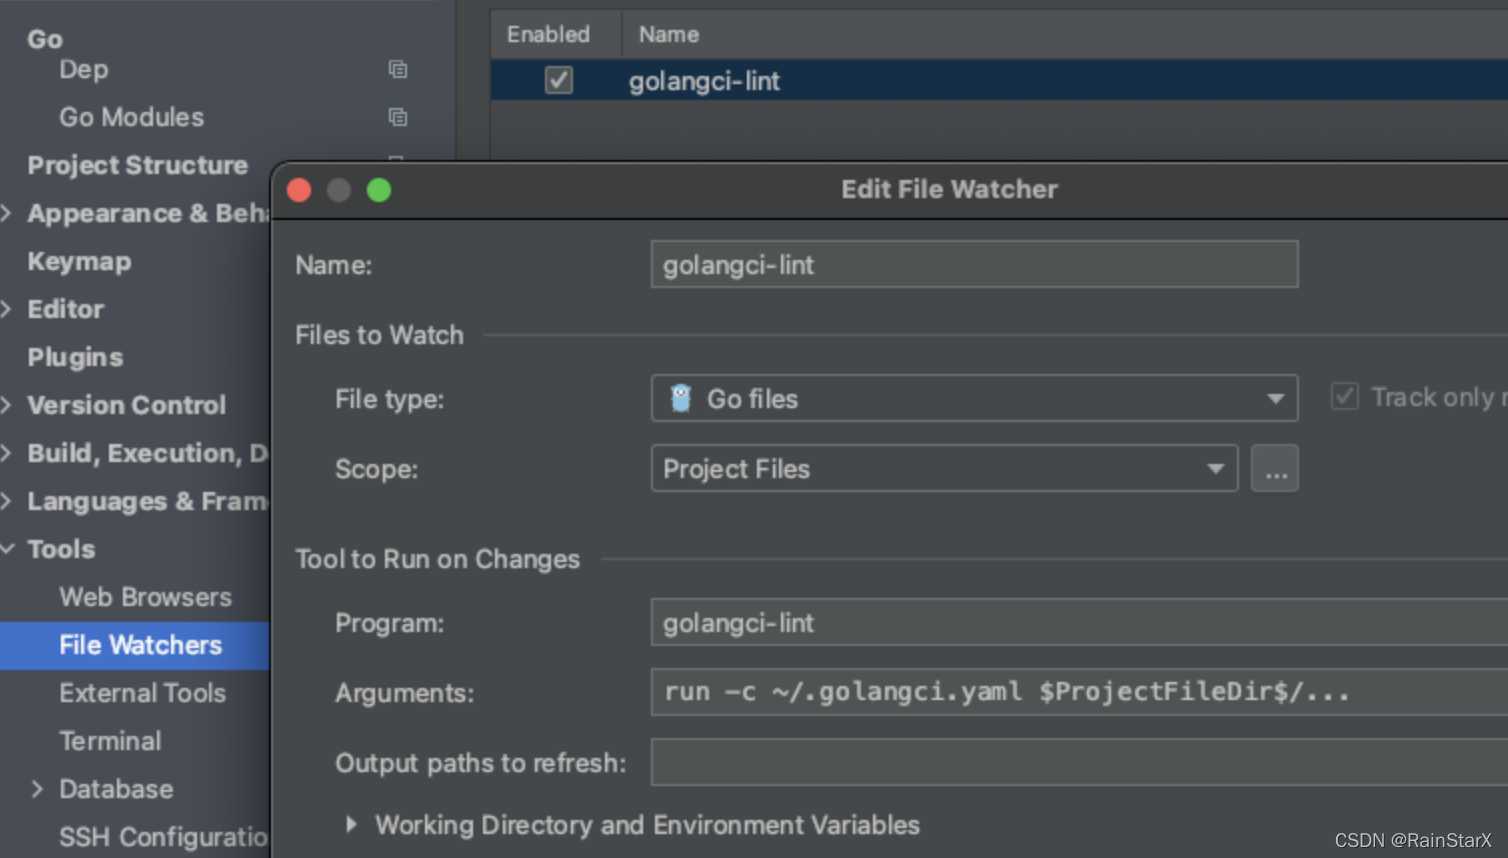
在File Watcher中配置golanglint-ci
run -c ~/.golangci.yaml $ProjectFileDir$/...
使用方式
打开一个project,插入一个空行,保存,在下方的输出栏中,会显示这个project的代码检查问题,且会自动将扫描出来的代码问题修复
配置文件
https://git.woa.com/standards/go/blob/master/.golangci.yml
run -c ~/.golangci.yaml P r o j e c t F i l e D i r ProjectFileDir ProjectFileDir/…
.golangci.yml
# 完整版本 https://golangci-lint.run/usage/configuration/
linters-settings:
  funlen:
    lines: 80
    statements: 80
  goconst:
    min-len: 2
    min-occurrences: 2
  gocyclo:
    min-complexity: 20
  goimports:
    #
  revive:
    confidence: 0
  govet:
    check-shadowing: true
  lll:
    line-length: 120
  errcheck:
    check-type-assertions: true
  gocritic:
    enabled-checks:
      - nestingReduce
      - commentFormatting
    settings:
      nestingReduce:
        bodyWidth: 5

linters:
  disable-all: true
  enable:
    - deadcode
    - funlen
    - goconst
    - gocyclo
    - gofmt
    - ineffassign
    - staticcheck
    - structcheck
    - typecheck
    - goimports
    - revive
    - gosimple
    - govet
    - lll
    - rowserrcheck
    - errcheck
    - unused
    - varcheck
    - sqlclosecheck
    - gocritic

run:
  timeout: 20m

issues:
  exclude-use-default: true


  include:
    - EXC0004 # govet (possible misuse of unsafe.Pointer|should have signature)
    - EXC0005 # staticcheck ineffective break statement. Did you mean to break out of the outer loop
    - EXC0012 # revive exported (method|function|type|const) (.+) should have comment or be unexported
    - EXC0013 # revive package comment should be of the form "(.+)...
    - EXC0014 # revive comment on exported (.+) should be of the form "(.+)..."
    - EXC0015 # revive should have a package comment, unless it's in another file for this package

  exclude-rules:
    - path: _test\.go
      linters:
        - funlen
    - linters:
        - staticcheck
      text: "SA6002: argument should be pointer-like to avoid allocations" # sync.pool.Put(buf), slice `var buf []byte` will tiger this
    - linters:
        - structcheck
      text: "Store` is unused"
    - linters:
        - lll
      source: "^//go:generate " # Exclude lll issues for long lines with go:generate

  max-same-issues: 0
  new: false
  max-issues-per-linter: 0

output:
  sort-results: true

service:
  golangci-lint-version: 1.28.x


 被折叠的 条评论
为什么被折叠?
被折叠的 条评论
为什么被折叠?
 到【灌水乐园】发言


