


目录
1.“黑边“的场景
2. 二值化--单一颜色边缘的图像
3. canny边缘检测+霍夫直线变换--处理负责的边缘图像
4. 性能优化
5. 资料
在页面展示中,如果图片/视频有黑边,比较影响体验,我我们今天实现下对图片/视频进行黑边检测。检测到黑边的信息之后,使用ffmpeg或者opencv进行裁剪即可实现黑边的去除即可。
一、“黑边“的场景
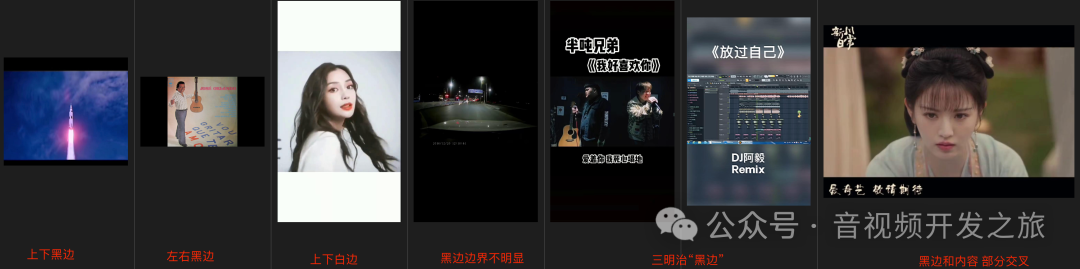
黑边的场景有很多种类型:单一颜色的黑边;边界不明显的黑边;三明治黑边;黑边与内容有交叉的场景等等,如下图所示
设计一个通用的黑边检测与去除兼容上面各种场景是一个有意思的事情。下面给出两种实现方案:二值化;Canny边缘检测+霍夫之间检测
二、二值化--单一颜色边缘的图像
对于常规的图片,使用canny边缘检测,即可区分除边界

主要思路:
通过对图片进行GaussianBlur高斯模糊减少噪声;然后进行threshold二值化处理,获取黑白值;通过findContours查找轮廓;选择除轮廓中最大的近似矩形的轮廓;然后获取其边界并进行裁剪
代码和详细说明如下:
def docropBlackEdges(imagepath,outputImagePath):#读取图片,并把图片转为灰度图img = cv2.imread(imagepath)gray = cv2.cvtColor(img,cv2.COLOR_BGR2GRAY)# 消除噪声,使用高斯模糊减少图像中的噪声,使轮廓更加准确gray = cv2.GaussianBlur(gray, (3,3), 0)#二值化处理,像素值大于1的设置为255(白色),其余的设置为0(黑色)_, thresh = cv2.threshold(gray, 1, 255, cv2.THRESH_BINARY + cv2.THRESH_BINARY)#查找轮廓,这里使用RETR_EXTERNAL(只检测外轮廓)#CHAIN_APPROX_SIMPLE 表示压缩垂直 水平和对角线元素,指标来他们的终点信息,减少轮廓点的数量contours,hierarchy = cv2.findContours(thresh,cv2.RETR_EXTERNAL,cv2.CHAIN_APPROX_SIMPLE)#选择最大的轮廓biggest = np.array([])max_area = 0for cntrs in contours:#计算轮廓的面积area = cv2.contourArea(cntrs)#计算轮廓的周长peri = cv2.arcLength(cntrs, True)#对轮廓点进行近似,找到近似为矩形的轮廓approx = cv2.approxPolyDP(cntrs, 0.02 * peri, True)if area > max_area and len(approx) == 4:biggest = approxmax_area = areacnt = biggest#通过找到的最大轮廓,计算器边界矩形,然后进行裁剪if len(cnt)>0:x, y, w, h = cv2.boundingRect(cnt)crop = img[y:y+h, x:x+w]cv2.imwrite(outputImagePath,crop)
这种方法,对于单一颜色边界,处理比较好,处理速度也比较快,但是对于,相对复杂的边界,就无法正常的检测,如下图

三、canny边缘检测+霍夫直线变换--处理负责的边缘图像

主要思路:
读取图片转为灰度图;使用GaussianBlur进行去噪;然后进行Canny边缘检测;再使用霍夫直线检测进行直线检测获取边界;最后进行裁剪
def docropBlackEdges(imagepath,outputImagePath):image = cv2.imread(imagepath)gray = cv2.cvtColor(image,cv2.COLOR_BGR2GRAY)blurred = cv2.GaussianBlur(gray, (3, 3), 0)edge = cv2.Canny(blurred, 1, 150)lines = lines_detector_hough(edge)leftX,rightX,topY,bottomY =calculateCropRange(image, lines,outputImagePath)其中lines_detector_hough的实现https://github.com/o0o0o0o0o0o0o/image-processing-from-scratch/blob/master/hough%20transform/HoughTransform.pydef lines_detector_hough(edge,ThetaDim = None,DistStep = None,threshold = None,halfThetaWindowSize = 2,halfDistWindowSize = None):''':param edge: 经过边缘检测得到的二值图:param ThetaDim: hough空间中theta轴的刻度数量(将[0,pi)均分为多少份),反应theta轴的粒度,越大粒度越细:param DistStep: hough空间中dist轴的划分粒度,即dist轴的最小单位长度:param threshold: 投票表决认定存在直线的起始阈值:return: 返回检测出的所有直线的参数(theta,dist)@author: bilibili-会飞的吴克'''imgsize = edge.shapeif ThetaDim == None:ThetaDim = 90if DistStep == None:DistStep = 1MaxDist = np.sqrt(imgsize[0]**2 + imgsize[1]**2)DistDim = int(np.ceil(MaxDist/DistStep))if halfDistWindowSize == None:halfDistWindowSize = int(DistDim/50)accumulator = np.zeros((ThetaDim,DistDim)) # theta的范围是[0,pi). 在这里将[0,pi)进行了线性映射.类似的,也对Dist轴进行了线性映射sinTheta = [np.sin(t*np.pi/ThetaDim) for t in range(ThetaDim)]cosTheta = [np.cos(t*np.pi/ThetaDim) for t in range(ThetaDim)]for i in range(imgsize[0]):for j in range(imgsize[1]):if not edge[i,j] == 0:for k in range(ThetaDim):accumulator[k][int(round((i*cosTheta[k]+j*sinTheta[k])*DistDim/MaxDist))] += 1M = accumulator.max()if threshold == None:threshold = int(M*2.3875/10)result = np.array(np.where(accumulator > threshold)) # 阈值化temp = [[],[]]for i in range(result.shape[1]):eight_neiborhood = accumulator[max(0, result[0,i] - halfThetaWindowSize + 1):min(result[0,i] + halfThetaWindowSize, accumulator.shape[0]), max(0, result[1,i] - halfDistWindowSize + 1):min(result[1,i] + halfDistWindowSize, accumulator.shape[1])]if (accumulator[result[0,i],result[1,i]] >= eight_neiborhood).all():temp[0].append(result[0,i])temp[1].append(result[1,i])result = np.array(temp) # 非极大值抑制result = result.astype(np.float64)result[0] = result[0]*np.pi/ThetaDimresult[1] = result[1]*MaxDist/DistDimreturn result
这个实现时相当耗时的,主要在accumulator 3层for循环那里
四、性能优化
cv中实现了HoughLines,可用通过下面的方式快速的掉用,相比上面的python版本,耗时降低1-2个数量级
def docropBlackEdges(imagepath,outputImagePath):image = cv2.imread(imagepath)gray = cv2.cvtColor(image,cv2.COLOR_BGR2GRAY)blurred = cv2.GaussianBlur(gray, (3, 3), 0)edge = cv2.Canny(blurred, 1, 150)#使用cv内部实现的HoughLines(c++版本)大大减少处理是耗时tlines = cv2.HoughLines(edge,1.0,np.pi/180,150)
五、资料
1.图解cv2.HoughLines
https://blog.youkuaiyun.com/qq_54185421/article/details/126661672
2. 检测图像边缘黑边裁剪算法 python 图像的边缘检测
https://blog.51cto.com/u_16213663/7834273
3.Hough变换-理解篇
https://blog.youkuaiyun.com/abcjennifer/article/details/7448513
感谢你的阅读
接下来我们继续学习输出AIGC相关内容,欢迎关注公众号“音视频开发之旅”,一起学习成长。
欢迎交流


 1485
1485

 被折叠的 条评论
为什么被折叠?
被折叠的 条评论
为什么被折叠?
 到【灌水乐园】发言


