 Spring Security OAuth:数据库存储与授权配置详解


 本文介绍了如何将OAuth客户端和授权码信息从内存迁移到数据库,包括创建`oauth_client_details`和`oauth_code`表,配置`AuthorizationServer`和使用JDBC服务。涉及配置ClientDetailsService、TokenStore和AuthorizationCodeServices,以及加密和验证过程。
一 说明
1.1 概要说明
前面文章的介绍了,客户单和授权码存储在内存中,现在需要存储到数据库中。
本操作在第5章节的基础上进行操作。
1.2 这里配置说明
1.配置好需要的的两个表: oauth_client_details 和oauth_code
2.进行各种配置文件的配置。
3.不需要自己写查询sql语句的逻辑。
二 操作
2.1 客户端认证信息的配置
2.1.1 在数据库中创建oauth_client_details
DROP TABLE IF EXISTS `oauth_client_details`; CREATE TABLE `oauth_client_details` ( `client_id` varchar(255) CHARACTER SET utf8 COLLATE utf8_general_ci NOT NULL COMMENT '客户端标 识',`resource_ids` varchar(255) CHARACTER SET utf8 COLLATE utf8_general_ci NULL DEFAULT NULL COMMENT '接入资源列表', `client_secret` varchar(255) CHARACTER SET utf8 COLLATE utf8_general_ci NULL DEFAULT NULL COMMENT '客户端秘钥', `scope` varchar(255) CHARACTER SET utf8 COLLATE utf8_general_ci NULL DEFAULT NULL, `authorized_grant_types` varchar(255) CHARACTER SET utf8 COLLATE utf8_general_ci NULL DEFAULT NULL, `web_server_redirect_uri` varchar(255) CHARACTER SET utf8 COLLATE utf8_general_ci NULL DEFAULT NULL, `authorities` varchar(255) CHARACTER SET utf8 COLLATE utf8_general_ci NULL DEFAULT NULL, `access_token_validity` int(11) NULL DEFAULT NULL, `refresh_token_validity` int(11) NULL DEFAULT NULL, `additional_information` longtext CHARACTER SET utf8 COLLATE utf8_general_ci NULL, `create_time` timestamp(0) NOT NULL DEFAULT CURRENT_TIMESTAMP(0) ON UPDATE CURRENT_TIMESTAMP(0), `archived` tinyint(4) NULL DEFAULT NULL, `trusted` tinyint(4) NULL DEFAULT NULL, `autoapprove` varchar(255) CHARACTER SET utf8 COLLATE utf8_general_ci NULL DEFAULT NULL, PRIMARY KEY (`client_id`) USING BTREE ) ENGINE = InnoDB CHARACTER SET = utf8 COLLATE = utf8_general_ci COMMENT = '接入客户端信息' ROW_FORMAT = Dynamic; INSERT INTO `oauth_client_details` VALUES ('c1', 'res1', '$2a$10$NlBC84MVb7F95EXYTXwLneXgCca6/GipyWR5NHm8K0203bSQMLpvm', 'ROLE_ADMIN,ROLE_USER,ROLE_API', 'client_credentials,password,authorization_code,implicit,refresh_token', 'http://www.baidu.com', NULL, 7200, 259200, NULL, '2019‐09‐09 16:04:28', 0, 0, 'false'); INSERT INTO `oauth_client_details` VALUES ('c2', 'res2', '$2a$10$NlBC84MVb7F95EXYTXwLneXgCca6/GipyWR5NHm8K0203bSQMLpvm', 'ROLE_API', 'client_credentials,password,authorization_code,implicit,refresh_token', 'http://www.baidu.com', NULL, 31536000, 2592000, NULL, '2019‐09‐09 21:48:51', 0, 0, 'false');2.1.2 在数据库中创建oauth_code表
DROP TABLE IF EXISTS `oauth_code`; CREATE TABLE `oauth_code` ( `create_time` timestamp(0) NOT NULL DEFAULT CURRENT_TIMESTAMP, `code` varchar(255) CHARACTER SET utf8 COLLATE utf8_general_ci NULL DEFAULT NULL, `authentication` blob NULL, INDEX `code_index`(`code`) USING BTREE ) ENGINE = InnoDB CHARACTER SET = utf8 COLLATE = utf8_general_ci ROW_FORMAT = Compact;2.2 配置授权服务
2.2.1 修改AuthorizationServer
2.AuthorizationServer中进行配置
配置授权码,存储数据库
package com.ljf.springsecurity.oauth.config;
import org.springframework.beans.factory.annotation.Autowired;
import org.springframework.context.annotation.Bean;
import org.springframework.context.annotation.Configuration;
import org.springframework.http.HttpMethod;
import org.springframework.security.authentication.AuthenticationManager;
import org.springframework.security.crypto.bcrypt.BCryptPasswordEncoder;
import org.springframework.security.crypto.password.PasswordEncoder;
import org.springframework.security.oauth2.config.annotation.configurers.ClientDetailsServiceConfigurer;
import org.springframework.security.oauth2.config.annotation.web.configuration.AuthorizationServerConfigurerAdapter;
import org.springframework.security.oauth2.config.annotation.web.configuration.EnableAuthorizationServer;
import org.springframework.security.oauth2.config.annotation.web.configurers.AuthorizationServerEndpointsConfigurer;
import org.springframework.security.oauth2.config.annotation.web.configurers.AuthorizationServerSecurityConfigurer;
import org.springframework.security.oauth2.provider.ClientDetailsService;
import org.springframework.security.oauth2.provider.client.JdbcClientDetailsService;
import org.springframework.security.oauth2.provider.code.AuthorizationCodeServices;
import org.springframework.security.oauth2.provider.code.InMemoryAuthorizationCodeServices;
import org.springframework.security.oauth2.provider.code.JdbcAuthorizationCodeServices;
import org.springframework.security.oauth2.provider.token.AuthorizationServerTokenServices;
import org.springframework.security.oauth2.provider.token.DefaultTokenServices;
import org.springframework.security.oauth2.provider.token.TokenEnhancerChain;
import org.springframework.security.oauth2.provider.token.TokenStore;
import org.springframework.security.oauth2.provider.token.store.JwtAccessTokenConverter;
import javax.sql.DataSource;
import java.util.Arrays;
/**
* @ClassName: AuthorizationServer
* @Description: TODO
* @Author: liujianfu
* @Date: 2021/08/29 12:46:21
* @Version: V1.0
**/
@Configuration
@EnableAuthorizationServer
public class AuthorizationServer extends AuthorizationServerConfigurerAdapter {
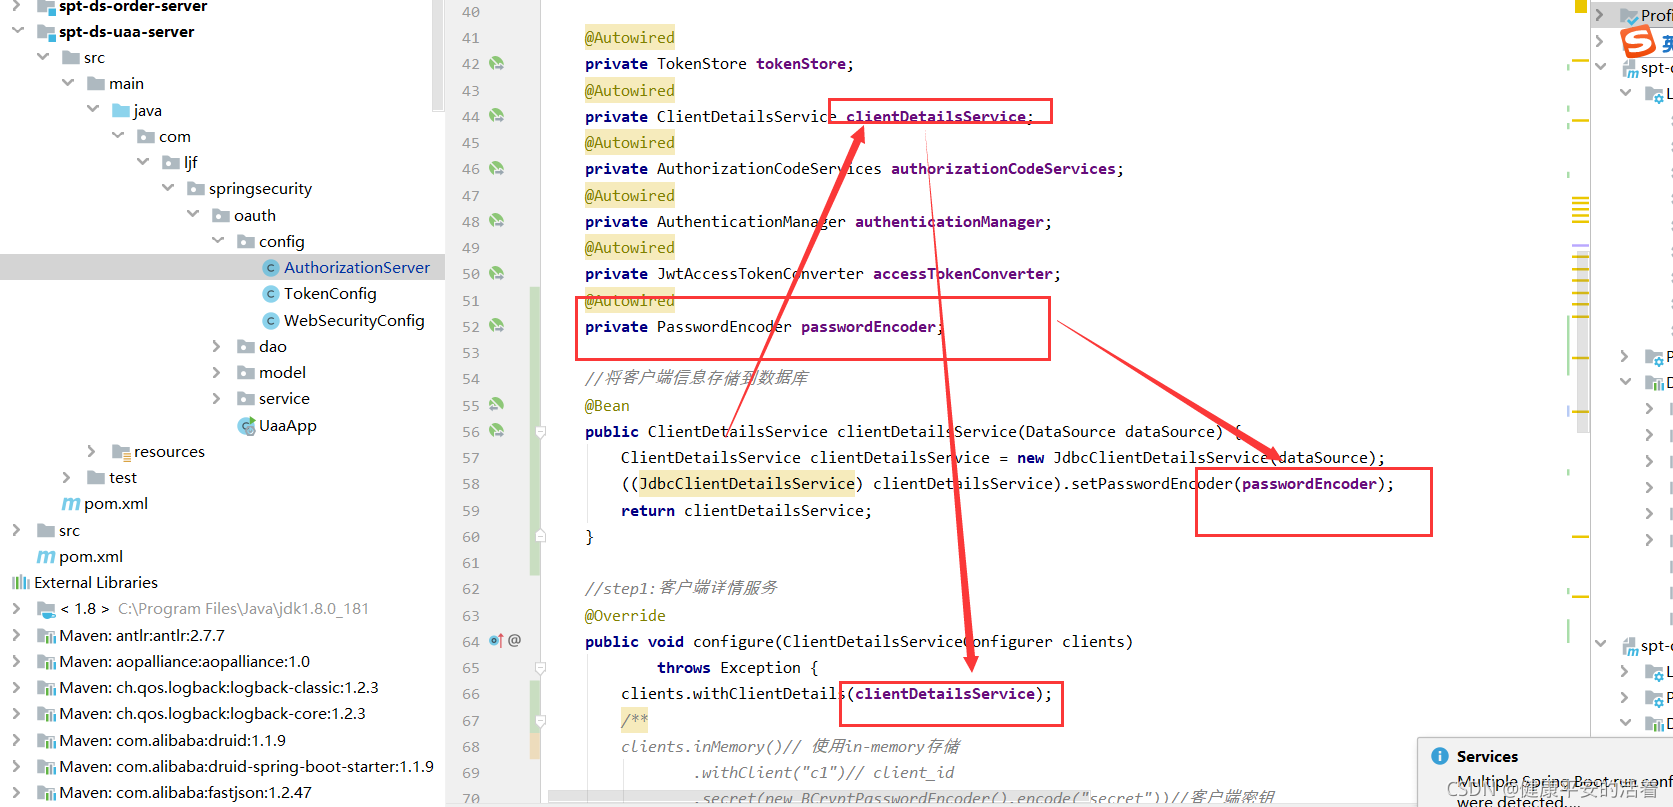
@Autowired
private TokenStore tokenStore;
@Autowired
private ClientDetailsService clientDetailsService;
@Autowired
private AuthorizationCodeServices authorizationCodeServices;
@Autowired
private AuthenticationManager authenticationManager;
@Autowired
private JwtAccessTokenConverter accessTokenConverter;
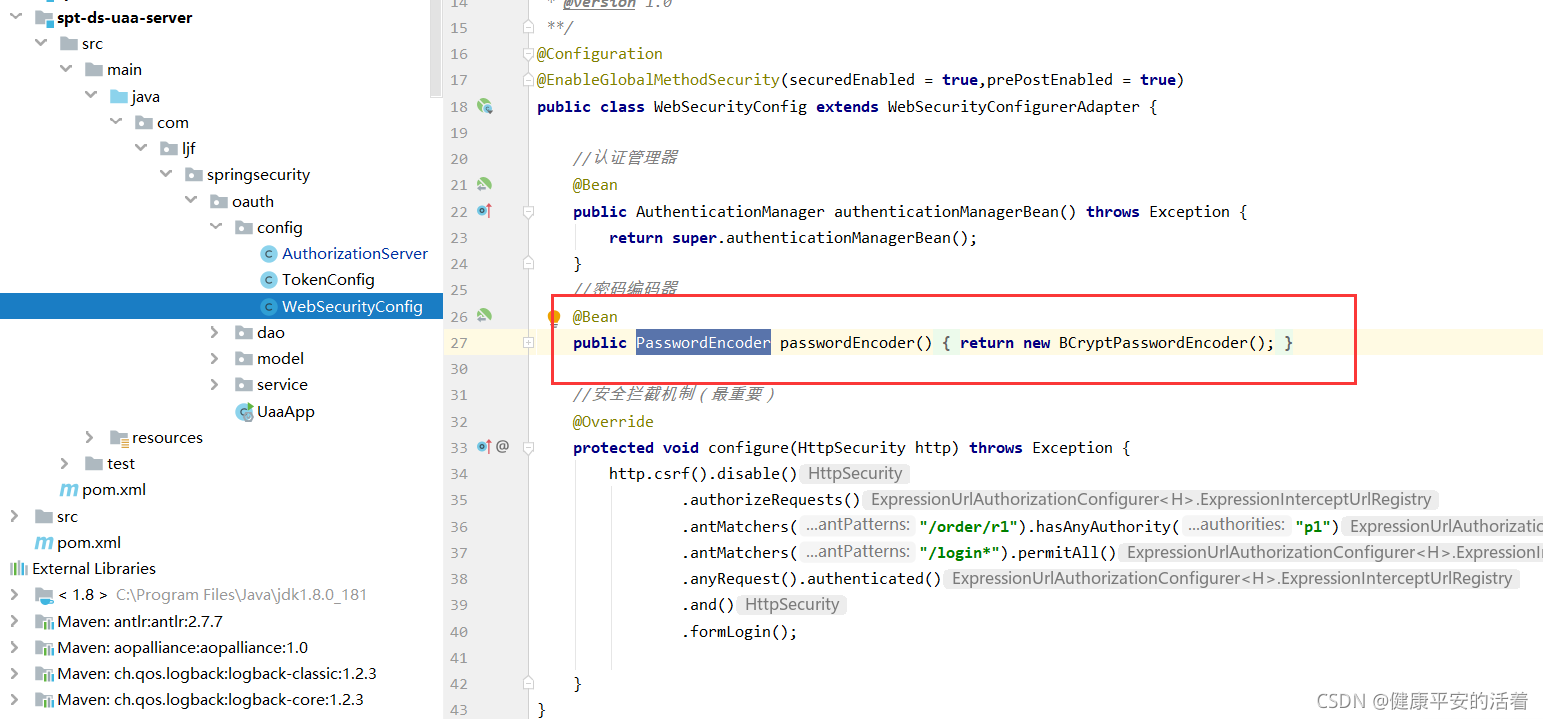
@Autowired
private PasswordEncoder passwordEncoder;
//将客户端信息存储到数据库
@Bean
public ClientDetailsService clientDetailsService(DataSource dataSource) {
ClientDetailsService clientDetailsService = new JdbcClientDetailsService(dataSource);
((JdbcClientDetailsService) clientDetailsService).setPasswordEncoder(passwordEncoder);
return clientDetailsService;
}
//step1:客户端详情服务
@Override
public void configure(ClientDetailsServiceConfigurer clients)
throws Exception {
clients.withClientDetails(clientDetailsService);
/**
clients.inMemory()// 使用in-memory存储
.withClient("c1")// client_id
.secret(new BCryptPasswordEncoder().encode("secret"))//客户端密钥
.resourceIds("res1")//资源列表
.authorizedGrantTypes("authorization_code", "password","client_credentials","implicit","refresh_token")// 该client允许的授权类型authorization_code,password,refresh_token,implicit,client_credentials
.scopes("all")// 允许的授权范围
.autoApprove(false)//false跳转到授权页面
//加上验证回调地址
.redirectUris("http://www.baidu.com");
**/
}
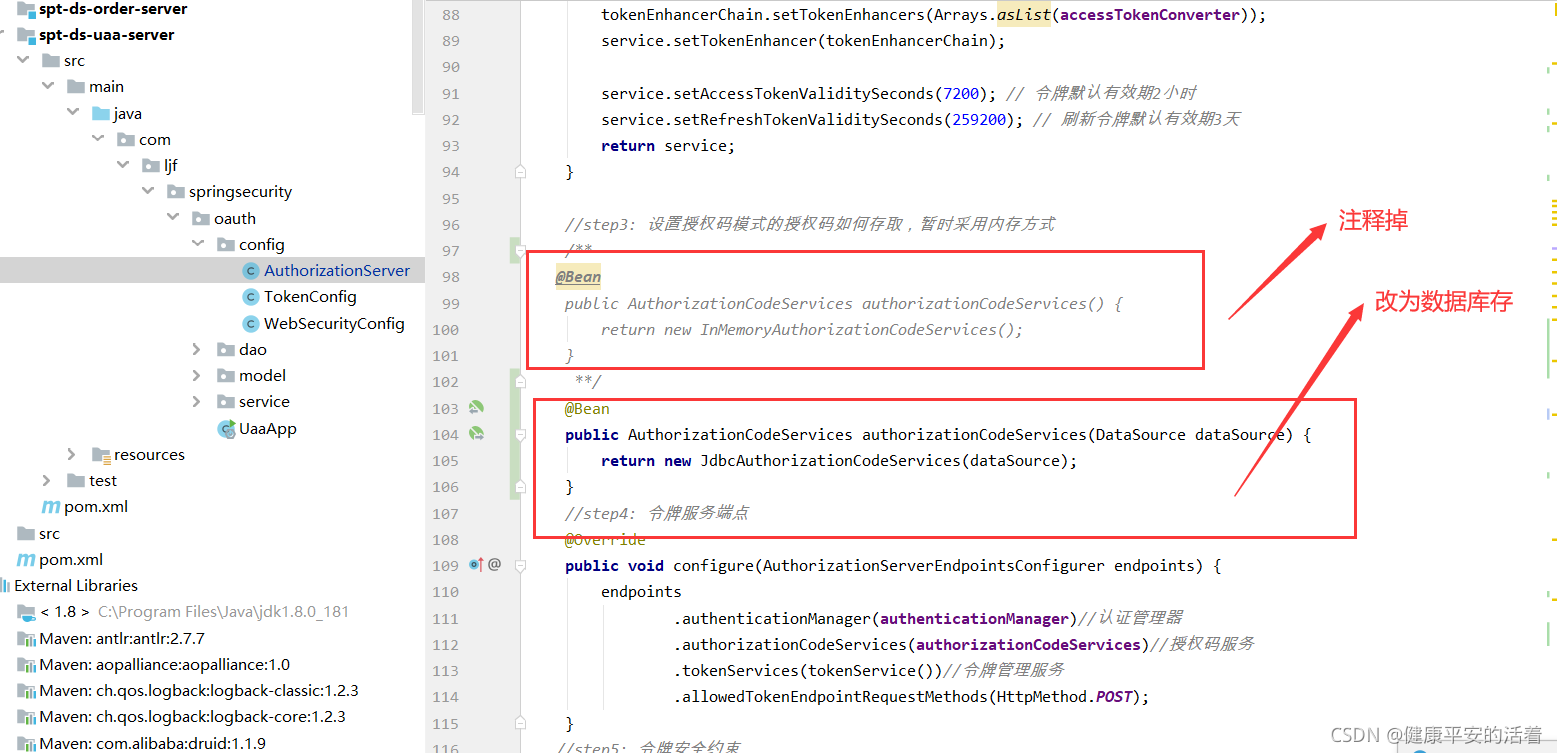
//step2; 令牌管理服务
@Bean
public AuthorizationServerTokenServices tokenService() {
DefaultTokenServices service=new DefaultTokenServices();
service.setClientDetailsService(clientDetailsService);//客户端详情服务
service.setSupportRefreshToken(true);//支持刷新令牌
service.setTokenStore(tokenStore);//令牌存储策略
//令牌增强
TokenEnhancerChain tokenEnhancerChain = new TokenEnhancerChain();
tokenEnhancerChain.setTokenEnhancers(Arrays.asList(accessTokenConverter));
service.setTokenEnhancer(tokenEnhancerChain);
service.setAccessTokenValiditySeconds(7200); // 令牌默认有效期2小时
service.setRefreshTokenValiditySeconds(259200); // 刷新令牌默认有效期3天
return service;
}
//step3: 设置授权码模式的授权码如何存取,暂时采用内存方式
/**
@Bean
public AuthorizationCodeServices authorizationCodeServices() {
return new InMemoryAuthorizationCodeServices();
}
**/
@Bean
public AuthorizationCodeServices authorizationCodeServices(DataSource dataSource) {
return new JdbcAuthorizationCodeServices(dataSource);
}
//step4: 令牌服务端点
@Override
public void configure(AuthorizationServerEndpointsConfigurer endpoints) {
endpoints
.authenticationManager(authenticationManager)//认证管理器
.authorizationCodeServices(authorizationCodeServices)//授权码服务
.tokenServices(tokenService())//令牌管理服务
.allowedTokenEndpointRequestMethods(HttpMethod.POST);
}
//step5: 令牌安全约束
@Override
public void configure(AuthorizationServerSecurityConfigurer security){
security
.tokenKeyAccess("permitAll()") //oauth/token_key是公开
.checkTokenAccess("permitAll()") //oauth/check_token公开
.allowFormAuthenticationForClients() //表单认证(申请令牌)
;
}
}
2.3 密码方式客户端信息存储
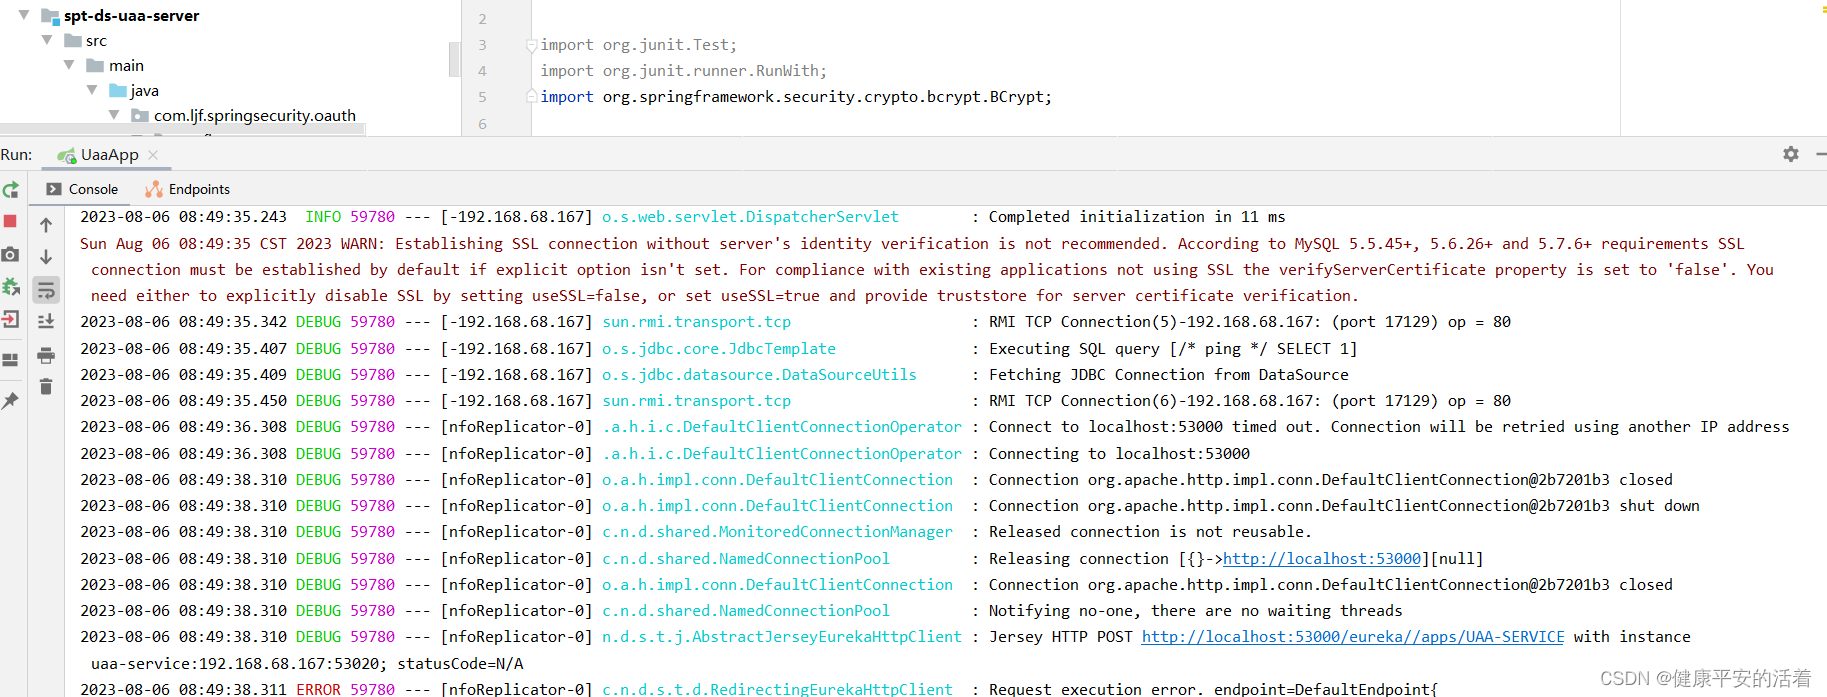
2.3.1 启动服务
1.启动认证服务
2.3.2 认证请求测试
2.postman进行测试
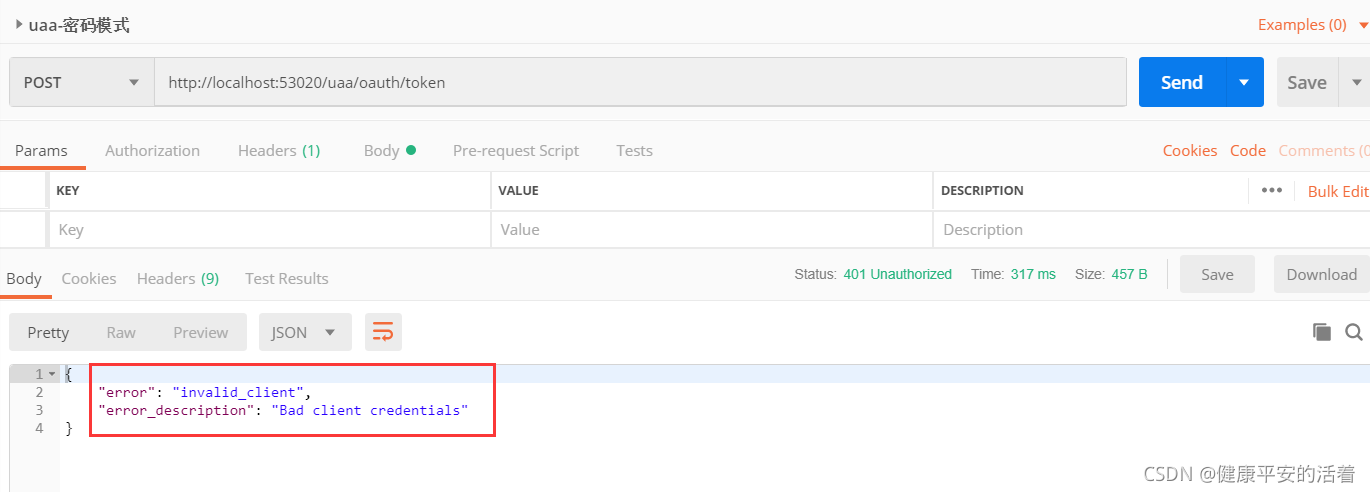
原因在于:要对client_secret的密码明文设置为加密

3.使用加密工具类, 将secret设置进行加密:
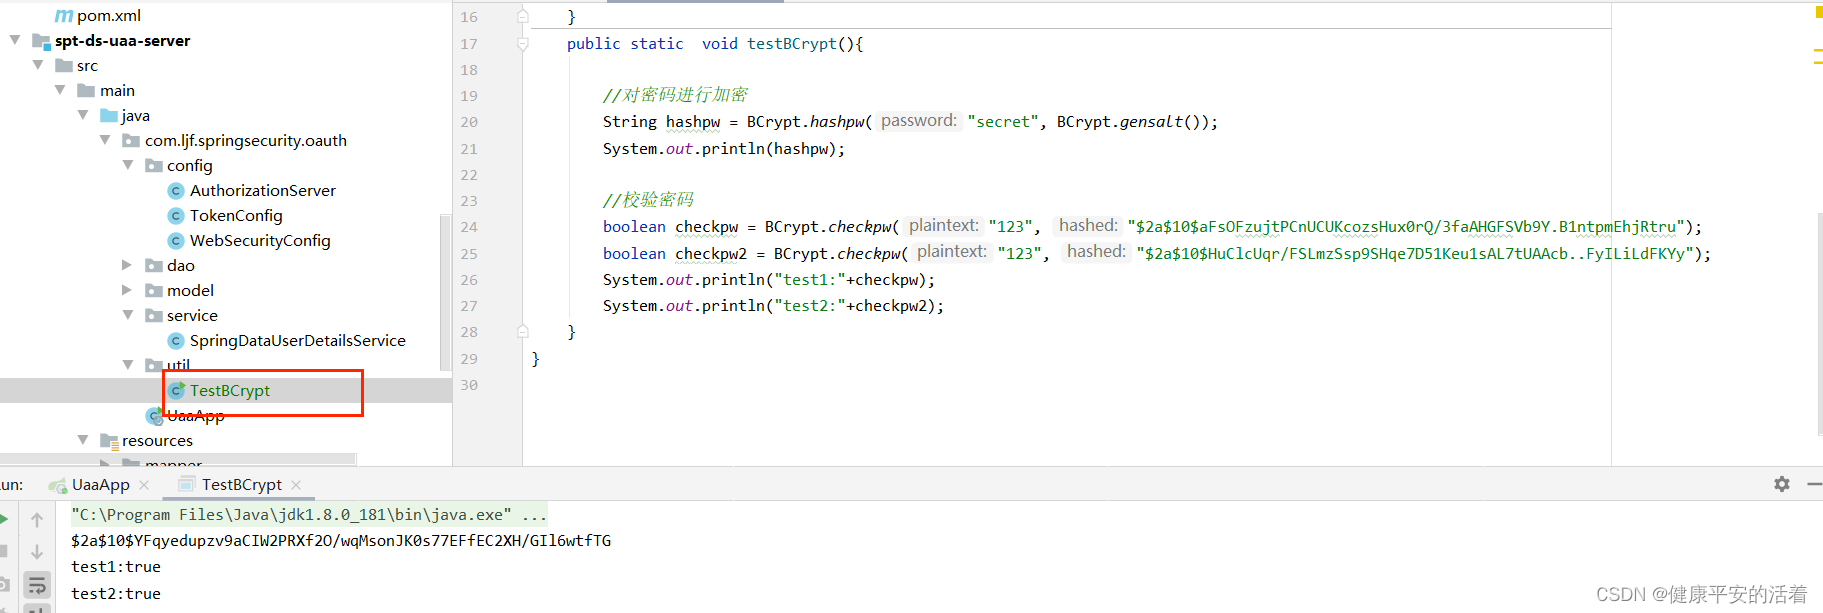
4. 加密后存储到数据库中

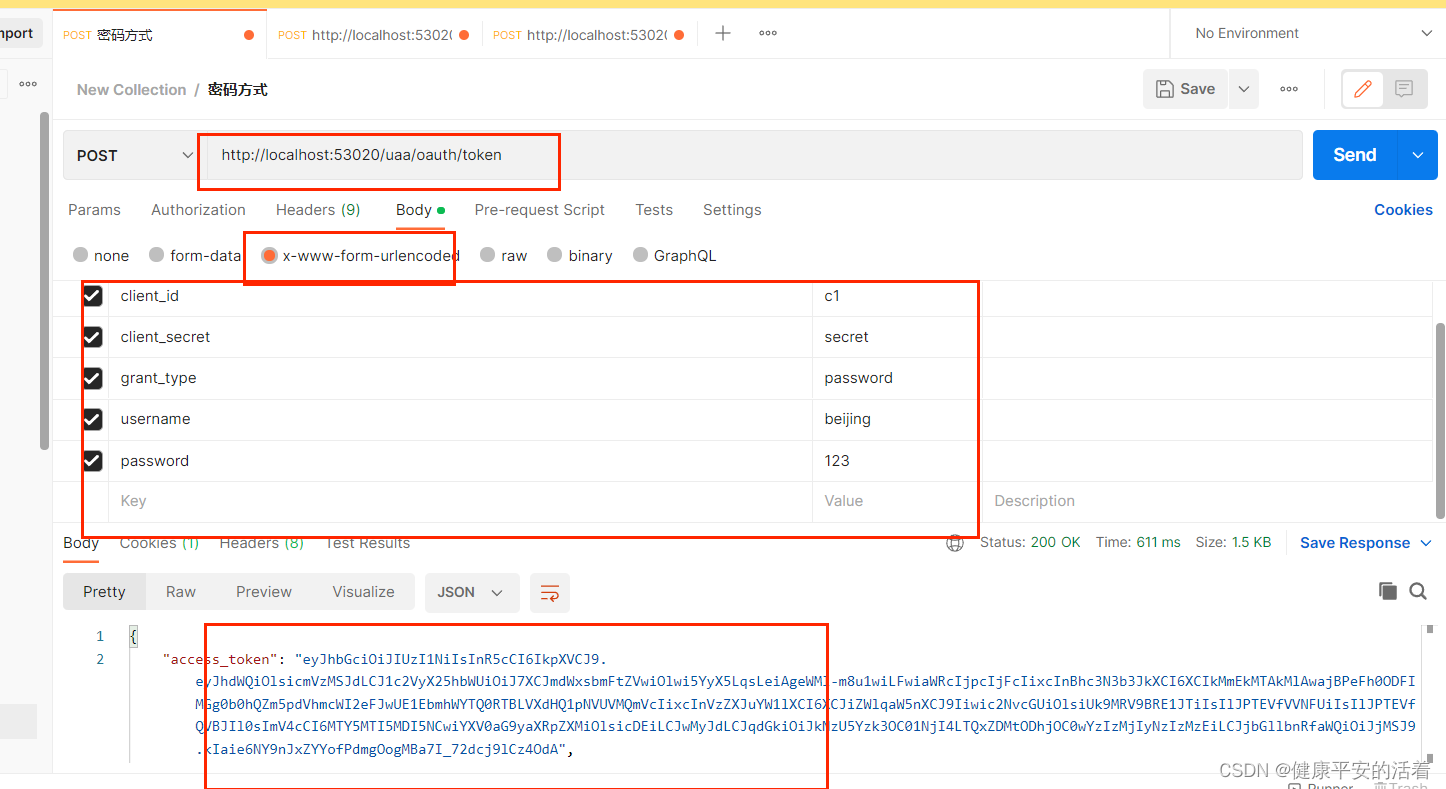
5.再次访问:http://localhost:53020/uaa/oauth/token
其中 :请求方式为:post
表单提交方式为: x-www-form-urlencoded
2.3.3 验证token
表单提交方式为: x-www-form-urlencoded 这种提交方式
地址:http://localhost:53020/uaa/oauth/check_token
表单提交方式为: x-www-form-urlencoded 这种提交方式
token=xxx,为上一步求得的token值,复制到此处,进行请求访问

2.4 授权码方式存储code测试
2.4.1 请求访问
地址:http://localhost:53020/uaa/oauth/authorize?client_id=c1&response_type=code&scope=ROLE_API&redirect_uri=http://www.baidu.com
注意: scope=ROLE_API 这个参数scope不再是all。
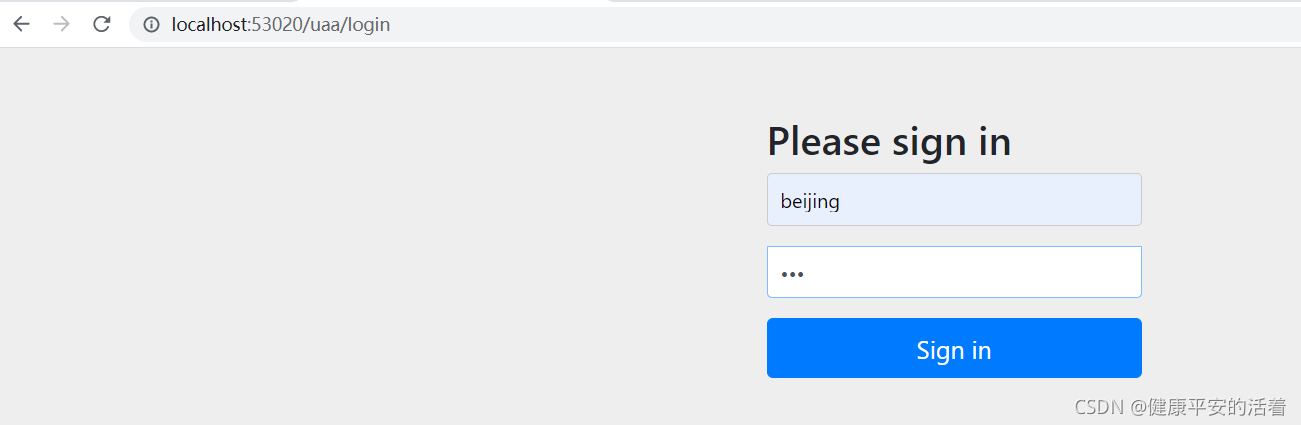
1.请求访问
登录界面
2.确认授权
3.授权码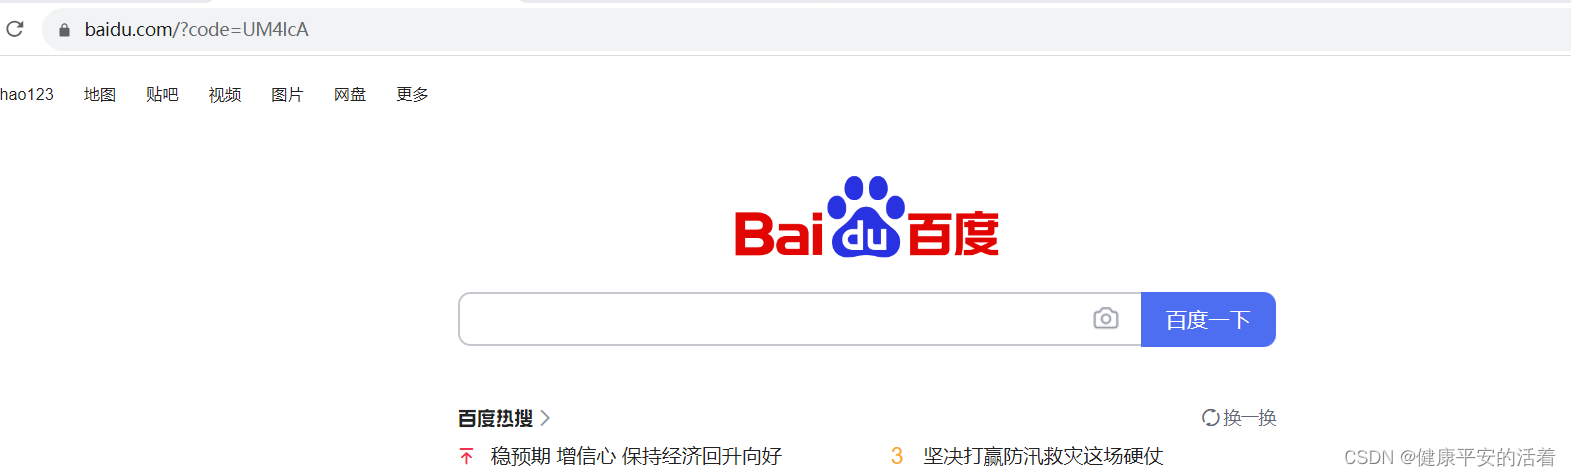
4.查看数据库:授权码code=UM4lcA已经存储到库中

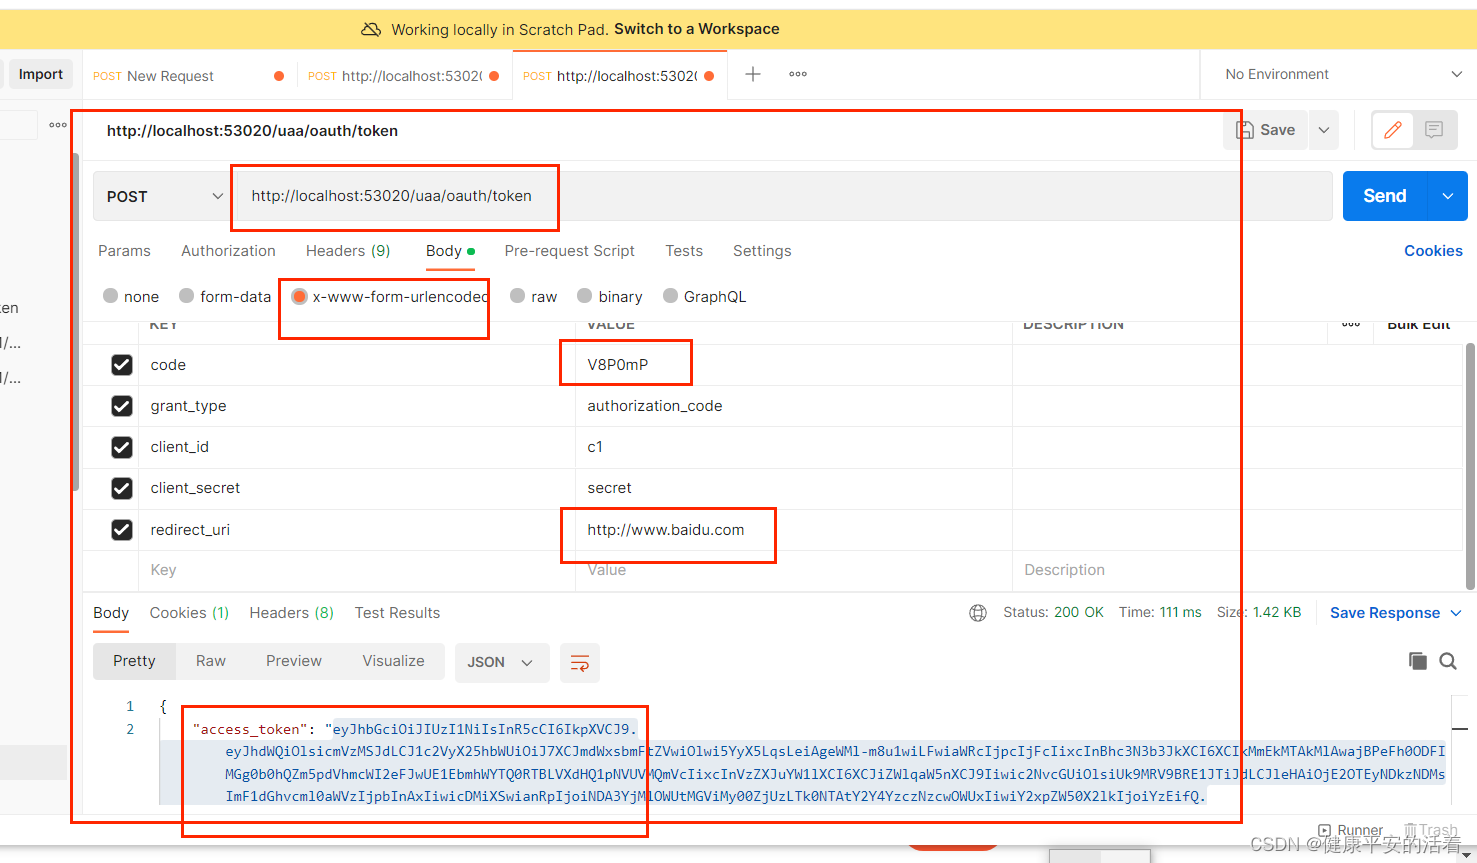
5.获取acesstoken
http://localhost:53020/uaa/oauth/token
表单提交方式为: x-www-form-urlencoded 这种提交方式
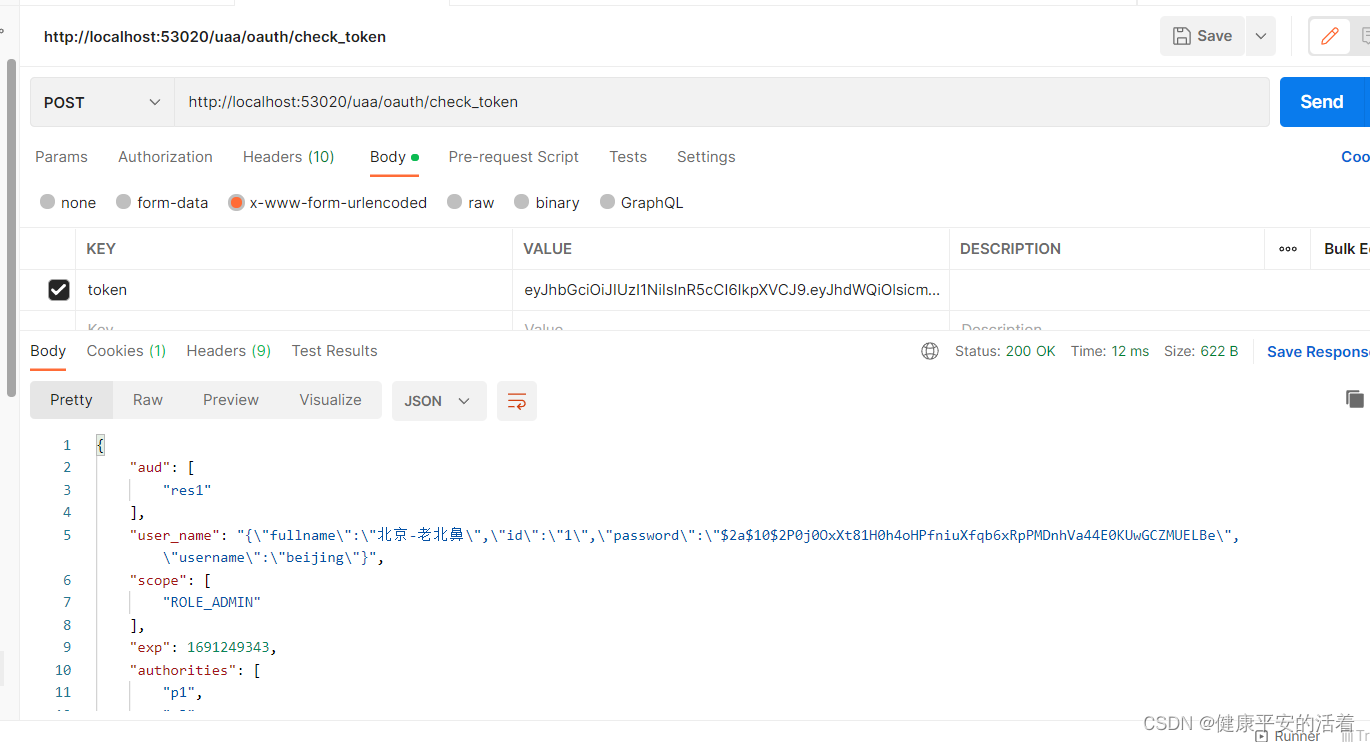
2.4.2 验证token
表单提交方式为: x-www-form-urlencoded 这种提交方式
地址:http://localhost:53020/uaa/oauth/check_token
表单提交方式为: x-www-form-urlencoded 这种提交方式
token=xxx,为上一步求得的token值,复制到此处,进行请求访问


 473
473

 被折叠的 条评论
为什么被折叠?
被折叠的 条评论
为什么被折叠?
 到【灌水乐园】发言


