


1、介绍
训练的模型基于yolov8n.pt,数据采用PASCAL VOC数据集,下面进行整个任务的步骤说明,任务分三部:
- 配置好Yolo环境:环境基于Anconda创建的Python虚拟环境。
- 下载数据集和处理数据集:数据集为PASCAL VOC数据集中2012train、2007train、2007test三个数据集。
- 运行Yolo程序:在处理数据集后运行Yolo程序训练模型。
2、下载数据集
对于Voc数据集下载,这里有两种下载方式,方式如下:
-
(1)自己从网站上进行下载;
-
(2)使用Python程序进行下载,当然这个方式比较看网络情况。
下面进行具体介绍这两种方式。
(1)网站下载
首先到PASCAL网站首页,这里给出网站网址:PASCAL 视觉对象类主页 (ox.ac.uk),到这个网站找到下图这个部分。

然后点击VOC2007这个链接,进入2007数据的页面。进入页面找到数据部分,也就是下面的这个图片。
最后点击上图的两个数据下载连接,即可下载2007的数据集。最后以同样的方式下载2012年的数据集,但是注意2012年下载训练集即可,不用下载测试集(测试集数据下载要注册账号,当然如果你有账号也可以进行下载,将我们测试用的2007测试集换成2012年的也可以)。
补充:如果你觉得数据集在浏览器下载太慢,那么可以将下载链接复制,如何到百度网盘进行下载,这样下载数据会快一些(当然这是基于我是会员的情况下)。步骤如下:

-
点击云添加中的添加链接任务

-
填入链接点击下载即可
-
这里给出三个数据下载的链接:
- 2007训练集:http://host.robots.ox.ac.uk/pascal/VOC/voc2007/VOCtrainval_06-Nov-2007.tar
- 2007测试集:http://host.robots.ox.ac.uk/pascal/VOC/voc2007/VOCtest_06-Nov-2007.tar
- 2012训练集:http://host.robots.ox.ac.uk/pascal/VOC/voc2012/VOCtrainval_11-May-2012.tar
-
完整的数据集大小是2.8GB左右
(2)Python程序下载
将下面程序复制到Pycharm中py文件的项目中运行即可(前提网络可以连接github这样可以下载数据),当然这个程序也包含对数据的处理,第一种方法并没有进行对数据的处理还要进一步对数据进行处理。
import xml.etree.ElementTree as ET
from tqdm import tqdm
from ultralytics.utils.downloads import download
from pathlib import Path
import yaml

# 加载VOC.yaml文件内容
yaml_content = """
path: ../datasets/VOC
train:
  - images/train2012
  - images/train2007
  - images/val2012
  - images/val2007
val:
  - images/test2007
test:
  - images/test2007
names:
  0: aeroplane
  1: bicycle
  2: bird
  3: boat
  4: bottle
  5: bus
  6: car
  7: cat
  8: chair
  9: cow
  10: diningtable
  11: dog
  12: horse
  13: motorbike
  14: person
  15: pottedplant
  16: sheep
  17: sofa
  18: train
  19: tvmonitor
"""

yaml = yaml.safe_load(yaml_content)

# 函数:转换标签
def convert_label(path, lb_path, year, image_id):
    # 函数:转换边界框
    def convert_box(size, box):
        dw, dh = 1. / size[0], 1. / size[1]
        x, y, w, h = (box[0] + box[1]) / 2.0 - 1, (box[2] + box[3]) / 2.0 - 1, box[1] - box[0], box[3] - box[2]
        return x * dw, y * dh, w * dw, h * dh

    # 打开标注文件并创建输出文件
    in_file = open(path / f'VOC{year}/Annotations/{image_id}.xml')
    out_file = open(lb_path, 'w')
    tree = ET.parse(in_file)
    root = tree.getroot()
    size = root.find('size')
    w = int(size.find('width').text)
    h = int(size.find('height').text)

    # 获取类别名称列表
    names = list(yaml['names'].values())
    for obj in root.iter('object'):
        cls = obj.find('name').text
        if cls in names and int(obj.find('difficult').text) != 1:
            xmlbox = obj.find('bndbox')
            bb = convert_box((w, h), [float(xmlbox.find(x).text) for x in ('xmin', 'xmax', 'ymin', 'ymax')])
            cls_id = names.index(cls)  # 类别ID
            out_file.write(" ".join(str(a) for a in (cls_id, *bb)) + '\n')

# 下载数据集
dir = Path(yaml['path'])  # 数据集根目录
url = 'https://github.com/ultralytics/assets/releases/download/v0.0.0/'
urls = [
    f'{url}VOCtrainval_06-Nov-2007.zip',  # 446MB, 5012张图片
    f'{url}VOCtest_06-Nov-2007.zip',  # 438MB, 4953张图片
    f'{url}VOCtrainval_11-May-2012.zip'  # 1.95GB, 17126张图片
]
# 下载并解压数据集到指定路径

download(urls, dir=dir / 'images', curl=True, threads=3, exist_ok=True)  # 下载并解压到现有路径(如果存在)

# 转换标签
path = dir / 'images/VOCdevkit'
for year, image_set in ('2012', 'train'), ('2012', 'val'), ('2007', 'train'), ('2007', 'val'), ('2007', 'test'):
    imgs_path = dir / 'images' / f'{image_set}{year}'  # 图片存储路径
    lbs_path = dir / 'labels' / f'{image_set}{year}'  # 标签存储路径
    imgs_path.mkdir(exist_ok=True, parents=True)  # 创建图片目录
    lbs_path.mkdir(exist_ok=True, parents=True)  # 创建标签目录

    # 读取图片ID列表
    with open(path / f'VOC{year}/ImageSets/Main/{image_set}.txt') as f:
        image_ids = f.read().strip().split()
    # 遍历每个图片ID并进行处理
    for id in tqdm(image_ids, desc=f'{image_set}{year}'):
        f = path / f'VOC{year}/JPEGImages/{id}.jpg'  # 旧的图片路径
        lb_path = (lbs_path / f.name).with_suffix('.txt')  # 新的标签路径
        f.rename(imgs_path / f.name)  # 移动图片到新路径
        convert_label(path, lb_path, year, id)  # 转换标签为YOLO格式
2、数据处理
(1)VOC.yaml文件介绍
这个部分主要是1中(1)中的第一种,网站下载数据,如何将数据处理成Yolo可以运行的数据。首先我们下载VOC.yaml文件,网址如下:ultralytics/ultralytics/cfg/datasets/VOC.yaml at main · ultralytics/ultralytics · GitHub 点击下载VOC.yaml文件即可。下面对VOC.yaml文件中的信息进行介绍。
# Ultralytics YOLO 🚀, AGPL-3.0 license:该模型为Ultralytics提供的YOLO模型,遵循AGPL-3.0开源协议。
# PASCAL VOC数据集是一个常用于目标检测的标准数据集,数据集地址为: http://host.robots.ox.ac.uk/pascal/VOC by University of Oxford
# 该数据集的详细文档链接:https://docs.ultralytics.com/datasets/detect/voc/
#使用示例:可以通过命令 yolo train data=VOC.yaml 来使用这个配置文件进行训练。
#描述了数据集的文件夹结构
# parent
# ├── ultralytics
# └── datasets
#     └── VOC  ← downloads here (2.8 GB)

# Train/val/test sets as 1) dir: path/to/imgs, 2) file: path/to/imgs.txt, or 3) list: [path/to/imgs1, path/to/imgs2, ..]

#数据集的根目录路径为:
path: D:/.../ultralytics/datasets/VOC
train: # 训练集的图像路径(相对于path),总共有16551张图像。包含以下4个路径:
  - images/train2012
  - images/train2007
  - images/val2012
  - images/val2007
val: # 验证集的图像路径(相对于path),包含4952张图像:
  - images/test2007
test: # 测试集的图像路径(可选):
  - images/test2007

# Classes是数据集的类别定义,共有20个类别,每个类别的名称对应于其编号。具体类别如下:
names:
  0: aeroplane
  1: bicycle
  2: bird
  3: boat
  4: bottle
  5: bus
  6: car
  7: cat
  8: chair
  9: cow
  10: diningtable
  11: dog
  12: horse
  13: motorbike
  14: person
  15: pottedplant
  16: sheep
  17: sofa
  18: train
  19: tvmonitor
(2)数据集处理
-
在项目目录下创建ultralytics\datasets\VOC\images\VOCdevkit文件夹,将VOC.yaml放入VOC文件夹下。
-
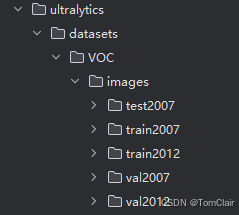
VOCdevkit文件夹存放3个数据压缩包的解包文件,解压好如下图:
-
如果防止运行时文件夹找不到可以按照创建好VOC.yaml中形式:
-
创建VOC数据集处理py文件,并将下面代码放入(使用时修改一下路径):

import xml.etree.ElementTree as ET
from tqdm import tqdm
from pathlib import Path

# 转换标签的函数
def convert_label(path, lb_path, year, image_id, names):
    # 转换边界框的函数
    def convert_box(size, box):
        dw, dh = 1. / size[0], 1. / size[1]
        x, y, w, h = (box[0] + box[1]) / 2.0 - 1, (box[2] + box[3]) / 2.0 - 1, box[1] - box[0], box[3] - box[2]
        print(f"Original box: {box}, Converted box: {(x * dw, y * dh, w * dw, h * dh)}")
        return x * dw, y * dh, w * dw, h * dh

    # 打开XML文件,解析图像的标注信息
    in_file = open(path / f'VOC{year}/Annotations/{image_id}.xml')
    tree = ET.parse(in_file)
    root = tree.getroot()
    print(ET.tostring(root, encoding='utf8').decode('utf8'))  # 打印 XML 文件的结构以检查节点

    # 获取图像的尺寸信息
    size = root.find('size')
    if size is None:
        print(f"Size information missing in {image_id}.xml, skipping.")
        return
    w = int(size.find('width').text)
    h = int(size.find('height').text)

    # 打开标签文件进行写入
    with open(lb_path, 'w') as out_file:
        for obj in root.iter('object'):
            cls = obj.find('name').text
            print(f"Object class in XML: {cls}")
            if cls in names:
                print(f"Class {cls} found in names list")
                xmlbox = obj.find('bndbox')
                if xmlbox is None:
                    print(f"Bounding box information missing in {image_id}.xml, skipping.")
                    continue
                # 转换边界框并写入标签文件
                bb = convert_box((w, h), [float(xmlbox.find(x).text) for x in ('xmin', 'xmax', 'ymin', 'ymax')])
                cls_id = names.index(cls)  # 类别ID
                line = " ".join(str(a) for a in (cls_id, *bb)) + '\n'
                out_file.write(line)
                print(f"Writing to file {lb_path}: {line.strip()}")

# 主代码部分
names = [
    "aeroplane", "bicycle", "bird", "boat", "bottle",
    "bus", "car", "cat", "chair", "cow",
    "diningtable", "dog", "horse", "motorbike", "person",
    "pottedplant", "sheep", "sofa", "train", "tvmonitor"
]

# 数据集路径
dir = Path("D:/.../ultralytics/datasets/VOC")
path = dir / 'images/VOCdevkit'

# 遍历年份和数据集类型(训练、验证、测试)
for year, image_set in ('2012', 'train'), ('2012', 'val'), ('2007', 'train'), ('2007', 'val'), ('2007', 'test'):
    imgs_path = dir / 'images' / f'{image_set}{year}'  # 图片存储路径
    lbs_path = dir / 'labels' / f'{image_set}{year}'  # 标签存储路径
    imgs_path.mkdir(exist_ok=True, parents=True)  # 创建图片目录
    lbs_path.mkdir(exist_ok=True, parents=True)  # 创建标签目录

    # 读取图像ID列表
    with open(path / f'VOC{year}/ImageSets/Main/{image_set}.txt') as f:
        image_ids = f.read().strip().split()
    # 遍历每个图像ID并进行处理
    for image_id in tqdm(image_ids, desc=f'{image_set}{year}'):
        img_path = path / f'VOC{year}/JPEGImages/{image_id}.jpg'  # 旧的图片路径

        # 转换标签为YOLO格式
        convert_label(path, lb_path, year, image_id, names)

        # 检查图像文件是否存在,若不存在则跳过
        if not img_path.exists():
            print(f"Warning: File {img_path} does not exist, skipping.")
            continue

        # 移动图像到新的路径
        img_path.rename(imgs_path / img_path.name)

        lb_path = (lbs_path / img_path.name).with_suffix('.txt')  # 新的标签路径
- 运行完检查一下labels中txt文件是否有数据,有就不用管。没有运行一遍下面代码:
import xml.etree.ElementTree as ET
from tqdm import tqdm
from pathlib import Path

# 转换标签的函数
def convert_label(path, lb_path, year, image_id, names):
    # 转换边界框的函数
    def convert_box(size, box):
        dw, dh = 1. / size[0], 1. / size[1]
        x, y, w, h = (box[0] + box[1]) / 2.0 - 1, (box[2] + box[3]) / 2.0 - 1, box[1] - box[0], box[3] - box[2]
        print(f"Original box: {box}, Converted box: {(x * dw, y * dh, w * dw, h * dh)}")
        return x * dw, y * dh, w * dw, h * dh

    # 打开XML文件,解析图像的标注信息
    in_file = open(path / f'VOC{year}/Annotations/{image_id}.xml')
    tree = ET.parse(in_file)
    root = tree.getroot()
    print(ET.tostring(root, encoding='utf8').decode('utf8'))  # 打印 XML 文件的结构以检查节点

    # 获取图像的尺寸信息
    size = root.find('size')
    if size is None:
        print(f"Size information missing in {image_id}.xml, skipping.")
        return
    w = int(size.find('width').text)
    h = int(size.find('height').text)

    # 打开标签文件进行写入
    with open(lb_path, 'w') as out_file:
        for obj in root.iter('object'):
            cls = obj.find('name').text
            print(f"Object class in XML: {cls}")
            if cls in names:
                print(f"Class {cls} found in names list")
                xmlbox = obj.find('bndbox')
                if xmlbox is None:
                    print(f"Bounding box information missing in {image_id}.xml, skipping.")
                    continue
                # 转换边界框并写入标签文件
                bb = convert_box((w, h), [float(xmlbox.find(x).text) for x in ('xmin', 'xmax', 'ymin', 'ymax')])
                cls_id = names.index(cls)  # 类别ID
                line = " ".join(str(a) for a in (cls_id, *bb)) + '\n'
                out_file.write(line)
                print(f"Writing to file {lb_path}: {line.strip()}")

# 主代码部分
names = [
    "aeroplane", "bicycle", "bird", "boat", "bottle",
    "bus", "car", "cat", "chair", "cow",
    "diningtable", "dog", "horse", "motorbike", "person",
    "pottedplant", "sheep", "sofa", "train", "tvmonitor"
]

# 数据集路径
dir = Path("D:/.../ultralytics/datasets/VOC")
path = dir / 'images/VOCdevkit'

# 遍历年份和数据集类型(训练、验证、测试)
for year, image_set in ('2012', 'train'), ('2012', 'val'), ('2007', 'train'), ('2007', 'val'), ('2007', 'test'):
    imgs_path = dir / 'images' / f'{image_set}{year}'  # 图片存储路径
    lbs_path = dir / 'labels' / f'{image_set}{year}'  # 标签存储路径
    imgs_path.mkdir(exist_ok=True, parents=True)  # 创建图片目录
    lbs_path.mkdir(exist_ok=True, parents=True)  # 创建标签目录

    # 读取图像ID列表
    with open(path / f'VOC{year}/ImageSets/Main/{image_set}.txt') as f:
        image_ids = f.read().strip().split()
    # 遍历每个图像ID并进行处理
    for image_id in tqdm(image_ids, desc=f'{image_set}{year}'):
        img_path = path / f'VOC{year}/JPEGImages/{image_id}.jpg'  # 旧的图片路径
		lb_path = (lbs_path / img_path.name).with_suffix('.txt')  # 新的标签路径

        # 转换标签为YOLO格式
        convert_label(path, lb_path, year, image_id, names)

        # 检查图像文件是否存在,若不存在则跳过
        if not img_path.exists():
            print(f"Warning: File {img_path} does not exist, skipping.")
            continue

        # 移动图像到新的路径
        img_path.rename(imgs_path / img_path.name)
- 到此数据处理结束,下面就可以进行训练我们的模型。
3、训练模型
- 运行下面代码即可:
from ultralytics import YOLO

# 主程序入口(多线程要在主函数运行)
if __name__ == "__main__":
    # 加载预训练的 YOLO 模型
    model = YOLO('yolov8n.pt')  # 这里的 'yolov8n.pt' 可以是 YOLO 官方提供的预训练模型,或者你自己的模型

    # 开始训练
    model.train(
        data='D:/.../ultralytics/datasets/VOC/VOC.yaml',  # 数据配置文件路径
        epochs=50,        # 训练的轮数
        batch=64,         # 批次大小,可以根据显存调整(如果调高可能爆显存)
        imgsz=640,        # 输入图像的尺寸
        workers=4,        # 数据加载线程数
        name='my_yolo_voc',  # 训练结果保存目录的名称
        project='./runs/train' # 训练项目保存位置
    )
- 出现下面图即运行成功,等待模型训练完即可。

- 如何想看每一轮模型训练效果,可以到项目目录中runs\train\my_yolo_voc下的results.csv文件中看模型训练效果,训练完会有一个best.pt是50轮中最好训练效果的模型,可以用来进行对2007test数据集进行测试。
- 到此整个任务结束。


 746
746


 到【灌水乐园】发言


