


一、axios的安装与使用
1、什么是axios
axios(ajax i/o system):向服务器请求数据的一种技术,不止可以用在vue中,也可以用在react、nodejs中等
2、axios的安装
npm i axios3、使用
在main.js中导入:
import Axios from 'axios'配置:
Vue.prototype.$axios = Axios;4、应用
this.$axios.get()
this.$axios.post()
this.$axios.put()
二、axios的传参
1、get方式的传参
只有params方式(以url的形式去传参)
两种写法:
1)、直接url后面加参数
this.$axios.get('productDetails?id=5') //仅能选择指定的一个id值2)、 params属性传参
this.$axios.get('productDetails',{
    params:{
        id:this.id    //可选择所有id
    }
})
2、post方式的传参
1)、data方式
this.$axios({
    url: 'http://localhost:9999/productDetail',
    method: 'post',
    headers: {
        'Content-Type': 'application/json'
    },
    data: {
        user: 'doubleyong',
        pwd: '123'
    }
}).then((res) => {
        console.log(res)
    }).catch((err) => {
        console.log(err)
    })

写法二:data方式
this.$axios.post('/api/user/login',{username: this.user, pwd: this.pwd },
{
    headers: {
        'Content-Type': 'application/json'
    }
}).then((res) => {
        console.log(res)
    })
2)、params方式(以url的形式去传参)
this.$axios({
    url: '/api/user/login' ,
    method: 'post',
    headers: {
        'Content-Type': 'application/json'
    },
    params:{
        username: this.user,
        pwd: this.pwd
    }
}).then((res) => {
        console.log(res)
    })

写法二:
this.$axios.post('http://localhost:9999/productDetail', {
    user: 'doubleyong',
    pwd: '123'
},{
    params: {
        id: 123
    },
    headers: {
        'Content-Type': 'application/json'
    }
}).then(function (res) {
        console.log(res)
    })
3、扩展
axios中请求参数为formData时怎么传参?
答:http://bugshouji.com/bbs-read-run?tid=1202
Axios参数问题,只需要值的情况(不传对象)
答:https://blog.youkuaiyun.com/yangyangkl123/article/details/109022628
vue中get请求如何传递数组参
答:https://blog.youkuaiyun.com/yangyangkl123/article/details/108997644
三、跨域
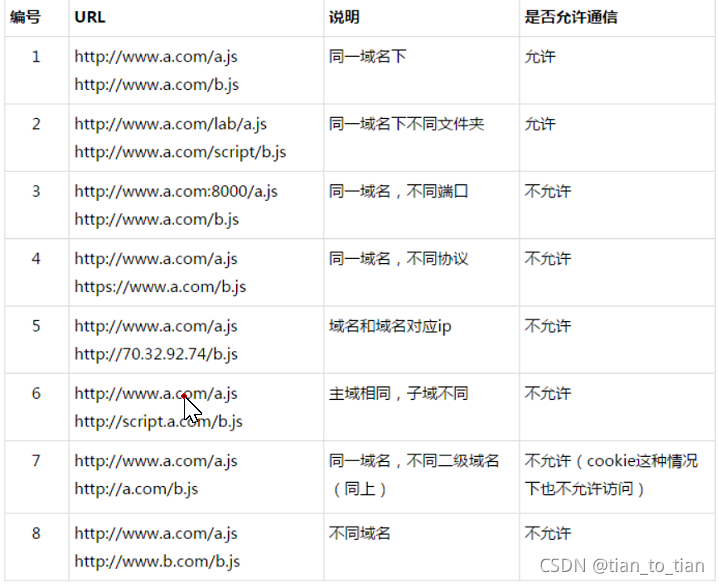
1、什么是跨域?
协议、域名、端口三者中有一个不一样,则为跨域。
2、为什么要有跨域?
参考:http://bugshouji.com/bbs-read-run?tid=337 (同源策略)
3、跨域得实现
三种方案:
方法一:代理跨域
参考:http://bugshouji.com/bbs-read-run?tid=1149
方法二:JSONP跨域(原理:回调函数)
参考:http://bugshouji.com/bbs-read-run?tid=108
方法三:服务端解决跨域(属于XHR2跨域)
nodejs中cors跨域
myapp.all('*', function(req, res, next) {
     res.header("Access-Control-Allow-Origin", "*");
     res.header("Access-Control-Allow-Headers", "X-Requested-With,X_Requested_With,Content-Type");
    // res.header("Content-Type", "application/json;charset=utf-8");  //注,如果包括页面等非json, 不要这句
     next();
 });
四、拦截器的使用
请求拦截:通常用于显示loading组件及添加token等操作,代码如下:
// 拦截Axios发起的所有请求,给请求添加token
Axios.interceptors.request.use(
    config => {
        vm.$store.dispatch('loadingStart'); // 显示loading组件
        if (store.getters.getToken) {  // 判断是否存在token,如果存在的话,则每个http header都加上token
            config.headers['Authorization'] = store.getters.getToken;
        }else{
            config.headers['Authorization'] = '';
        }
            return config;
    },
    err => {
        return Promise.reject(err);
    }
);
五、Axios的封装
import Axios from 'axios'

// const ConfigBaseURL = 'https://localhost:9999/'
// 使用create方法创建axios实例
const Service = Axios.create({
  // baseURL: ConfigBaseURL, // 1. 设置默认地址
  timeout: 7000 // 2. 请求超时时间

})

// 3. 给POST请求添加请求头设置(不同项目,值不一样)
Service.defaults.headers.post['Content-Type'] = 'application/json;charset=UTF-8'

Service.interceptors.request.use(config => {
  console.log('请求来了')
  return config
}, err => {
  console.log(err)
})

Service.interceptors.response.use(config => {
  console.log('响应来了')
  return config
}, err => {
  console.log(err)
})

export default Service


 2144
2144

 被折叠的 条评论
为什么被折叠?
被折叠的 条评论
为什么被折叠?
 到【灌水乐园】发言


