 计算机视觉:增强现实与姿态估计


 这篇博客探讨了如何使用平面和标记物进行姿态估计,通过图像处理和特征匹配计算相机姿态。还展示了如何在图像中放置虚拟物体,实现类似AR应用的效果,涉及到SIFT特征、RANSAC算法和OpenGL的使用。
1.以平面和标记物进行姿态估计
平面和标记物姿态估计可以通过图像已标记的物体,和已经标定的照相机来计算得出相机拍摄时候的姿态(相机的位移和旋转变换)
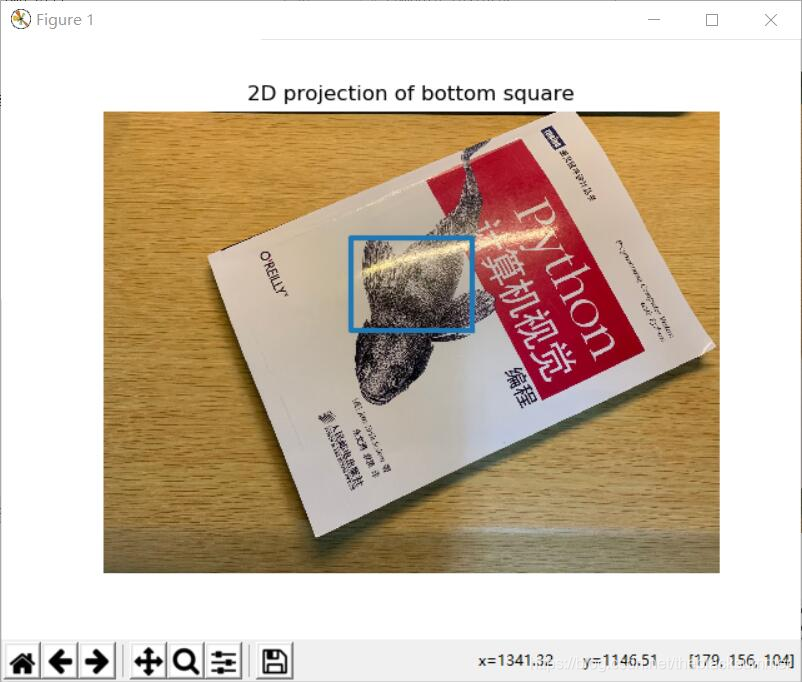
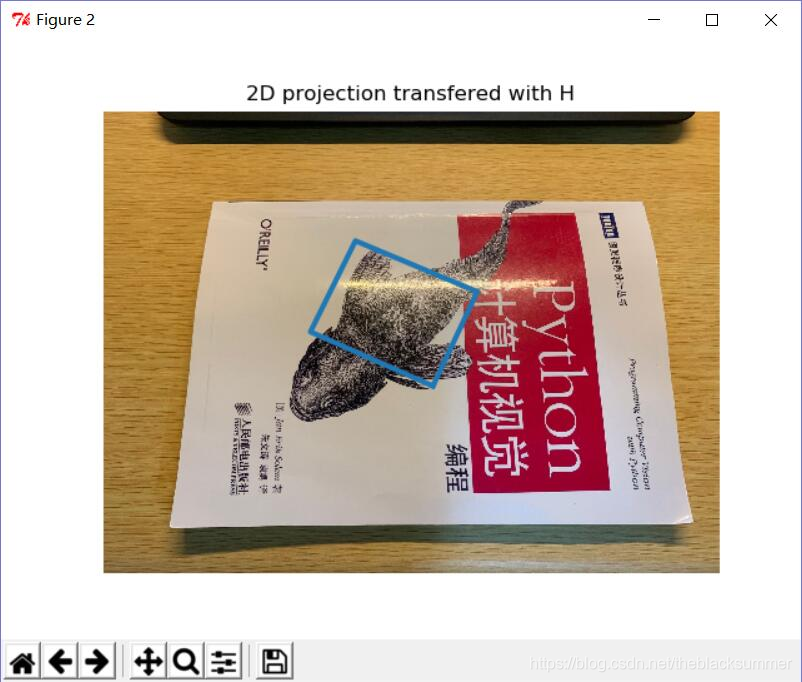
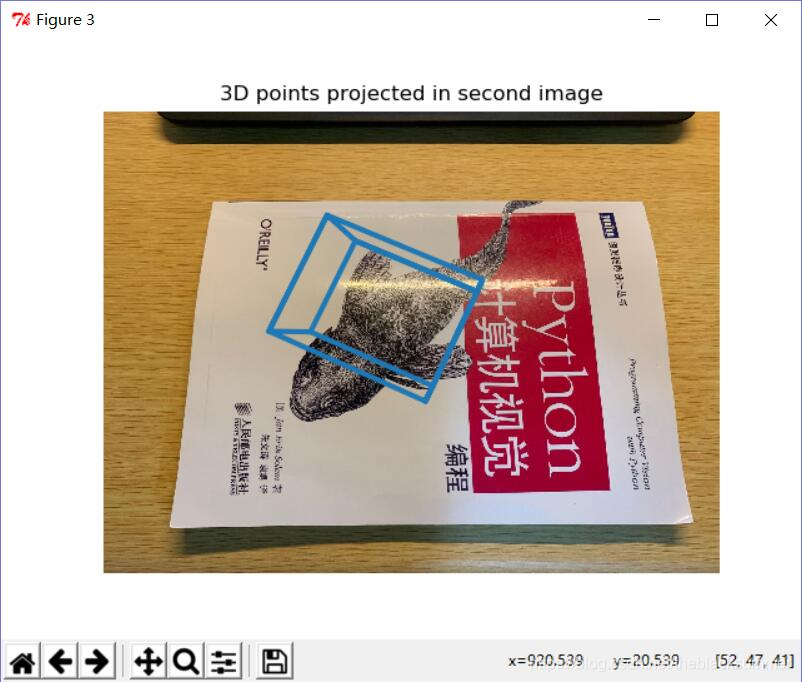
这种方法的思路如下。我们有两张不同角度拍摄的图像。首先,通过sift特征提取,RANSAC算法得到估计的单应性矩阵(关于SIFT,RANSAC和单应性矩阵,在我之前的博文有介绍)。其次,因为这个单应性矩阵是估计出来,所以代码中会对其进行验证,通过画一个正方形来判断单应性矩阵是否正确。最后,在画出正方体来看出相机的物理位置的变换。
代码:
from pylab import *
from PIL import Image
from OpenGL.GL import *
from OpenGL.GLU import *
from OpenGL.GLUT import *
If you have PCV installed, these imports should work
from PCV.geometry import homography, camera
from PCV.localdescriptors import sift
“”"
This is the augmented reality and pose estimation cube example from Section 4.3.
“”"
def cube_points(c, wid):
“”" Creates a list of points for plotting
a cube with plot. (the first 5 points are
the bottom square, some sides repeated). “”"
p = []
# bottom
p.append([c[0] - wid, c[1] - wid, c[2] - wid])
p.append([c[0] - wid, c[1] + wid, c[2] - wid])
p.append([c[0] + wid, c[1] + wid, c[2] - wid])
p.append([c[0] + wid, c[1] - wid, c[2] - wid])
p.append([c[0] - wid, c[1] - wid, c[2] - wid]) # same as first to close plot
# top
p.append([c[0] - wid, c[1] - wid, c[2] + wid])
p.append([c[0] - wid, c[1] + wid, c[2] + wid])
p.append([c[0] + wid, c[1] + wid, c[2] + wid])
p.append([c[0] + wid, c[1] - wid, c[2] + wid])
p.append([c[0] - wid, c[1] - wid, c[2] + wid])  # same as first to close plot

# vertical sides
p.append([c[0] - wid, c[1] - wid, c[2] + wid])
p.append([c[0] - wid, c[1] + wid, c[2] + wid])
p.append([c[0] - wid, c[1] + wid, c[2] - wid])
p.append([c[0] + wid, c[1] + wid, c[2] - wid])
p.append([c[0] + wid, c[1] + wid, c[2] + wid])
p.append([c[0] + wid, c[1] - wid, c[2] + wid])
p.append([c[0] + wid, c[1] - wid, c[2] - wid])

return array(p).T
def my_calibration(sz):
“”"
Calibration function for the camera (iPhone4) used in this example.
“”"
row, col = sz
fx = 2555 * col / 2592
fy = 2586 * row / 1936
K = diag([fx, fy, 1])
K[0, 2] = 0.5 * col
K[1, 2] = 0.5 * row
return K
compute features
sift.process_image(‘E:/Py_code/photo/Fourth/rs1.jpg’, ‘im0.sift’)
l0, d0 = sift.read_features_from_file(‘im0.sift’)
sift.process_image(‘E:/Py_code/photo/Fourth/rs2.jpg’, ‘im1.sift’)
l1, d1 = sift.read_features_from_file(‘im1.sift’)
match features and estimate homography
matches = sift.match_twosided(d0, d1)
ndx = matches.nonzero()[0]
fp = homography.make_homog(l0[ndx, :2].T)
ndx2 = [int(matches[i]) for i in ndx]
tp = homography.make_homog(l1[ndx2, :2].T)
model = homography.RansacModel()
H, inliers = homography.H_from_ransac(fp, tp, model)
camera calibration
K = my_calibration((1080, 1920))
3D points at plane z=0 with sides of length 0.2
box = cube_points([0, 0, 0.1], 0.1)
project bottom square in first image
cam1 = camera.Camera(hstack((K, dot(K, array([[0], [0], [-1]])))))
first points are the bottom square
box_cam1 = cam1.project(homography.make_homog(box[:, :5]))
use H to transfer points to the second image
box_trans = homography.normalize(dot(H, box_cam1))
compute second camera matrix from cam1 and H
cam2 = camera.Camera(dot(H, cam1.P))
A = dot(linalg.inv(K), cam2.P[:, :3])
A = array([A[:, 0], A[:, 1], cross(A[:, 0], A[:, 1])]).T
cam2.P[:, :3] = dot(K, A)
project with the second camera
box_cam2 = cam2.project(homography.make_homog(box))
plotting
im0 = array(Image.open(‘E:/Py_code/photo/Fourth/rs1.jpg’))
im1 = array(Image.open(‘E:/Py_code/photo/Fourth/rs2.jpg’))
figure()
imshow(im0)
plot(box_cam1[0, :], box_cam1[1, :], linewidth=3)
title(‘2D projection of bottom square’)
axis(‘off’)
figure()
imshow(im1)
plot(box_trans[0, :], box_trans[1, :], linewidth=3)
title(‘2D projection transfered with H’)
axis(‘off’)
figure()
imshow(im1)
plot(box_cam2[0, :], box_cam2[1, :], linewidth=3)
title(‘3D points projected in second image’)
axis(‘off’)
show()
实验结果:
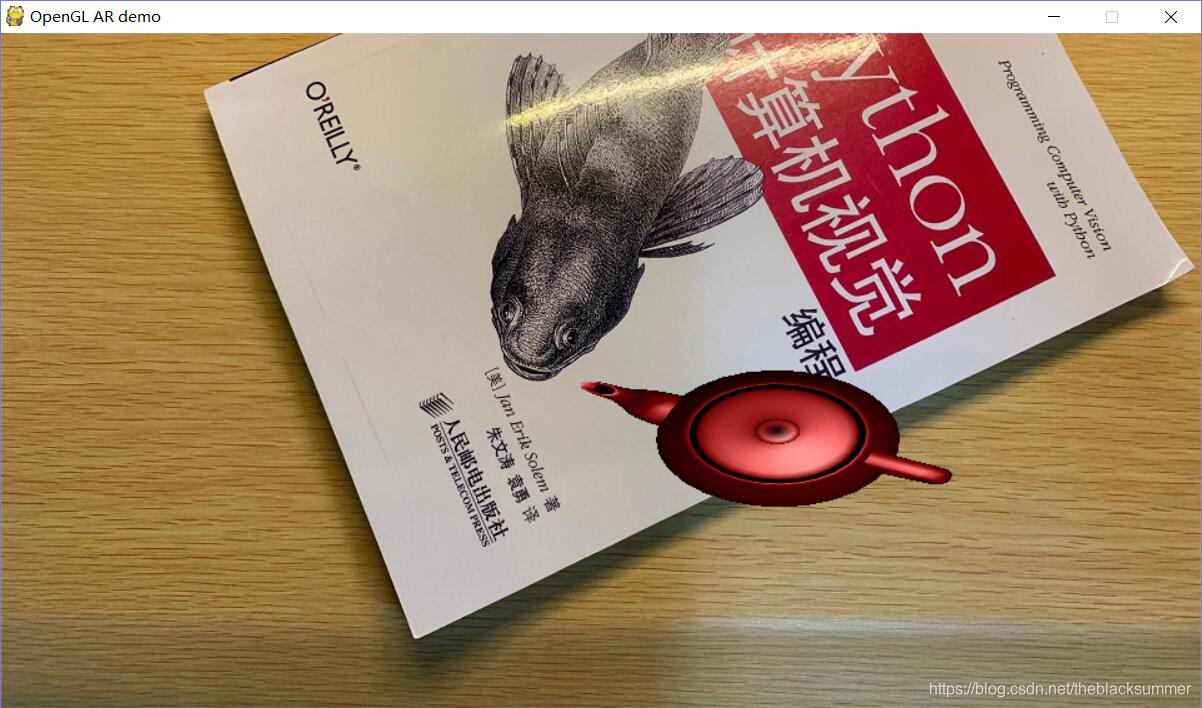
2.在图像中放置虚拟物体
这个的实现,就类似AR的应用,在标记的物体中添加虚拟的物体,只是这个的实现是在图像上,而不是针对视频。
代码:
import math
import pickle
from pylab import *
from OpenGL.GL import *
from OpenGL.GLU import *
from OpenGL.GLUT import *
import pygame, pygame.image
from pygame.locals import *
from PCV.geometry import homography, camera
from PCV.localdescriptors import sift
def cube_points(c, wid):
“”" Creates a list of points for plotting
a cube with plot. (the first 5 points are
the bottom square, some sides repeated). “”"
p = []
# bottom
p.append([c[0] - wid, c[1] - wid, c[2] - wid])
p.append([c[0] - wid, c[1] + wid, c[2] - wid])
p.append([c[0] + wid, c[1] + wid, c[2] - wid])
p.append([c[0] + wid, c[1] - wid, c[2] - wid])
p.append([c[0] - wid, c[1] - wid, c[2] - wid]) # same as first to close plot
# top
p.append([c[0] - wid, c[1] - wid, c[2] + wid])
p.append([c[0] - wid, c[1] + wid, c[2] + wid])
p.append([c[0] + wid, c[1] + wid, c[2] + wid])
p.append([c[0] + wid, c[1] - wid, c[2] + wid])
p.append([c[0] - wid, c[1] - wid, c[2] + wid])  # same as first to close plot

# vertical sides
p.append([c[0] - wid, c[1] - wid, c[2] + wid])
p.append([c[0] - wid, c[1] + wid, c[2] + wid])
p.append([c[0] - wid, c[1] + wid, c[2] - wid])
p.append([c[0] + wid, c[1] + wid, c[2] - wid])
p.append([c[0] + wid, c[1] + wid, c[2] + wid])
p.append([c[0] + wid, c[1] - wid, c[2] + wid])
p.append([c[0] + wid, c[1] - wid, c[2] - wid])

return array(p).T
def my_calibration(sz):
row, col = sz
fx = 2555 * col / 2592
fy = 2586 * row / 1936
K = diag([fx, fy, 1])
K[0, 2] = 0.5 * col
K[1, 2] = 0.5 * row
return K
def set_projection_from_camera(K):
glMatrixMode(GL_PROJECTION)
glLoadIdentity()
fx = K[0, 0]
fy = K[1, 1]
fovy = 2 * math.atan(0.5 * height / fy) * 180 / math.pi
aspect = (width * fy) / (height * fx)
near = 0.1
far = 100.0
gluPerspective(fovy, aspect, near, far)
glViewport(0, 0, width, height)
def set_modelview_from_camera(Rt):
glMatrixMode(GL_MODELVIEW)
glLoadIdentity()
Rx = np.array([[1, 0, 0], [0, 0, -1], [0, 1, 0]])
R = Rt[:, :3]
U, S, V = np.linalg.svd®
R = np.dot(U, V)
R[0, :] = -R[0, :]
t = Rt[:, 3]
M = np.eye(4)
M[:3, :3] = np.dot(R, Rx)
M[:3, 3] = t
M = M.T
m = M.flatten()
glLoadMatrixf(m)
def draw_background(imname):
bg_image = pygame.image.load(imname).convert()
bg_data = pygame.image.tostring(bg_image, “RGBX”, 1)
glMatrixMode(GL_MODELVIEW)
glLoadIdentity()
glClear(GL_COLOR_BUFFER_BIT | GL_DEPTH_BUFFER_BIT)
glEnable(GL_TEXTURE_2D)
glBindTexture(GL_TEXTURE_2D, glGenTextures(1))
glTexImage2D(GL_TEXTURE_2D, 0, GL_RGBA, width, height, 0, GL_RGBA, GL_UNSIGNED_BYTE, bg_data)
glTexParameterf(GL_TEXTURE_2D, GL_TEXTURE_MAG_FILTER, GL_NEAREST)
glTexParameterf(GL_TEXTURE_2D, GL_TEXTURE_MIN_FILTER, GL_NEAREST)
glBegin(GL_QUADS)
glTexCoord2f(0.0, 0.0);
glVertex3f(-1.0, -1.0, -1.0)
glTexCoord2f(1.0, 0.0);
glVertex3f(1.0, -1.0, -1.0)
glTexCoord2f(1.0, 1.0);
glVertex3f(1.0, 1.0, -1.0)
glTexCoord2f(0.0, 1.0);
glVertex3f(-1.0, 1.0, -1.0)
glEnd()
glDeleteTextures(1)
def draw_teapot(size):
glEnable(GL_LIGHTING)
glEnable(GL_LIGHT0)
glEnable(GL_DEPTH_TEST)
glClear(GL_DEPTH_BUFFER_BIT)
glMaterialfv(GL_FRONT, GL_AMBIENT, [0, 0, 0, 0])
glMaterialfv(GL_FRONT, GL_DIFFUSE, [0.0, 0.5, 0.5, 0.0])
glMaterialfv(GL_FRONT, GL_SPECULAR, [0.7, 0.6, 0.6, 0.0])
glMaterialf(GL_FRONT, GL_SHININESS, 0.25 * 128.0)
glutSolidTeapot(size)
width, height = 960,540
def setup():
pygame.init()
pygame.display.set_mode((width, height), OPENGL | DOUBLEBUF)
pygame.display.set_caption(“OpenGL AR demo”)
compute features
sift.process_image(‘E:/Py_code/photo/Fourth/s_re1.jpg’, ‘im0.sift’)
l0, d0 = sift.read_features_from_file(‘im0.sift’)
sift.process_image(‘E:/Py_code/photo/Fourth/s_re2.jpg’, ‘im1.sift’)
l1, d1 = sift.read_features_from_file(‘im1.sift’)
match features and estimate homography
matches = sift.match_twosided(d0, d1)
ndx = matches.nonzero()[0]
fp = homography.make_homog(l0[ndx, :2].T)
ndx2 = [int(matches[i]) for i in ndx]
tp = homography.make_homog(l1[ndx2, :2].T)
model = homography.RansacModel()
H, inliers = homography.H_from_ransac(fp, tp, model)
K = my_calibration((747, 1000))
cam1 = camera.Camera(hstack((K, dot(K, array([[0], [0], [-1]])))))
box = cube_points([0, 0, 0.1], 0.1)
box_cam1 = cam1.project(homography.make_homog(box[:, :5]))
box_trans = homography.normalize(dot(H, box_cam1))
cam2 = camera.Camera(dot(H, cam1.P))
A = dot(linalg.inv(K), cam2.P[:, :3])
A = array([A[:, 0], A[:, 1], cross(A[:, 0], A[:, 1])]).T
cam2.P[:, :3] = dot(K, A)
Rt = dot(linalg.inv(K), cam2.P)
setup()
draw_background(“E:/Py_code/photo/Fourth/s_re2.jpg”)
set_projection_from_camera(K)
set_modelview_from_camera(Rt)
draw_teapot(0.05)
pygame.display.flip()
while True:
for event in pygame.event.get():
if event.type == pygame.QUIT:
sys.exit()
实验结果:


 被折叠的 条评论
为什么被折叠?
被折叠的 条评论
为什么被折叠?
 到【灌水乐园】发言


