


 这篇博客深入探讨了ARM32和ARM64架构下,如何执行flush cache操作。在Arm32中,通过`flush_cache_all`和`v7_flush_dcache_all`函数来清除缓存,涉及到CLIDR寄存器和多级循环以遍历不同级别的缓存。而在Arm64中,使用类似的机制,但函数`__flush_dcache_all`在Linux 4.2之后被删除,取而代之的是使用`msr`、`mrs`和`dc`指令进行缓存清理。
Arm32 flush cache函数
函数:flush_cache_all
定义:
#define flush_cache_all() __cpuc_flush_kern_all()
从sharkl3的32 bit的System.map文件看,此函数最终对应的是下面的函数
v7_flush_kern_cache_all
ENTRY(v7_flush_kern_cache_all)
ARM( stmfd sp!, {r4-r5, r7, r9-r11, lr} )
THUMB( stmfd sp!, {r4-r7, r9-r11, lr} )
bl v7_flush_dcache_all
mov r0, #0
ALT_SMP(mcr p15, 0, r0, c7, c1, 0) @ invalidate I-cache inner shareable
ALT_UP(mcr p15, 0, r0, c7, c5, 0) @ I+BTB cache invalidate
ARM( ldmfd sp!, {r4-r5, r7, r9-r11, lr} )
THUMB( ldmfd sp!, {r4-r7, r9-r11, lr} )
ret lr
ENDPROC(v7_flush_kern_cache_all)
其实从config中的CONFIG_CPU_CACHE_V7=y也可以看出。
v7_flush_dcache_all
ENTRY(v7_flush_dcache_all)
dmb @ ensure ordering with previous memory accesses
mrc p15, 1, r0, c0, c0, 1 @ read clidr
CLIDR寄存器介绍 读出来的值是0xc3000123 说明sharkl3中包含L1、L2、L3三级cache
ICB, [31:30]
0b10 L2 cache is the highest inner level.
0b11 L3 cache is the highest inner level.
LoC, [26:24]
0b010 L3 cache is not implemented.
0b011 L2 and L3 cache are implemented.
这个寄存器的值仅表明集成到core的cache,不包括外挂cache的信息。
mov r3, r0, lsr #23 @ move LoC into position
ands r3, r3, #7 << 1 @ extract LoC*2 from clidr r3是cache_level的个数
beq finished @ if loc is 0, then no need to clean
start_flush_levels:
mov r10, #0 @ start clean at cache level 0 从L1 cache开始
flush_levels: cache level循环
add r2, r10, r10, lsr #1 @ work out 3x current cache level
mov r1, r0, lsr r2 @ extract cache type bits from clidr
and r1, r1, #7 @ mask of the bits for current cache only
cmp r1, #2 @ see what cache we have at this level
blt skip @ skip if no cache, or just i-cache
#ifdef CONFIG_PREEMPT
save_and_disable_irqs_notrace r9 @ make cssr&csidr read atomic
#endif
CSSELR 寄存器介绍:选择要操作的cache_level 比如L1、L2、L3
Level, [3:1]
0b000 L1.
0b001 L2. Only if L2 is present, or if no L2 present then L3 is present.
0b010 L3. Only if L3 exists.
InD, [0]
0b0 Data or unified cache.
0b1 Instruction cache.
mcr p15, 2, r10, c0, c0, 0 @ select current cache level in cssr 即CSSELR 更改cache_level
isb @ isb to sych the new cssr&csidr
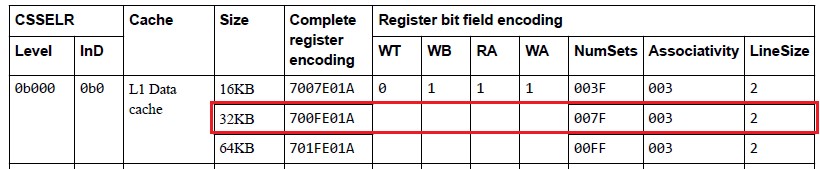
mrc p15, 1, r1, c0, c0, 0 @ read the new csidr 读出来的值是0x700fe01a
当前的值反应下面的配置,WB=RA=WA=1 (支持写回、读写分配)4ways、128sets,linesize=64Bytes
#ifdef CONFIG_PREEMPT
restore_irqs_notrace r9
#endif
and r2, r1, #7 @ extract the length of the cache lines linesize == 64
add r2, r2, #4 @ add 4 (line length offset)
movw r4, #0x3ff
ands r4, r4, r1, lsr #3 @ find maximum number on the way size == 4
clz r5, r4 @ find bit position of way size increment
movw r7, #0x7fff
ands r7, r7, r1, lsr #13 @ extract max number of the index size sets == 128
loop1: ways循环
mov r9, r7 @ create working copy of max index
loop2: sets循环
ARM( orr r11, r10, r4, lsl r5 ) @ factor way and cache number into r11
THUMB( lsl r6, r4, r5 )
THUMB( orr r11, r10, r6 ) @ factor way and cache number into r11
ARM( orr r11, r11, r9, lsl r2 ) @ factor index number into r11
THUMB( lsl r6, r9, r2 )
THUMB( orr r11, r11, r6 ) @ factor index number into r11
mcr p15, 0, r11, c7, c14, 2 @ clean & invalidate by set/way (指定好的set/way)
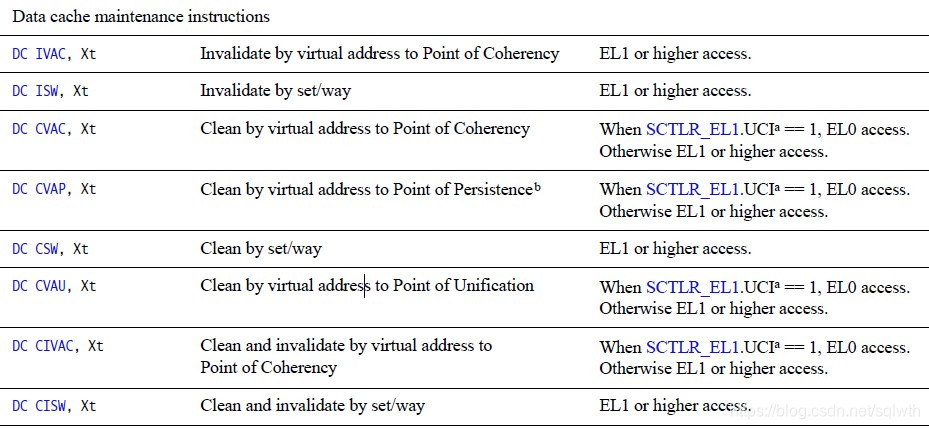
flush对应的操作是 clean+invalid
clean是把cache中的内容刷入下一级存储中
invalid是告诉cpu当前cache中的数据无效,cpu需要从下一级存储中重新去读
执行DCCISW操作:Data Cache line Clean and Invalidate by Set/Way 参数定义如下
SetWay, bits [31:4] 指定set/way
• Way, bits[31:32-A], the number of the way to operate on.
• Set, bits[B-1:L], the number of the set to operate on.
A = Log2(ASSOCIATIVITY), L = Log2(LINELEN), B = (L + S), S = Log2(NSETS).
Level, bits [3:1]
• 0: L1 1: L2 2:L3 …
subs r9, r9, #1 @ decrement the index set的循环索引
bge loop2
subs r4, r4, #1 @ decrement the way ways的循环索引
bge loop1
skip:
add r10, r10, #2 @ increment cache number 进入flush_levels循环,修改r10
cmp r3, r10 和r3对比,如果r3比r10大
bgt flush_levels 进入flush_levels cache level循环
finished:
mov r10, #0 @ switch back to cache level 0
mcr p15, 2, r10, c0, c0, 0 @ select current cache level in cssr 切换到L1 cache
dsb st
isb
ret lr
ENDPROC(v7_flush_dcache_all)
三层循环,大概是下面的意思,省略一些判断环节
level_num = get_cache_level();
for (int i = 0; i < level_num; i++) {
set_cache_level(i);
get_cache_info(&way_num, &set_num);
for(int j = way_num; j > 0; j--) {
for(int k = set_num; k > 0; k--) {
clean_inv_dcache(j,k);
}
}
}
Arm64 flush dcache函数
__flush_dcache_all
下面这个函数从Linux 4.2中被删掉了,这个是4.1.52的代码,对应的英文注释一致
__flush_dcache_all:
dmb sy // ensure ordering with previous memory accesses
mrs x0, clidr_el1 // read clidr
and x3, x0, #0x7000000 // extract loc from clidr
lsr x3, x3, #23 // left align loc bit field
cbz x3, finished // if loc is 0, then no need to clean
mov x10, #0 // start clean at cache level 0
loop1: cache level循环
add x2, x10, x10, lsr #1 // work out 3x current cache level
lsr x1, x0, x2 // extract cache type bits from clidr
and x1, x1, #7 // mask of the bits for current cache only
cmp x1, #2 // see what cache we have at this level
b.lt skip // skip if no cache, or just i-cache
save_and_disable_irqs x9 // make CSSELR and CCSIDR access atomic
msr csselr_el1, x10 // select current cache level in csselr
isb // isb to sych the new cssr&csidr
mrs x1, ccsidr_el1 // read the new ccsidr
restore_irqs x9
and x2, x1, #7 // extract the length of the cache lines
add x2, x2, #4 // add 4 (line length offset)
mov x4, #0x3ff
and x4, x4, x1, lsr #3 // find maximum number on the way size
clz w5, w4 // find bit position of way size increment
mov x7, #0x7fff
and x7, x7, x1, lsr #13 // extract max number of the index size
loop2: ways循环
mov x9, x4 // create working copy of max way size
loop3: sets循环
lsl x6, x9, x5
orr x11, x10, x6 // factor way and cache number into x11
lsl x6, x7, x2
orr x11, x11, x6 // factor index number into x11
dc cisw, x11 // clean & invalidate by set/way
subs x9, x9, #1 // decrement the way
b.ge loop3
subs x7, x7, #1 // decrement the index
b.ge loop2
skip:
add x10, x10, #2 // increment cache number
cmp x3, x10
b.gt loop1
finished:
mov x10, #0 // swith back to cache level 0
msr csselr_el1, x10 // select current cache level in csselr
dsb sy
isb
ret
ENDPROC(__flush_dcache_all)
SPRD的实现类似 函数名也是__flush_dcache_all。
在drivers/soc/sprd/debug/sysdump/sysdump64.h中
Arm64对应的刷新操作指令


 1368
1368

 被折叠的 条评论
为什么被折叠?
被折叠的 条评论
为什么被折叠?
 到【灌水乐园】发言


