


一、前言
前面我们主要讲解了写什么,讲解通过ini文件加载,自定义realm源(ishi加密),对用户认证和权限授权。这一章开始,我们开始整合shrio到web项目中,当然还是与我们之前的springmvc与mybatis整合。这里的mybatis不强求,如果你整合的时候也可以用hibernate,只不过是另一个数据框架。
二、整合spring
2.1 基础框架
语言准备好基础框架:springmvc+mybatis的整合文件,项目采用maven
2.2jar包导入,pom.xml引入
|
1
2
3
4
5
6
7
8
9
10
11
12
13
14
15
16
17
18
19
20
21
22
23
24
25
26
|
<!--======================================shrio=================================================-->
<
dependency
>
<
groupId
>org.apache.shiro</
groupId
>
<
artifactId
>shiro-core</
artifactId
>
<
version
>1.2.4</
version
>
</
dependency
>
<
dependency
>
<
groupId
>org.apache.shiro</
groupId
>
<
artifactId
>shiro-web</
artifactId
>
<
version
>1.2.4</
version
>
</
dependency
>
<
dependency
>
<
groupId
>org.apache.shiro</
groupId
>
<
artifactId
>shiro-spring</
artifactId
>
<
version
>1.2.4</
version
>
</
dependency
>
<
dependency
>
<
groupId
>org.apache.shiro</
groupId
>
<
artifactId
>shiro-ehcache</
artifactId
>
<
version
>1.2.4</
version
>
</
dependency
>
<
dependency
>
<
groupId
>org.apache.shiro</
groupId
>
<
artifactId
>shiro-quartz</
artifactId
>
<
version
>1.2.4</
version
>
</
dependency
>
|
2.3在web.xml配置filter
|
1
2
3
4
5
6
7
8
9
10
11
12
13
14
15
|
<!--===============================================shiro过虑器================================================-->
<!-- shiro过虑器,DelegatingFilterProx会从spring容器中找shiroFilter代理模式(律师模式) -->
<
filter
>
<
filter-name
>shiroFilter</
filter-name
>
<
filter-class
>org.springframework.web.filter.DelegatingFilterProxy</
filter-class
>
<!--设置为true有servlet容器控制filter声明周期-->
<
init-param
>
<
param-name
>targetFilterLifecycle</
param-name
>
<
param-value
>true</
param-value
>
</
init-param
>
</
filter
>
<
filter-mapping
>
<
filter-name
>shiroFilter</
filter-name
>
<
url-pattern
>/*</
url-pattern
>
</
filter-mapping
>
|
2.4在spring中配置filter
配置完毕web.xml,我们需要在spring设置我们filter,主要配置:(拒绝权限地址,用户认证跳转页面)1、过滤器,2、安全管理器, 3、自己定义realm
跟我们用ini配置是思想是一样的。拦截---交给shrio的filter---shrio拦截
(applicationContext-shiro.xml)
|
1
2
3
4
5
6
7
8
9
10
11
12
13
14
15
16
17
18
19
20
21
22
23
24
25
26
27
28
29
30
31
32
33
34
35
36
37
38
|
<
beans
xmlns
=
"http://www.springframework.org/schema/beans"
xmlns:xsi
=
"http://www.w3.org/2001/XMLSchema-instance"
xmlns:mvc
=
"http://www.springframework.org/schema/mvc"
xmlns:context
=
"http://www.springframework.org/schema/context"
xmlns:aop
=
"http://www.springframework.org/schema/aop"
xmlns:tx
=
"http://www.springframework.org/schema/tx"
xsi:schemaLocation="http://www.springframework.org/schema/beans
http://www.springframework.org/schema/beans/spring-beans-4.0.xsd
http://www.springframework.org/schema/mvc
http://www.springframework.org/schema/mvc/spring-mvc-4.0.xsd
http://www.springframework.org/schema/context
http://www.springframework.org/schema/context/spring-context-4.0.xsd
http://www.springframework.org/schema/aop
http://www.springframework.org/schema/aop/spring-aop-4.0.xsd
http://www.springframework.org/schema/tx
http://www.springframework.org/schema/tx/spring-tx-4.0.xsd ">
<!-- Shiro 的Web过滤器 -->
<!--1、与web.xml对应的bean-->
<
bean
id
=
"shiroFilter"
class
=
"org.apache.shiro.spring.web.ShiroFilterFactoryBean"
>
<
property
name
=
"securityManager"
ref
=
"securityManager"
/>
<!-- 如果没有认证将要跳转的登陆地址,http可访问的url,如果不在表单认证过虑器FormAuthenticationFilter中指定此地址就为身份认证地址 -->
<
property
name
=
"loginUrl"
value
=
"/login.action"
/>
<!-- 没有权限跳转的地址 -->
<
property
name
=
"unauthorizedUrl"
value
=
"/pages/jsp/refuse.jsp"
/>
<!--过滤定义,从上而下,蒋匿名的anon放最下面-->
<
property
name
=
"filterChainDefinitions"
>
<
value
>
/** anon
</
value
>
</
property
>
</
bean
>
<!-- 2、安全管理器 -->
<
bean
id
=
"securityManager"
class
=
"org.apache.shiro.web.mgt.DefaultWebSecurityManager"
>
<
property
name
=
"realm"
ref
=
"userRealm"
/>
</
bean
>
<!--3、realm-->
<
bean
id
=
"userRealm"
class
=
"com.ycy.shiro.CustomRealm"
/>
</
beans
>
|
2.4.1 shrio过滤器
上面所说的过滤器需要配置文件,配置如下
过滤器简称
对应的Java类
anon
org.apache.shiro.web.filter.authc.AnonymousFilter
authc
org.apache.shiro.web.filter.authc.FormAuthenticationFilter
authcBasic
org.apache.shiro.web.filter.authc.BasicHttpAuthenticationFilter
perms
org.apache.shiro.web.filter.authz.PermissionsAuthorizationFilter
port
org.apache.shiro.web.filter.authz.PortFilter
rest
org.apache.shiro.web.filter.authz.HttpMethodPermissionFilter
roles
org.apache.shiro.web.filter.authz.RolesAuthorizationFilter
ssl
org.apache.shiro.web.filter.authz.SslFilter
user
org.apache.shiro.web.filter.authc.UserFilter
logout
org.apache.shiro.web.filter.authc.LogoutFilter
Shiro-1.2.2内置的FilterChain
|
1
2
3
4
5
6
7
8
9
10
11
12
13
14
15
16
17
18
19
20
21
22
23
24
25
26
27
28
29
30
31
32
33
34
35
36
37
38
39
40
41
42
43
44
45
46
47
48
49
50
51
52
53
54
55
56
57
58
59
60
61
62
63
64
65
66
67
68
69
70
71
72
73
74
75
76
77
78
79
80
|
=========================================================================================================================
1)Shiro验证URL时,URL匹配成功便不再继续匹配查找(所以要注意配置文件中的URL顺序,尤其在使用通配符时)
故filterChainDefinitions的配置顺序为自上而下,以最上面的为准
2)当运行一个Web应用程序时,Shiro将会创建一些有用的默认Filter实例,并自动地在[main]项中将它们置为可用
自动地可用的默认的Filter实例是被DefaultFilter枚举类定义的,枚举的名称字段就是可供配置的名称
anon---------------org.apache.shiro.web.filter.authc.AnonymousFilter
authc--------------org.apache.shiro.web.filter.authc.FormAuthenticationFilter
perms--------------org.apache.shiro.web.filter.authz.PermissionAuthorizationFilter
port---------------org.apache.shiro.web.filter.authz.PortFilter
rest---------------org.apache.shiro.web.filter.authz.HttpMethodPermissionFilter
roles--------------org.apache.shiro.web.filter.authz.RolesAuthorizationFilter
ssl----------------org.apache.shiro.web.filter.authz.SslFilter
user---------------org.apache.shiro.web.filter.authz.UserFilter
=========================================================================================================================
3)通常可将这些过滤器分为两组
anon,authc,authcBasic,user是第一组认证过滤器
perms,port,rest,roles,ssl是第二组授权过滤器
注意user和authc不同:当应用开启了rememberMe时,用户下次访问时可以是一个user,但绝不会是authc,因为authc是需要重新认证的
user表示用户不一定已通过认证,只要曾被Shiro记住过登录状态的用户就可以正常发起请求,比如rememberMe
说白了,以前的一个用户登录时开启了rememberMe,然后他关闭浏览器,下次再访问时他就是一个user,而不会authc
=========================================================================================================================
4)举几个例子
/admin=authc,roles[admin] 表示用户必需已通过认证,并拥有admin角色才可以正常发起'/admin'请求
/edit=authc,perms[admin:edit] 表示用户必需已通过认证,并拥有admin:edit权限才可以正常发起'/edit'请求
/home=user 表示用户不一定需要已经通过认证,只需要曾经被Shiro记住过登录状态就可以正常发起'/home'请求
=========================================================================================================================
5)各默认过滤器常用如下(注意URL Pattern里用到的是两颗星,这样才能实现任意层次的全匹配)
/admins/**=anon 无参,表示可匿名使用,可以理解为匿名用户或游客
/admins/user/**=authc 无参,表示需认证才能使用
/admins/user/**=authcBasic 无参,表示httpBasic认证
/admins/user/**=user 无参,表示必须存在用户,当登入操作时不做检查
/admins/user/**=ssl 无参,表示安全的URL请求,协议为https
/admins/user/**=perms[user:add:*]
参数可写多个,多参时必须加上引号,且参数之间用逗号分割,如/admins/user/**=perms["user:add:*,user:modify:*"]
当有多个参数时必须每个参数都通过才算通过,相当于isPermitedAll()方法
/admins/user/**=port[8081]
当请求的URL端口不是8081时,跳转到schemal://serverName:8081?queryString
其中schmal是协议http或https等,serverName是你访问的Host,8081是Port端口,queryString是你访问的URL里的?后面的参数
/admins/user/**=rest[user]
根据请求的方法,相当于/admins/user/**=perms[user:method],其中method为post,get,delete等
/admins/user/**=roles[admin]
参数可写多个,多个时必须加上引号,且参数之间用逗号分割,如/admins/user/**=roles["admin,guest"]
当有多个参数时必须每个参数都通过才算通过,相当于hasAllRoles()方法
|
2.5自定义realm的编写
realm从数据库查询用户信息,将用户菜单、usercode、username等设置在SimpleAuthenticationInfo中。数据库表可参考前面几个章节的mapper.xml
|
1
2
3
4
5
6
7
8
9
10
11
12
13
14
15
16
17
18
19
20
21
22
23
24
25
26
27
28
29
30
31
32
33
34
35
36
37
38
39
40
41
42
43
44
45
46
47
48
49
50
51
52
53
54
55
56
57
58
59
60
61
62
63
64
65
66
67
68
69
70
71
72
73
74
75
76
77
78
79
80
81
82
83
84
85
86
87
88
89
90
91
92
93
94
95
96
97
98
99
100
101
102
103
104
105
106
107
108
109
110
111
112
113
114
115
116
117
118
119
120
121
122
123
124
125
126
127
128
129
130
131
132
133
134
135
136
137
138
139
140
141
142
143
144
145
|
package
com.ycy.shiro;
import
java.util.ArrayList;
import
java.util.List;
import
com.ycy.model.ActiveUser;
import
com.ycy.model.SysPermission;
import
com.ycy.model.SysUser;
import
com.ycy.service.SysService;
import
org.apache.shiro.SecurityUtils;
import
org.apache.shiro.authc.AuthenticationException;
import
org.apache.shiro.authc.AuthenticationInfo;
import
org.apache.shiro.authc.AuthenticationToken;
import
org.apache.shiro.authc.SimpleAuthenticationInfo;
import
org.apache.shiro.authz.AuthorizationInfo;
import
org.apache.shiro.authz.SimpleAuthorizationInfo;
import
org.apache.shiro.realm.AuthorizingRealm;
import
org.apache.shiro.subject.PrincipalCollection;
import
org.apache.shiro.util.ByteSource;
import
org.springframework.beans.factory.annotation.Autowired;
import
org.springframework.stereotype.Component;
import
org.springframework.stereotype.Service;
/**
*
* <p>
* Title: CustomRealm
* </p>
* <p>
* Description:自定义realm
* </p>
*/
public
class
CustomRealm
extends
AuthorizingRealm {
//注入service
@Autowired
private
SysService sysService;
// 设置realm的名称
@Override
public
void
setName(String name) {
super
.setName(
"customRealm"
);
}
// 用于认证
//realm的认证方法,从数据库查询用户信息
@Override
protected
AuthenticationInfo doGetAuthenticationInfo(
AuthenticationToken token)
throws
AuthenticationException {
// token是用户输入的用户名和密码
// 第一步从token中取出用户名
String userCode = (String) token.getPrincipal();
// 第二步:根据用户输入的userCode从数据库查询
SysUser sysUser =
null
;
try
{
sysUser = sysService.findSysUserByUserCode(userCode);
}
catch
(Exception e1) {
e1.printStackTrace();
}
// 如果查询不到返回null
if
(sysUser==
null
){
//
return
null
;
}
// 从数据库查询到密码
String password = sysUser.getPassword();
//盐
String salt = sysUser.getSalt();
// 如果查询到返回认证信息AuthenticationInfo
//activeUser就是用户身份信息
ActiveUser activeUser =
new
ActiveUser();
activeUser.setUserid(sysUser.getId());
activeUser.setUsercode(sysUser.getUsercode());
activeUser.setUsername(sysUser.getUsername());
//..
//根据用户id取出菜单
List<SysPermission> menus =
null
;
try
{
//通过service取出菜单
menus = sysService.findMenuListByUserId(sysUser.getId());
}
catch
(Exception e) {
e.printStackTrace();
}
//将用户菜单 设置到activeUser
activeUser.setMenus(menus);
//将activeUser设置simpleAuthenticationInfo
SimpleAuthenticationInfo simpleAuthenticationInfo =
new
SimpleAuthenticationInfo(
activeUser, password,ByteSource.Util.bytes(salt),
this
.getName());
return
simpleAuthenticationInfo;
}
// 用于授权
@Override
protected
AuthorizationInfo doGetAuthorizationInfo(
PrincipalCollection principals) {
//从 principals获取主身份信息
//将getPrimaryPrincipal方法返回值转为真实身份类型(在上边的doGetAuthenticationInfo认证通过填充到SimpleAuthenticationInfo中身份类型),
ActiveUser activeUser = (ActiveUser) principals.getPrimaryPrincipal();
//根据身份信息获取权限信息
//从数据库获取到权限数据
List<SysPermission> permissionList =
null
;
try
{
permissionList = sysService.findMenuListByUserId(activeUser.getUserid());
}
catch
(Exception e) {
e.printStackTrace();
}
//单独定一个集合对象
List<String> permissions =
new
ArrayList<String>();
if
(permissionList!=
null
){
for
(SysPermission sysPermission:permissionList){
//将数据库中的权限标签 符放入集合
permissions.add(sysPermission.getPercode());
}
}
//查到权限数据,返回授权信息(要包括 上边的permissions)
SimpleAuthorizationInfo simpleAuthorizationInfo =
new
SimpleAuthorizationInfo();
//将上边查询到授权信息填充到simpleAuthorizationInfo对象中
simpleAuthorizationInfo.addStringPermissions(permissions);
return
simpleAuthorizationInfo;
}
//清除缓存
public
void
clearCached() {
PrincipalCollection principals = SecurityUtils.getSubject().getPrincipals();
super
.clearCache(principals);
}
}
|
注意:先前的我们springmvc整合项目时候,先加载审springmvc:scan扫描是配置在springmvc里面,这个需要重新配置到spring
|
1
|
<
param-value
>classpath:spring/applicationContext-*.xml</
param-value
>
|
配置
|
1
|
<
context:component-scan
base-package
=
"com.ycy"
/>
|
到这个applicationContext-*.xml中里面,因为这个是第一加载顺序。
三、shrio实现登录退出实例
上面已经实现了整合,说白了就是加一个shrio的拦截器而已。真正的实现还没做,我们以登录退出来做一个实例。
3.1登录
使用FormAuthenticationFilter过虑器实现 ,原理如下:
将用户没有认证时,请求loginurl进行认证,用户身份和用户密码提交数据到loginurl
FormAuthenticationFilter拦截住取出request中的username和password(两个参数名称是可以配置的)
FormAuthenticationFilter调用realm传入一个token(username和password)
realm认证时根据username查询用户信息(在Activeuser中存储,包括 userid、usercode、username、menus)。
如果查询不到,realm返回null,FormAuthenticationFilter向request域中填充一个参数(记录了异常信息)
3.1.1 LoginController
|
1
2
3
4
5
6
7
8
9
10
11
12
13
14
15
16
17
18
19
20
21
22
23
24
25
26
27
28
29
30
31
32
33
34
35
36
37
38
39
40
41
42
43
44
45
46
47
48
49
50
51
52
53
54
55
56
57
58
59
60
61
62
63
64
65
66
67
68
69
70
71
72
73
|
package
com.ycy.controller;
import
com.ycy.Exception.CustomException;
import
com.ycy.model.ActiveUser;
import
com.ycy.service.SysService;
import
org.apache.shiro.authc.IncorrectCredentialsException;
import
org.apache.shiro.authc.UnknownAccountException;
import
org.springframework.beans.factory.annotation.Autowired;
import
org.springframework.stereotype.Controller;
import
org.springframework.web.bind.annotation.RequestMapping;
import
javax.servlet.http.HttpServletRequest;
import
javax.servlet.http.HttpSession;
/**
*
* <p>Title: LoginController</p>
* <p>Description: 登陆和退出</p>
*/
@Controller
public
class
LoginController {
@Autowired
private
SysService sysService;
//用户登陆提交方法
/*@RequestMapping("/login")
public String login(HttpSession session,String usercode,String password,String randomcode)throws Exception{
//校验验证码
//从session获取正确的验证码
String validateCode = (String)session.getAttribute("validateCode");
if(!randomcode.equals(validateCode)){
//抛出异常:验证码错误
throw new CustomException("验证码 错误 !");
}
//用户身份认证
ActiveUser activeUser = sysService.authenticat(usercode, password);
//记录session
session.setAttribute("activeUser", activeUser);
//重定向到商品查询页面
return "redirect:/first";
}
//用户退出
@RequestMapping("/logout")
public String logout(HttpSession session)throws Exception{
//session失效
session.invalidate();
//重定向到商品查询页面
return "redirect:/items/queryItems";
}*/
@RequestMapping
(
"/login"
)
public
String login(HttpServletRequest request)
throws
Exception{
//如果登录失败从request中获取认证异常信息,shrioLoginFailure就是shiro异常类的全限定名
String exceptionClassName = (String) request.getAttribute(
"shiroLoginFailure"
);
//根据shrio返回的异常路径判断,抛出指定异常信息
if
(exceptionClassName!=
null
){
if
(UnknownAccountException.
class
.getName().equals(exceptionClassName)){
//抛出异常
throw
new
CustomException(
"账户不存在"
);
}
else
if
(IncorrectCredentialsException.
class
.getName().equals(exceptionClassName)){
throw
new
CustomException(
"用户名/密码错误"
);
}
else
{
throw
new
Exception(
"未知错误"
);
}
}
return
"login"
;
}
}
|
3.1.2 配置applicationContext-shiro.xml
|
1
2
3
4
5
6
7
8
9
10
11
12
13
14
15
16
17
18
19
20
21
22
23
24
25
26
27
28
29
30
31
32
33
34
35
36
37
38
39
40
41
42
43
44
45
46
47
48
49
50
51
52
53
54
55
56
57
58
59
60
61
62
63
64
65
66
67
68
69
70
71
|
package
com.ycy.controller;
import
com.ycy.Exception.CustomException;
import
com.ycy.model.ActiveUser;
import
com.ycy.service.SysService;
import
org.apache.shiro.authc.IncorrectCredentialsException;
import
org.apache.shiro.authc.UnknownAccountException;
import
org.springframework.beans.factory.annotation.Autowired;
import
org.springframework.stereotype.Controller;
import
org.springframework.web.bind.annotation.RequestMapping;
import
javax.servlet.http.HttpServletRequest;
import
javax.servlet.http.HttpSession;
/**
*
* <p>Title: LoginController</p>
* <p>Description: 登陆和退出</p>
*/
@Controller
public
class
LoginController {
@Autowired
private
SysService sysService;
//用户登陆提交方法
/*@RequestMapping("/login")
public String login(HttpSession session,String usercode,String password,String randomcode)throws Exception{
//校验验证码
//从session获取正确的验证码
String validateCode = (String)session.getAttribute("validateCode");
if(!randomcode.equals(validateCode)){
//抛出异常:验证码错误
throw new CustomException("验证码 错误 !");
}
//用户身份认证
ActiveUser activeUser = sysService.authenticat(usercode, password);
//记录session
session.setAttribute("activeUser", activeUser);
//重定向到商品查询页面
return "redirect:/first";
}
//用户退出
@RequestMapping("/logout")
public String logout(HttpSession session)throws Exception{
//session失效
session.invalidate();
//重定向到商品查询页面
return "redirect:/items/queryItems";
}*/
@RequestMapping
(
"/login"
)
public
String login(HttpServletRequest request)
throws
Exception{
//如果登录失败从request中获取认证异常信息,shrioLoginFailure就是shiro异常类的全限定名
String exceptionClassName=(String)request.getAttribute(
"shiroLoginFailure"
);
//根据shrio返回的异常路径判断,抛出指定异常信息
if
(exceptionClassName!=
null
){
if
(UnknownAccountException.
class
.getName().equals(exceptionClassName)){
//抛出异常
throw
new
CustomException(
"账户不存在"
);
}
}
else
if
(IncorrectCredentialsException.
class
.getName().equals(exceptionClassName)){
throw
new
CustomException(
"用户名/密码错误"
);
}
return
"login"
;
}
}
|
3.1.3 加入首页数据
|
1
2
3
4
5
6
7
8
9
10
|
//系统首页
@RequestMapping
(
"/first"
)
public
String first(Model model)
throws
Exception{
//从shiro的session中取出activeUser
Subject subject= SecurityUtils.getSubject();
ActiveUser activeUser=(ActiveUser)subject.getPrincipal();
//通过model传送到页面
model.addAttribute(
"activeUser"
,activeUser);
return
"first"
;
}
|
3.2 退出
退出我们已经用shiro的。很简单
|
1
2
|
<!--请求logout,shrio擦除sssion-->
/logout=logout
|
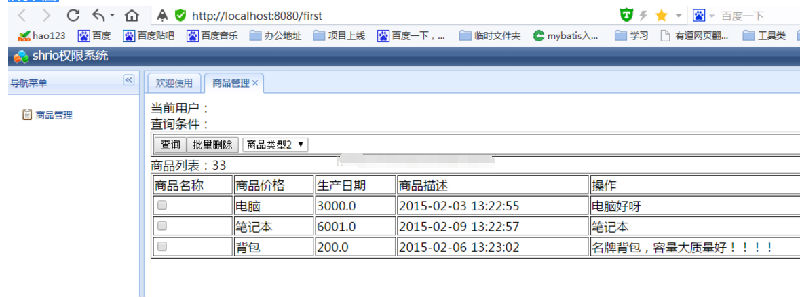
展示页面:
3.3 总结登录退出实例5步走
1、web.xml配置shiroFileter拦截器
2、applicationContext-shiro配置:1、首先配置 shiroFileter 2、设置securityManager 3、设置过滤表达式 4、设置我们自己的realm
3、再配置loginController,根据异常返回用户认证错误信息
4、配置FristController,从securityUtil.getInstance(),加入环境。然后获取subject主体,再用属性注入到实体
5、在frist.jsp 获取controller传入的activeUser数据展示。

 1112


 扫一扫


 被折叠的 条评论
为什么被折叠?
 到【灌水乐园】发言


