


作者简介:大家好,我是smart哥,前中兴通讯、美团架构师,现某互联网公司CTO
联系qq:184480602,加我进群,大家一起学习,一起进步,一起对抗互联网寒冬
函数式接口是什么
定义:
有且仅有一个抽象方法的接口(不包括默认方法、静态方法以及对Object方法的重写)
大家对函数式接口的认识应该都来自于Java8的Stream API,比如Predicate、Function,借助这些函数式接口,Stream才能写出一个个骚操作:
public class StreamTest {
public static void main(String[] args) {
List<User> userList = Lists.newArrayList();
userList.add(new User(1L, "彼得", 18));
userList.add(new User(2L, "鲍勃", 19));
userList.add(new User(3L, "威廉", 20));
userList.stream()
.filter(user -> user.getAge() > 18)
.map(User::getName)
.forEach(System.out::println);
}
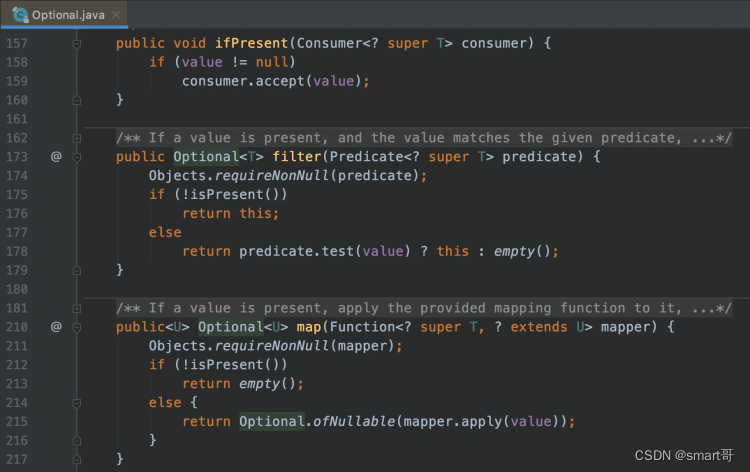
}点进filter方法,你会发现它的参数就是一个函数式接口Predicate:

我们可以从中得到启发:
函数式接口不同于以往的普通接口,它最大的作用其实是为了支持行为参数传递,比如传递Lambda、方法引用、函数式接口对应的实例对象等。
函数式接口的玩法介绍
public class FunctionalInterfaceTest {

    // 写了一个方法,参数是函数式接口。对于函数式接口,一般可以传递3类参数:实现类对象、Lambda、方法引用
    public static void execute(Runnable runnable) {
        try {
            runnable.run();
        } catch (Exception e) {
            e.printStackTrace();
        }
    }

    // 接下来演示分别传递3类参数。3~7演示的是方法引用。
    public static void main(String[] args) {
        // 1.传入匿名对象
        execute(new Runnable() {
            @Override
            public void run() {
                System.out.println("匿名对象");
            }
        });

        // 2.使用Lambda,()表示Runnable#run()的参数,println()是Runnable#run()的方法体
        execute(() -> System.out.println("使用lambda"));

        // 4.因为wrapPrintln和上面的println做的是同样的事,可以替换
        UserService userService = new UserService();
        execute(() -> userService.wrapPrintln());

        // 5.IDEA提示上面的代码可以优化成 方法引用
        execute(userService::wrapPrintln);

        // 7.你会发现上面的写法仍是对的,因为“仅有一个抽象方法”是对Runnable的约束,不要搞混
    }

    // 3.我们试着把println()移到wrapPrintln中
    static class UserService {
        public void wrapPrintln() {
            System.out.println("包装后的println");
        }

        // 6.给UserService新增一个方法
        public void anotherMethod() {
            System.out.println("另一个方法,不影响execute使用wrapPrintln");
        }
    }
}
使用场景1:抽取通用的处理代码
经过上面的铺垫,你应该能理解下面的写法,这是我在某客时间看到的一段代码。
public void sendBook() {
    try {
        this.service.sendBook();
    } catch (Throwable t) {
        this.notification.send(new SendFailure(t)));
        throw t;
    }
}

public void sendChapter() {
    try {
        this.service.sendChapter();
    } catch (Throwable t) {
        this.notification.send(new SendFailure(t)));
        throw t;
    }
}

public void startTranslation() {
    try {
        this.service.startTranslation();
    } catch (Throwable t) {
        this.notification.send(new SendFailure(t)));
        throw t;
    }
}
代码本身没有问题,但可以优化。上面三个方法都有相同的异常处理方式,可以抽取成通用模板:
private void execute(final Runnable runnable) {
    try {
        runnable.run();
    } catch (Throwable t) {
        this.notification.send(new SendFailure(t)));
        throw t;
    }
}
然后把原来的方法作为参数传进去:
public void sendBook() {
execute(this.service::sendBook);
}
public void sendChapter() {
execute(this.service::sendChapter);
}
public void startTranslation() {
execute(this.service::startTranslation);
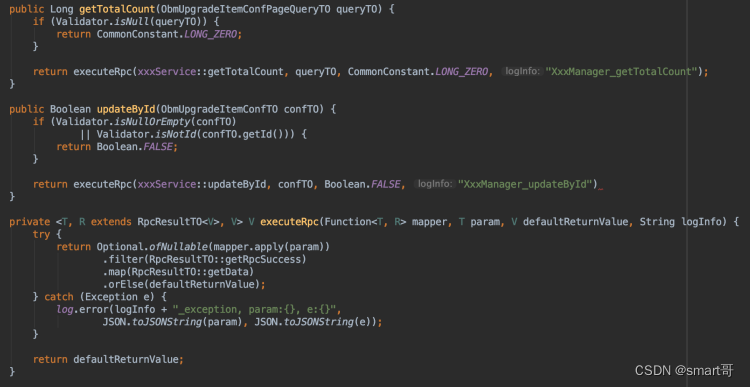
}你也可以试着把这个技巧应用在自己的项目中,比如这样(仅供参考):
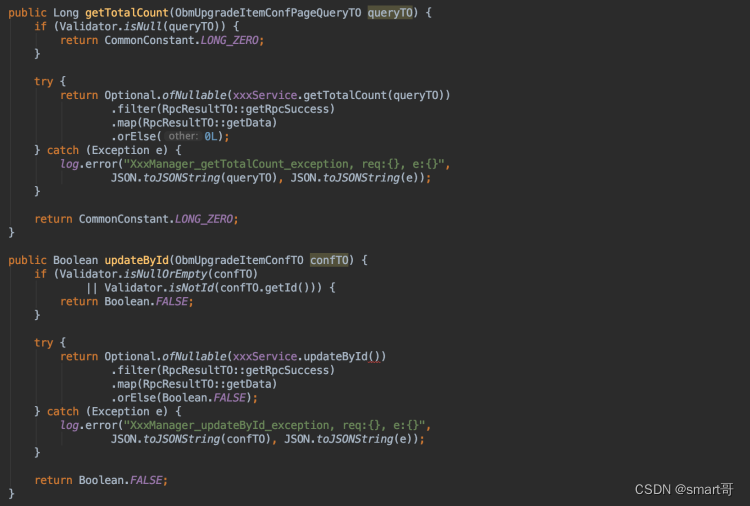
抽取通用代码后:
使用场景2:将方法作为参数传递
再介绍一个前几天写代码时遇到的一个场景:
我自定义了一个权限注解@RequiresPermission,如果被加在Controller上,那么内部所有接口都要权限校验,否则只校验加了@RequiresPermission的接口。但无论如何,我要先收集需要权限校验的接口。
@Component
public class PermissionMethodCollectionListener
        implements ApplicationListener<ContextRefreshedEvent>,
        ApplicationContextAware {

    // 省略其他方法

    @Override
    public void onApplicationEvent(ContextRefreshedEvent contextRefreshedEvent) {
        // ...

        for (Object bean : beans) {
            Class<?> controllerClazz = bean.getClass();
            Method[] methods = controllerClazz.getMethods();

            /*
            * 1.判断并收集接口:
            * 1.1 如果Controller上有@RequiresPermission,收集所有的接口
            * 1.2 如果Controller上没有@RequiresPermission,那么只收集有@RequiresPermission的接口
            * */

            // 2.存储需要权限认证的接口
        }

       // ...
    }
}
最直观的代码是:
@Component
public class PermissionMethodCollectionListener
        implements ApplicationListener<ContextRefreshedEvent>,
        ApplicationContextAware {

    // ...

    @Override
    public void onApplicationEvent(ContextRefreshedEvent contextRefreshedEvent) {
        // ...

        for (Object bean : beans) {
            Class<?> controllerClazz = bean.getClass();
            Method[] methods = controllerClazz.getMethods();

            Annotation annotationOnController  = AnnotationUtils.findAnnotation(controllerClazz, RequiresPermission.class);
            // 注意:应该有个变量去接收,这里省略了
            if (annotationOnController == null) {
                // Controller上没注解,那么收集 @RequiresPermission + @RequestMapping 的方法
                Arrays.stream(methods)
                        .filter(this::hasPermissionAnnotation)
                        .map(method -> {
                            StringBuilder sb = new StringBuilder();
                            String methodName = method.getName();
                            return sb.append(controllerClazz.getSimpleName()).append("#").append(methodName).toString();
                        })
                        .collect(Collectors.toSet());
            } else {
                // Controller有注解,那么收集 @RequestMapping 的方法
                Arrays.stream(methods)
                        .filter(this::isApiMethod)
                        .map(method -> {
                            StringBuilder sb = new StringBuilder();
                            String methodName = method.getName();
                            return sb.append(controllerClazz.getSimpleName()).append("#").append(methodName).toString();
                        })
                        .collect(Collectors.toSet());
            }

            // ...
        }

    }

    private boolean hasPermissionAnnotation(Method method) {
        // 打了@RequiresPermission + @RequestMapping
        return AnnotationUtils.findAnnotation(method, RequestMapping.class) != null
                && AnnotationUtils.findAnnotation(method, RequiresPermission.class) != null;
    }

    private boolean isApiMethod(Method method) {
        // 打了@RequestMapping注解
        return AnnotationUtils.findAnnotation(method, RequestMapping.class) != null;
    }
}
你会发现,有两坨Stream代码,他们的差别就是filter,所以可以把Stream的代码抽出来,把filter作为参数传递:
@Component
public class PermissionMethodCollectionListener
        implements ApplicationListener<ContextRefreshedEvent>,
        ApplicationContextAware {

    // ...

    @Override
    public void onApplicationEvent(ContextRefreshedEvent contextRefreshedEvent) {
        // ...

        for (Object bean : beans) {
            Class<?> controllerClazz = bean.getClass();

            // 如果Controller上有@RequiresPermission,那么所有接口都要收集(isApiMethod),否则只收集打了@Permission的接口(hasPermissionAnnotation)
            Predicate<Method> filter = AnnotationUtils.findAnnotation(controllerClazz, RequiresPermission.class) != null
                    ? this::isApiMethod
                    : this::hasPermissionAnnotation;

            // 过滤出Controller中需要权限验证的method
            Set<String> permissionMethodsWithinController = getPermissionMethodsWithinController(
                    controllerClazz.getName(),
                    controllerClazz.getMethods(),
                    filter
            );

            // ...
        }

    }

    private Set<String> getPermissionMethodsWithinController(String controllerName, Method[] methods, Predicate<Method> filter) {

        return Arrays.stream(methods)
                .filter(filter)
                .map(method -> {
                    StringBuilder sb = new StringBuilder();
                    String methodName = method.getName();
                    return sb.append(controllerName).append("#").append(methodName).toString();
                })
                .collect(Collectors.toSet());
    }

    private boolean hasPermissionAnnotation(Method method) {
        return AnnotationUtils.findAnnotation(method, RequestMapping.class) != null
                && AnnotationUtils.findAnnotation(method, RequiresPermission.class) != null;
    }

    private boolean isApiMethod(Method method) {
        return AnnotationUtils.findAnnotation(method, RequestMapping.class) != null;
    }

}
使用场景3:抽取工具类
工具类引入函数式接口提高通用性的场景大家都不陌生,包括我们之前经常举例的ConvertUtil。这里再介绍一个:
@Slf4j
public final class RetryUtil {

    private RetryUtil() {
    }

    public static <T> T retry(Supplier<T> executor, int retryTime) {
        for (int i = 0; i < retryTime; i++) {
            try {
                return executor.get();
            } catch (Exception e) {
                log.info(e);
            }
        }
        // 抛异常还是返回值,根据业务自己定义
        throw new ServiceException("重试后依然错误");
    }

}
稍微复杂一点的版本(但还是很简单):
/**
 * 简易重试工具类
 */
@Slf4j
public final class RetryUtil {

    private RetryUtil() {
    }

    /**
     * 重试执行
     *
     * @param executor         目标方法
     * @param retryTimes       重试次数
     * @param retryInterval    重试间隔
     * @param intervalTimeUnit 时间单位
     * @param <T>              目标方法返回值类型
     * @return 目标方法执行结果
     */
    public static <T> T execute(Supplier<T> executor, int retryTimes, int retryInterval, TimeUnit intervalTimeUnit) {
        for (int i = 1; i <= retryTimes + 1; i++) {
            try {
                return executor.get();
            } catch (Exception e) {
                log.info("target method exception, ignore and retry {}", i, e);
            }
            if (i <= retryTimes) {
                sleep(retryInterval, intervalTimeUnit);
                log.info("retry {}", i);
            }
        }
        log.error("retry failed");
        // 抛异常还是返回值,根据业务自己定义
        throw new ServiceException("重试后依然错误");
    }

    /**
     * 重试执行
     *
     * @param executor         目标方法
     * @param retryTimes       重试次数
     * @param retryInterval    重试间隔
     * @param intervalTimeUnit 时间单位
     */
    public static void execute(Runnable executor, int retryTimes, int retryInterval, TimeUnit intervalTimeUnit) {
        for (int i = 1; i <= retryTimes + 1; i++) {
            try {
                executor.run();
                return;
            } catch (Exception e) {
                if (i <= retryTimes) {
                    sleep(retryInterval, intervalTimeUnit);
                    log.info("target method exception, ignore and retry {}", i, e);
                }
            }
        }
        log.error("retry failed");
    }

    private static void sleep(int retryInterval, TimeUnit intervalTimeUnit) {
        if (retryInterval > 0 && intervalTimeUnit != null) {
            try {
                intervalTimeUnit.sleep(retryInterval);
            } catch (InterruptedException ie) {
                log.error("sleep interruptedException");
            }
        }
    }

}
如果你愿意,还可以更完善些(有点复杂了):
/**
 * 简易重试工具类
 */
@Slf4j
public final class RetryUtil {

    private RetryUtil() {
    }

    /**
     * 结果重试(不捕获异常)
     *
     * @param executor            目标方法
     * @param retryCondition      结果重试条件
     * @param retryTimes          重试次数
     * @param retryIntervalMillis 重试间隔(毫秒)
     * @param failureResult       重试失败返回值
     * @param <T>                 返回值类型
     * @return 目标方法执行结果
     */
    public static <T> T resultRetry(Supplier<T> executor,
                                    Predicate<T> retryCondition,
                                    int retryTimes, int retryIntervalMillis, Supplier<T> failureResult) {
        return resultRetry(executor, retryCondition, retryTimes, retryIntervalMillis, failureResult, (e, isLastException) -> {
            throw new RuntimeException(e);
        });
    }

    /**
     * 结果重试
     *
     * @param executor            目标方法
     * @param retryCondition      结果重试条件
     * @param retryTimes          重试次数
     * @param retryIntervalMillis 重试间隔(毫秒)
     * @param failureResult       重试失败返回值
     * @param exceptionCallback   异常回调
     * @param <T>                 返回值类型
     * @return 目标方法执行结果
     */
    public static <T> T resultRetry(Supplier<T> executor,
                                    Predicate<T> retryCondition,
                                    int retryTimes, int retryIntervalMillis,
                                    Supplier<T> failureResult, ExceptionCallback exceptionCallback) {
        for (int i = 1; i <= retryTimes + 1; i++) {
            try {
                T result = executor.get();

                // 没抛异常 && 没有结果重试条件,返回执行结果
                if (retryCondition == null) {
                    return result;
                }

                // 没抛异常 && 有结果重试条件 && 不满足重试条件,返回执行结果
                if (!retryCondition.test(result)) {
                    return result;
                }
            } catch (Exception e) {
                if (exceptionCallback != null) {
                    boolean isLastException = i == retryTimes + 1;
                    exceptionCallback.onException(e, isLastException);
                }
            }
            if (i <= retryTimes) {
                sleep(retryIntervalMillis);
                log.info("retry {}", i);
            }
        }
        log.error("retry failed");
        return failureResult.get();
    }

    /**
     * 异常重试
     *
     * @param executor            目标方法
     * @param retryTimes          重试次数
     * @param retryIntervalMillis 重试间隔(毫秒)
     * @param failureResult       重试失败返回值
     * @param <T>                 返回值类型
     * @return 目标方法执行结果
     */
    public static <T> T exceptionRetry(Supplier<T> executor, int retryTimes, int retryIntervalMillis, Supplier<T> failureResult) {
        return resultRetry(executor, null, retryTimes, retryIntervalMillis, failureResult, (e, isLastException) -> {
            if (isLastException) {
                log.error("retry failed", e);
            } else {
                log.info("retry exception, message:{}", e.getMessage());
            }
        });
    }

    /**
     * 异常重试
     *
     * @param executor            目标方法
     * @param retryTimes          重试次数
     * @param retryIntervalMillis 重试间隔(毫秒)
     * @param exceptionCallback   异常回调
     */
    public static void exceptionRetry(Runnable executor,
                                      int retryTimes,
                                      int retryIntervalMillis,
                                      ExceptionCallback exceptionCallback) {
        for (int i = 1; i <= retryTimes + 1; i++) {
            try {
                executor.run();
                return;
            } catch (Exception e) {
                if (exceptionCallback != null) {
                    boolean isLastException = i == retryTimes + 1;
                    exceptionCallback.onException(e, isLastException);
                }
            }
            if (i <= retryTimes) {
                sleep(retryIntervalMillis);
                log.info("retry {}", i);
            }
        }
        log.error("retry failed");
    }

    // ~~~~~~~~~~~~ private methods ~~~~~~~~~~~~

    private static void sleep(int retryIntervalMillis) {
        if (retryIntervalMillis > 0) {
            try {
                TimeUnit.MILLISECONDS.sleep(retryIntervalMillis);
            } catch (InterruptedException ie) {
                log.error("sleep interruptedException");
            }
        }
    }

    public interface ExceptionCallback {
        /**
         * 异常回调
         *
         * @param e               异常对象
         * @param isLastException 是否最后一次异常
         */
        void onException(Exception e, boolean isLastException);
    }
}在实际开发中,我们有时需要调用外部接口获取数据。但外部接口有时会不稳定,需要我们多次尝试调用。上面的RetryUtil就是对“重试”操作的抽取,便于复用。当然,上面的工具类非常简陋,功能很单一,比如无法设置重试的策略(比如第一次等待100毫秒重试、第二次等待500毫秒重试...)。实际开发中往往会直接引入第三方工具类,比如Guava的(也可以用Spring-Retry,需要引入依赖)。
如何用好函数式接口
即使上面介绍了这么多案例,可能还是有部分同学觉得“没什么卵用”,于是选择性地忽略。实际上对于前端开发而言,所谓的“函数式接口”只是他们的常规操作罢了,只不过他们管这个叫“回调函数”。回调函数最大的好处是,把决定权交给调用方,从而使得方法更加通用、灵活,换句话说:让你的方法复用性更强!
举个例子:
public String concat(String str1, String str2) {
    // 省略很多其他业务代码...
    return str1 + "~" + str2;
}
如果你把参数设计成String str1和String str2,那么这个方法就被写死了,具体的处理规则就是“用波浪线拼接str1和str2”,如果想改成“用下划线拼接str1和str2”,就必须重新写一个concat方法。
但如果一开始你就想到用函数式接口作为入参,那么情况就不一样了:
// 把concat方法改造成这样,支持传入函数式接口参数
public static String concat(String str1, String str2, Concator concator) {
    // 省略很多其他业务代码...
    return concator.concat(str1, str2);
}

// 新增函数式接口,配合上面的方法
@FunctionalInterface
public interface Concator {
    String concat(String str1, String str2);
}

// 测试案例
public static void main(String[] args) {
    String concat = concat("a", "b", (str1, str2) -> str1 + "_" + str2);
    System.out.println(concat);
}
是不是灵活很多?
所以,能否用好函数式接口,取决于你是否真的理解它的作用。我们应该善于从别的语言中借鉴学习,才能跳出Java的思想牢笼,让自己的思维更加开阔。即使你没学过其他语言,也应该多看看JDK官方是怎么使用的,以及他们为什么能想到这么用呢?
作者简介:大家好,我是smart哥,前中兴通讯、美团架构师,现某互联网公司CTO
进群,大家一起学习,一起进步,一起对抗互联网寒冬


 630
630

 被折叠的 条评论
为什么被折叠?
被折叠的 条评论
为什么被折叠?
 到【灌水乐园】发言


