


1. conda 相关命令
# 创建环境
conda create -n python3.8.20 python=3.8.20(在当前用户目录下创建环境,其它用户无法访问)
conda create -p /opt/python3.8.20 python=3.8.20(在/opt目录下创建全局的python环境,其它用户可用,全局环境,建议用这种方式)

# 删除环境
conda remove -n python3.8.20 --all(指定环境名字删除环境)
conda remove -p /opt/python3.8.20 --all(指定环境路径删除环境)

# 克隆环境
conda create -n <new_env_name> --clone <old_env_name_or_path>
conda create -p <new_env_path> --clone <old_env_name_or_path>

# 激活环境
conda activate python3.8.20(指定环境名字激活环境)
conda activate /opt/python3.8.20(指定环境路径激活环境)

# 退出环境
conda deactivate

# 查看环境
conda env list

# 搜索包
conda search <package_name>

# 安装本地包
conda install <local_package_path>

# 防止打开终端conda默认激活基本环境
conda config --set auto_activate_base false
可通过 conda -h 查看详细的说明文档:
[11:49:07  site-packages]$ conda -h
usage: conda [-h] [-V] command ...

conda is a tool for managing and deploying applications, environments and packages.

Options:

positional arguments:
  command
    clean        Remove unused packages and caches.
    compare      Compare packages between conda environments.
    config       Modify configuration values in .condarc. This is modeled after the git config command. Writes to the user .condarc file (/home/xxxx/.condarc) by
                 default.
    create       Create a new conda environment from a list of specified packages.
    help         Displays a list of available conda commands and their help strings.
    info         Display information about current conda install.
    init         Initialize conda for shell interaction. [Experimental]
    install      Installs a list of packages into a specified conda environment.
    list         List linked packages in a conda environment.
    package      Low-level conda package utility. (EXPERIMENTAL)
    remove       Remove a list of packages from a specified conda environment.
    uninstall    Alias for conda remove.
    run          Run an executable in a conda environment.
    search       Search for packages and display associated information. The input is a MatchSpec, a query language for conda packages. See examples below.
    update       Updates conda packages to the latest compatible version.
    upgrade      Alias for conda update.

optional arguments:
  -h, --help     Show this help message and exit.
  -V, --version  Show the conda version number and exit.

conda commands available from other packages:
  content-trust
  env
2. 配置代理
一般公司的的电脑需要通过代理才能上网,因此需要配置 conda 命令的网络代理。
【Windows】
conda 配置文件路径为:<用户>/.condarc,但在此文件中配置代理,conda 命令无法正确解析,因此需要换个思路。
以管理员身份打开 Anaconda Powershell Promopt(Miniconda3)(Miniconda 安装完之后,在 "开始" 菜单中就有),用命令在 Powershell 中设置一次性代理即可(每次使用都需要重新设置一遍)。设置代理命令示例(根据实际情况修改):
$env:HTTP_PROXY="http://<user>:<password>@<proxy_server>:<port>"
$env:HTTPS_PROXY="http://<user>:<password>@<proxy_server>:<port>"
$ 必须要带上。

此时 Win10 电脑上不应该存在 <用户>/.condarc 文件。
接下来就可以用 conda create xxx 创建 conda 虚拟环境了。
【Linux】
在 shell 终端导入环境变量即可:
export http_proxy="http://<user>:<password>@<proxy_server>:<port>"
export https_proxy="http://<user>:<password>@<proxy_server>:<port>"
接下来就可以用 conda create xxx 创建 conda 虚拟环境了。
这些都是临时生效的方案,要永久生效需要根据具体系统的配置方式进行配置了。
3. 配置源
来源:anaconda | 镜像站使用帮助 | 清华大学开源软件镜像站 | Tsinghua Open Source Mirror
Anaconda 是一个用于科学计算的 Python 发行版,支持 Linux, Mac, Windows, 包含了众多流行的科学计算、数据分析的 Python 包。
TUNA 还提供了 Anaconda 仓库与第三方源(conda-forge、msys2、pytorch 等,查看完整列表,更多第三方源可以前往校园网联合镜像站查看)的镜像,各系统都可以通过修改用户目录下的 .condarc 文件来使用 TUNA 镜像源。Windows 用户无法直接创建名为 .condarc 的文件,可先执行 conda config --set show_channel_urls yes 生成该文件之后再修改。
注:由于更新过快难以同步,我们不同步 pytorch-nightly, pytorch-nightly-cpu, ignite-nightly 这三个包。
各系统都可以通过修改用户目录下的 .condarc 文件来使用镜像站。不同系统下的 .condarc 目录如下:
- Linux:
${HOME}/.condarc - macOS:
${HOME}/.condarc - Windows:
C:\Users\<YourUserName\>\.condarc
channels:
  - defaults
show_channel_urls: true
default_channels:
  - https://mirrors.tuna.tsinghua.edu.cn/anaconda/pkgs/main
  - https://mirrors.tuna.tsinghua.edu.cn/anaconda/pkgs/r
  - https://mirrors.tuna.tsinghua.edu.cn/anaconda/pkgs/msys2
custom_channels:
  conda-forge: https://mirrors.tuna.tsinghua.edu.cn/anaconda/cloud
  msys2: https://mirrors.tuna.tsinghua.edu.cn/anaconda/cloud
  bioconda: https://mirrors.tuna.tsinghua.edu.cn/anaconda/cloud
  menpo: https://mirrors.tuna.tsinghua.edu.cn/anaconda/cloud
  pytorch: https://mirrors.tuna.tsinghua.edu.cn/anaconda/cloud
  pytorch-lts: https://mirrors.tuna.tsinghua.edu.cn/anaconda/cloud
  simpleitk: https://mirrors.tuna.tsinghua.edu.cn/anaconda/cloud
  deepmodeling: https://mirrors.tuna.tsinghua.edu.cn/anaconda/cloud/
即可添加 Anaconda Python 免费仓库。
运行 conda clean -i 清除索引缓存,保证用的是镜像站提供的索引。
运行 conda create -n myenv numpy 测试一下吧。
4. 软件包缓存路径
可通过 conda info 查看:
[11:41:34  ~]$ conda info

     active environment : None
            shell level : 0
       user config file : /home/xxxx/.condarc
 populated config files : /home/xxxx/.condarc
          conda version : 4.12.0
    conda-build version : not installed
         python version : 3.9.12.final.0
       virtual packages : __linux=4.19.112=0
                          __glibc=2.28=0
                          __unix=0=0
                          __archspec=1=x86_64
       base environment : /opt/miniconda3  (read only)
      conda av data dir : /opt/miniconda3/etc/conda
  conda av metadata url : None
           channel URLs : https://mirrors.tuna.tsinghua.edu.cn/anaconda/pkgs/main/linux-64
                          https://mirrors.tuna.tsinghua.edu.cn/anaconda/pkgs/main/noarch
                          https://mirrors.tuna.tsinghua.edu.cn/anaconda/pkgs/r/linux-64
                          https://mirrors.tuna.tsinghua.edu.cn/anaconda/pkgs/r/noarch
                          https://mirrors.tuna.tsinghua.edu.cn/anaconda/pkgs/msys2/linux-64
                          https://mirrors.tuna.tsinghua.edu.cn/anaconda/pkgs/msys2/noarch
          package cache : /opt/miniconda3/pkgs
                          /home/xxxx/.conda/pkgs
       envs directories : /home/xxxx/.conda/envs
                          /opt/miniconda3/envs
               platform : linux-64
             user-agent : conda/4.12.0 requests/2.27.1 CPython/3.9.12 Linux/4.19.112-2.el8.x86_64 newstartos/V4.4.2-zte glibc/2.28
                UID:GID : 1000:1000
             netrc file : None
           offline mode : False
如果无法联网,可通过其它途径下载包,放在该目录下,即可安装。
5. 导出&导入 conda 环境
【有网环境】
1、进入要导出的环境中,e.g. pytorch.v1.6.0
2、导出环境:
conda env export --file pytorch.v1.6.0.yaml
3、导入环境:
conda env create -f pytorch.v1.6.0.yaml
【无网环境】
1、在目标机器上安装 conda。
2、把源机器上的 /home/zhangdongyu/.conda 打包,上传到目标机器解压到对应位置即可。但是要注意,目标路径和源路径必须一致。即,用户名必须一致。因为其中的一些 python 文件记录了这个位置,更麻烦的是一些库文件中也有这个位置。因此,如果路径不同,想用 sed 统一替换路径是行不通的。所以,这里的移植必须保证路径完全一样。
例如这个库文件记录了路径:
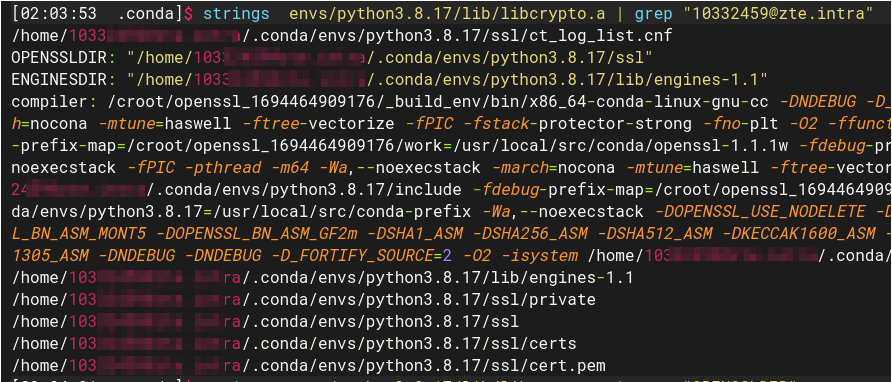
通过 sed 把路径 /home/xxxx 替换为 /home/zhangdongyu 会导致库无法使用。
如何解决这个问题?
例如目标机器的用户是 zhangdongyu,而源机器的用户是 xxxx。那么就在源机器上建立个 zhangdongyu 用户,然后切换到 zhangdongyu 用户安装 conda 环境,最后复制到目标机器就行了。最简单的方法是 conda 安装环境的时候不要安装在用户目录下,而是要安装在 /opt 目录下,例如:conda create -p /opt/python3.8.20 python=3.8.20。这样移植起来非常方便,只需把 /opt/python3.8.20 打包上传到目标环境的 /opt 目录下,然后解压即可。
6. 常见错误
● urllib3.exceptions.LocationParseError:Failed to parse: http://xxx

这种原因一般是代理密码中有特殊字符,导致解析失败,需要转义。参考如下内容:
今天从 Github 克隆代码时提示超时,我意识到可能是代理没有设置,便设置 Git 代理:
git config --global https.proxy "http://<user>:<password>@<proxy_server>:<port>"
git config --global http.proxy "http://<user>:<password>@<proxy_server>:<port>"
但是我的域账号密码中有 @ 字符,导致代理服务器域名解析错误,想尝试 \ 转义,也无效果。查看 .gitconfig 文件,发现 \ 字符变成了 / 字符,可能 git 不支持 \ 转义。
查看到https://stackoverflow.com/questions/6172719/escape-character-in-git-proxy-password中有讲使用 URL Encoded value 来转义,即 @->%40,使用之后即可。
其它常见的%转义字符有:
!   #   $    &   '   (   )   *   +   ,   /   :   ;   =   ?   @   [   ]
%21 %23 %24 %26 %27 %28 %29 %2A %2B %2C %2F %3A %3B %3D %3F %40 %5B %5D


 1376
1376

 被折叠的 条评论
为什么被折叠?
被折叠的 条评论
为什么被折叠?
 到【灌水乐园】发言


