


 本文详细介绍了Vue.js中的核心概念与实用技巧,包括计时器、MVP与MVVM模型对比、父子组件通信、数组操作方法、计算属性、条件与列表渲染、组件使用细节等,帮助开发者深入理解Vue框架并提升开发效率。
1、计时器
window对象的方法:JS中重要的全局函数。
setTimeout (code执行代码, millisec延迟毫秒数)— 函数在指定的毫秒数后执行。clearTimeout (timeoutID)setInterval() 函数在指定的毫秒数间隔里重复调用。clearInterval()
tips:即使setTImeout()传入0毫秒,函数也不会立刻执行,会进入队列。
2、对比MVP与MVVM模型
MVP模型:模型层,视图层,控制器
面向DOM编程。
控制器层在大量使用DOM操作。
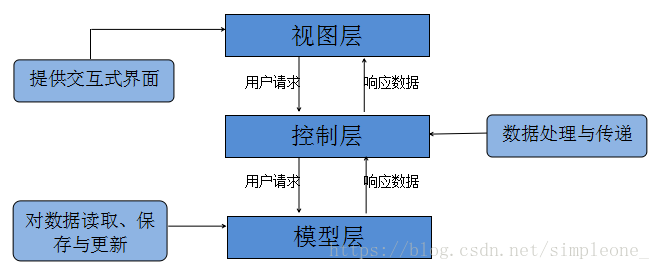
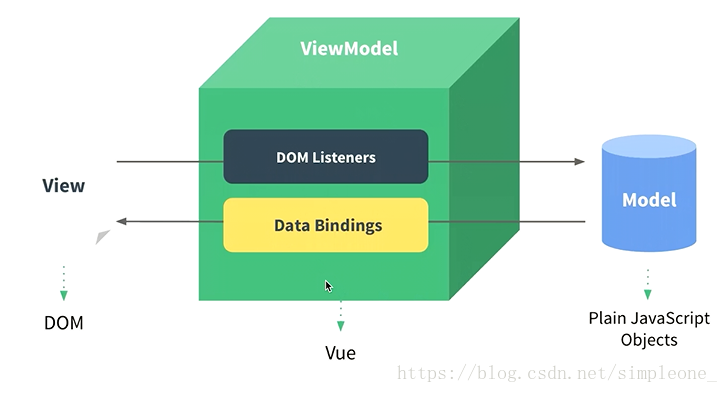
MVVM模型:数据层,视图层,
面向数据编程,M层
VM层实现:object.defineproperties、虚拟DOM
3、Vue父子组件通信
父组件向子组件传值通过绑定属性。
- 在父组件模板下,为子组件增加绑定属性
v-bind - 在子组件属性包中,注册传入的变量
props:[] - 子组件的模板中可以使用该变量
<div id="app">
    <ul>
        <todo-item
        :content:"content" // <!-- --------------------------------- -->
        ></todo-item>
    </ul>
</div>

<script>
    var TodoItem = {
        props: ['content'],  // ----------------------------------------
        template: "<li>{{}}<li/>"
    }

    new Vue() {
        el: "#app",
        conponents: {
            todo-item: TodoItem
        }
        data: "content"
    }
</script>
子组件向父组件传值通过事件传值:自定义事件广播。
- 子组件在方法中调用
this.$emit("自定义事件",向父级传递的参数) - 在父组件模板中的子组件上订阅事件:
@自定义事件=“处理函数” - 处理函数可以设置参数,接收子组件传入的变量。
 <div id="app">
        <ul>
            <todo-item
            v-for="(item, index) in list"
            :content="item"
            :index="index"
            @delete="handleItemDelete"  <!-- -------------------------------- -->
            >
            {{item}}
            </todo-item>
        </ul>
    </div>

    <script>
        var TodoItem = {
            props: ['content','index'],
            template: "<li @click='handleItemClick'>{{content}}</li>",
            methods: {
                handleItemClick: function() {
                    this.$emit("delete", this.index); // -------------------------------
                }
            }
        }

        var app = new Vue({
            el: '#app',
            components: {
                TodoItem:TodoItem
            },
            data: {
                list: [],
                inputValue: ''
            },
            methods: {
                handleItemDelete: function(index) { // ---------------------------------
                    this.list.splice(index,1) // splice(index,1) 删除本位
                }
            }
        })
    </script>
单向数据流:父组件可以向子组件任意传递参数,但是子组件不能修改父组件传来的参数
var counter = {
props: ['count'],
data: function() {
return {
number : this.count // clone------------------------------------
}
},
template: '<div @click="handleClick">{{number}}</div>',
methods: {
handleClick: function() {
// this.count ++ // 虽然奏效,但是会报错,你不可以直接改变父组件传来的值;需要复制存在变量里
this.number = this.number + 2
this.$emit('change', 2)
}
}
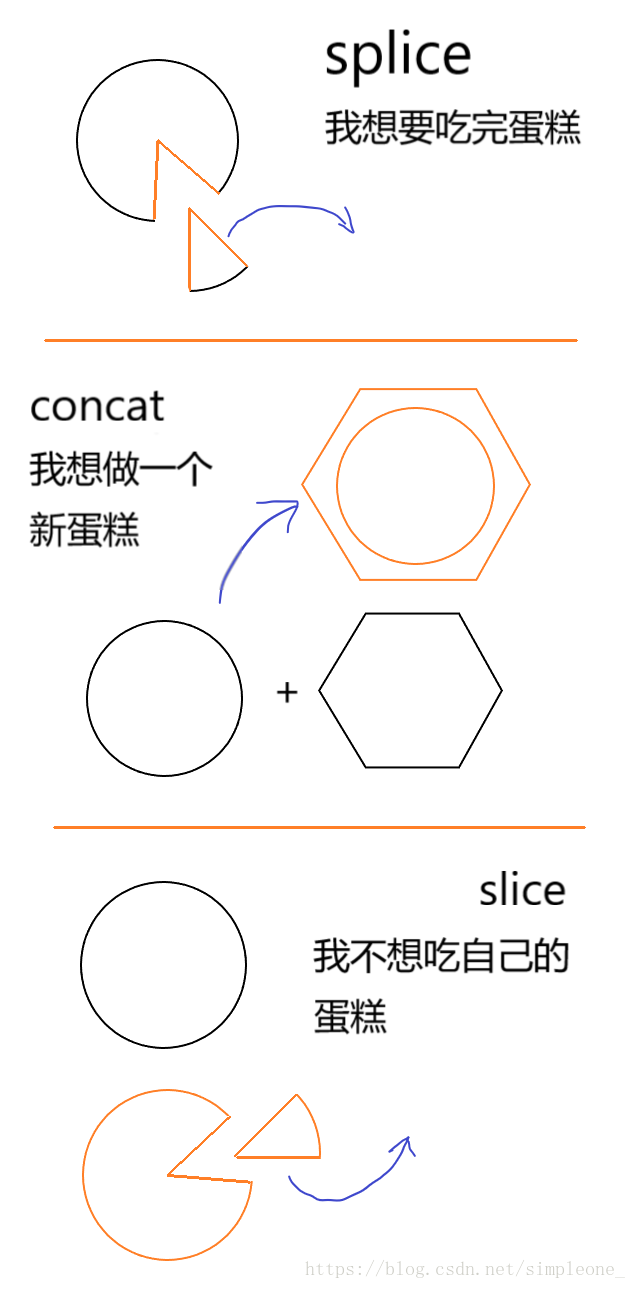
}4、数组的方法
splice() 数组拼接 改变原数组 切一块蛋糕拿过来,缺口补上
用途:删除数组元素,增加数组元素
参数:操作位置(索引),删除数量,新增元素
返回值:返回由删除元素组成的数组
tips:若新增元素是数组,插入数组本身而不是数组元素,区别于concat()
var array = [1,2,3,4,5];
array.splice(2,2,[1,2,3],3);  // => (2) [3, 4]
// array = [1, 2, [1, 2, 3], 3, 5]array.splice(index,howmany,item1, …..,itemX)
- index:从哪开始玩 ,可删可增
- howmany:删几个
array.splice(index, 1)返回被删除index本身 - itemX:增的东西
concat() 合并数组 改变副本 照着别人蛋糕的基础上,添自己的料,做出来一个新蛋糕
用途:调用者和参数合并成一个新数组
参数:简单值或数组
返回值:返回全新的合并数组
tips:参数若是数组,则连接的是数组元素,而非数组本身;但不会递归扁平化数组,也就是第一层数组会拼接数组元素,若数组元素还是数组则不会再扁平化。
var array = [1, 2, 3];
array.concat(4, [5, 6, [7, 8]]); // => [1, 2, 3, 4, 5, 6, [7, 8]]
// array = [1, 2, 3]- array.concat(arrayX,arrayX,……,arrayX)
slice() 拆分数组 改变副本 复制一个蛋糕,切一块拿过来
用途:返回指定片段的新数组
参数:开始位置(索引),结束位置,前闭后开
返回值:返回全新的片段数组
tips:不包含第二个参数本身的值;若只有一个参数则是从开始位置到全部;若传入参数是负数,则表示相对于 数组中最后一个元素的位置:-1指定了最后一个元素。
var array = [1, 2, 3, 4, 5];
array.slice(1, 3);  // => [2, 3]
array.slice(0, -2); // => [1, 2, 3]
// array = [1, 2, 3, 4, 5]- array.slice(start, end)
5、Vue生命周期
// 生命周期函数就是Vue实例再某一个时间点会自动执行的函数
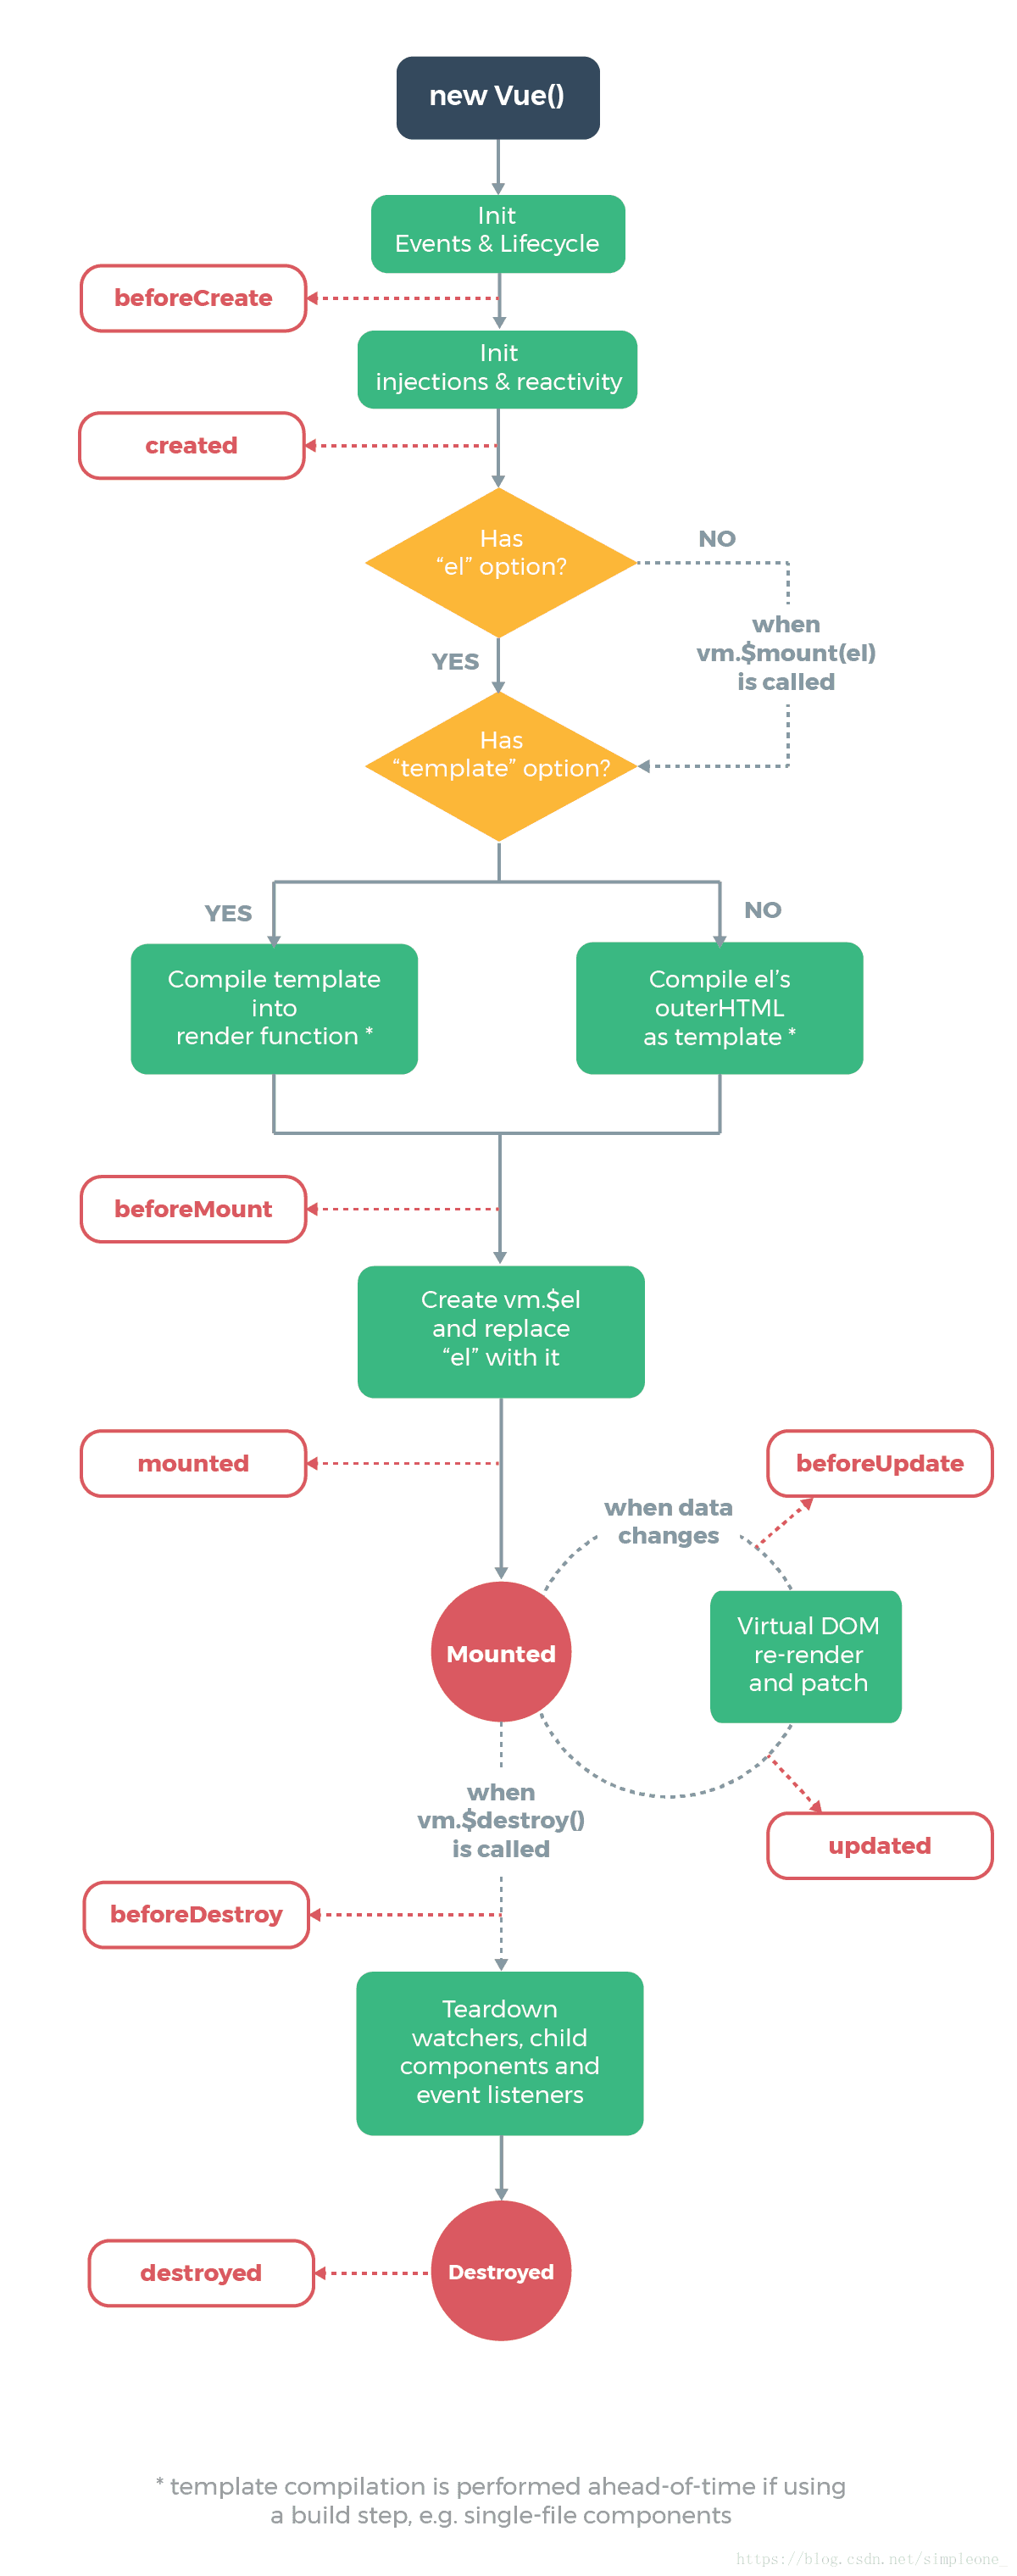
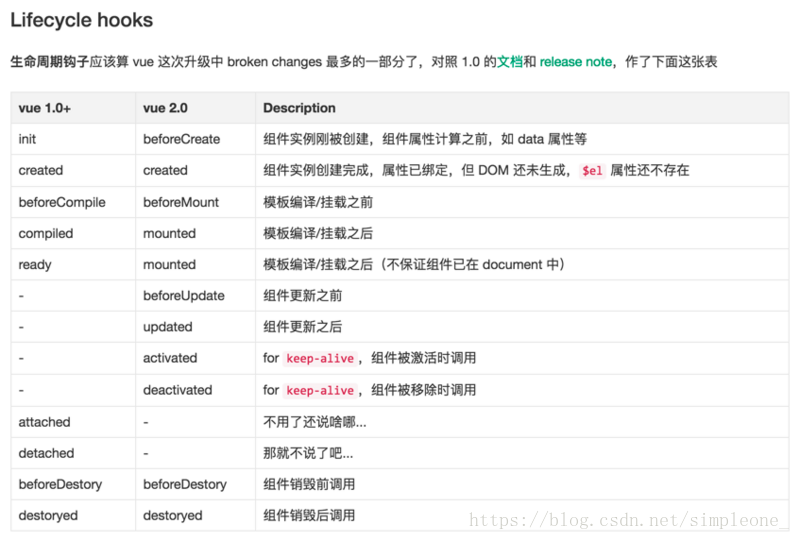
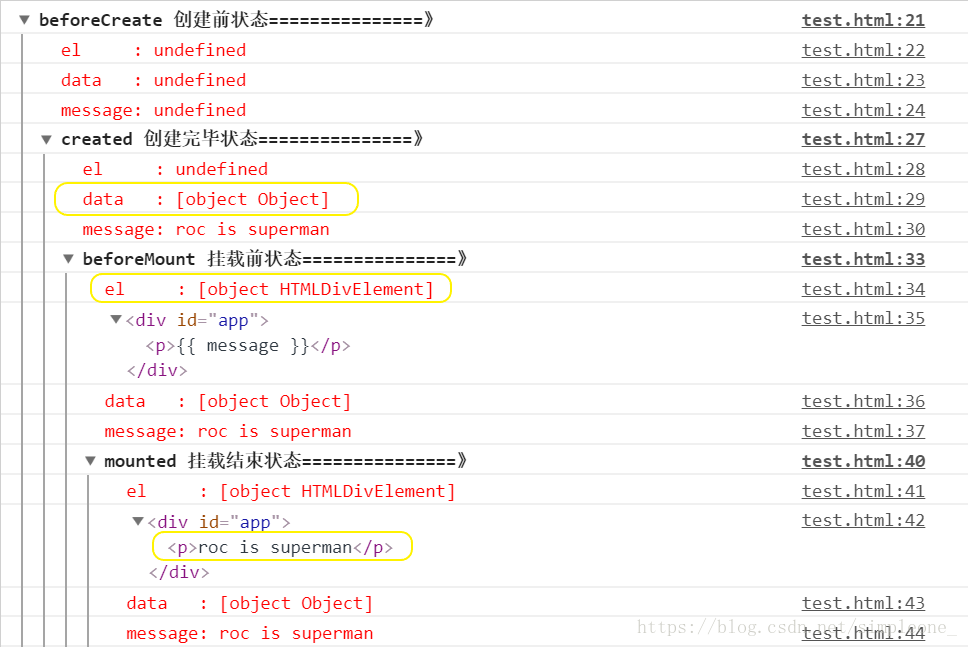
beforecreated:只有空壳
created:完成了 data 数据的初始化,el没有
beforeMount:完成了 el 和 data 初始化
mounted :完成挂载,进行渲染
另外在标红处,我们能发现el还是 {{message}},这里就是应用的 Virtual DOM(虚拟Dom)技术,先把坑占住了。到后面mounted挂载的时候再把值渲染进去。
6、计算属性computed
计算属性的优点:有缓存机制,性能高
计算属性依赖值没有改变,就不会重新计算值,直接使用上一次计算的缓存,从而提高性能。
watch侦听器同样拥有缓存机制。
<div id="root">{{fullName}}</div>

<script>
    var vm = new Vue({
        el: "#root",
        data: {
            firstName: "yang",
            lastName: "peng"
        },
        computed: {  // 计算属性依赖值没有改变,则不会重新计算,有缓存机制性能更好
            fullName: {
                get: function() { // 取值时就会调用get逻辑
                    return this.firstName + " " + this.lastName
                },
                set: function(value) { // 设置值时可以调用set逻辑,接收外部传入的设置值
                    var arr = value.split(" ");
                    this.firstName = arr[0];
                    this.lastName = arr[1];
                }
            }
        }
    })
</script>
split()方法
作用:拆分字符串
参数:依据什么拆,拆完的长度限制
返回值:一个数组,不包含依据本身,数组长度由第二个参数决定
stringObject.split(separator, howmany)

var str="How are you doing today?"

document.write(str.split(" ") + "<br />") // How,are,you,doing,today?
document.write(str.split("") + "<br />") // H,o,w, ,a,r,e, ,y,o,u, ,d,o,i,n,g, ,t,o,d,a,y,?
document.write(str.split(" ",3)) // How,are,you
7、Vue样式与数据项的绑定
class对象绑定
<head>
    <style>
        .activated { /* -------------------------------------- */
            color: red
        }
    </style>
</head>
<body>
    <div id="root">
        <div @click="handleClick"
            :class="{activated: isActivated}"  // ----------------------------------
        >
        Hello world
    </div>
    </div>

    <script>
        var vm = new Vue({
            el: "#root",
            data: {
                isActivated: false  // --------------------------------
            },
            methods: {
                handleClick: function() {
                    this.isActivated = !this.isActivated; // ---------------------------
                }
            }
        })
    </script>
</body>- 给对象绑定类名属性叫activated,使用一个布尔值变量isActivated控制类的显示状态,css为activated类设置样式。
- 置反套路
this.isActivated = !this.isActivated;
class数组绑定
    <style>
        .activated  {  /* -------------------------------- */
            color: red
        }
    </style>
</head>
<body>
    <div id="root">
        <div @click="handleClick"
            :class="[activated, activatedOne]" /* --------------------------------- */
        >
        Hello world
    </div>
    </div>

    <script>
        var vm = new Vue({
            el: "#root",
            data: {
                activated: "",
                activatedOne: "activated-one"  // -------------------------------
            },
            methods: {
                handleClick: function() {  // --------------------------------
                    this.activated = this.activated === "activated" ? "" : "activated"
                }
            }
        })
    </script>
</body>
style对象/数组绑定
<head>
    <style>
        .activated  {
            color: red
        }
    </style>
</head>
<body>
    <div id="root">
        <!-- <div :style="styleObj" @click="handleClick"> -->
        <div :style="[styleObj]" @click="handleClick">    <!-- --------------------- -->
        Hello world
        </div>
    </div>

    <script>
        var vm = new Vue({
            el: "#root",
            data: {
                styleObj: { // -------------------------------
                    color: "black"
                }
            },
            methods: {
                handleClick: function() { // ------------------------------
                    this.styleObj.color = this.styleObj.color === "black" ? "red" : "black";
                }
            }
        })
    </script>
</body>
8、Vue条件渲染
<div id="root">
    <div v-show="show">{{message}}</div> <!--show的值是布尔值,指令会进行布尔运算-->
    <div v-if="show">{{message}}</div>

    <div v-if="show === 'a'">This is A</div>
    <div v-else-if="show === 'b'">This is B</div>
    <div v-else>This is others</div>

    <div v-if="show">
        用户名:<input key="username" />
    </div>
    <div v-else>
        邮箱名:<input key:"password">
        <!-- 当改变show时,输入框内的值还会保留:原因是Vue有尽可能的复用机制,为了避免可以为每一个元素设置唯一的key值,diff算法-->
    </div>
</div>

<script>
    var vm = new Vue({
        el: "#root",
        data: {
            show: "a",
            message: "Hello World"
        }
    })
</script>
9、Vue列表渲染
- 列表渲染指令 —
v-for="(item, index) of list" - 列表渲染性能 —
:key - 页面响应式更新:根据数据项的改变,页面相应渲染 — 例如数据项是数组,不能通过数组索引设置新值而使页面更新。
- 方法一:使用Vue提供的数组变异方法:
pop/push/shift/unshift/splice/sort/reversevm.list.splice(1,1,{id:"002",text:"3"}) - 方法二:改变数组的引用:
vm.list = {[新数组]} - 方法三:调用Set()方法 — 全局
Vue.set(vm.list,0,{})实例vm.$set(vm.list,0,{})
- 方法一:使用Vue提供的数组变异方法:
- 循环两个元素以上时,使用父容器包裹一层循环,使用模板占位。
- 对象循环,
vm.userInfo.name = "Dell Lee"改变对象属性; 新增对象属性:
- 方法一:
vm.userInfo = {新对象的引用} - 方法二:
Vue.set(vm.userInfo,"address","beijing")/vm.$set(vm.userInfo,"address","beijing")
- 方法一:
<div id="root">
   <div v-for="(item, index) of list" :key="index">
   <!-- 首先使用key值来提升复用,但是key值取index时(即数组索引)操作Dom时依旧费性能-->
       {{item}} ---- {{index}}
   </div>
</div>

<script>
    var vm = new Vue({
        el: "#root",
        data: {
            list: [
                "hello",
                "dell",
                "nice",
                "to",
                "meet",
                "you"
            ]
        }
    })
</script>

// -------------------------------------------------------------------------

<div id="root">
   <div v-for="(item, index) of list"
   :key="item.id">                     <!--此时性能最高-->
       {{item.text}} ---- {{index}}
   </div>
</div>

<script>
    var vm = new Vue({
        el: "#root",
        data: {
            list: [{
                id: "993828210",
                text: "hello"
            },{
                id: "993828211",
                text: "Dell"
            },{
                id: "993828212",
                text: "Lee"
            }]
        }
    })
</script>

// 当向数组里动态增加内容时,页面会响应内容
// 想通过新增数组项来更新页面元素时,不能使用下标的方式
// vm.list[4] = {id:"002",text:"3"}
// 需要使用Vue提供的数组遍历方法:pop/push/shift/unshift/splice/sort/reverse
// vm.list.splice(1,1,{id:"002",text:"3"}) 响应式替换数组元素
// 另一种方法是改变引用vm.list = {[新数组]}

// ------------------------------------------------------------------

// 当需要循环生成两个以上元素时:

<div id="root">
    <template
        v-for="(item,index) of list"
        :key="item.id"
    >
        <div>
            {{item.text}} ---- {{index}}
        </div>
        <span>
            {{item.text}}
        </span>
    </template><!--如果每个元素设定循环指令过于冗余,应当用父容器包裹 -->
</div>         <!--为了不使父容器包裹后出现占地方,可以使用模板占位。-->

<script>
    var vm = new Vue({
        el: "#root",
        data: {
            list: [{              // 当向数组里动态增加内容时,页面会响应内容
                id: "993828210",  // 想通过新增数组项来更新页面元素时,不能使用下标的方式
                text: "hello"     // vm.list[4] = {id:"002",text:"3"}
            },{                   // 需要使用Vue提供的数组遍历方法:pop/push/shift/unshift/splice/sort/reverse
                id: "993828211",  // vm.list.splice(1,1,{id:"002",text:"3"}) 响应式替换数组元素
                text: "Dell"      // 另一种方法是改变引用vm.list = {[新数组]}
            },{                   // 另一种方法是:Vue.set(vm.list,0,{})
                id: "993828212",  // vm.$set(vm.list,0,{})
                text: "Lee"
            }]
        }
    })
</script>


// --------------------------------------------------------

<div id="root">
    <div v-for="(item,key,index) of userInfo"> <!-- 对象循环时有三个值:项,键,序号-->
        {{item}} --- {{key}} --- {{index}}
    </div>
</div>

<script>
    var vm = new Vue({
        el: "#root",
        data: {
            userInfo: {
                name: "Dell",  // vm.userInfo.name = "Dell Lee" 改变对象属性
                ahe: 28,
                gender: "male",
                salary: "secret"
                               // vm.userInfo.address = "beijing" 新增对象属性 不能响应页面
            }                  // vm.userInfo = {新对象的引用}
        }                      // Vue.set(vm.userInfo,"address","beijing") --- Vue全局方法
    })                         // vm.$set(vm.userInfo,"address","beijing") --- Vue实例方法
</script>
10、Vue组件使用细节
1.使用is属性解决标签模板的BUG问题。
问题:定义<row>组件,想要插入<tbody>,直接插入导致DOM树层级问题:原本在<tbody>内的<tr>,会与<table>同级
原因:由于ES5规定<tbody>内必须有<tr>,而组件<row>不会被识别成<tr>,导致无法识别而抛出
<body>
    <div id="root">
       <table>
           <tbody>
               <row></row>
               <row></row>
               <row></row>
           </tbody>
       </table>
    </div>

    <script>
        Vue.component('row',{
            template: '<tr><td>this is a row</td></tr>'
        })

        var vm = new Vue({
            el: "#root",
        })
    </script>
</body>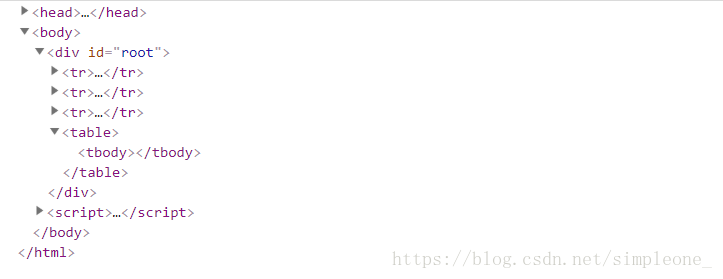
解决方法:为<tr>设置is属性。
<body>
    <div id="root">
       <table>
           <tbody>
               <tr is="row"></tr>  <!-- -------------------------------- -->
               <tr is="row"></tr>
               <tr is="row"></tr>
           </tbody>
       </table>
    </div>

    <script>
        Vue.component('row',{
            template: '<tr><td>this is a row</td></tr>'
        })

        var vm = new Vue({
            el: "#root",
        })
    </script>
</body>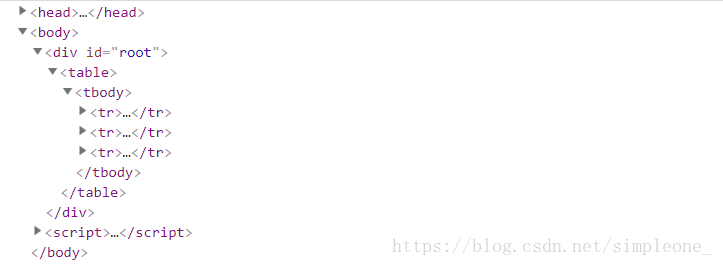
2、组件和根实例上data属性的区别
组件中:data属性对应一个函数,可以返回一个对象。
因为每个组件会被复用多次,因此希望每个组件的数据独立,而不是共享一个数据。因此data属性是一个函数而不是一个对象。
<body>
    <div id="root">
       <table>
           <tbody>
               <tr is="row"></tr>
               <tr is="row"></tr>
               <tr is="row"></tr>
           </tbody>
       </table>
    </div>

    <script>
        Vue.component('row', {
            data: function() {  // 在组件中的data属性只能是一个函数,返回一个对象
                return {
                    content: 'this is content'
                }
            },
            template: '<tr><td>{{content}}</td></tr>'
        })

        var vm = new Vue({
            el: "#root"
        })
    </script>
</body>3、有些极其复杂的情况下,不得不操作DOM,这时候使用ref属性。
在一个DOM元素上设置ref属性 <div ref='demo'></div>,通过this.$refs.demo可以获取该元素。
<div id="root">
    <div ref='hello'
        @click="handleClick"
    >
        hello world
    </div>
</div>

<script>
    var vm = new Vue({
        el: "#root",
        methods: {
            handleClick: function() {
                alert(this.$refs.hello.innerHTML)
            }
        }
    })
</script>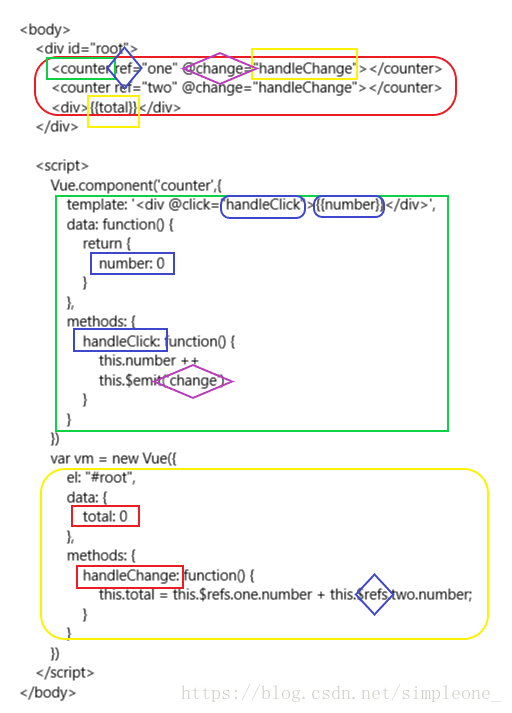
11、组件参数校验和非props特性
父组件传入一个属性content,关于content的校验可以写在一个数组中,或者对象中。
props: ['content']

props:{
    content: String
}

props: {
    content: [String, Number]
}

Vue.component('child',{
    props: {
        content: {
            type: String,                      // 类型校验
            equired: true,                 // 是否是必须项
            default: 'default value'            // 默认值
            validator: function(value) {   // 自定义校验器
                return (value.length > 5)
            }
        }
    },
    template: '<div>{{content}}</div>'
})
props特性:父传子接,子组件可以直接使用参数,该属性不会显示在DOM中
非props特性:父传子不接,子组件不能使用参数,该属性会显示在DOM中
12、给组件绑定原生事件
如果想在组件上监听原生事件:@click.native="function"
<body>
<div id="root">
<child @click="handleClick"></child> // 组件上的事件是自定义事件
</div>
<script>
Vue.component('child',{
template: '<div @click="handleChildClick">Child</div>', // DOM上的事件是原生事件
method: {
handleChildClick: function() {
this.$emit('click')
}
}
})
var vm = new Vue({
el: "#root",
methods: {
handleClick: function() {
}
}
})
</script>
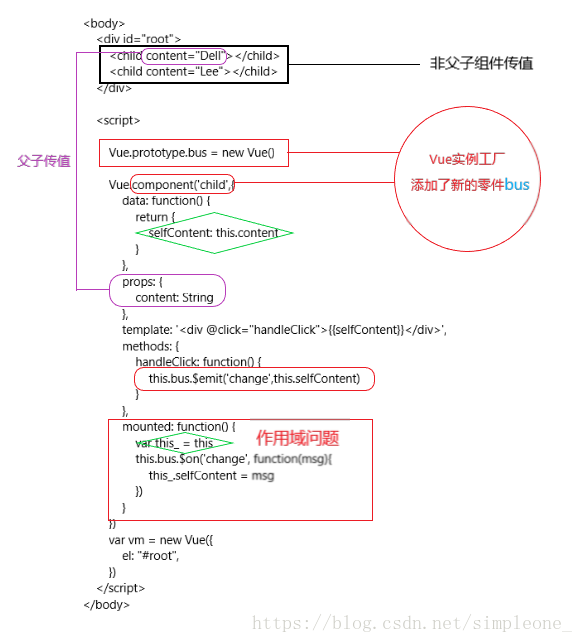
</body>13、非父子组件传值
- vuex
- 总线机制/观察者模式/发布订阅
14、父组件向子组件传值的复杂情况:<slot>插槽
<body>
    <div id="root">
       <child>
           <h1>Dell</h1>    // 传递内容
       </child>
    </div>
    <script>
        Vue.component('child', {
            template: `<div>
                            <p>Hello</p>
                            <slot>默认值</slot>
                        </div>`           // 必须用根标签包裹
        })

        var vm = new Vue({
            el: "#root",
        })
    </script>
</body>
<body>
<div id="root">
<child>
<div class="header" slot='header'>header</div> <!--具名插槽-- >
<div class="footer" slot='footer'>footer</div>
</child>
</div>
<script>
Vue.component('child', {
template: `<div>
<slot name='header'></slot>
<div class="child">content</div>
<slot name='footer'></slot>
</div>` // 必须用根标签包裹
})
var vm = new Vue({
el: "#root",
})
</script>
</body>作用域插槽
用途:逻辑计算与最终展示分离:逻辑循环一个数组,可以展示成10个<li>或10个<h1>
- 父组件调用子组件时传递了一个作用域插槽:插槽必须由
<template>包裹; <template>内设置slot-scope属性,将子组件逻辑计算的返回值的存放在对象中。- 父组件内设定如何显示,子组件完成逻辑运算
<body>
    <div id="root">
       <child>
           <template slot-scope="props">
               <li>{{props.item}} --- hello</li>  <!--每一个子组件如何显示由父组件决定-->
           </template>>
       </child>
    </div>
    <script>

        Vue.component('child', {
            data: function() {
                return {
                    list: [1,2,3,4]
                }
            },
            template: `<div>
                        <ul>
                            <slot
                                v-for="item of list"
                                :item=item
                                >
                            </slot>
                        </ul>
                        </div>`  // 子组件负责计算逻辑
        })

        var vm = new Vue({
            el: "#root",
        })
    </script>
</body>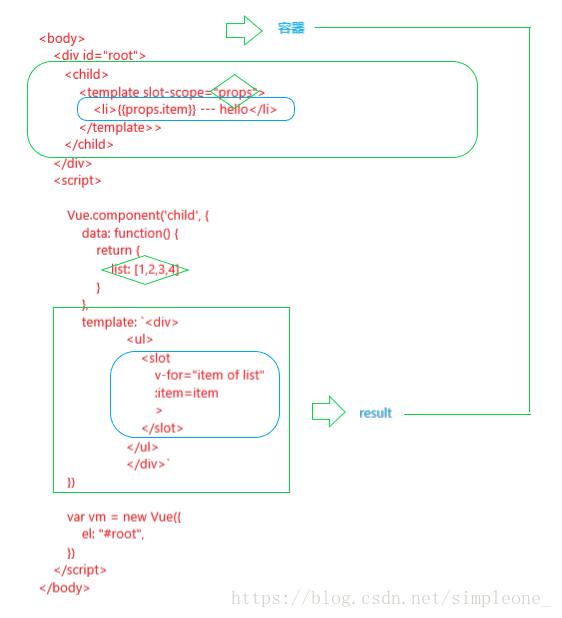
15、Vue动态组件与v-once指令
<component :is="type"></component>- v-once可以有效提高静态内容的展示效率:它会将元素放进内存,而不是销毁/创建
<body>
    <div id="root">
        <child-one v-if="type ==='child-one'"></child-one>
        <child-two v-if="type ==='child-two'"></child-two>
        <button @click="handleBtnClick">change</button>
    </div>
    <script>

        Vue.component('child-one', {
            template: '<div v-once>child-one</div>'
        })
        Vue.component('child-two', {
            template: '<div v-once>child-two</div>'
        })
        var vm = new Vue({
            el: "#root",
            data: {
                type: 'child-one'
            },
            methods: {
                handleBtnClick: function() {
                    this.type = this.type === 'child-one' ? 'child-two' : 'child-one'
                }
            }
        })
    </script>
</body>
16、过度动画transition
<head>
<style>
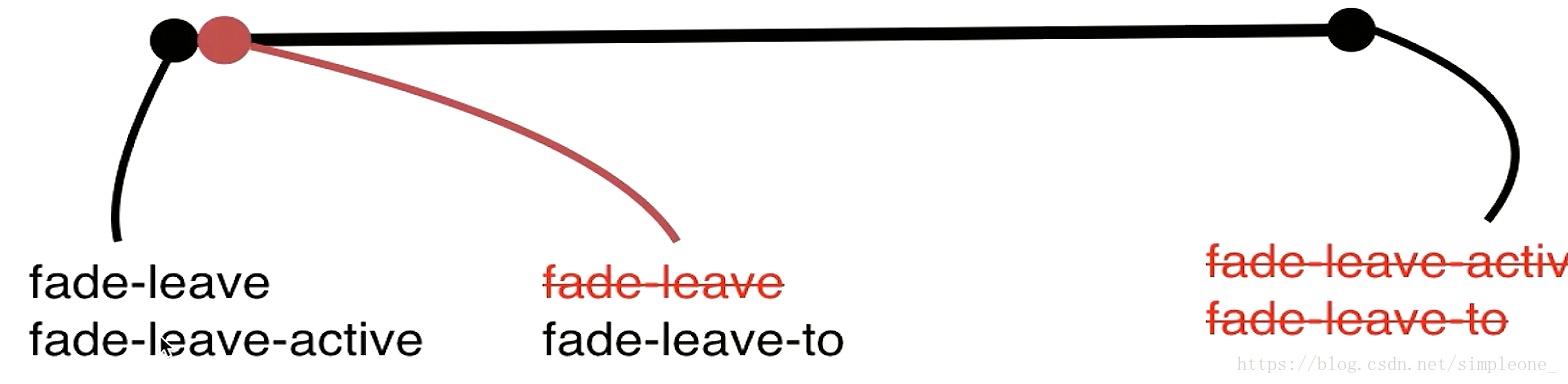
.fade-enter, .fade-leave-to {
opacity: 0;
}
.fade-enter-active, .fade-leave-active {
transition: opacity 1s;
}/*监听动画,如果触发了opacity属性,则要求在1S内,完成改变*/
.v-enter {
/*可以指定transition的name属性来定义类名,也可以不添加name属性使用默认类名v-*/
}
</style>
</head>
<body>
<div id="root">
<transition name="fade"> //------------------------------------
<div v-if="show">hello</div>
</transition>
<button @click="handleClick">切换</button>
</div>
<script>
var vm = new Vue({
el: "#root",
data: {
show: true
},
methods: {
handleClick: function() {
this.show = !this.show
}
}
})
</script>
</body>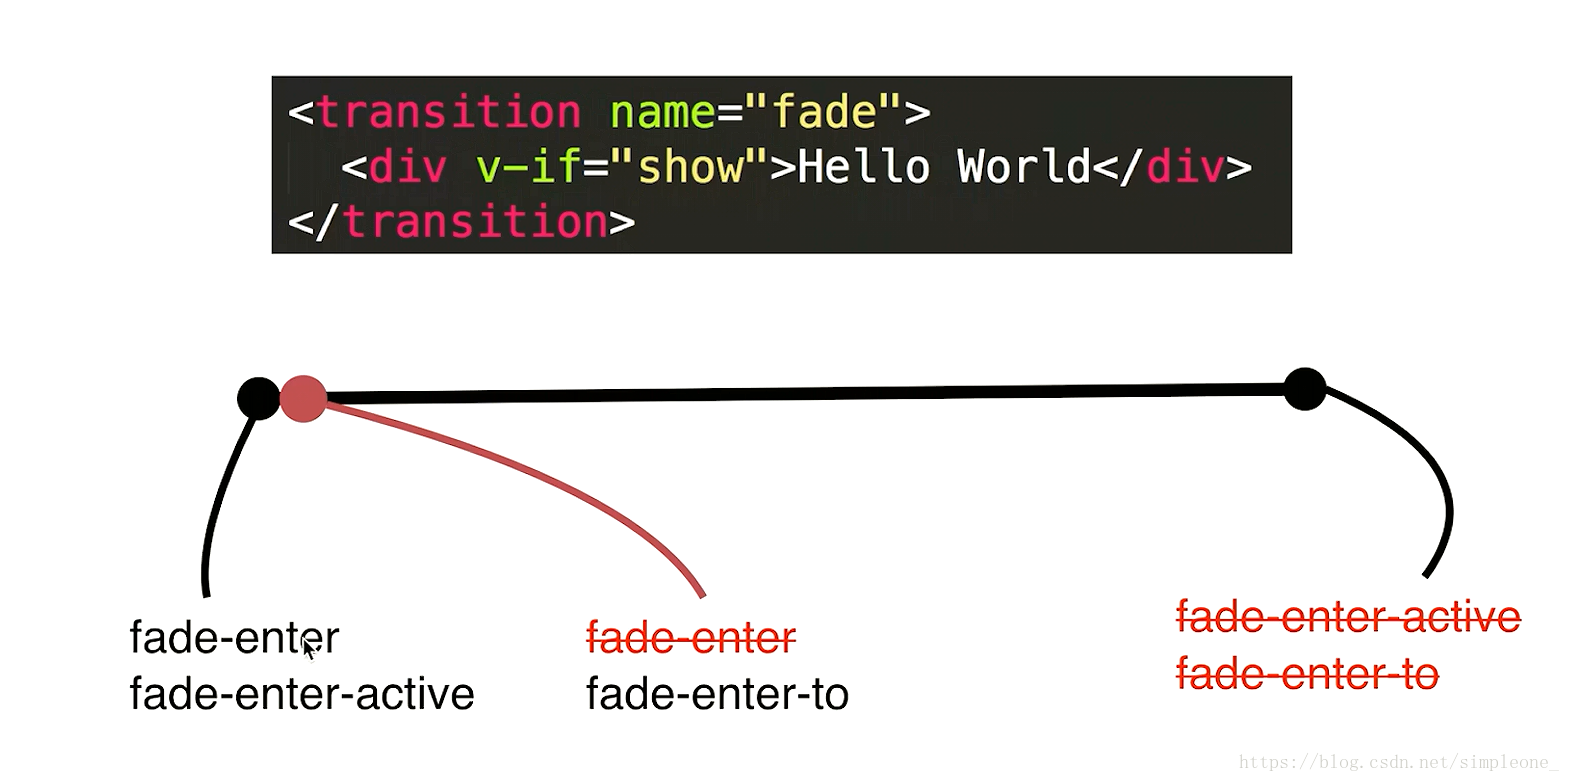
17、自定义动画类名绑定[transition\keyframe]
<style>
        @keyframes bounce-in {
            0% {
                transform: scale(0);
            }
            50% {
                transform: scale(1.5);
            }
            100% {
                transform: scale(1);
            }
        }
        .fade-leave-active {
            transform-origin: left center;
            animation: bounce-in 1s;
        }
        .fade-enter-active {                /* 可以写成自定义类 .active*/
            transform-origin: left center;
            animation: bounce-in 1s reverse;
        }

    </style>
</head>
<body>
    <div id="root">
        <transition name="fade">             <!--同时绑定自定义类名-->
        <!-- <transition name="fade" enter-active-class="active"></transition> -->
            <div v-if="show">hello</div>
        </transition>

        <button @click="handleClick">切换</button>
</div> 作为扩展可以引用animate动画库:enter-active-class="animated xxxx"
同时使用两种动画:添加两种类名,并引入样式
动画时间以谁为准:
<transition type="transition/keyframe">:duration="5000":duration="{enter: 5000, leave: 10000}"
<link rel="stylesheet" href="./animate.css"> //-------------------------------
    <style>                                  // ------------------------------
        .fade-enter,
        .fade-leave-to {
            opacity: 0;
        }
        .fade-enter-active,
        .fade-leave-active {
            transition: opacity 3s;
        }
    </style>
</head>
<body>
    <div id="root">
        <transition
        type="transtiion"                      //-----------------------
        :duration="10000"                      //-----------------------
        :duration="{enter: 5000, leave: 10000}"//-----------------------
        name="fade"
        appear
        enter-active-class="animated swing fade-enter-active" //-----------------------
        leave-active-class="animated shake fade-leave-active"
        appear-active-class="animated swing"
        >
        <!-- <transition name="fade" enter-active-class="active"></transition> -->
            <div v-if="show">hello</div>
        </transition>

        <button @click="handleClick">切换</button>
    </div>
18、通过js实现动画
<body>
    <div id="root">
        <transition
        name="fade"
        @before-enter="handleBeforeEnter"
        @enter="handleEnter"
        @after-enter="handleAfterEnter"
        >
           <div v-show="show">hello world</div>
        </transition>
        <button @click="handleClick">切换</button>
    </div>
    <script>
        var vm = new Vue({
            el: "#root",
            data: {
                show: true
            },
            methods: {
                handleClick: function() {
                    this.show = !this.show
                },
                handleBeforeEnter: function(el) {
                    el.style.color = 'red'
                    console.log("before enter")
                },
                handleEnter: function(el, done){
                    console.log("enter");
                    setTimeout(() => {
                        el.style.color = 'green'
                    }, 2000);
                    setTimeout(() => {
                        done()
                    },4000)
                },
                handleAfterEnter: function(el) {
                    el.style.color = "#000"
                    console.log("after enter")
                }
            }
        })
    </script>
</body>可以使用第三方JS动画库velocity.js:
<body>
    <div id="root">
        <transition
        name="fade"
        @before-enter="handleBeforeEnter"
        @enter="handleEnter"
        @after-enter="handleAfterEnter"
        >
           <div v-show="show">hello world</div>
        </transition>
        <button @click="handleClick">切换</button>
    </div>
    <script>
        var vm = new Vue({
            el: "#root",
            data: {
                show: true
            },
            methods: {
                handleClick: function() {
                    this.show = !this.show
                },
                handleBeforeEnter: function(el) {
                    el.style.opacity = 0;
                },
                handleEnter: function(el, done){
                   Velocity(el, {
                       opacity: 1
                    }, {
                        duration: 1000,
                        complete: done
                    })
                },
                handleAfterEnter: function(el) {
                    alert("over")
                }
            }
        })
    </script>
</body>
19、多个元素和组件的动画
<style>
        .fade-enter, .fade-leave-to {
            opacity: 0;
        }
        .fade-enter-active, .fade-leave-avtive {
            transition: opacity 1s;
        }
    </style>

<body>
    <div id="root">
        <transition name="fade" mode="in-out">
           <div v-if="show" key="hello">hello world</div>  <!--由于复用dom机制,Vue会尽可能的复用,导致样式无法展示,避免复用可以加key值-->
           <div v-else key="bye">Bye World</div>
        </transition>
        <button @click="handleClick">切换</button>
    </div>
    <script>

        Vue.component('child', {
            template: '<div>child</div >'
        })
        Vue.component('child-one', {
            template: '<div>child</div >'
        })
        var vm = new Vue({
            el: "#root",
            data: {
                show: true
            },
            methods: {
                handleClick: function() {
                    this.show = !this.show
                },
            }
        })
    </script>

//----------------------------------------

<div>
    <transition>
        <component is:type></component>
    </transition>
    <button @click="handleClick"></button>
</div>

Vue.component('child', {
    template: '<div>child</div>'
})
Vue.component('child-one', {
    template: '<div>child-one</div>'
})

var vm = new Vue({
    el: '#root',
    data: {
        type:'child'
    },
    methods: {
        handleClick: function() {
            this.type = this.type === 'child' ? 'child-one' : 'child'
        }
    }
})实现列表循环:使用<transition-group>
20、Vue中的动画封装
<body>
    <div id="root">
        <fade :show="show">   // 仅仅调用组件
            <div>
                hello world
            </div>
        </fade>
        <button @click="handleClick">toggle</button>
    </div>
    <script>

        Vue.component('fade', {
            props: ['show'],
            template: `
            <transition @before-enter="handleBeforeEnter"
                @enter="handleEnter">
                <slot v-if="show"></slot>
            </transition>`,
            methods: {
                handleBeforeEnter: function(el) {
                    el.style.color = 'red'
                },
                handleEnter: function(el, done) {
                    setTimeout(() => {
                        el.style.color = 'green'
                        done();
                    }, 2000)
                }
            }
        })
        var count = 0;
        var vm = new Vue({
            el: "#root",
            data: {
                show: 'false'
            },
            methods: {
                handleClick: function() {
                    this.show = !this.show
                },
            }
        })
    </script>
</body>


 2048
2048

 被折叠的 条评论
为什么被折叠?
被折叠的 条评论
为什么被折叠?
 到【灌水乐园】发言


