


上一篇文章一文弄懂Agent从手搓Claude开始,我们介绍了如何手搓Agent,发现有些事情必须要去做:比如和LLM传递信息,使用Tools,用ReAct增强Agent,用RAG获取外部信息,记住历史信息等等。我曾经说过,重复的事情做三遍,就应该考虑工具化。
LangChain正是在这样的背景下诞生的,它提供了一个辅助实现这些功能的框架和工具集,从而帮助开发者构建更加强大,可落地的商业Agent应用程序。本文会探讨LangChain的基础核心功能,以及我自己对框架使用的思考。
1. 准备工作
安装langchain
pip install -U langchain==1.0
# Requires Python 3.10+
使用deepseek-chat作为后端大模型
llm = init_chat_model(
"deepseek-chat",
    api_key="<API KEY>",
    temperature=0.5,
    timeout=20,
    max_tokens=1000,
    http_client=httpx.Client(verify=False),
)
打印agent和大模型通信的request,response,为了理解langchain背后的原理,查看通信内容会有很大帮助。
def log_request(request):    print("============ Outgoing Request ============")    print(f"Method: {request.method}")    print(f"URL: {request.url}")    # 记录请求体    if hasattr(request, 'content'):        try:            if isinstance(request.content, (bytes, bytearray)):                body = request.content.decode('utf-8')            else:                body = str(request.content)            try:                body_json = json.loads(body)                print("Body (JSON):")                print(json.dumps(body_json, indent=2, ensure_ascii=False))            except:                print(f"Body: {body}")        except Exception as e:            print(f"Body: [Unable to read: {e}]")    print("===============================")
def log_response(response):    print("=========== Incoming Response ===========")    print(f"Status: {response.status_code}")    # 读取响应内容    try:        response.read()  # 这步很重要!        content = response.text
        # 尝试美化JSON输出        try:            content_json = json.loads(content)            print("Content (JSON):")            print(json.dumps(content_json, indent=2, ensure_ascii=False))        except:            # 限制输出长度            if len(content) > 1000:                print(f"Content: {content[:1000]}...")            else:                print(f"Content: {content}")
    except Exception as e:        print(f"Error reading response content: {e}")    print("==============================")
# 创建自定义 HTTP clienthttp_client = httpx.Client(    verify=False,    event_hooks={        'request': [log_request],        'response': [log_response],    })
llm = init_chat_model(    "deepseek-chat",    api_key="<API KEY>",    temperature=0.5,    timeout=20,    max_tokens=1000,    http_client=http_client,)
agent = create_agent(    model=llm,    system_prompt="You are a helpful assistant",)
2. Messages
Messages是LangChain里最基础的概念,代表了对模型的输入和输出。一个典型的使用如下:
from langchain.messages import SystemMessage, HumanMessage, AIMessage

messages = [
    SystemMessage("You are a poetry expert"),
    HumanMessage("Write a haiku about spring"),
    AIMessage("Cherry blossoms bloom...")
]
response = llm.invoke(messages)
实际上这些不同的Messages类型就对应System、User、Assistant这三个role,不用对象封装,手搓的话,与下面的效果等价
messages = [
    {"role": "system", "content": "You are a poetry expert"},
    {"role": "user", "content": "Write a haiku about spring"},
    {"role": "assistant", "content": "Cherry blossoms bloom..."}
]
response = llm.invoke(messages)
3. Tools
使用工具是Agent的基本能力,在langchain的封装下,我们不再需要自己写使用工具的prompt,而是用如下的方式:
from langchain.agents import create_agentfrom langchain.tools import tool, ToolRuntime
from deepseek_model import llm, log_before_model

# Access the current conversation state@tooldef summarize_conversation(        runtime: ToolRuntime) -> str:    """Summarize the conversation so far."""    messages = runtime.state["messages"]
    human_msgs = sum(1 for m in messages if m.__class__.__name__ == "HumanMessage")    ai_msgs = sum(1 for m in messages if m.__class__.__name__ == "AIMessage")
    return f"Conversation has {human_msgs} user messages, {ai_msgs} AI responses"

agent = create_agent(    model=llm,    system_prompt="You are a helpful assistant",    tools=[summarize_conversation],    middleware=[log_before_model],)
messages = {"messages": [    {"role": "system", "content": "when the number of messages is asked, you can call summarize_conversation tool"},    {"role": "user", "content": "Nice to meet you"},    {"role": "assistant", "content": "Nice to meet you too"},    {"role": "user", "content": "tell me how many user and assistant messages are in this conversation"}]}
response = agent.invoke(messages, print_mode="values")
for m in response["messages"]: if m.__class__.__name__ == "AIMessage": print(m.content)其背后,langchain是把通过@tool标识的工具类,用tools=[summarize_conversation]注册到agent。原理就是通过python的Decorator把函数变成StructuredTool类:
class StructuredTool(BaseTool):    """Tool that can operate on any number of inputs."""
    description: str = ""    args_schema: Annotated[ArgsSchema, SkipValidation()] = Field(        ..., description="The tool schema."    )    """The input arguments' schema."""    func: Callable[..., Any] | None = None    """The function to run when the tool is called."""    coroutine: Callable[..., Awaitable[Any]] | None = None    """The asynchronous version of the function."""
这个类的主要目的是方便agent把函数信息转化为llm可以理解的工具使用的Prompt,这些内容包括函数的name、description,以及args_schema(参数信息)。通过打印给发送给llm的request内容,可以发现,生成的关于tool使用的prompt如下所示:
"tools": [ { "type": "function", "function": { "name": "summarize_conversation", "description": "Summarize the conversation so far.", "parameters": { "properties": {}, "type": "object" } } } ]llm返回给agent的response内容如下,这是在告诉agent要去执行tool call:
"message": { "role": "assistant", "content": "I'll check how many messages are in this conversation for you.", "tool_calls": [ { "index": 0, "id": "call_00_GhtKT5QA8SmSLq9GcsNpDlbq", "type": "function", "function": { "name": "summarize_conversation", "arguments": "{}" } } ] }, "logprobs": null, "finish_reason": "tool_calls" }对比一文弄懂Agent从手搓Claude开始中我们实现Function Calling的方式,不同点只是使用的格式(或者说我们和LLM之间的协定)不一样,但原理都是一样的。
4. Memory
记忆(Memory)是一个能够记录以往交互信息的系统。对于智能体而言,记忆能力至关重要——它不仅能保存历史交互记录,更能从反馈中学习进化,逐步适应不同用户的个性化需求。随着智能体需要处理愈发复杂的任务和海量用户交互,这种记忆能力已成为提升运行效率和用户体验的核心要素。
我们以long-term memory为例,演示一下其使用情况,假设这些信息要存入postgres数据库。
from dataclasses import dataclass
from langchain.agents import create_agentfrom langchain.tools import tool, ToolRuntimefrom langgraph.store.postgres import PostgresStore  # 改为 PostgreSQL 存储from typing_extensions import TypedDict
from deepseek_model import llm
DB_URI = "postgresql://postgres:1314520@localhost:5432/Test?sslmode=disable"
with PostgresStore.from_conn_string(    conn_string=DB_URI,    pipeline=False,    pool_config=None,    index=None,    ttl=None) as store:
    store.setup()
    @dataclass    class Context:        user_id: str

    # TypedDict defines the structure of user information for the LLM    class UserInfo(TypedDict):        name: str        age: int        address: str

    # Tool that allows agent to update user information (useful for chat applications)    @tool    def save_user_info(user_info: UserInfo, runtime: ToolRuntime[Context, dict]) -> str:        """Save user info."""        # Access the store - same as that provided to `create_agent`        store = runtime.store        user_id = runtime.context.user_id        # Store data in the store (namespace, key, data)        store.put(("users",), user_id, user_info)        return "Successfully saved user info."

    agent = create_agent(        model=llm,        tools=[save_user_info],        store=store,        context_schema=Context    )
    # Run the agent    result = agent.invoke(        {"messages": [{"role": "user", "content": "My name is Frank Smith, 48 years old, live at 1024 Hamilton Ave. in San Jose, California. please save it using save_user_info function"}]},        # user_id passed in context to identify whose information is being updated        context=Context(user_id="user_123")    )
    for m in result["messages"]:        if m.__class__.__name__ == "AIMessage":            print(m.content)
    # You can access the store directly to get the value    user_info = store.get(("users",), "user_123")    print(user_info)
运行完以上程序,我们会发现在数据库中的store表中,多出了一条记录,且这条记录可以随时从db中取出。通过数据库的持久化,我们就可以长时间保留用户信息。在商业应用中,我们的Agent服务肯定都是多实例的,这种持久化也能实现服务的stateless,从而让用户的request可以在不同的Agent实例间迁移。

5. Structured output
Structured output使Agent能够以特定、可预测的格式返回数据。LangChain的create_agent可自动处理结构化输出:用户设定所需的结构化输出schema后,当模型生成结构化数据时,系统会自动捕获并验证这些数据,最终通过dict的'structured_response'键返回处理结果。
以下是个简单的示例:
from typing import Literal
from langchain.agents import create_agentfrom pydantic import BaseModel, Field
from deepseek_model import llm, print_dict_structured

class ProductReview(BaseModel):    """Analysis of a product review."""    rating: int | None = Field(description="The rating of the product", ge=1, le=5)    sentiment: Literal["positive", "negative"] = Field(description="The sentiment of the review")    key_points: list[str] = Field(description="The key points of the review. Lowercase, 1-3 words each.")

agent = create_agent(    model=llm,    response_format=ProductReview)
result = agent.invoke({    "messages": [{"role": "user",                  "content": "Analyze this review: 'bad product: 2 out of 5 stars. Fast shipping, but too expensive'"}]})review = result["structured_response"]print(review)
执行上面的程序,会得到以下结果:
'structured_response': ProductReview(rating=2, sentiment='negative', key_points=['fast shipping', 'too expensive']其背后原理,也是通过Function Calling实现的,观察agent发送给llm的request日志,会看到以下的内容,就是一个典型的Function Calling 的prompt
"tools": [ { "type": "function", "function": { "name": "ProductReview", "description": "Analysis of a product review.", "parameters": { "properties": { "rating": { "anyOf": [ { "maximum": 5, "minimum": 1, "type": "integer" }, { "type": "null" } ], "description": "The rating of the product" }, "sentiment": { "description": "The sentiment of the review", "enum": [ "positive", "negative" ], "type": "string" }, "key_points": { "description": "The key points of the review. Lowercase, 1-3 words each.", "items": { "type": "string" }, "type": "array" } }, "required": [ "rating", "sentiment", "key_points" ], "type": "object" } } } ]6. 链式处理
LCEL(LangChain Expression Language)也是Chain这个名字的来历,LCEL语法利用了 Python 的 运算符重载 特性,具体来说是 or 方法重载。从而使得运算符|有了类似于管道的功能,可以串联一系列Agent需要的操作,比如基本示例:提示 + 模型 + 输出解析器:
prompt = ChatPromptTemplate.from_template("请用中文回答:{question}")output_parser = StrOutputParser()
chain = prompt | llm | output_parser
print("begin invoke")try:    result = chain.invoke({"question": "杭州今天的天气怎么样?"})    print(result)except Exception as e:    print(f"调用失败: {e}")
其背后的原理,就是运算符重载,以下是一个模拟LangChain的LCEL语法实现:
class Runnable:    def __init__(self, name):        self.name = name
    def __or__(self, other):        # 模拟 LCEL 的链式连接        return Chain([self, other])
    def run(self, input_data):        return f"{self.name}处理({input_data})"
    def __str__(self):        return self.name
class Chain:    def __init__(self, steps):        self.steps = steps
    def run(self, input_data):        result = input_data        for step in self.steps:            result = step.run(result)        return result
    def __or__(self, other):        return Chain(self.steps + [other])
# 使用 | 操作符构建处理链step1 = Runnable("加载数据")step2 = Runnable("清洗数据")step3 = Runnable("分析数据")
pipeline = step1 | step2 | step3result = pipeline.run("原始数据")print(result)  # 分析数据处理(清洗数据处理(加载数据处理(原始数据)))
但是在LangChain1.0之后,对于更加复杂的场景,比如复杂的状态管理、多分支逻辑、循环或涉及多个代理协作时,更加推荐使用LangGraph来处理。
7. LangChain中的软件设计
作为一个软件老登,在关注LangChain的功能的同时,一定也会关注它是怎么设计和实现的。我发现有两个典型的设计:一个是上下文设计,另一个是可扩展设计。在langchain中也有用到
7.1 上下文设计
Context在框架中之所以重要,是因为我们在处理信息的时候,往往要借助上下文信息。比如在java的web框架中有ServletContext,在Spring框架中有ApplicationContext。Context进一步可以分为Procedure Context(过程上下文)和Global Context(全局上下文):
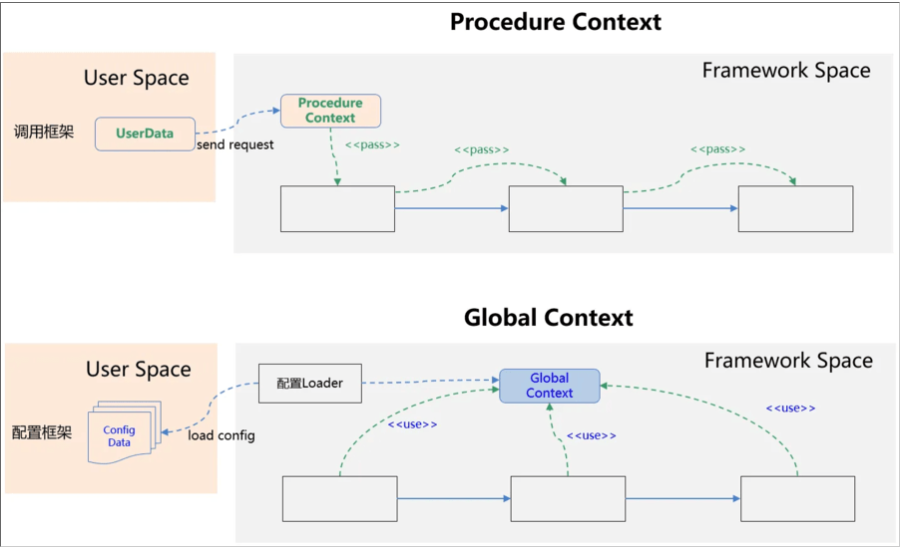
在langchain中,上下文主要是通过ToolRuntime实现的:
@dataclassclass ToolRuntime state: StateT context: ContextT config: RunnableConfig stream_writer: StreamWriter tool_call_id: str | None store: BaseStore | None结合Memory的内容,我们可以将langchain中的context分为以下三类:
类别 | 别称 | 作用范围 | 示例 |
|---|---|---|---|
| Context | 静态配置 | 会话范围 | 用户ID、API密钥、数据库连接、权限、环境设置 |
| State | 短期记忆 | 会话范围 | 当前消息、上传文件、认证状态、工具执行结果 |
| Store | 长期记忆 | 跨会话 | 用户偏好、提取的洞察、记忆信息、历史数据 |
其中,Context是静态信息,属于Global Context。Sate、Store是Procedure Context。准确的说Store不仅仅是single procedure的,也可以是cross-procedure的。
7.2 可扩展设计
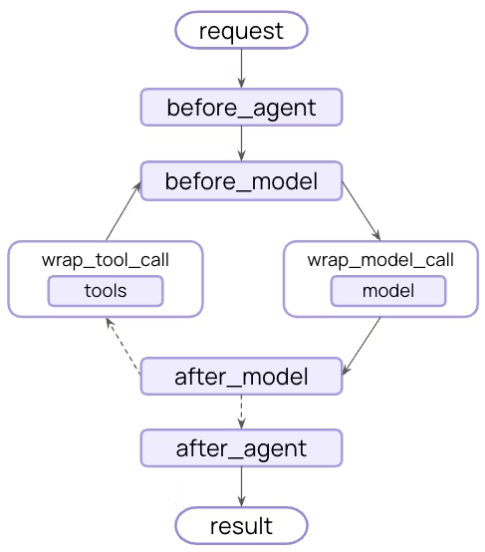
- Middleware扩展
Middleware在python的语境下,是一种常用的设计模式,和过滤器、管道模式类似。通过Middleware我们可以在横切面添加额外的功能。
客户端请求 → Middleware1 → Middleware2 → ... → 业务处理 → Middleware2 → Middleware1 → 客户端响应Langchain除了大量的build-in的middleware,用户可以在以下的扩展点(hook点)自定义middleware,从而极大的提升了框架的可扩展性,基本上,所有的框架都有类似的设计。
- 依赖倒置
langchain中的Store是抽象的,这个设计和我在cola-job中的设计是一模一样的,通过依赖倒置,磨平具体实现InMemoryStore,DBStore,RedisStore之间的差异。有时候,我们也把这个模式叫面向接口编程。
- 泛型
Python在3.5之后引入了泛型。(我个人更喜欢强类型的语言,这样很多类型问题编译时就能提示)在上面的例子中,我们已经看到了用户自定义State、Context的方法。实际上都是因为StateT和ContextT泛型的使用,从而在保证扩展性的同时,同时兼顾了类型安全。
8. 关于框架的反思
从上文的原理解释中,你应该也发现了,使用LangChain构建Agent和手搓Agent的最大区别是,LangChain通过抽象、封装的方式,帮我们生成了本来需要我们自己写的Prompt,以及和LLM的交互细节也被屏蔽了,比如Function Calling的过程。在带来了一定便利性的同时,也给像我这样的初学者带来了不少困惑,很多事情没有像手搓Agent时那么直观,要通过看日志、看它的源码,才能理解其背后的原理。
这是一个典型的使用框架带来的问题,即框架作为一个“黑盒”,会增加学习成本,性能成本,debug成本,维护成本等。使用不当,还会额外引入复杂度,我曾经猛烈的抨击过流程引擎,在我经历过的项目中,但凡引入流程引擎框架的,无一例外都被搞得乌烟瘴气,得不偿失。本来简单直接的业务逻辑,在流程引擎的编排下,变得支离破碎,上下文不连续,晦涩难懂,更加复杂。
所以对于LangChain,特别是LangGraph(本质上就是一个workflow工作流编排工具),请各位一定要谨慎选择,不要轻易趟这个浑水。如果觉得我是危言耸听的,可以看看这篇文章《为什么我们不再使用 LangChain 来构建我们的 AI 智能体》
因为篇幅关系,我会在下一篇介绍LangChain的其它三个扩展模块,LangGraph,DeepAgents 和 LangSmith


 568
568

 被折叠的 条评论
为什么被折叠?
被折叠的 条评论
为什么被折叠?
 到【灌水乐园】发言


