


转载于 https://blog.youkuaiyun.com/Mculover666/article/details/100555620
本篇详细的记录了如何使用STM32CubeMX配置STM32L431RCT6的硬件SDMMC外设读取SD卡数据。
1. 准备工作
硬件准备
- 开发板
首先需要准备一个开发板,这里我准备的是STM32L4的开发板(BearPi):

- Micro SD卡
小熊派开发板板载 Micro SD 卡槽,最大支持 32 GB,需要提前自行准备一张 Micro SD卡,如图:

软件准备
- 需要安装好Keil - MDK及芯片对应的包,以便编译和下载生成的代码;
- 准备一个串口调试助手,这里我使用的是
Serial Port Utility;
Keil MDK和串口助手Serial Port Utility 的安装包都可以在文末关注公众号获取,回复关键字获取相应的安装包:

2.生成MDK工程
选择芯片型号
打开STM32CubeMX,打开MCU选择器:

搜索并选中芯片STM32L431RCT6:

配置时钟源
- 如果选择使用外部高速时钟(HSE),则需要在System Core中配置RCC;
- 如果使用默认内部时钟(HSI),这一步可以略过;
这里我都使用外部时钟:

配置串口
小熊派开发板板载ST-Link并且虚拟了一个串口,原理图如下:

这里我将开关拨到AT-MCU模式,使PC的串口与USART1之间连接。
接下来开始配置USART1:

配置 SDMMC 接口
知识小卡片 —— SDMMC接口
SDMMC接口的全称叫SD/SDIO MMC card host interface,SD/SDIO MMC 卡 主机接口,通俗的来说,就是这个接口支持SD卡,支持SDIO设备,支持MMC卡。
知识小卡片结束啦~
首先查看小熊派开发板的原理图:

然后根据原理图配置 SDMMC 接口:

配置时钟树
STM32L4的最高主频到80M,所以配置PLL,最后使HCLK = 80Mhz即可:

生成工程设置

代码生成设置
最后设置生成独立的初始化文件:

生成代码
点击GENERATE CODE即可生成MDK-V5工程:

3. 在MDK中编写、编译、下载用户代码
重定向printf( )函数
参考:【STM32Cube_09】重定向printf函数到串口输出的多种方法。
读取SD卡信息并打印
SD 卡系统(包括主机和 SD 卡)定义了两种操作模式:
- 卡识别模式
- 数据传输模式
在系统复位后,主机处于卡识别模式,寻找总线上可用的 SD卡设备;同时,SD 卡也处于卡
识别模式,直到被主机识别到。
使用STM32CubeMX初始化的工程中会自动生成 SDMMC 初始化函数,向 SD 卡发送命令,当 SD 卡接收到命令后, SD 卡就会进入数据传输模式,而主机在总线上所有卡被识别后也进入数据传输模式。
所以在操作之前,需要先检查 SD 卡是否处于数据传输模式并且处于数据传输状态:
在main函数中首先定义一个变量用于存储 SD 卡状态:
int sdcard_status = 0;
HAL_SD_CardCIDTypeDef sdcard_cid;
- 1
- 2
然后在while(1)之前编写如下读取信息代码:
/* USER CODE BEGIN 2 */
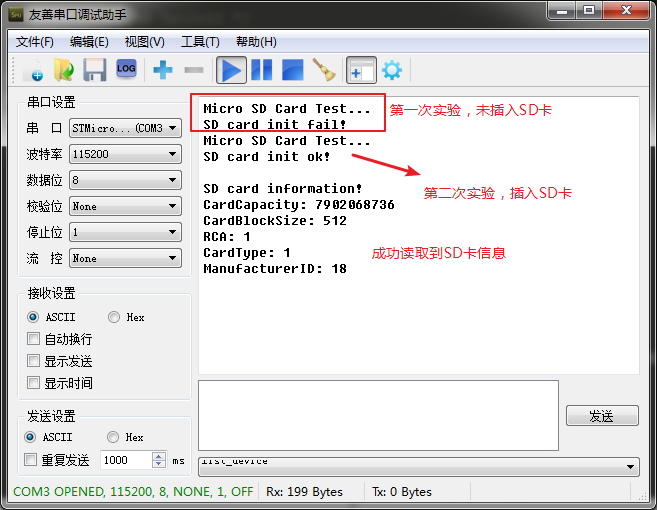
printf("Micro SD Card Test...\r\n");
/* 检测SD卡是否正常(处于数据传输模式的传输状态) */
sdcard_status = HAL_SD_GetCardState(&hsd1);
if(sdcard_status == HAL_SD_CARD_TRANSFER)
{
printf(“SD card init ok!\r\n\r\n”);
<span class="token comment">//打印SD卡基本信息</span>
<span class="token function">printf</span><span class="token punctuation">(</span><span class="token string">"SD card information!\r\n"</span><span class="token punctuation">)</span><span class="token punctuation">;</span>
<span class="token function">printf</span><span class="token punctuation">(</span><span class="token string">"CardCapacity: %llu\r\n"</span><span class="token punctuation">,</span><span class="token punctuation">(</span><span class="token punctuation">(</span><span class="token keyword">unsigned</span> <span class="token keyword">long</span> <span class="token keyword">long</span><span class="token punctuation">)</span>hsd1<span class="token punctuation">.</span>SdCard<span class="token punctuation">.</span>BlockSize<span class="token operator">*</span>hsd1<span class="token punctuation">.</span>SdCard<span class="token punctuation">.</span>BlockNbr<span class="token punctuation">)</span><span class="token punctuation">)</span><span class="token punctuation">;</span>
<span class="token function">printf</span><span class="token punctuation">(</span><span class="token string">"CardBlockSize: %d \r\n"</span><span class="token punctuation">,</span>hsd1<span class="token punctuation">.</span>SdCard<span class="token punctuation">.</span>BlockSize<span class="token punctuation">)</span><span class="token punctuation">;</span>
<span class="token function">printf</span><span class="token punctuation">(</span><span class="token string">"RCA: %d \r\n"</span><span class="token punctuation">,</span>hsd1<span class="token punctuation">.</span>SdCard<span class="token punctuation">.</span>RelCardAdd<span class="token punctuation">)</span><span class="token punctuation">;</span>
<span class="token function">printf</span><span class="token punctuation">(</span><span class="token string">"CardType: %d \r\n"</span><span class="token punctuation">,</span>hsd1<span class="token punctuation">.</span>SdCard<span class="token punctuation">.</span>CardType<span class="token punctuation">)</span><span class="token punctuation">;</span>
<span class="token comment">//读取并打印SD卡的CID信息</span>
<span class="token function">HAL_SD_GetCardCID</span><span class="token punctuation">(</span><span class="token operator">&</span>hsd1<span class="token punctuation">,</span><span class="token operator">&</span>sdcard_cid<span class="token punctuation">)</span><span class="token punctuation">;</span>
<span class="token function">printf</span><span class="token punctuation">(</span><span class="token string">"ManufacturerID: %d \r\n"</span><span class="token punctuation">,</span>sdcard_cid<span class="token punctuation">.</span>ManufacturerID<span class="token punctuation">)</span><span class="token punctuation">;</span>
}
else
{
printf(“SD card init fail!\r\n” );
return 0;
}
/* USER CODE END 2 */
- 1
- 2
- 3
- 4
- 5
- 6
- 7
- 8
- 9
- 10
- 11
- 12
- 13
- 14
- 15
- 16
- 17
- 18
- 19
- 20
- 21
- 22
- 23
- 24
- 25
- 26
编译下载后串口助手输出结果如下:
擦除SD卡块数据
为了验证实验的正确性或,先擦除数据:
/* 擦除SD卡块 */
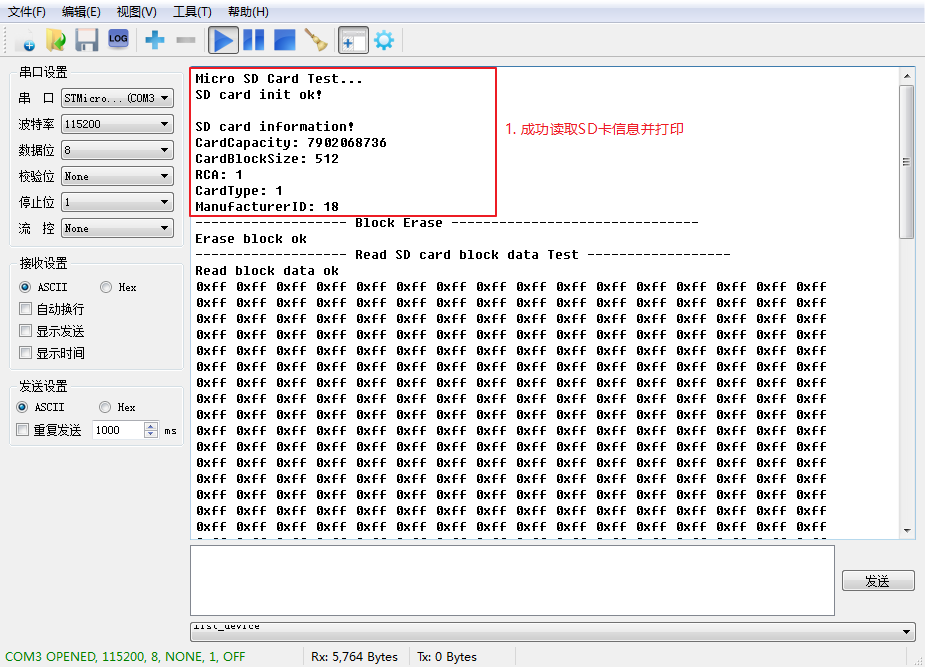
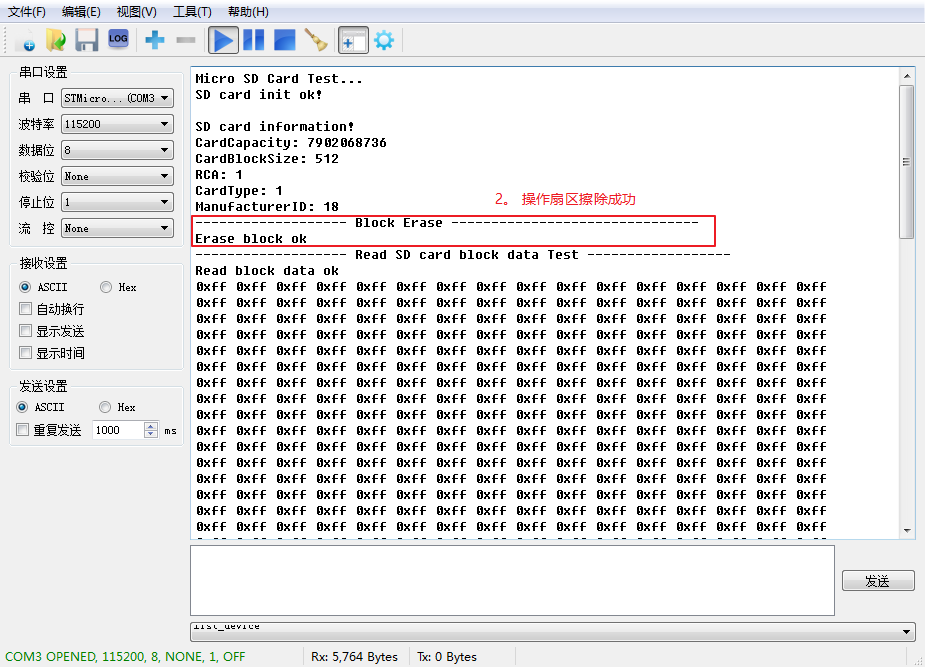
printf("------------------- Block Erase -------------------------------\r\n");
sdcard_status = HAL_SD_Erase(&hsd1, 0, 512);
if (sdcard_status == 0)
{
printf("Erase block ok\r\n");
}
else
{
printf("Erase block fail\r\n");
}
- 1
- 2
- 3
- 4
- 5
- 6
- 7
- 8
- 9
- 10
- 11
读取SD卡块数据
首先开辟一个全局缓冲区,用于存放从SD卡读出的数据:
/* Private user code ---------------------------------------------------------*/
/* USER CODE BEGIN 0 */
uint8_t read_buf[512];
/* USER CODE END 0 */
- 1
- 2
- 3
- 4
然后在之前读取信息的代码之后添加读取数据的代码:
/* 读取未操作之前的数据 */
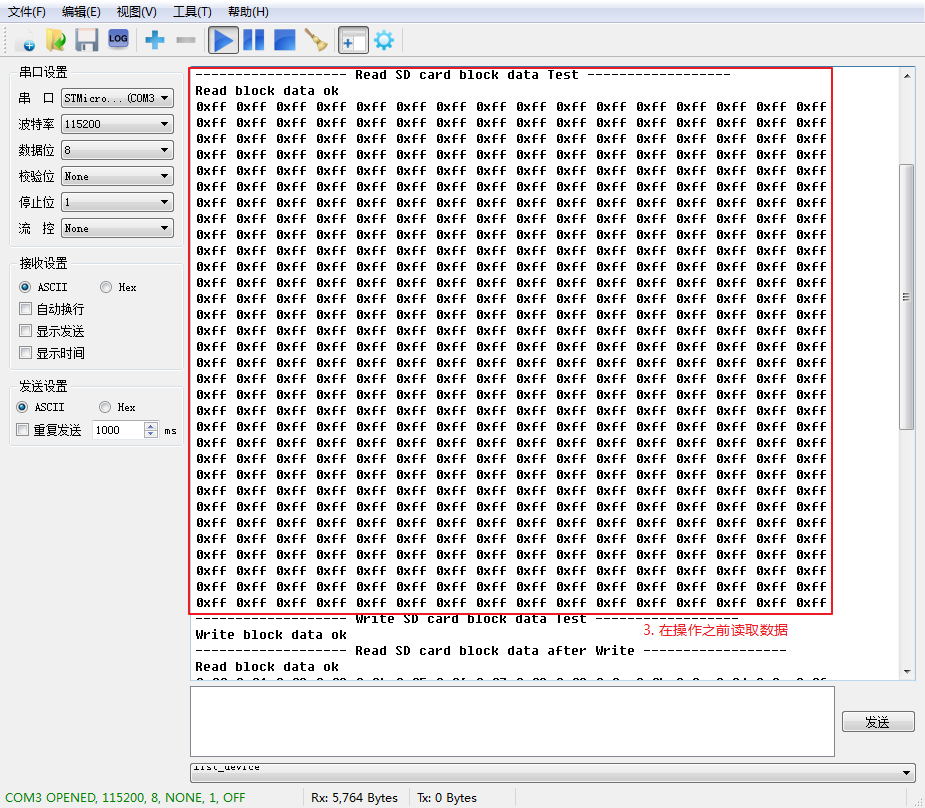
printf("------------------- Read SD card block data Test ------------------\r\n");
sdcard_status = HAL_SD_ReadBlocks(&hsd1,(uint8_t *)read_buf,0,1,0xffff);
if(sdcard_status == 0)
{
printf("Read block data ok \r\n" );
for(i = 0; i < 512; i++)
{
printf("0x%02x ", read_buf[i]);
if((i+1)%16 == 0)
{
printf("\r\n");
}
}
}
else
{
printf("Read block data fail!\r\n " );
}
- 1
- 2
- 3
- 4
- 5
- 6
- 7
- 8
- 9
- 10
- 11
- 12
- 13
- 14
- 15
- 16
- 17
- 18
- 19
向SD卡块写入数据
同样的,开辟一个全局缓冲区,用于存放即将要写入SD卡的数据:
uint8_t write_buf[512];
- 1
然后在之前读取数据的代码之后添加的代码,将缓冲区的数据赋初值:
/* 填充缓冲区数据 */
for(i = 0; i < 512; i++)
{
    write_buf[i] = i % 256;
}
- 1
- 2
- 3
- 4
- 5
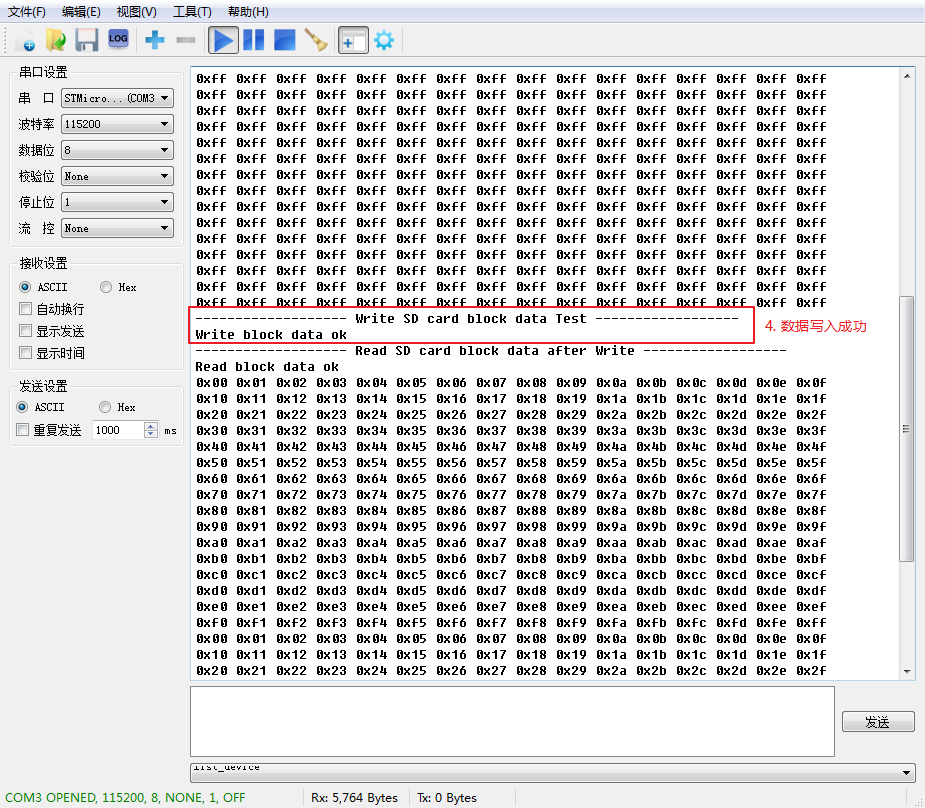
然后继续添加代码,将该缓冲区数据写入SD卡:
/* 向SD卡块写入数据 */
printf("------------------- Write SD card block data Test ------------------\r\n");
sdcard_status = HAL_SD_WriteBlocks(&hsd1,(uint8_t *)write_buf,0,1,0xffff);
if(sdcard_status == 0)
{
    printf("Write block data ok \r\n" );
}
else
{
    printf("Write block data fail!\r\n " );
}
- 1
- 2
- 3
- 4
- 5
- 6
- 7
- 8
- 9
- 10
- 11
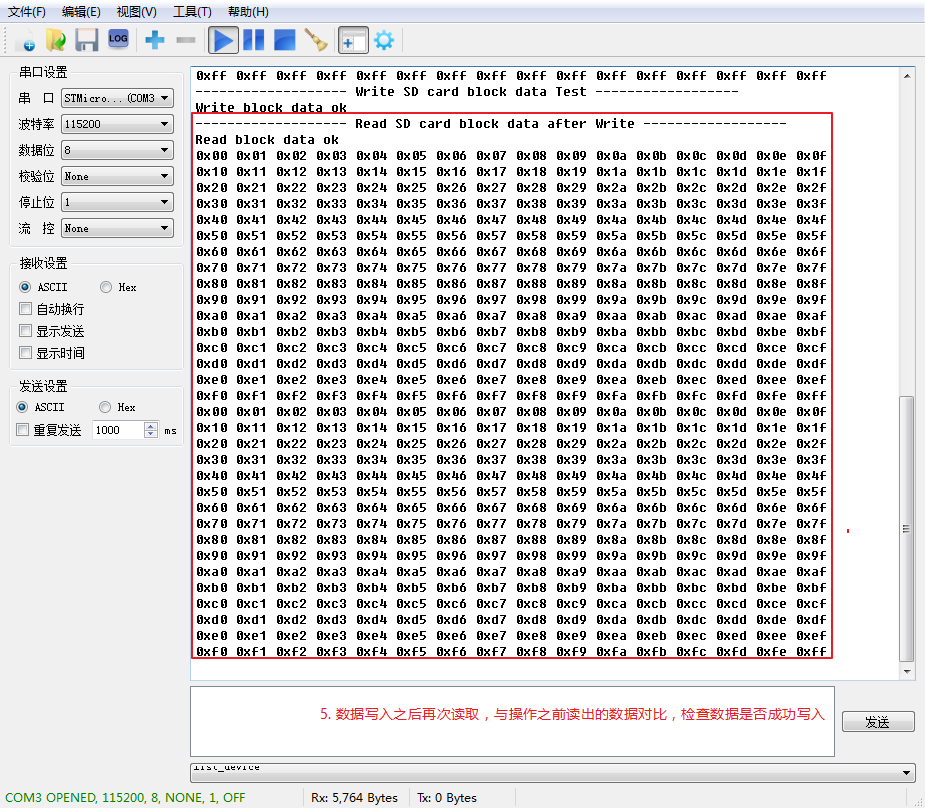
添加完之后,为了检查数据是否正常写入,再将数据读出:
/* 读取操作之后的数据 */
printf("------------------- Read SD card block data after Write ------------------\r\n");
sdcard_status = HAL_SD_ReadBlocks(&hsd1,(uint8_t *)read_buf,0,1,0xffff);
if(sdcard_status == 0)
{
    printf("Read block data ok \r\n" );
    for(i = 0; i < 512; i++)
    {
        printf("0x%02x ", read_buf[i]);
        if((i+1)%16 == 0)
        {
            printf("\r\n");
        }
    }
}
- 1
- 2
- 3
- 4
- 5
- 6
- 7
- 8
- 9
- 10
- 11
- 12
- 13
- 14
- 15
将程序编译下载,最终的实验结果如下:
至此,我们已经学会如何使用硬件SDMMC接口读取SD数据,STM32CubeMX系列教程完结。
更多精彩文章及资源,请关注我的微信公众号:『mculover666』。

</div>
<link href="https://csdnimg.cn/release/phoenix/mdeditor/markdown_views-b6c3c6d139.css" rel="stylesheet">
<div class="more-toolbox">
<div class="left-toolbox">
<ul class="toolbox-list">
<li class="tool-item tool-active is-like tool-clicked"><a href="javascript:;"><svg class="icon" aria-hidden="true">
<use xmlns:xlink="http://www.w3.org/1999/xlink" xlink:href="#csdnc-thumbsup"></use>
</svg><span class="name">点赞</span>
<span class="count">1</span>
</a></li>
<li class="tool-item tool-active is-collection "><a href="javascript:;" data-report-click="{"mod":"popu_824"}"><svg class="icon" aria-hidden="true">
<use xmlns:xlink="http://www.w3.org/1999/xlink" xlink:href="#icon-csdnc-Collection-G"></use>
</svg><span class="name">收藏</span></a></li>
<li class="tool-item tool-active is-share"><a href="javascript:;"><svg class="icon" aria-hidden="true">
<use xmlns:xlink="http://www.w3.org/1999/xlink" xlink:href="#icon-csdnc-fenxiang"></use>
</svg>分享</a></li>
<!--打赏开始-->
<!--打赏结束-->
<li class="tool-item tool-more">
<a>
<svg t="1575545411852" class="icon" viewBox="0 0 1024 1024" version="1.1" xmlns="http://www.w3.org/2000/svg" p-id="5717" xmlns:xlink="http://www.w3.org/1999/xlink" width="200" height="200"><defs><style type="text/css"></style></defs><path d="M179.176 499.222m-113.245 0a113.245 113.245 0 1 0 226.49 0 113.245 113.245 0 1 0-226.49 0Z" p-id="5718"></path><path d="M509.684 499.222m-113.245 0a113.245 113.245 0 1 0 226.49 0 113.245 113.245 0 1 0-226.49 0Z" p-id="5719"></path><path d="M846.175 499.222m-113.245 0a113.245 113.245 0 1 0 226.49 0 113.245 113.245 0 1 0-226.49 0Z" p-id="5720"></path></svg>
</a>
<ul class="more-box">
<li class="item"><a class="article-report">文章举报</a></li>
</ul>
</li>
</ul>
</div>
</div>
<div class="person-messagebox">
<div class="left-message"><a href="https://blog.youkuaiyun.com/Mculover666">
<img src="https://profile.csdnimg.cn/6/D/C/3_mculover666" class="avatar_pic" username="Mculover666">
<img src="https://g.csdnimg.cn/static/user-reg-year/2x/2.png" class="user-years">
</a></div>
<div class="middle-message">
<div class="title"><span class="tit"><a href="https://blog.youkuaiyun.com/Mculover666" data-report-click="{"mod":"popu_379"}" target="_blank">Mculover666</a></span>
<span class="flag expert">
<a href="https://blog.youkuaiyun.com/home/help.html#classicfication" target="_blank">
<svg class="icon" aria-hidden="true">
<use xmlns:xlink="http://www.w3.org/1999/xlink" xlink:href="#csdnc-blogexpert"></use>
</svg>
博客专家
</a>
</span>
</div>
<div class="text"><span>发布了157 篇原创文章</span> · <span>获赞 499</span> · <span>访问量 19万+</span></div>
</div>
<div class="right-message">
<a href="https://im.youkuaiyun.com/im/main.html?userName=Mculover666" target="_blank" class="btn btn-sm btn-red-hollow bt-button personal-letter">私信
</a>
<a class="btn btn-sm attented bt-button personal-watch" data-report-click="{"mod":"popu_379"}">已关注</a>
</div>
</div>
</div>


 被折叠的 条评论
为什么被折叠?
被折叠的 条评论
为什么被折叠?
 到【灌水乐园】发言


