今天我将为大家分享基于Service与ContentProvider的音乐播放实例,对于接触Android有一些时日的人来 说,Android的核心也就是Activity,Service,ContentProvider,BroadCastReceiver,以及串联它们 的Intent五大模块,Activity我就不用多说了,而我将就这个例子来说一下Service,以及ContentProvider.
Service:
Android中的服务,它与Activity不同,它是不能与用户交互的,运行在后台的程序,如果我们退出应用时,没有结束进程,它仍然在后台运 行,那我们什么时候会用到Service呢?比如我们播放音乐的时候,有可能想边听音乐边干些其他事情,当我们退出播放音乐的应用,如果不用 Service,我们就听不到歌了,所以这时候就得用到Service了,又比如当我们一个应用的数据是通过网络获取的,不同时间(一段时间)的数据是不 同的这时候我们可以用Service在后台定时更新,而不用每打开应用的时候在去获取。
CotentProvider:
Android中的内容提供者,它让我们可以通过一个URL跨应用获取数据(通常是SQLite数据库),我觉得Android这个还是机制还是非 常不错的,特别是我们想获取Sdcard里一些数据时,比如我们想获取所有Sdcard里的音频,视频,图片等,我们只要通过一个URL就可以轻松搞定, 其实我们在开机或者插入Sdcard时,Android会做一些事情,就是它自动建库,将我们卡里所有音频,视频,图片等信息存在相应的表中,我们可以用 DDMS打开看一下如下图(data/data目录下),红线是我手机当前卡建立的数据库(不同卡会建立不同的数据库)

然后我们可以将这个数据库导出,用可以打开.db的工具打开浏览数据库的相关信息如下图所示(我这里打开了音频的数据表,可以看到我手机里所有音频文件,当然还有数据表字段):

本来这个应用是我用来写播放音乐Widget的代码,但是布局有点多,我就简单化了,做了一个比较 简单的Demo,老规矩Step by Step.
第一步:新建一个Android工程命名为MusicDemo.
第二步:候改main.xml布局文件(我这里增加了四个按钮,上一首,播放,下一首,暂停)代码如下:
01 | <?xmlversion="1.0"encoding="utf-8"?> |
02 | <LinearLayoutxmlns:android="http://schemas.android.com/apk/res/android" |
03 | android:orientation="vertical" |
04 | android:layout_width="fill_parent" |
05 | android:layout_height="fill_parent" |
08 | android:layout_width="fill_parent" |
09 | android:layout_height="wrap_content" |
10 | android:text="Welcome to Mr Wei's blog." |
13 | android:orientation="horizontal" |
14 | android:layout_width="fill_parent" |
15 | android:layout_height="wrap_content" |
18 | android:id="@+id/previous" |
19 | android:layout_height="fill_parent" |
20 | android:layout_width="wrap_content" |
21 | android:layout_weight="1" |
25 | android:id="@+id/play" |
26 | android:layout_height="fill_parent" |
27 | android:layout_width="wrap_content" |
28 | android:layout_weight="1" |
32 | android:id="@+id/next" |
33 | android:layout_height="fill_parent" |
34 | android:layout_width="wrap_content" |
35 | android:layout_weight="1" |
39 | android:id="@+id/pause" |
40 | android:layout_height="fill_parent" |
41 | android:layout_width="wrap_content" |
42 | android:layout_weight="1" |
第三步:新建一个MusicService.java类,播放音乐都是在这个类里进行的哦,代码如下:
001 | package com.tutor.music; |
002 | import java.io.IOException; |
003 | import android.app.Service; |
004 | import android.content.Intent; |
005 | import android.database.Cursor; |
006 | import android.media.MediaPlayer; |
007 | import android.net.Uri; |
008 | import android.os.IBinder; |
009 | import android.provider.MediaStore; |
010 | import android.widget.Toast; |
011 | public classMusicService extends Service { |
013 | String[] mCursorCols =new String[] { |
015 | MediaStore.Audio.Media.ARTIST, MediaStore.Audio.Media.ALBUM, |
016 | MediaStore.Audio.Media.TITLE, MediaStore.Audio.Media.DATA, |
017 | MediaStore.Audio.Media.MIME_TYPE, MediaStore.Audio.Media.ALBUM_ID, |
018 | MediaStore.Audio.Media.ARTIST_ID, MediaStore.Audio.Media.DURATION |
020 | privateMediaPlayer mMediaPlayer; |
021 | privateCursor mCursor; |
022 | privateint mPlayPosition = 0; |
024 | publicstatic final String PLAY_ACTION = "com.tutor.music.PLAY_ACTION"; |
025 | publicstatic final String PAUSE_ACTION = "com.tutor.music.PAUSE_ACTION"; |
026 | publicstatic final String NEXT_ACTION = "com.tutor.music.NEXT_ACTION"; |
027 | publicstatic final String PREVIOUS_ACTION = "com.tutor.music.PREVIOUS_ACTION"; |
029 | publicIBinder onBind(Intent arg0) { |
034 | publicvoid onCreate() { |
036 | mMediaPlayer =new MediaPlayer(); |
038 | Uri MUSIC_URL = MediaStore.Audio.Media.EXTERNAL_CONTENT_URI; |
041 | mCursor = getContentResolver().query(MUSIC_URL, mCursorCols,"duration > 10000", null, null); |
045 | publicvoid onStart(Intent intent, int startId) { |
046 | super.onStart(intent, startId); |
048 | String action = intent.getAction(); |
049 | if(action.equals(PLAY_ACTION)){ |
051 | }elseif(action.equals(PAUSE_ACTION)){ |
053 | }elseif(action.equals(NEXT_ACTION)){ |
055 | }elseif(action.equals(PREVIOUS_ACTION)){ |
070 | publicvoid previous() { |
071 | if(mPlayPosition == 0) { |
072 | mPlayPosition = mCursor.getCount() -1; |
079 | if(mPlayPosition == mCursor.getCount() - 1) { |
087 | mMediaPlayer.reset(); |
088 | String dataSource = getDateByPosition(mCursor, mPlayPosition); |
089 | String info = getInfoByPosition(mCursor, mPlayPosition); |
091 | Toast.makeText(getApplicationContext(), info, Toast.LENGTH_SHORT).show(); |
093 | mMediaPlayer.setDataSource(dataSource); |
094 | mMediaPlayer.prepare(); |
095 | mMediaPlayer.start(); |
096 | } catch (IllegalArgumentException e1) { |
097 | e1.printStackTrace(); |
098 | } catch (IllegalStateException e1) { |
099 | e1.printStackTrace(); |
100 | } catch (IOException e1) { |
101 | e1.printStackTrace(); |
105 | publicString getDateByPosition(Cursor c,intposition){ |
106 | c.moveToPosition(position); |
107 | intdataColumn = c.getColumnIndex(MediaStore.Audio.Media.DATA); |
108 | String data = c.getString(dataColumn); |
112 | publicString getInfoByPosition(Cursor c,intposition){ |
113 | c.moveToPosition(position); |
114 | inttitleColumn = c.getColumnIndex(MediaStore.Audio.Media.TITLE); |
115 | intartistColumn = c.getColumnIndex(MediaStore.Audio.Media.ARTIST); |
116 | String info = c.getString(artistColumn)+" "+ c.getString(titleColumn); |
121 | publicvoid onDestroy() { |
123 | mMediaPlayer.release(); |
第四步:修改Musicdemo.java代码如下(代码比较简洁易懂):
01 | package com.tutor.music; |
02 | import android.app.Activity; |
03 | import android.content.ComponentName; |
04 | import android.content.Intent; |
05 | import android.os.Bundle; |
06 | import android.view.View; |
07 | import android.view.View.OnClickListener; |
08 | import android.widget.Button; |
09 | public classMusicDemo extends Activity implements OnClickListener { |
11 | privateButton mPrevious,mPlay,mNext,mPause; |
12 | privateComponentName component; |
13 | publicvoid onCreate(Bundle savedInstanceState) { |
14 | super.onCreate(savedInstanceState); |
15 | setContentView(R.layout.main); |
20 | publicvoid setupViews(){ |
21 | component =new ComponentName(this, |
24 | mPrevious = (Button)findViewById(R.id.previous); |
25 | mPlay = (Button)findViewById(R.id.play); |
26 | mNext = (Button)findViewById(R.id.next); |
27 | mPause = (Button)findViewById(R.id.pause); |
29 | mPrevious.setOnClickListener(this); |
30 | mPlay.setOnClickListener(this); |
31 | mNext.setOnClickListener(this); |
32 | mPause.setOnClickListener(this); |
35 | publicvoid onClick(View v) { |
37 | Intent mIntent =new Intent(MusicService.PREVIOUS_ACTION); |
38 | mIntent.setComponent(component); |
39 | startService(mIntent); |
41 | Intent mIntent =new Intent(MusicService.PLAY_ACTION); |
42 | mIntent.setComponent(component); |
43 | startService(mIntent); |
45 | Intent mIntent =new Intent(MusicService.NEXT_ACTION); |
46 | mIntent.setComponent(component); |
47 | startService(mIntent); |
49 | Intent mIntent =new Intent(MusicService.PAUSE_ACTION); |
50 | mIntent.setComponent(component); |
51 | startService(mIntent); |
第五步:修改AndroidManifest.xml,这里只是把我们的MusicService申明进去,不然会报错(第14行代码),代码如下:
01 | <?xmlversion="1.0"encoding="utf-8"?> |
02 | <manifestxmlns:android="http://schemas.android.com/apk/res/android" |
03 | package="com.tutor.music" |
04 | android:versionCode="1" |
05 | android:versionName="1.0"> |
06 | <applicationandroid:icon="@drawable/icon"android:label="@string/app_name"> |
07 | <activityandroid:name=".MusicDemo" |
08 | android:label="@string/app_name"> |
10 | <actionandroid:name="android.intent.action.MAIN"/> |
11 | <categoryandroid:name="android.intent.category.LAUNCHER"/> |
14 | <serviceandroid:name=".MusicService"android:exported="true"/> |
16 | <uses-sdkandroid:minSdkVersion="7"/> |
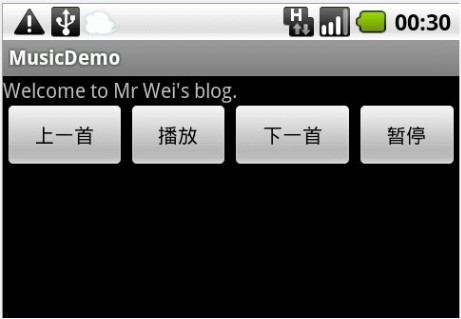
第六步:运行上述Android工程,效果如下图所示:
效果1:首界面:
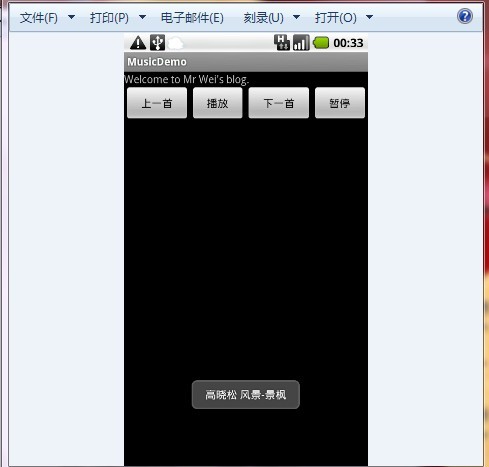
效果2:点击播发按钮开始播放音乐:
效果3:我们可以在设置(Settings)->应用(Applications)->正在运行的服务(Running Services)查看我们启动了一个新的Service:

文章转自:http://blog.youkuaiyun.com/android_tutor/article/details/5743183


 本文介绍了一个基于Service和ContentProvider的简易音乐播放器实现。通过示例代码详细讲解了如何利用Service在后台播放音乐,并使用ContentProvider获取设备上的音频文件。


 182
182

 被折叠的 条评论
为什么被折叠?
被折叠的 条评论
为什么被折叠?
 到【灌水乐园】发言


