要管理 **235 个部门**,必须先将这些部门的层级关系建模为一棵“组织树”(Tree Structure),这样才能实现类似 `x00 → x01`、`xh0 → xh1/xh2` 的权限继承。
我们来详细讲解:**如何将部门结构建模为树结构,支持 JSON 和数据库两种方式。**
---
## ✅ 一、什么是“树形组织结构”?
理想的数据形式是:
```js
{
"id": "x00",
"name": "总公司",
"children": [
{
"id": "xh0",
"name": "行政部",
"children": [
{ "id": "xh1", "name": "行政一分部", "children": [] },
{ "id": "xh2", "name": "行政二分部", "children": [] }
]
},
{
"id": "xs0",
"name": "销售部",
"children": [
{ "id": "xs1", "name": "华东区", "children": [] },
{ "id": "xs2", "name": "华南区", "children": [] },
{ "id": "xs3", "name": "华北区", "children": [] }
]
}
]
}
```
这叫 **递归嵌套树结构(Recursive Tree)**,便于前端展示和后端遍历。
---
## ✅ 二、方法 1:使用 JSON 文件建模(适合静态或小规模更新)
### 📁 步骤 1:创建 `org-tree.json`
```json
[
{
"id": "x00",
"name": "总公司",
"parentId": null
},
{
"id": "xh0",
"name": "行政部",
"parentId": "x00"
},
{
"id": "xh1",
"name": "行政一分部",
"parentId": "xh0"
},
{
"id": "xh2",
"name": "行政二分部",
"parentId": "xh0"
},
{
"id": "xs0",
"name": "销售部",
"parentId": "x00"
},
{
"id": "xs1",
"name": "华东区",
"parentId": "xs0"
},
{
"id": "xs2",
"name": "华南区",
"parentId": "xs0"
},
{
"id": "xs3",
"name": "华北区",
"parentId": "xs0"
}
]
```
> 每个节点只记录自己的 `id`、`name` 和父级 `parentId`
---
### 🔁 步骤 2:用 JavaScript 转换为树结构
```javascript
function buildTree(flatList) {
const map = {};
const roots = [];
// 第一步:建立 id -> node 映射
flatList.forEach(item => {
map[item.id] = { ...item, children: [] };
});
// 第二步:连接父子关系
flatList.forEach(item => {
if (item.parentId === null || item.parentId === undefined) {
roots.push(map[item.id]); // 根节点
} else {
const parent = map[item.parentId];
if (parent) {
parent.children.push(map[item.id]);
}
}
});
return roots;
}
// 使用示例
fetch('/data/org-tree.json')
.then(res => res.json())
.then(data => {
const tree = buildTree(data);
console.log(JSON.stringify(tree, null, 2));
});
```
✅ 输出结果就是上面那个嵌套树!
---
## ✅ 三、方法 2:使用数据库建模(推荐用于生产环境)
对于 235 个部门,建议用数据库存储。
### 🗃️ 表设计:`departments` 表
```sql
CREATE TABLE departments (
id VARCHAR(10) PRIMARY KEY,
name VARCHAR(50) NOT NULL,
parent_id VARCHAR(10),
FOREIGN KEY (parent_id) REFERENCES departments(id)
);
```
插入数据:
```sql
INSERT INTO departments (id, name, parent_id) VALUES
('x00', '总公司', NULL),
('xh0', '行政部', 'x00'),
('xh1', '行政一分部', 'xh0'),
('xh2', '行政二分部', 'xh0'),
('xs0', '销售部', 'x00'),
('xs1', '华东区', 'xs0'),
('xs2', '华南区', 'xs0'),
('xs3', '华北区', 'xs0');
```
---
### 🔁 后端 Python Flask 中构建树结构
```python
import json
from flask import Flask, jsonify
app = Flask(__name__)
def fetch_tree_from_db():
connection = get_db_connection()
cursor = connection.cursor()
cursor.execute("SELECT id, name, parent_id FROM departments ORDER BY id")
rows = cursor.fetchall()
connection.close()
# 构建树
items = {}
root_nodes = []
for row in rows:
item = {
'id': row[0],
'name': row[1],
'children': []
}
items[row[0]] = item
for row in rows:
item = items[row[0]]
parent_id = row[2]
if parent_id is None:
root_nodes.append(item)
else:
parent = items.get(parent_id)
if parent:
parent['children'].append(item)
return root_nodes
@app.route('/api/org-tree')
def org_tree():
tree = fetch_tree_from_db()
return jsonify(tree)
```
前端调用 `/api/org-tree` 即可获取完整树结构。
---
## ✅ 四、高级方案:自动维护闭包表(Closure Table)
如果你需要高性能查询“某节点下所有子节点”,可以基于上述树结构生成 **闭包表**。
### 自动生成闭包表的 Python 函数
```python
def build_closure(connection):
cursor = connection.cursor()
cursor.execute("DELETE FROM department_closure") # 清空旧数据
# 获取所有节点及其父子关系
cursor.execute("SELECT id, parent_id FROM departments")
nodes = {row[0]: row[1] for row in cursor.fetchall()}
closure = []
def get_descendants(node_id, depth=0):
result = [(node_id, depth)]
children = [k for k, v in nodes.items() if v == node_id]
for child in children:
result.extend(get_descendants(child, depth + 1))
return result
for node_id in nodes:
descendants = get_descendants(node_id)
for desc_id, depth in descendants:
closure.append((node_id, desc_id, depth))
# 批量插入
cursor.executemany(
"INSERT INTO department_closure (ancestor, descendant, depth) VALUES (%s, %s, %s)",
closure
)
connection.commit()
```
> 这个函数可以在系统启动或组织架构变更时运行一次。
---
## ✅ 五、如何从 Excel 导入 235 个部门?
大多数公司都有 Excel 组织架构表,格式如下:
| ID | Name | ParentID |
|------|----------|----------|
| x00 | 总公司 | |
| xh0 | 行政部 | x00 |
| xh1 | 行政一分部 | xh0 |
### 方法:
1. 用 Python 读取 Excel(`pandas` + `openpyxl`)
2. 插入到 `departments` 表
3. 调用 `build_closure()` 重建闭包表
```python
import pandas as pd
df = pd.read_excel('departments.xlsx')
for _, row in df.iterrows():
cursor.execute(
"INSERT INTO departments (id, name, parent_id) VALUES (%s, %s, %s)",
(row['ID'], row['Name'], row.get('ParentID'))
)
conn.commit()
```
---
## ✅ 六、可视化工具建议
你可以做一个简单的页面让用户查看和编辑组织架构:
```html
<div id="tree"></div>
<script>
// 渲染树(简化版)
function renderTree(nodes, container) {
const ul = document.createElement('ul');
nodes.forEach(node => {
const li = document.createElement('li');
li.textContent = `${node.name} (${node.id})`;
ul.appendChild(li);
if (node.children && node.children.length > 0) {
renderTree(node.children, li);
}
});
container.appendChild(ul);
}
fetch('/api/org-tree').then(r => r.json()).then(tree => {
renderTree(tree, document.getElementById('tree'));
});
</script>
```
---
## ✅ 总结:建模方法对比
| 方法 | 是否适合 235 部门 | 维护难度 | 推荐场景 |
|------|------------------|----------|-----------|
| JSON 文件 + parentId | ✅ 初期可用 | 低 | 快速原型 |
| 数据库表 + parentId | ✅ 强烈推荐 | 中 | 生产环境 |
| 闭包表(预计算路径) | ✅ 最佳性能 | 中高 | 权限频繁查询 |
| CTE 查询(MySQL 8+) | ✅ 可替代闭包表 | 低 | 不想维护额外表 |
📌 **最终建议:**
- 用数据库 `departments` 表存储树
- 提供 API 返回嵌套树结构
- 配合 `department_closure` 表做高效权限查询
---


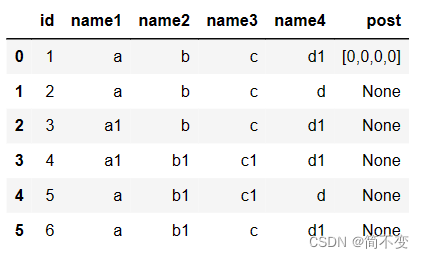
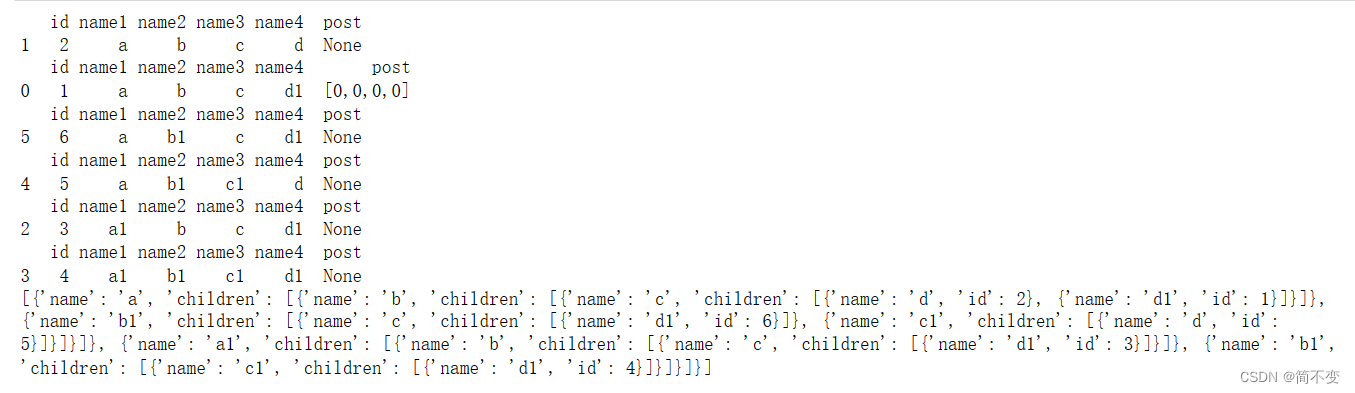
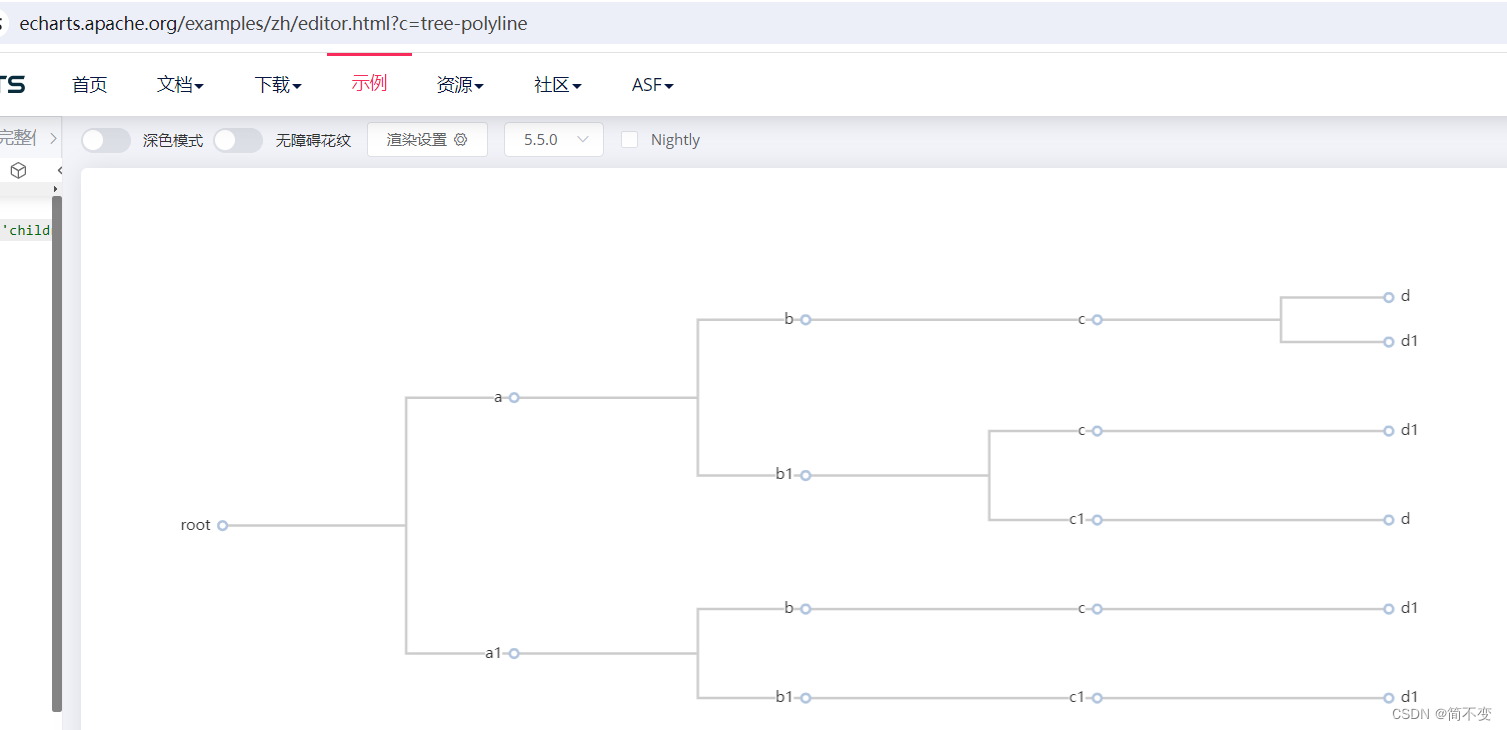
 本文介绍了如何使用Python的pandas库,结合sqlite3数据库,通过groupby函数将数据转换为树状children结构,以便于在echarts中展示层级关系。


 4万+
4万+

 被折叠的 条评论
为什么被折叠?
被折叠的 条评论
为什么被折叠?
 到【灌水乐园】发言


