


1. 前言
1.1. 背景
测试同学火急火燎说系统出问题了,一点一个不吱声。可是我这明明操作得像德芙一样丝滑,究竟是谁想要谋害朕?业务说数据对不上,数据被谁给操作了?又是什么时候操作的?产品同学反应某个页面会发生“随机性”卡顿,是哪一台有“问题”的服务器响应了请求?研发同学向你求助,能不能找到某个特殊参数相关联的请求信息,帮他找出异常所在?你是否也碰到过上面的问题,让你抓耳挠腮,寝食难安。 那么,是时候需要一款日志插件,来帮你解决上述的所有问题。
1.2. 概览
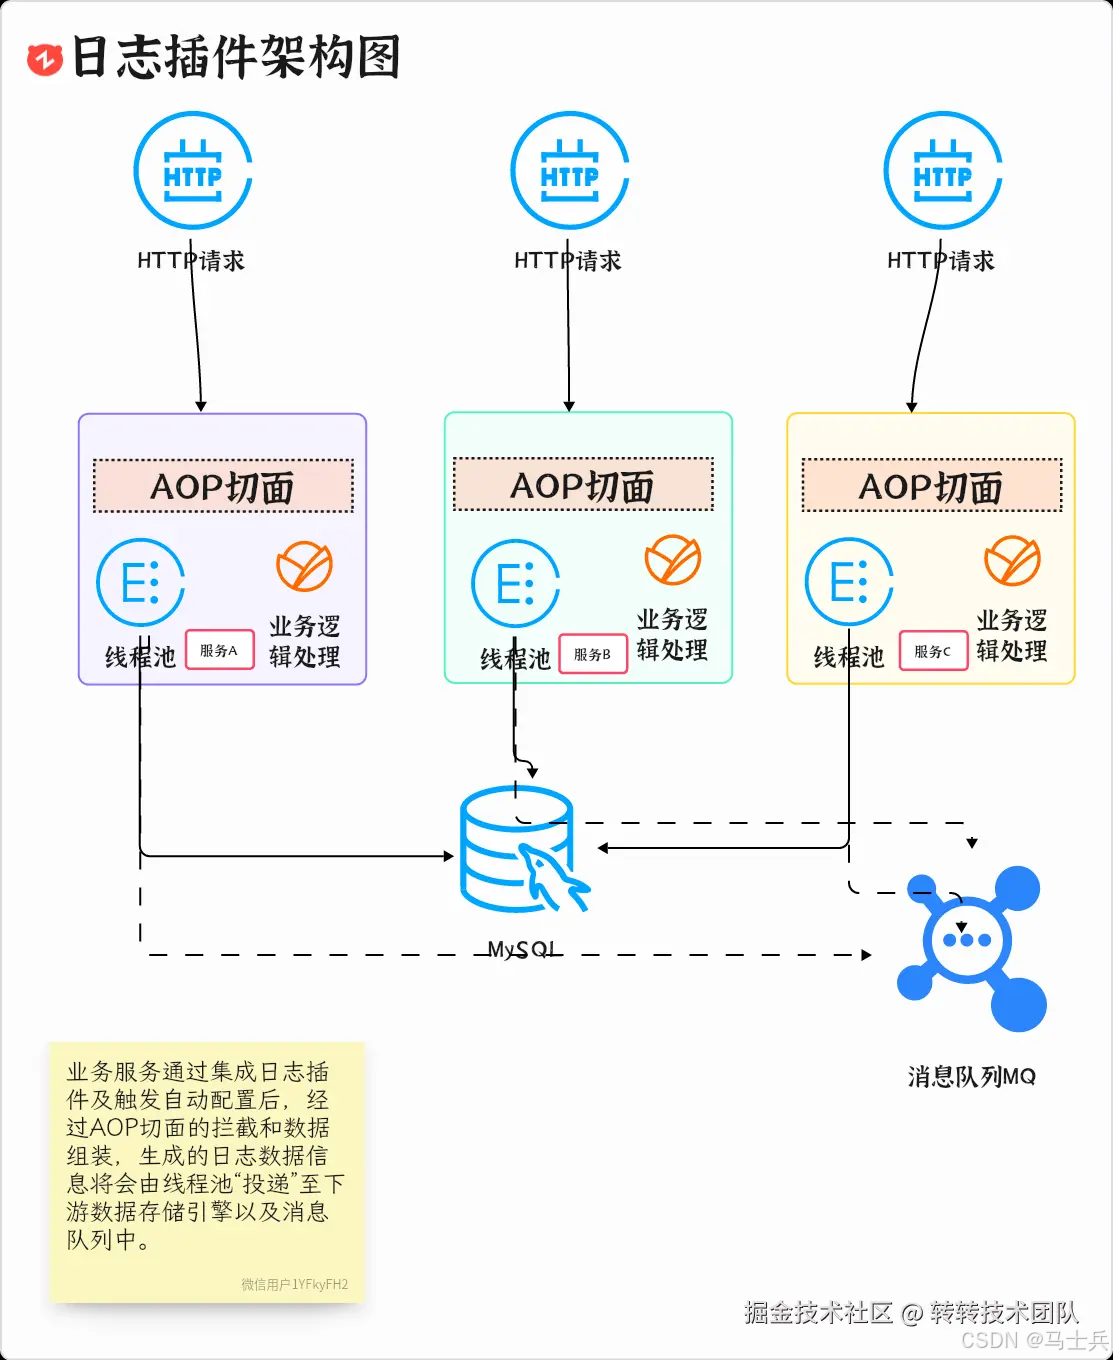
乾数据系统作为转转广告投放的基础服务,虽然系统并发量不像 C 端系统动辄数十上百万,但是每一次业务操作背后,都影响着广告投放的稳定性以及资金结算的准确性。 因此,我们基于AOP切面技术,开发了一款日志审计插件,用于乾数据系统的操作审计以及研发人员的异常排查工作,业务项目通过引入插件对应的 Maven-GAV 坐标,即可自动集成插件。并且插件通过集成消息队列,还可支持一些特殊的实时分析功能。以下是日志插件的基础架构图。
2. 实现
2.1. “好东西”
2.1.1. git-commit-id-maven-plugin 插件
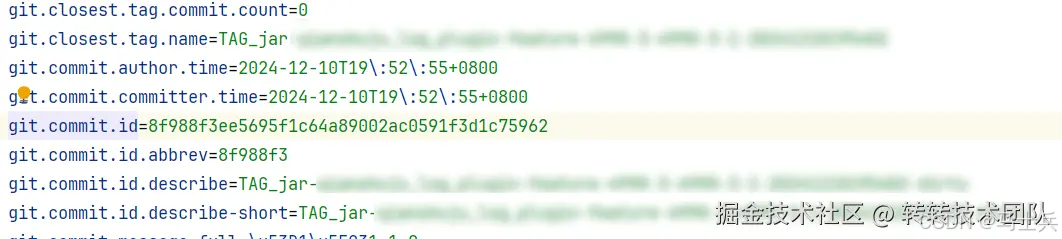
为了在开发过程中,特别是和研发小伙伴联合调试的过程中,更好的定位到问题所在,避免插件使用版本不一致带来的各种问题, 可以使用git-commit-id-maven-plugin插件。git-commit-id-maven-plugin 是一个 Maven 插件,在 Maven 构建过程中,插件会生成一个名为 git-commit-id.properties 的文件。这个文件通常包含有关当前构建的 Git 提交哈希、分支名称、提交时间等信息。
xml
代码解读
复制代码
<groupId>io.github.git-commit-id</groupId> <artifactId>git-commit-id-maven-plugin</artifactId> <version>${git-commit-id-maven-plugin.version}</version> <executions> <execution> <id>get-the-git-infos</id> <goals> <goal>revision</goal> </goals> </execution> </executions> <configuration> <validationProperties> <!-- verify that the current repository is not dirty --> <validationProperty> <name>validating git dirty</name> <value>${git.dirty}</value> <shouldMatchTo>false</shouldMatchTo> </validationProperty> </validationProperties> <generateGitPropertiesFile>true</generateGitPropertiesFile> <generateGitPropertiesFilename>${project.build.outputDirectory}/META-INF/scm/${project.groupId}/${project.artifactId}/git.properties</generateGitPropertiesFilename> </configuration>
java
代码解读
复制代码
private static final Properties GIT_PROPERTIES; static { try { GIT_PROPERTIES = new Properties(); //读取插件生成的GIT信息文件 GIT_PROPERTIES.load(ResourceUtil.getResourceObj("META-INF/scm/com.bj58.zhuanzhuan/qianshuju_log_plugin/git.properties").getStream()); } catch (IOException e) { throw new RuntimeException(e); } }
2.1.2. hibernate-validator
对于自定义配置,用户可能有意或无意会输入一些奇奇怪怪的东西,轻则导致项目无法启动,重则产生不可估量的影响。因此,对于属性的校验,可以引入hibernate-validator框架,然后利用@Validated 配套的校验注解,自定义校验规则。
xml
代码解读
复制代码
<dependency> <groupId>org.hibernate.validator</groupId> <artifactId>hibernate-validator</artifactId> </dependency>
java
代码解读
复制代码
/** * 日志-线程池核心数大小(默认CPU*2) * 对于IO密集型,可设置线程数为 cpu核心数*2,并根据情况可适当增加。 * */ @Min(value = 1, message = "线程池核心数大小不能小于0!") private int corePoolSize = Runtime.getRuntime().availableProcessors() * 2 + 1; /** * 最大线程池数量 */ @Min(value = 1, message = "线程池最大数大小不能小于0!") private int maxPoolSize=128;
2.1.3. spring-boot-configuration-processor 插件
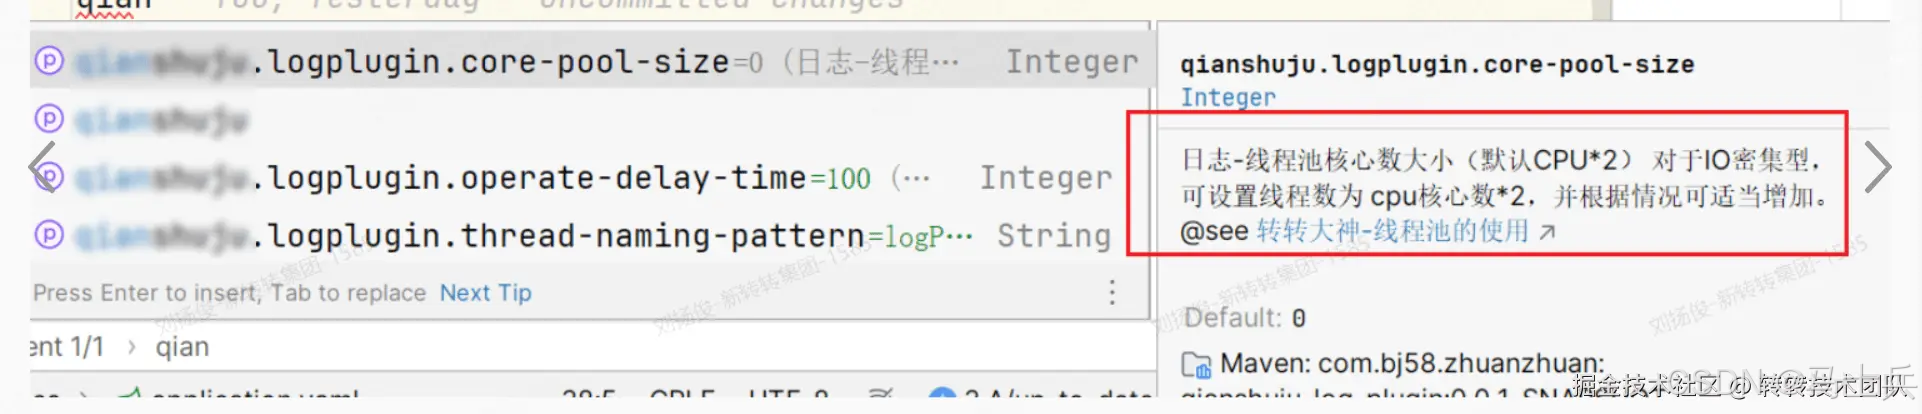
如果想给用户更好的使用体验,可以引入spring-boot-configuration-processor插件,该插件在打包的时候,会生成 target/classes/META-INF/spring-configuration-metadata.json文件,该文件被 IDEA 读取到后,在用户配置属性的时候,会有自动提示的效果。下面为摘取的/spring-configuration-metadata.json 文件中的部分内容。
json
代码解读
复制代码
[{ "name": "qianshuju.logplugin.core-pool-size", "type": "java.lang.Integer", "description": "日志-线程池核心数大小(默认CPU*2) 对于IO密集型,可设置线程数为 cpu核心数*2,并根据情况可适当增加。 @see <a href=\"https:\/\/dashen.zhuanspirit.com\/x\/YYVxCQ\">转转大神-线程池的使用<\/a>", "sourceType": "com.bj58.zhuanzhuan.qianshuju.logPlugin.config.LogPluginProperties", "defaultValue": 0 }, { "name": "qianshuju.logplugin.max-pool-size", "type": "java.lang.Integer", "description": "最大线程池数量", "sourceType": "com.bj58.zhuanzhuan.qianshuju.logPlugin.config.LogPluginProperties", "defaultValue": 128 }]
2.1.4. maven-source-plugin 插件
如果想让用户 import 插件包后,能看到源码,最简单的方法就是让用户利用 IDEA 的反编译功能,反编译出代码,但是会丢失很多的注释信息,因此我们可以使用maven-source-plugin插件,顺带打出一个源码包,即在 pom.xml 中加上如下配置:
xml
代码解读
复制代码
<plugin> <!-- https://mvnrepository.com/artifact/org.apache.maven.plugins/maven-source-plugin --> <groupId>org.apache.maven.plugins</groupId> <artifactId>maven-source-plugin</artifactId> <version>3.2.1</version> <executions> <execution> <goals> <goal> jar-no-fork </goal> </goals> </execution> </executions> </plugin>
2.1.5. 依赖版本问题
Springboot 中有很多版本冲突问题,有些高版本的依赖包改动很大,删代码,改方法,比比皆是,因此不向下兼容,对使用者来说,最好使用统一的包版本管理,在 pom 中加入如下配置:
xml
代码解读
复制代码
<dependencyManagement> <dependencies> <dependency> <groupId>org.springframework.boot</groupId> <artifactId>spring-boot-dependencies</artifactId> <version>2.7.18</version> <scope>import</scope> <type>pom</type> </dependency> </dependencies> </dependencyManagement>
如果仍然出现版本冲突问题,建议 IDEA 下载Maven Helper插件后,查阅对应版本 spring 官方文档,以下就是从springboot 2.7.18文档中,摘录的部分对其他依赖要求的最低版本:

2.2. 底层工具
因篇幅有限,本篇文章不会细致到每一个代码细节,而是挑取核心的重点模块和易错模块进行阐述。因此针对本文中涉及到的一些基础工具类实现,将不再赘述,仅仅提供实现思路。
| 代码涉及的工具类 | 作用 | 建议 |
|---|---|---|
| WebUtil | 获取当前 servlet 请求,解析请求参数,请求 header 等 | 参考 org.springframework.web.util.WebUtils |
| UrlUtil | 获取 Url 中的 path 路径 | 参考 org.springframework.web.util.UriUtils |
| LogPluginGitUtil | 代码 git 版本工具 | 参考 git-commit-id-maven-plugin 插件 |
| LogPluginSpringUtils | Spring 容器工具 | 参考 org.springframework.beans.factory.config.BeanFactoryPostProcessor |
| LogPluginNetUtil | 获取服务网络状态 | 参考 org.springframework.boot.web.context.WebServerInitializedEvent |
| SicUtil | 转转信息管理平台工具类,用于获取工程相关信息 | 内部框架,暂无参考 |
| CommonConstant | 配置常量,用于插件部分默认配置 | 例如默认线程池名称 |
2.3. 整体概览
如果你问我,本日志插件最核心的地方是什么?我认为不是 AOP 切面,也不是线程池,而应该是自动配置模块,即 spring.factories 中配置的EnableAutoConfiguration属性值, 因为它涵盖了整个日志插件被容器管理的各个相关 Bean,每个 Bean 都各司其职,“坚守”着自己的岗位,完成着部分功能。 因此,要想对本插件有一个整体的认知,我觉得有必要好好讲一讲 AutoConfiguration 所涉及到的那些组件们。

| 组件 | 作用 |
|---|---|
| LogPluginProperties | 用户自定义配置所映射的实体类,基于本类的配置来进行后续其他组件的“加工” |
| ICreatedByService | 租户服务,用户获取当前请求对应的“租户”标识,即操作者用户标识 |
| Server | 用于获取当前“宿主”服务的状态信息,例如 IP,环境信息等 |
| ThreadPoolTaskExecutor | 插件核心线程池,用于执行日志数据传输任务 |
| IlogPersistenceService | 日志数据持久层服务,用于将数据传递至下游存储引擎 |
| IDataStreamService | 消息队列服务,用于将数据投递至下游 MQ 进行数据分析,本插件目前仅支持转转架构部自研组件ZZMQ |
| LogRelayTask | 封装的日志任务,提交给线程池执行 |
2.4. 具体实现
2.4.1. 插件属性配置类:LogPluginProperties
为了实现让用户能够根据自身环境,自定义做一些配置,我们抽取了LogPluginProperties类来作为用户的统一配置类入口,该配置类中包含了插件线程池,Stream 流配置等。最后通过利用afterPropertiesSet()钩子,可以对部分设置进行缺省配置,以及执行部分依赖检查工作。

提示:DataStreamType.ZZ_MQ 中的
ZZMQ是基于早期的RocketMQ,加入了许多转转自己的特性,独立于社区版本,由架构团队负责维护、开发与运维的消息中间件。当前因为篇幅有限,只展示 ZZMQ 的配置样例,如需使用 Kafka 或 RabbitMQ,可自行改造。
java
代码解读
复制代码
@Data @EqualsAndHashCode @ToString @ConfigurationProperties("qianshuju.logplugin") @Validated @Slf4j public class LogPluginProperties implements InitializingBean { /** 数据流类型 */ private String dataStreamType = DataStreamType.ZZ_MQ; /** 启用流 */ private Boolean enableStream = false; /** zzmq属性 */ private ZZMQProperties zzmqProperties; /** * 宿主项目名称(即当前项目名,用于区分日志 ) */ private String renter; @Override public void afterPropertiesSet() throws Exception { if (StrUtil.isBlank(renter)) { //用户未主动配置项目名称,降级为使用SIC封装的应用名 renter = SicUtil.getCurrentSicInfo().getAppName(); } checkEnv(); //检查环境变量 } @Data @EqualsAndHashCode @ToString public static class ZZMQProperties { /** zzmq-topic */ private String topic = "qianshuju-log"; /** zzmq-tag */ private String tag = ""; /** zzmq.producer.group的名称 必填*/ private String producerName = ""; } private void checkEnv() { if (enableStream) { if (ObjectUtil.equal(dataStreamType, DataStreamType.ZZ_MQ)) { try { Class.forName("com.alibaba.rocketmq.client.producer.DefaultMQProducer"); } catch (ClassNotFoundException e) { log.error("checkEnv fail: ", e); throw new RuntimeException("The streaming service has been enabled and the configuration item is ZZMQ, but the corresponding dependency is missing!"); } } } } }
2.4.2. 定义统一的日志信息实体 PluginLogDto
因篇幅有限,仅展示部分关键字段
java
代码解读
复制代码
@Data @EqualsAndHashCode @ToString public class PluginLogDto implements Serializable { /** * 日志标题 */ private String title; /** * 服务器地址 */ private String serverIp; /** * 服务器名字 */ private String serverName; /** * 客户端地址 */ private String clientIp; /** * 请求地址 */ private String requestUri; /** * 请求参数 */ private String requestParam; /** * 方法名 */ private String methodName; }
2.4.3. 日志持久服务 IlogPersistenceService
为了调试方便,我们配置了一个默认的日志持久化服务,直接把日志信息打印到控制台上。当然,用户可以实现自己的持久化服务,例如存储到 ES 当中,方便后续的检索。
java
代码解读
复制代码
/**控制台日志默认持久化实现,仅供本地简单调试使用,请勿直接用于生产环境 * @author liuyangjun@zhuanzhuan.com * * @date 2024/3/28 */ public class DefaultLogPersistenceServiceImpl implements IlogPersistenceService { @Override public void saveApiLog(PluginLogDto pluginLogDto) { System.out.println(JSON.toJSONString(pluginLogDto)); } @Override public void saveErrorLog(PluginLogDto pluginLogDto) { System.out.println(JSON.toJSONString(pluginLogDto)); } }
2.4.4. 租户配置 ICreatedByService
插件使用者可以实现自己的ICreatedByService实现类,来提供给插件获取当前操作用户的标识,例如我们可以从当前“安全上下文”中获取当登录用户信息。
java
代码解读
复制代码
@Component public class DefaultCreatedByServiceImpl implements ICreatedByService { @Override public String getCreatedBy() { return Optional.ofNullable(UserContext.getLoginUserInfo()).map(UserLoginInfo::getRealName).orElse("null"); } }
2.4.5. 日志数据流服务 IDataStreamService
通过日志数据流服务,将日志数据推送至消息队列中,下游的实时分析服务可以做一些分析服务。利用 Springboot 的@ConditionalOn这一套组件,来完成对应消息服务组件的自动配置。
当前仅支持
ZZMQ组件的自动配置,也可改造成支持Kafka或者RocketMQ。
java
代码解读
复制代码
@Service @Slf4j @ConditionalOnProperty(name = "qianshuju.logplugin.dataStreamType", havingValue = "zzmq") @ConditionalOnClass(DefaultMQProducer.class) public class ZZMQDataStreamServiceImpl implements IDataStreamService { @Autowired private LogPluginProperties logPluginProperties; private DefaultMQProducer defaultMqProducer; @Override public boolean sendToStream(PluginLogDto pluginLogDto) { ZZMQProperties zzmqProperties = logPluginProperties.getZzmqProperties(); Message message = new Message(zzmqProperties.getTopic(), zzmqProperties.getTag(), JsonUtil.silentObject2String(pluginLogDto).getBytes()); try { SendResult send = defaultMqProducer.send(message); return ObjectUtil.equal(send.getSendStatus(), SendStatus.SEND_OK); } catch (MQClientException | RemotingException | MQBrokerException | InterruptedException e) { log.error("sendToStream fail: ", e); return false; } } @PostConstruct public void init() { String producerName = logPluginProperties.getZzmqProperties().getProducerName(); this.defaultMqProducer = SpringUtil.getBean(producerName, DefaultMQProducer.class); } }
通过如下简单的配置,就能够“激活”我们的日志数据流服务了。
| key | value | remark |
|---|---|---|
| qianshuju.logplugin.dataStreamType | ZZMQ/kafka/RabbitMQ | 启动的流式组件,当前仅支持 ZZMQ |
| qianshuju.logplugin.enableStream | true/false | 是否开启流式服务 |
2.4.6. 线程池服务
为了不影响“业务”性能,我们将日志数据的分发逻辑,放到了线程池中去执行。在此,有两种推荐的线程池,一种是带监控功能的线程池 ,例如转转架构部提供的MonitoredThreadPoolExecutor,能够监控到日志线程池中的状态。

当然,如果你手头上没有这样的“武器”,那么你也可以使用 Spring 提供的ThreadPoolTaskExecutor线程池, 该线程池继承自 Spring-ExecutorConfigurationSupport,实现了 destroy in interface DisposableBean接口,能够保证服务停止的时候,解决任务丢失的问题。
java
代码解读
复制代码
@Bean(name = CommonConstant.LOG_PLUGIN_EXECUTOR, autowireCandidate = false) public ThreadPoolTaskExecutor logPluginExecutor() { ThreadPoolTaskExecutor threadPoolTaskExecutor = new ThreadPoolTaskExecutor(); threadPoolTaskExecutor.setCorePoolSize(logPluginProperties.getCorePoolSize()); threadPoolTaskExecutor.setMaxPoolSize(logPluginProperties.getMaxPoolSize()); threadPoolTaskExecutor.setKeepAliveSeconds(60); threadPoolTaskExecutor.setQueueCapacity(logPluginProperties.getQueueCapacity()); threadPoolTaskExecutor.setAllowCoreThreadTimeOut(false); BasicThreadFactory threadFactory = new BasicThreadFactory.Builder() .namingPattern(logPluginProperties.getThreadNamingPattern()) .daemon(false) .uncaughtExceptionHandler((t, e) -> { log.warn("日志线程执行任务失败", e); }) .build(); threadPoolTaskExecutor.setThreadFactory(threadFactory); threadPoolTaskExecutor.setRejectedExecutionHandler(new ThreadPoolExecutor.DiscardPolicy()); //注意,此处有大坑,如果设置了setWaitForTasksToCompleteOnShutdown为true,即容器需要等待线程池停止, // 则必须设置setAwaitTerminationSeconds具体的秒数!否则setWaitForTasksToCompleteOnShutdown将不生效! threadPoolTaskExecutor.setWaitForTasksToCompleteOnShutdown(true); // private long awaitTerminationMillis = 0; // 默认值为0,如果自己不设置,相当于setWaitForTasksToCompleteOnShutdown=true白设置了 threadPoolTaskExecutor.setAwaitTerminationSeconds(CommonConstant.LOGPLUGIN_EXECUTOR_AWAIT_TERMINATION_SECONDS); threadPoolTaskExecutor.setThreadPriority(Thread.MIN_PRIORITY); threadPoolTaskExecutor.setDaemon(false); return threadPoolTaskExecutor; }
2.4.7. 最后的最后:切面!
终于,我们已经了解了所有的组件以及它们对应的“职责”,那么,切面就是最后将把他们组合起来,实现最终日志逻辑的大 Boss。通过注解切点,我们把相关的切面逻辑织入进去。 获取到注解标注的部分信息,再结合请求参数,方法信息,报错信息,拼装成我们最后的日志数据。

java
代码解读
复制代码
@Aspect @Component @Slf4j public class LogApiLogAspect { @Autowired private Server server; @Autowired private ICreatedByService iCreatedByService; @Autowired private LogPluginProperties logPluginProperties; @Resource(name = CommonConstant.LOG_PLUGIN_EXECUTOR) private ThreadPoolTaskExecutor executor; @Autowired private IlogPersistenceService ilogPersistenceService; @Autowired(required = false) private IDataStreamService dataStreamService; /** * 配置织入点 **/ @Pointcut("@annotation(com.bj58.zhuanzhuan.qianshuju.logPlugin.annotation.ApiLog)") public void logPointCut() { } @AfterReturning("@annotation(apiLog)") public void doAround(JoinPoint point, ApiLog apiLog) { handleUsualLog(point); } @AfterThrowing(value = "logPointCut()", throwing = "exception") public void afterThrowing(JoinPoint joinPoint, Exception exception) { handleExceptionLog(joinPoint, exception); } /** * 处理正常日志 */ protected void handleUsualLog(JoinPoint point) { ApiLog apiLog = null; try { apiLog = getAnnotationLog(point); } catch (Exception ex) { log.warn("updateMediumWorkerOrderInfo", ex); throw ex; } if (ObjectUtil.isNull(apiLog)) { return; } String className = point.getTarget().getClass().getSimpleName(); String methodName = point.getSignature().getName(); String params = getRequestValue(point); try { HttpServletRequest request = WebUtil.getRequest(); LogApi logApi = new LogApi(); logApi.setTitle(apiLog.value()); logApi.setClazzName(className); logApi.setMethodName(methodName); logApi.setRequestParam(params); logApi.setCreateBy(iCreatedByService.getCreatedBy()); logApi.setRequestType(request.getMethod()); logApi.setServerIp(this.server.getIp() + ":" + LogPluginNetUtil.getPort()); logApi.setClientIp(IpUtil.getIpAddr(request)); logApi.setRequestUri(UrlUtil.getPath(request.getRequestURI())); logApi.setEnv(LogPluginNetUtil.getEnv()); logApi.setServerName(logPluginProperties.getRenter()); executor.execute(new LogRelayTask(logApi, ilogPersistenceService, dataStreamService)); } catch (Throwable throwable) { log.warn("处理正常日志发生异常", throwable); } } /** * 是否存在注解,如果存在就获取 */ private @Nullable ApiLog getAnnotationLog(JoinPoint joinPoint) { Signature signature = joinPoint.getSignature(); MethodSignature methodSignature = (MethodSignature) signature; Method method = methodSignature.getMethod(); if (method != null) { return method.getAnnotation(ApiLog.class); } return null; } }
2.5. 结果呈现
最终,我们就实现了如下图的效果,通过检索引擎,能够快速根据指定参数找到对应的接口,进而找到相关联的时间,服务器地址,参数,创建人等信息,结合这些信息,极大提升了我们排查问题的效率。

3. 写在最后
3.1. 未来思考
当前,我们已经实现了一个简单的日志审计插件,然而,要想把插件做得更加完善,道阻且长,我们还有很多地方需要思考。
- 当前注解 ApiLog 的 value 值,即业务操作名称为写死的字面值,是否可通过
SpringEl表达式,配合方法参数,动态生成业务操作名称? - 当前注解只能标注在 Controller 上,是否可以做成标注在 service 方法上,甚至任意方法上,即实现类似事务嵌套机制一样的日志注解嵌套?利用
栈是否可以实现? - 当前插件可兼容的 JDK21 的 Springboot 版本为 2.7.18~3 之间,当 springboot 升级到 3.X 之后,SpringBoot3.x 移除
spring.factories,只支持使用 META-INF/spring/org.springframework.boot.autoconfigure.AutoConfiguration.imports 增加自动配置,此时插件该如何兼容?是否需要把工程结构再细拆分下去? - 转转架构部提供了很好的链路追踪工具:
天网,是否可以集成天网链路追踪,关联TraceId,不仅可以通过天网可视化查询服务之间的调用链路,还可以利用 TraceId 查出链路相关联的日志信息。
3.2. 总结
本文介绍了一款基于 AOP 切面技术的日志审计插件,旨在解决系统操作审计和异常排查的问题。插件能够自动集成并支持实时分析功能。文章首先阐述了插件的背景和重要性,接着详细介绍了插件的实现,包括多个有用的 Maven 插件和框架,如git-commit-id-maven-plugin、hibernate-validator和spring-boot-configuration-processor,以提升开发效率和用户体验。
插件的核心在于自动配置模块,涵盖了多个组件的协作,如日志信息实体、日志持久化服务和数据流服务。通过线程池处理日志数据,确保不影响业务性能。最后,文章展示了切面逻辑的实现,结合请求参数和方法信息,生成最终的日志数据。
整体而言,本文不仅提供了日志插件的实现细节,还分享了在工程中使用的“好东西”,为开发者在日志管理和异常排查方面提供了实用的解决方案。
3.3. 参考文档
- [美团技术团队-如何优雅地记录操作日志?]tech.meituan.com/2021/09/16/…
- [动态代理—拦截器—责任链—AOP 面向切面编程底层原理]liuyangjun.blog.youkuaiyun.com/article/det…
- [Spring2.7.18 官方文档]docs.spring.io/spring-boot…


 1万+
1万+

 被折叠的 条评论
为什么被折叠?
被折叠的 条评论
为什么被折叠?
 到【灌水乐园】发言


