


 本文记录了一次使用Tensorflow进行路面裂纹分类的毕业设计,详细介绍了CNN架构、训练过程、损失准确率曲线的绘制,并展示了达到92.1%验证集准确率的良好效果。
版权声明:本文为博主原创文章,转载 请注明出处:https://blog.youkuaiyun.com/sc2079/article/details/90478551
- 写在前面
本科毕业设计终于告一段落了。特写博客记录做毕业设计(路面裂纹识别)期间的踩过的坑和收获。希望对你有用。
目前有:
1.Tensorflow&CNN:裂纹分类
2.Tensorflow&CNN:验证集预测与模型评价
3.PyQt5多个GUI界面设计
本篇讲CNN的训练与预测(以裂纹分类为例)。任务目标:将裂纹图片数据集自动分类:纵向裂纹、横向裂纹、块状裂纹、龟裂裂纹、无裂纹共五类。
本篇主要参照博客tensorflow: 花卉分类。
- 环境配置安装
运行环境:Python3.6、Spyder
依赖模块:Skimage、Tensorflow(CPU)、Numpy 、Matlpotlib、Cv2等
- 开始工作
1.CNN架构
所使用的CNN架构如下:

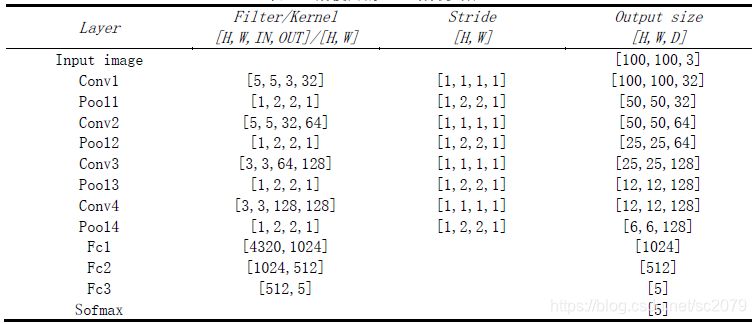
一共七层。(Pool 不算层)
2.训练
所使用的训练代码如下:
from skimage import io,transform
import glob
import os
import tensorflow as tf
import numpy as np
import time
import matplotlib.pyplot as plt
import pandas as pd


start_time = time.time()
tf.reset_default_graph()   #清除过往tensorflow数据记录
#训练图片集地址
path='..//img5//'

#将所有的图片resize成100*100
w=100
h=100
c=3
#归一化
def normlization(img):
    X=img.copy()
    X1= np.mean(X, axis = 0) # 减去均值,使得以0为中心
    X2=X-X1
    X3= np.std(X2, axis = 0) # 归一化
    X4=X2/X3
    return X4

#读取图片
def read_img(path):
    cate=[path+x for x in os.listdir(path)]
    imgs=[]
    labels=[]
    for idx,folder in enumerate(cate):
        for im in glob.glob(folder+'/*.jpg'):
            #print('reading the images:%s'%(im))
            img=io.imread(im)
            img=transform.resize(img,(w,h))
            #img=normlization(img)
            imgs.append(img)
            labels.append(idx)
    return np.asarray(imgs,np.float32),np.asarray(labels,np.int32)
data,label=read_img(path)


#打乱顺序
num_example=data.shape[0]
arr=np.arange(num_example)
np.random.shuffle(arr)
data=data[arr]
label=label[arr]


#将所有数据分为训练集和验证集
ratio=0.8
s=np.int(num_example*ratio)
x_train=data[:s]
y_train=label[:s]
x_val=data[s:]
y_val=label[s:]

#-----------------构建网络----------------------
#占位符
x=tf.placeholder(tf.float32,shape=[None,w,h,c],name='x')
y_=tf.placeholder(tf.int32,shape=[None,],name='y_')

def inference(input_tensor, train, regularizer):
    with tf.variable_scope('layer1-conv1'):
        conv1_weights = tf.get_variable("weight",[5,5,3,32],initializer=tf.truncated_normal_initializer(stddev=0.1))
        conv1_biases = tf.get_variable("bias", [32], initializer=tf.constant_initializer(0.0))
        conv1 = tf.nn.conv2d(input_tensor, conv1_weights, strides=[1, 1, 1, 1], padding=
最低0.47元/天 解锁文章


 1599
1599

 被折叠的 条评论
为什么被折叠?
被折叠的 条评论
为什么被折叠?
 到【灌水乐园】发言


