


 本文详细介绍如何在Windows环境下搭建TensorFlow对象检测环境,并通过实际案例演示如何使用TensorFlow进行对象检测,包括环境配置、模型训练及测试等关键步骤。
转载请说明出处,谢谢~https://blog.youkuaiyun.com/sarsscofy/article/details/81111815
I.环境及准备DATA
OS:Win10
Python环境:Python3.5
Tensorflow:0.12.0(native安装)
Tensorflow模型:models-master,下载路径:https://github.com/tensorflow/models(速度慢,可考虑翻墙)
Protobuf包:protoc-3.4.0-win32.zip ,下载路径:https://github.com/google/protobuf/releases?after=v3.4.1
II.环境配置
1.pip安装:pillow jupyter matplotlib lxml
安装前,先在cmd窗口中,用pip指令检查下当前是否已经安装上述模块:
pip list下面会列出当前已安装的所有模块,例如下面是我的:
C:\Users\smile3>pip list
Package             Version
------------------- --------
absl-py             0.2.2
astor               0.7.1
backcall            0.1.0
bleach              2.1.3
colorama            0.3.9
cycler              0.10.0
decorator           4.3.0
entrypoints         0.2.3
gast                0.2.0
grpcio              1.13.0
html5lib            1.0.1
ipykernel           4.8.2
ipython             6.4.0
ipython-genutils    0.2.0
ipywidgets          7.2.1
jedi                0.12.1
Jinja2              2.10
......
如果没有安装,可以用如下指令安装:
pip3 --default-timeout=300 install 具体模块的名称timout表示超时时间,如果网络不好可以考虑改个更大的数字,or翻下墙试试。。
下面以安装jupiter为例说明,安装指令:
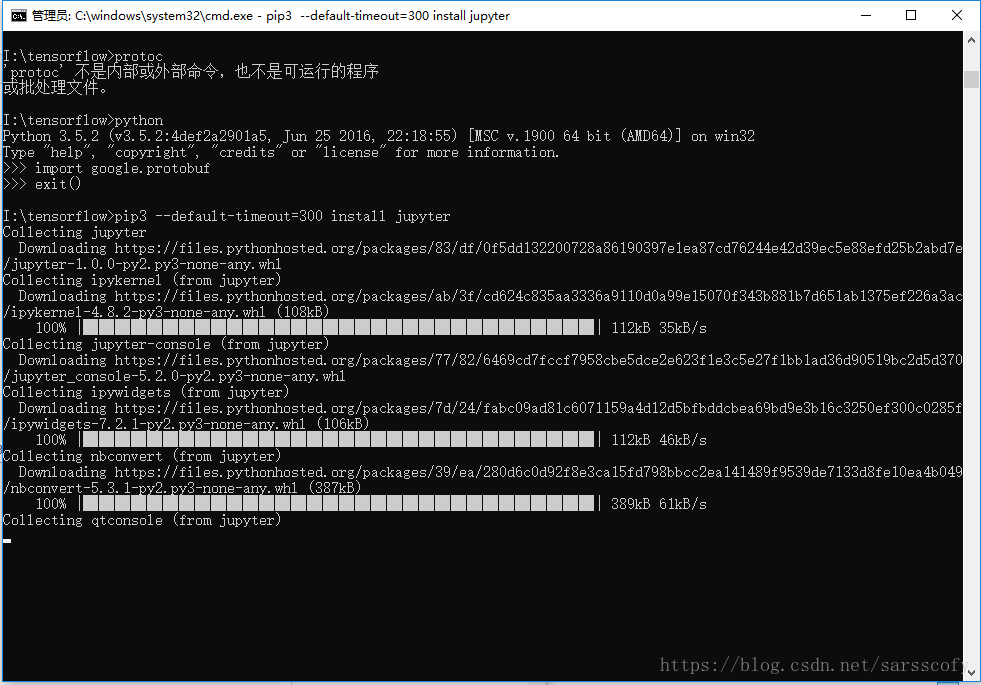
安装成功后,会有如下提示(这个下的东西比较多,请耐心等候哈):
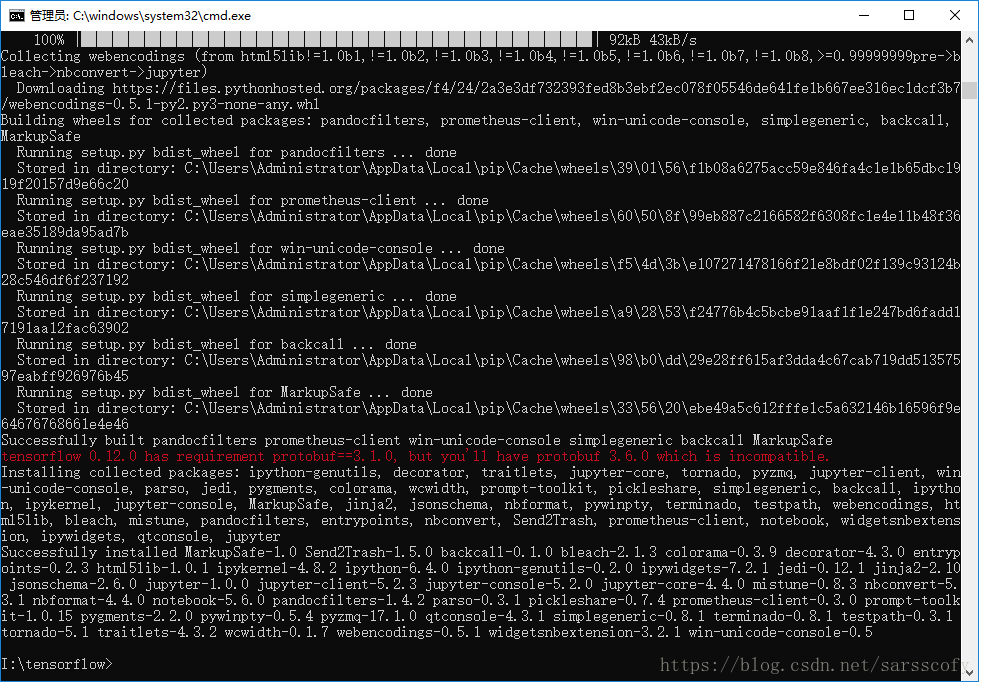
(忽略掉红色的提示信息,对目前这个demo没有影响,具体影响的是什么,还没验证,有经验的XDJM麻烦帮忙指点下,谢谢)
一般情况下,如果不是native安装而是安装Anaconda的话,这些都是自动安装的,不过最好还是检查下。
2.安装配置Protobuf
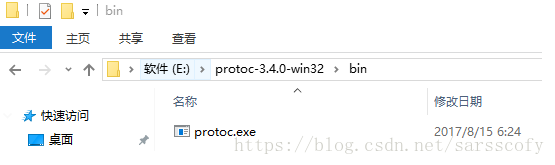
1)解压下载的文件 protoc-3.4.0-win32.zip
2)找到并将 bin下 protoc.exe 文件的路径添加到系统的环境变量中(我的是:E:\protoc-3.4.0-win32\bin)
3)验证
在cmd窗口中输入protoc,如果出现类似一堆参数信息,则说明配置生效:
C:\Users\smile3>protoc
Usage: protoc [OPTION] PROTO_FILES
Parse PROTO_FILES and generate output based on the options given:
  -IPATH, --proto_path=PATH   Specify the directory in which to search for
                              imports.  May be specified multiple times;
                              directories will be searched in order.  If not
                              given, the current working directory is used.
  --version                   Show version info and exit.
  -h, --help                  Show this text and exit.
  --encode=MESSAGE_TYPE       Read a text-format message of the given type
                              from standard input and write it in binary
......
提醒一下:
新配置了环境变量后,要cmd新打开一个命令窗口,用之前打开的会无效,因为老窗口对应的环境变量也是老的。
III.object_detection API 安装
1.编译生成py文件
在cmd命令窗口中,进入model-master中的research目录下,输入指令:
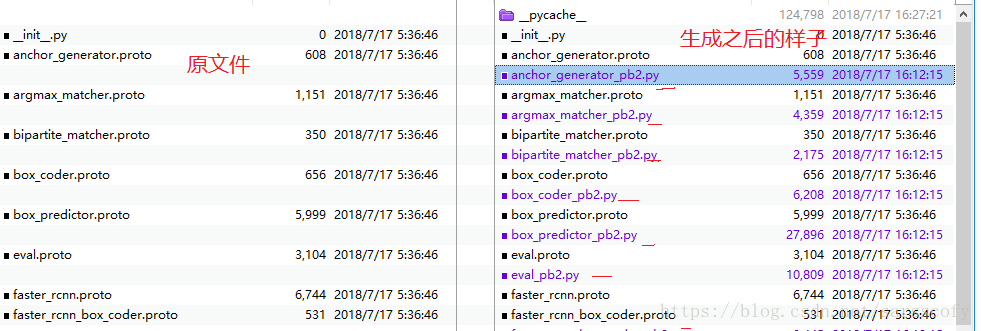
protoc object_detection/protos/*.proto --python_out=.静候一会儿 ,如果没有异常提示,则会发现在\models-master\research\object_detection\protos路径下多了一些py文件:
2.安装 object_detection API
1)在research目录下输入如下指令:
python object_detection/builders/model_builder_test.py等待一会儿,如果出现“OK”则说明成功,如下图成功提示:
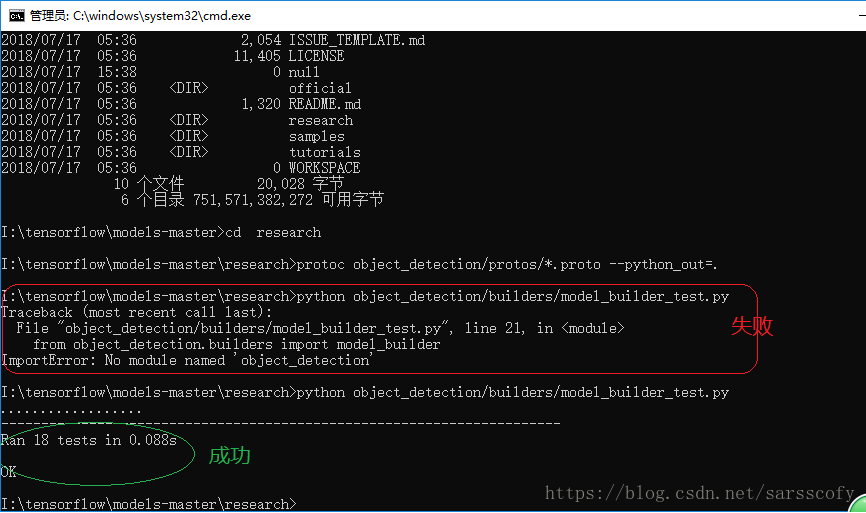
2)如果出现上图中“ImportError:No module named 'object_detection'”的错误,则说明缺少环境变量,可以通过如下操作解决:
如果是native安装,则:
A. 直接找到python安装目录下的site-packages文件夹,例如我的是(具体的要结合自己的实际情况配置):
C:\Users\smile3(系统用户名)\AppData\Local\Programs\Python\Python35\Lib\site-packagesB. 创建.pth文件,文件名随意,例如我的是:tensorflow_path.pth。
C. 文件内容为本地models-master文件下research目录、以及 reserach下slim的路径,例如:
# 要换成自己的目录,下面是我的目录
I:\tensorflow\models-master\research
I:\tensorflow\models-master\research\slim
如果是Anaconda安装, 则在\Anaconda\Lib\site-packages 这个文件夹目录下,写一个.pth文件,内容同上。
配置好了后,再按照“2.安装 object_detection API”操作一遍就OK了。
IV.Demo测试
网上好多用“jupyter-notebook”调试的教程,我这里就不详细介绍了,还是直接用Python文件,方便项目借鉴。
1.创建文件
文件名:随意,我的是:object_detect_demo.py
编码格式:UTF-8,一定要注意!
存放路径:\models-master\research\object_detection
2.根据官方Demo修改,具体文件内容如下:
#一定要保存为UTF8的格式哦
import numpy as np
import os
import six.moves.urllib as urllib
import sys
import tarfile
import tensorflow as tf
import zipfile
import matplotlib
import cv2

# Matplotlib chooses Xwindows backend by default.
matplotlib.use('Agg')

from collections import defaultdict
from io import StringIO
from matplotlib import pyplot as plt
from PIL import Image
from utils import label_map_util
from utils import visualization_utils as vis_util


##################### Download Model,如果本地已下载也可修改成本地路径
# What model to download.
MODEL_NAME = 'ssd_mobilenet_v1_coco_11_06_2017'
MODEL_FILE = MODEL_NAME + '.tar.gz'
DOWNLOAD_BASE = 'http://download.tensorflow.org/models/object_detection/'

# Path to frozen detection graph. This is the actual model that is used for the object detection.
PATH_TO_CKPT = MODEL_NAME + '/frozen_inference_graph.pb'

# List of the strings that is used to add correct label for each box.
PATH_TO_LABELS = os.path.join('data', 'mscoco_label_map.pbtxt')

NUM_CLASSES = 90

# Download model if not already downloaded
if not os.path.exists(PATH_TO_CKPT):
    print('Downloading model... (This may take over 5 minutes)')
    opener = urllib.request.URLopener()
    opener.retrieve(DOWNLOAD_BASE + MODEL_FILE, MODEL_FILE)
    print('Extracting...')
    tar_file = tarfile.open(MODEL_FILE)
    for file in tar_file.getmembers():
        file_name = os.path.basename(file.name)
        if 'frozen_inference_graph.pb' in file_name:
            tar_file.extract(file, os.getcwd())
else:
    print('Model already downloaded.')

##################### Load a (frozen) Tensorflow model into memory.
print('Loading model...')
detection_graph = tf.Graph()

with detection_graph.as_default():
    od_graph_def = tf.GraphDef()
    with tf.gfile.GFile(PATH_TO_CKPT, 'rb') as fid:
        serialized_graph = fid.read()
        od_graph_def.ParseFromString(serialized_graph)
        tf.import_graph_def(od_graph_def, name='')

##################### Loading label map
print('Loading label map...')
label_map = label_map_util.load_labelmap(PATH_TO_LABELS)
categories = label_map_util.convert_label_map_to_categories(label_map, max_num_classes=NUM_CLASSES, use_display_name=True)
category_index = label_map_util.create_category_index(categories)

##################### Helper code
def load_image_into_numpy_array(image):
  (im_width, im_height) = image.size
  return np.array(image.getdata()).reshape(
      (im_height, im_width, 3)).astype(np.uint8)

##################### Detection
# 测试图片的路径,可以根据自己的实际情况修改
TEST_IMAGE_PATH = 'test_images/image1.jpg'

# Size, in inches, of the output images.
IMAGE_SIZE = (12, 8)

print('Detecting...')
with detection_graph.as_default():
  with tf.Session(graph=detection_graph) as sess:
    print(TEST_IMAGE_PATH)
    image = Image.open(TEST_IMAGE_PATH)
    image_np = load_image_into_numpy_array(image)
    image_np_expanded = np.expand_dims(image_np, axis=0)
    image_tensor = detection_graph.get_tensor_by_name('image_tensor:0')
    boxes = detection_graph.get_tensor_by_name('detection_boxes:0')
    scores = detection_graph.get_tensor_by_name('detection_scores:0')
    classes = detection_graph.get_tensor_by_name('detection_classes:0')
    num_detections = detection_graph.get_tensor_by_name('num_detections:0')
    # Actual detection.
    (boxes, scores, classes, num_detections) = sess.run(
        [boxes, scores, classes, num_detections],
        feed_dict={image_tensor: image_np_expanded})

    # Visualization of the results of a detection.
    vis_util.visualize_boxes_and_labels_on_image_array(
        image_np,
        np.squeeze(boxes),
        np.squeeze(classes).astype(np.int32),
        np.squeeze(scores),
        category_index,
        use_normalized_coordinates=True,
        line_thickness=8)
    print(TEST_IMAGE_PATH.split('.')[0]+'_labeled.jpg')
    plt.figure(figsize=IMAGE_SIZE, dpi=300)
    # 不知道为什么,在我的机器上没显示出图片,有知道的朋友指点下,谢谢
    plt.imshow(image_np)
    # 保存标记图片
    plt.savefig(TEST_IMAGE_PATH.split('.')[0] + '_labeled.jpg')
3.运行及结果
在命令窗口中进入文件的存放目录,然后用python指令运行:
I:\tensorflow\models-master\research\object_detection>python object_detect_demo.py结果存放在\models-master\research\object_detection\test_images 目录下,如果没有修改个路径的话。
识别结果如下:
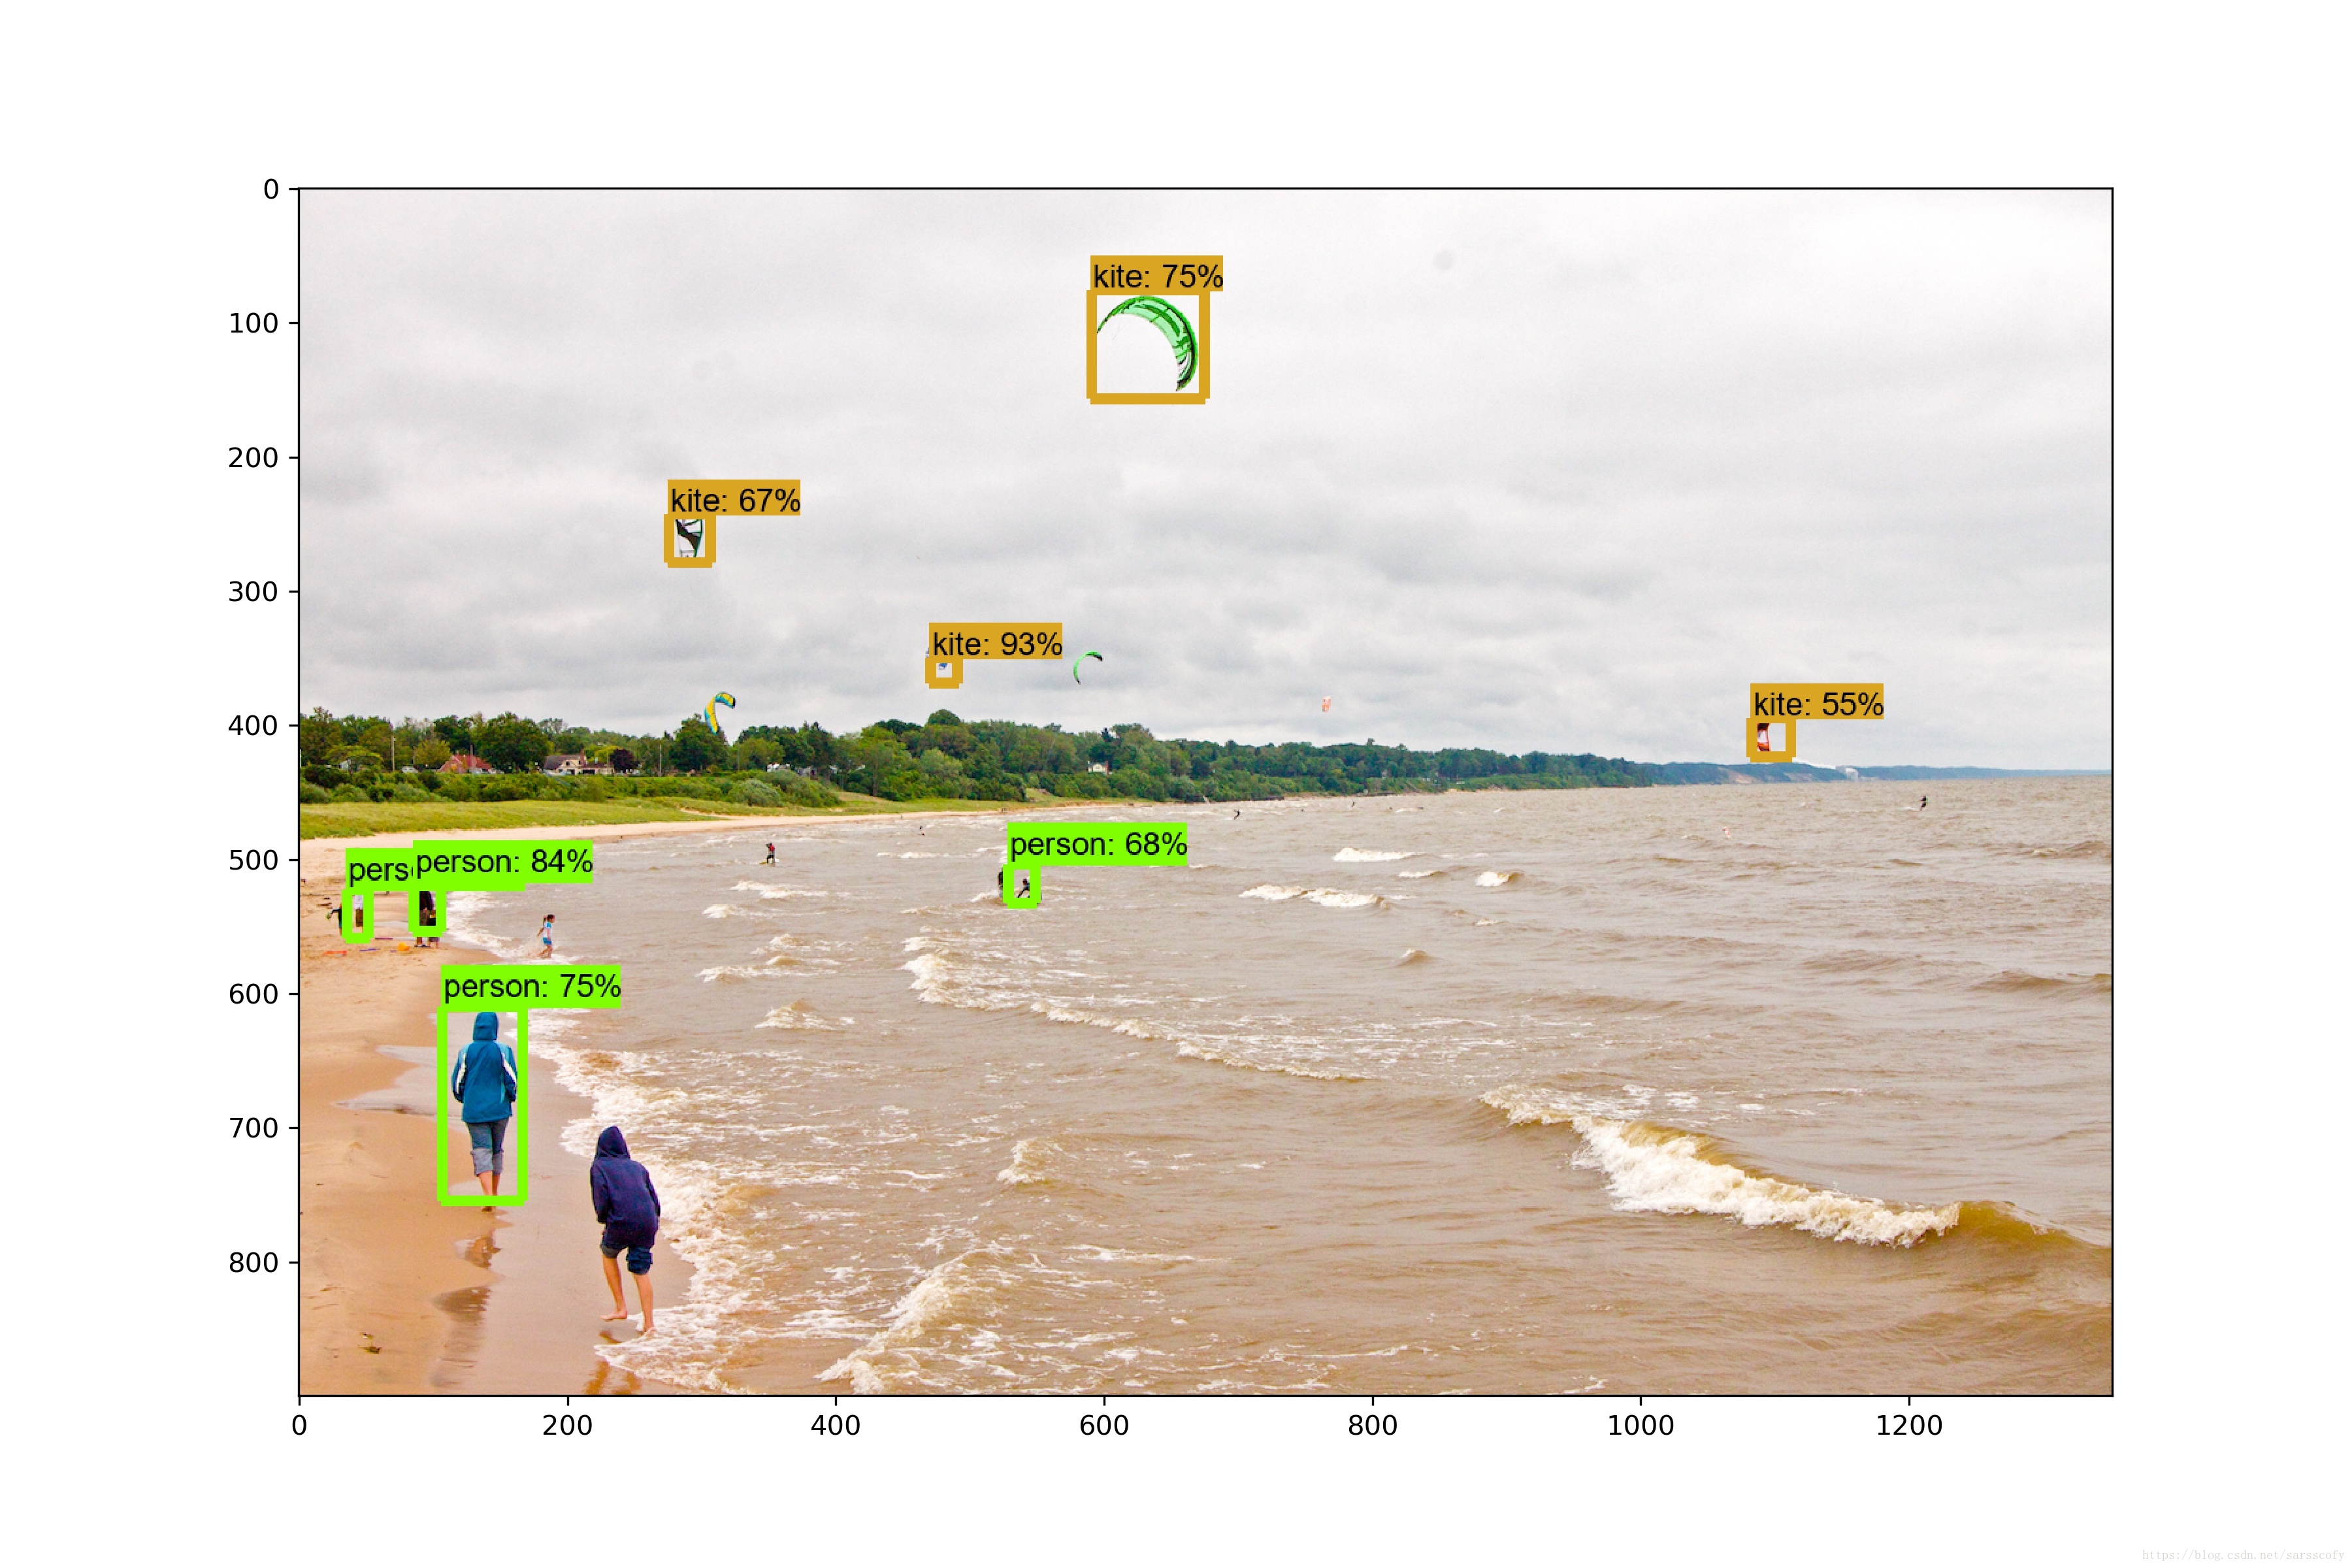
这个结果并没有官方提供的识别图片精确,可能是跟机器和运行的模型的有关。
V.FAQ
想起来再加。。。
VI.参考资料
网上的很多XDJM帮助我跑通了这个Demo,非常感谢:
https://blog.youkuaiyun.com/zlase/article/details/78734138
http://rensanning.iteye.com/blog/2381885
https://www.jianshu.com/p/21bae50b6e0d
https://blog.youkuaiyun.com/c20081052/article/details/77608954
……
转载请说明出处,谢谢~https://blog.youkuaiyun.com/sarsscofy/article/details/81111815


 3540
3540

 被折叠的 条评论
为什么被折叠?
被折叠的 条评论
为什么被折叠?
 到【灌水乐园】发言


