


 本文深入探讨了SIP协议中消息、事务及对话等元素的生命周期,并通过实例展示了这些元素在呼叫建立过程中的交互作用。此外,还介绍了为简化上层应用开发引入的呼叫这一抽象概念。
In sip protocol, the difficult thing is the liecycle of sip elements, including dialog, transaction and message. Though defined as different layers in sip, their lifecycle usually overlaps. Message is the layer at the bottom. Transaction is the layer above message, it's comprised of a sip request message (sent by UAC) and all subsequent response messages (sent by UAS) to the request. A transaction is identified by Branch parameter in Via header. On top of the transaction layer is the dialog layer, which defines a peer-to-peer relationship between participants. Its identifier is the combination of the To tag, From tag and Call-ID.
The lifecycle of elements varies depending on the actual messages exchanged. As an example, Alice called Bob, and Bob accepted the call. During the session initialization process, they exchanged a bunch of sip messages. The lifecycle of transaction and dialog elements are shown below:
(Yellow block and blue block represent the lifecyle of a dialog, indicate Early sate and Confirmed state respectively. Green block represents the lifecycle of a transaction.)
 The lifecycle of elements are different if Bob rejected Alice's call. In this case, the ack message belongs to the transaction that created by the invite message, not having its own transaction anymore.
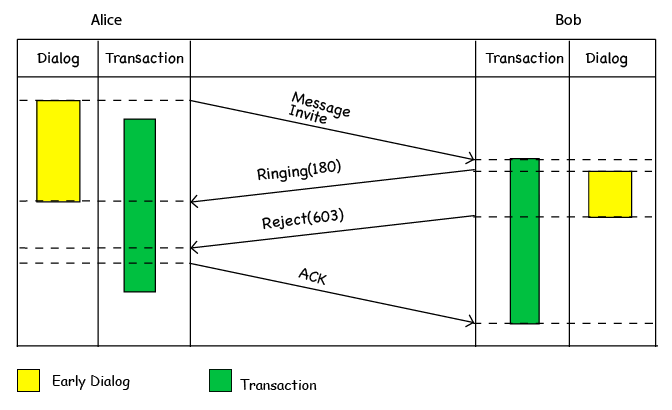
The previous example suffices to show the complexity of sip elements' lifecycle. It's import to understand the lifecycle of elements to implement a mature sip protocol stack.
The essential idea of layered design is to hide lower layer's implementation detail. In sip protocol, though it's designed as layered protocol, the lower layer isn't completely transparent.
Suppose our application runs on top of a sip protocol stack. In an ideal world, our application should only relies on the dialog layer to run. But because dialog's lifecycle doesn't fully cover the lifecycle of transactions in lower layer, our application still has to rely on transaction layer or even message layer. The dependencies on different layers of sip protocol stack make things a lot complicated.
In order to simplify things, many sip protocol stack implementations abstract another higher level layer, " call", which is not defined in sip protocol specification. The existance of this layer successfully decouples our application from those different underlying layers.
The lifecycle of elements varies depending on the actual messages exchanged. As an example, Alice called Bob, and Bob accepted the call. During the session initialization process, they exchanged a bunch of sip messages. The lifecycle of transaction and dialog elements are shown below:
(Yellow block and blue block represent the lifecyle of a dialog, indicate Early sate and Confirmed state respectively. Green block represents the lifecycle of a transaction.)
The previous example suffices to show the complexity of sip elements' lifecycle. It's import to understand the lifecycle of elements to implement a mature sip protocol stack.
The essential idea of layered design is to hide lower layer's implementation detail. In sip protocol, though it's designed as layered protocol, the lower layer isn't completely transparent.
Suppose our application runs on top of a sip protocol stack. In an ideal world, our application should only relies on the dialog layer to run. But because dialog's lifecycle doesn't fully cover the lifecycle of transactions in lower layer, our application still has to rely on transaction layer or even message layer. The dependencies on different layers of sip protocol stack make things a lot complicated.
In order to simplify things, many sip protocol stack implementations abstract another higher level layer, " call", which is not defined in sip protocol specification. The existance of this layer successfully decouples our application from those different underlying layers.


 864
864

 被折叠的 条评论
为什么被折叠?
被折叠的 条评论
为什么被折叠?
 到【灌水乐园】发言


