


 本文深入剖析了Volley网络请求框架的内部运作原理,包括RequestQueue的构建与启动、请求的生命周期管理、缓存机制及网络请求流程。展示了如何通过Volley高效地管理HTTP请求与响应。
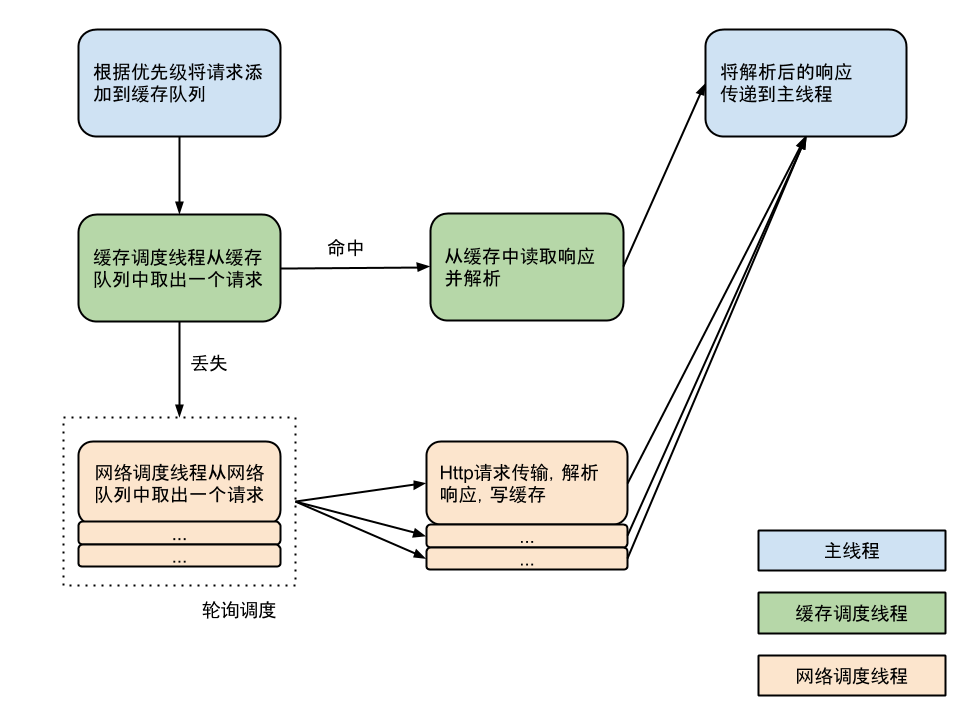
流程图
盗张网上的流程图
源码分析
构建RequestQueue
Volley 的调用比较简单,通过 newRequestQueue(…) 函数新建并启动一个请求队列RequestQueue后,只需要往这个RequestQueue不断 add Request 即可。我们来看看newRequestQueue(…)的代码:
 public static RequestQueue newRequestQueue(Context context, HttpStack stack) {
        File cacheDir = new File(context.getCacheDir(), DEFAULT_CACHE_DIR);

        String userAgent = "volley/0";
        try {
            String packageName = context.getPackageName();
            PackageInfo info = context.getPackageManager().getPackageInfo(packageName, 0);
            userAgent = packageName + "/" + info.versionCode;
        } catch (NameNotFoundException e) {
        }

        if (stack == null) {
//            当不显示指定HttpStack时,若SDK版本9以上使用HttpUrlConnection,9以下使用HttpClient
            if (Build.VERSION.SDK_INT >= 9) {
                stack = new HurlStack();
            } else {
                // Prior to Gingerbread, HttpUrlConnection was unreliable.
                // See: http://android-developers.blogspot.com/2011/09/androids-http-clients.html
                stack = new HttpClientStack(AndroidHttpClient.newInstance(userAgent));
            }
        }

        Network network = new BasicNetwork(stack);

        RequestQueue queue = new RequestQueue(new DiskBasedCache(cacheDir), network);
        queue.start();

        return queue;
    }
当不显示指定HttpStack时,若SDK版本9以上使用HttpUrlConnection,9以下使用HttpClient,当然我们可以在此处传入OkHttpClient。(HttpClient的Api太多不好维护,现在已被废弃,建议使用HttpUrlConnection)
Request这个类 代表一个网络请求的抽象类。
public abstract class Request<T> implements Comparable<Request<T>> `我们通过构建一个Request类的非抽象子类(StringRequest、JsonRequest、ImageRequest 或自定义)对象,并将其加入到RequestQueue中来完成一次网络请求操作。
Volley 支持 8 种 Http 请求方式 GET, POST, PUT, DELETE, HEAD, OPTIONS, TRACE, PATCH
Request 类中包含了请求 url,请求请求方式,请求 Header,请求 Body,请求的优先级等信息(实现了Comparable接口,这里的优先级,仅仅是保证一个请求比另外一个请求先处理,而并不能保证一个高优先级请求一定会比低优先级的请求先回来
)。
因为是抽象类,子类必须重写的两个方法。
protected abstract Response<T> parseNetworkResponse(NetworkResponse var1);
子类重写此方法,将网络返回的原生字节内容,转换成合适的类型。此方法会在工作线程中被调用。
protected abstract void deliverResponse(T var1);子类重写此方法,将解析成合适类型的内容传递给它们的监听回调。
RequestQueue中有如下元素:
一个Request被提交之后有几个去处:
1。mCurrentRequests对应所有请求队列。所有调用add的Request必然都会添加到这里面来。
2.mNetworkQueue 对应网络队列。如果一个Request不需要缓存,那么add之后会被直接添加到网络队列中。
3.mCacheQueue对应缓存请求。如果一个Request需要缓存,并且当前的RequestQueue中并没有一个Request的getCacheKey和当前Request相同(可以认为一个请求),那么加入缓存队列,让缓存工作线程来处理。
4.mWaitingRequests对应等待队列。如果RequestQueue中已经有一个相同请求在处理,这里只需要将这个Request放到等待队列中,等之前的Request结果回来之后,进行处理即可(我们同时发出了三个一模一样的Request,此时底层其实不必真正走三个网络请求,而只需要走一个请求即可。所以Request1被add之后会被调度执行,而Request2 和Request3被加进来时,如果Request1还未执行完毕,那么Request2和 Request3只需要等着Request1的结果即可。)
此外还有默认的一个缓存线程和四个网络线程
  private final PriorityBlockingQueue<Request> mCacheQueue;
    private final PriorityBlockingQueue<Request> mNetworkQueue;
    private static final int DEFAULT_NETWORK_THREAD_POOL_SIZE = 4;
    private NetworkDispatcher[] mDispatchers;
    private CacheDispatcher mCacheDispatcher;
    private final Map<String, Queue<Request>> mWaitingRequests;
private final Set<Request> mCurrentRequests;- 启动队列:
接下来启动队列:
public void start() {
        this.stop();
        this.mCacheDispatcher = new CacheDispatcher(this.mCacheQueue, this.mNetworkQueue, this.mCache, this.mDelivery);
        this.mCacheDispatcher.start();

        for(int i = 0; i < this.mDispatchers.length; ++i) {
            NetworkDispatcher networkDispatcher = new NetworkDispatcher(this.mNetworkQueue, this.mNetwork, this.mCache, this.mDelivery);
            this.mDispatchers[i] = networkDispatcher;
            networkDispatcher.start();
        }

    }
public void stop() {
        if(this.mCacheDispatcher != null) {
            this.mCacheDispatcher.quit();
        }

        for(int i = 0; i < this.mDispatchers.length; ++i) {
            if(this.mDispatchers[i] != null) {
                this.mDispatchers[i].quit();
            }
        }

    }
首先停止当前正在运行的线程,开启一个缓存调度线程CacheDispatcher和 n 个网络调度线程NetworkDispatcher,这里 n 默认为 4,存在优化的余地,比如可以根据 CPU 核数以及网络类型计算更合适的并发数。缓存调度线程不断的从缓存请求队列中取出 Request 去处理,网络调度线程不断的从网络请求队列中取出 Request 去处理。
缓存线程的run():
@Override
 public void run() {
 //初始化Cache
 mCache.initialize();
 Request<?> request;
 while (true) {
   //阻塞 获取一个Cache任务
   request = mCacheQueue.take();
  try {
   //已经被取消
    if (request.isCanceled()) {
    request.finish("cache-discard-canceled");
    continue;
   }
   //如果拿cache未果,放入网络请求队列
   Cache.Entry entry = mCache.get(request.getCacheKey());
   if (entry == null) {
    request.addMarker("cache-miss");
    mNetworkQueue.put(request);
    continue;
   }
   //缓存超时,硬过期,放入网络请求队列
   if (entry.isExpired()) {
    request.addMarker("cache-hit-expired");
    request.setCacheEntry(entry);
    mNetworkQueue.put(request);
    continue;
   }
   //根据Cache构造Response
   Response<?> response = request.parseNetworkResponse(
     new NetworkResponse(entry.data, entry.responseHeaders));
   //是否超过软过期
   if (!entry.refreshNeeded()) {
    // 直接返回Cache
    mDelivery.postResponse(request, response);
   } else {
    request.setCacheEntry(entry);
    //设置中间结果
    response.intermediate = true;
    //发送中间结果
    final Request<?> finalRequest = request;
    mDelivery.postResponse(request, response, new Runnable() {
     @Override
     public void run() {
      try {
       //返回中间结果后,将请求放入网络队列
       mNetworkQueue.put(finalRequest);
      } catch (InterruptedException e) {
       // Not much we can do about this.
      }
     }
    });
   }
  } catch (Exception e) {

  }
 }
}
这里的Cache分为硬过期和软过期:
public interface Cache {
    /**
     * Retrieves an entry from the cache.
     * @param key Cache key
     * @return An {@link Entry} or null in the event of a cache miss
     */
    public Entry get(String key);

    /**
     * Adds or replaces an entry to the cache.
     * @param key Cache key
     * @param entry Data to store and metadata for cache coherency, TTL, etc.
     */
    public void put(String key, Entry entry);

    /**
     * Performs any potentially long-running actions needed to initialize the cache;
     * will be called from a worker thread.
     */
    public void initialize();

    /**
     * Invalidates an entry in the cache.
     * @param key Cache key
     * @param fullExpire True to fully expire the entry, false to soft expire
     */
    public void invalidate(String key, boolean fullExpire);

    /**
     * Removes an entry from the cache.
     * @param key Cache key
     */
    public void remove(String key);

    /**
     * Empties the cache.
     */
    public void clear();

    /**
     * Data and metadata for an entry returned by the cache.
     */
    public static class Entry {
        /** The data returned from cache. */
        public byte[] data;

        /** ETag for cache coherency. */
        public String etag;

        /** Date of this response as reported by the server. */
        public long serverDate;

        /** TTL for this record. */
        public long ttl;

        /** Soft TTL for this record. */
        public long softTtl;

        /** Immutable response headers as received from server; must be non-null. */
        public Map<String, String> responseHeaders = Collections.emptyMap();

        /** True if the entry is expired. */
        public boolean isExpired() {
            return this.ttl < System.currentTimeMillis();
        }

        /** True if a refresh is needed from the original data source. */
        public boolean refreshNeeded() {
            return this.softTtl < System.currentTimeMillis();
        }
    }

}
softTtl字段对应软过期,ttl字段对应硬过期。如果ttl过期,那么这个缓存永远不会被使用了;如果softTtl没有过期,这个数据直接返回;如果softTtl过期,那么这次请求将有两次返回,第一次返回这个Cahce,第二次返回网络请求的结果:先进入页面展示缓存,然后再刷新页面
接下来看网络线程的run():
执行网络请求的工作线程,默认有4个线程,它不停地从网络队列中取任务执行。
public void run() {
 Process.setThreadPriority(Process.THREAD_PRIORITY_BACKGROUND);
 Request<?> request;
 while (true) {
  long startTimeMs = SystemClock.elapsedRealtime();
  // release previous request object to avoid leaking request object when mQueue is drained.
  request = null;
  try {
   request = mQueue.take();
  } catch (InterruptedException e) {
   if (mQuit) {
    return;
   }
   continue;
  }

  try {
   request.addMarker("network-queue-take");
   //取消
   if (request.isCanceled()) {
    request.finish("network-discard-cancelled");
    continue;
   }
   //通过Http栈实现客户端发送网络请求
   NetworkResponse networkResponse = mNetwork.performRequest(request);
   request.addMarker("network-http-complete");

   // 如果缓存软过期,那么会重新走网络;如果server返回304,表示上次之后请求结果数据本地并没有过期,所以可以直接用本地的,因为之前Volley已经发过一次Response了,所以这里就不需要再发送Response结果了。
   if (networkResponse.notModified && request.hasHadResponseDelivered()) {
    request.finish("not-modified");
    continue;
   }

   Response<?> response = request.parseNetworkResponse(networkResponse);
   request.addMarker("network-parse-complete");
   //更新缓存
   if (request.shouldCache() && response.cacheEntry != null) {
    mCache.put(request.getCacheKey(), response.cacheEntry);
    request.addMarker("network-cache-written");
   }
   //发送结果
   request.markDelivered();
   mDelivery.postResponse(request, response);
  } catch (VolleyError volleyError) {
   volleyError.setNetworkTimeMs(SystemClock.elapsedRealtime() - startTimeMs);
   parseAndDeliverNetworkError(request, volleyError);
  } catch (Exception e) {
   VolleyLog.e(e, "Unhandled exception %s", e.toString());
   VolleyError volleyError = new VolleyError(e);
   volleyError.setNetworkTimeMs(SystemClock.elapsedRealtime() - startTimeMs);
   mDelivery.postError(request, volleyError);
  }
 }
}- 请求完成:
/**
     * Called from {@link Request#finish(String)}, indicating that processing of the given request
     * has finished.
     *
     * <p>Releases waiting requests for <code>request.getCacheKey()</code> if
     *      <code>request.shouldCache()</code>.</p>
     */
    void finish(Request request) {
        // Remove from the set of requests currently being processed.
        synchronized (mCurrentRequests) {
            mCurrentRequests.remove(request);
        }

        if (request.shouldCache()) {
            synchronized (mWaitingRequests) {
                String cacheKey = request.getCacheKey();
                Queue<Request> waitingRequests = mWaitingRequests.remove(cacheKey);
                if (waitingRequests != null) {
                    if (VolleyLog.DEBUG) {
                        VolleyLog.v("Releasing %d waiting requests for cacheKey=%s.",
                                waitingRequests.size(), cacheKey);
                    }
                    // Process all queued up requests. They won't be considered as in flight, but
                    // that's not a problem as the cache has been primed by 'request'.
                    mCacheQueue.addAll(waitingRequests);
                }
            }
        }
    }
(1). 首先从正在进行中请求集合mCurrentRequests中移除该请求。
(2). 然后查找请求等待集合mWaitingRequests中是否存在等待的请求,如果存在,则将等待队列移除,并将等待队列所有的请求添加到缓存请求队列中,让缓存请求处理线程CacheDispatcher自动处理。
- 请求取消:
public void cancelAll(RequestFilter filter)
public void cancelAll(final Object tag)
取消当前请求集合中所有符合条件的请求。
filter 参数表示可以按照自定义的过滤器过滤需要取消的请求。
tag 表示按照Request.setTag设置好的 tag 取消请求,比如同属于某个 Activity 的。
NetworkImageView自动管理请求
    @Override
    protected void onDetachedFromWindow() {
        if (mImageContainer != null) {
            // If the view was bound to an image request, cancel it and clear
            // out the image from the view.
            mImageContainer.cancelRequest();
            setImageBitmap(null);
            // also clear out the container so we can reload the image if necessary.
            mImageContainer = null;
        }
        super.onDetachedFromWindow();
    }
此时自动触发事件取消之前的请求。
private void loadImageIfNecessary(final boolean isInLayoutPass) {
  ***
          if (mImageContainer != null && mImageContainer.getRequestUrl() != null) {
            if (mImageContainer.getRequestUrl().equals(mUrl)) {
                // if the request is from the same URL, return.
                return;
            } else {
                // if there is a pre-existing request, cancel it if it's fetching a different URL.
                mImageContainer.cancelRequest();
                setDefaultImageOrNull();
            }
        }
***
}
相同的请求直接返回,不同的url则取消之前的请求


 947
947

 被折叠的 条评论
为什么被折叠?
被折叠的 条评论
为什么被折叠?
 到【灌水乐园】发言


