


本代码使用的Android版本:android-studio-2024.2.1.11-windows
目录
本文章还有使用自定义适配器来实现该功能的那一篇博客,自定义适配器那一片文章博客链接如下:
本篇文章先介绍基础适配器的基础使用方法
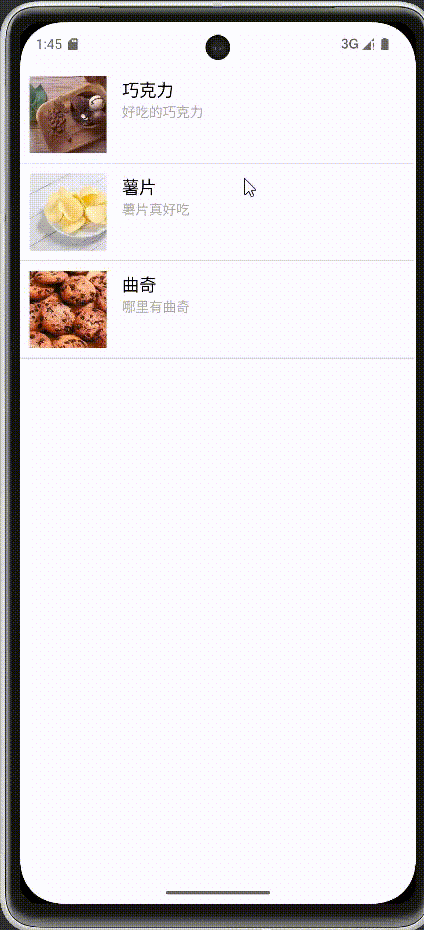
实现效果图
废话先不多说,先看效果图
一、适配器的五个主要参数
下面这部分的代码块是创建SimpleAdapter的五个参数。
//装配适配器
SimpleAdapter adapter = new SimpleAdapter(
    this, // 上下文
    productData, // 数据源
    R.layout.item_commodity, // 自定义布局资源 item
    new String[]{"name", "description", "image"}, // 数据源中的键数组
    new int[]{R.id.productName, R.id.productDescription, R.id.productImage} // 布局文件中的视图 ID 数组
);上下文环境:在OnCreate中的this就是上下文环境,可以直接输入
数据源:根据键数组填充的数据源。列如:[巧克力,巧克力是由可可制作而成,图片(巧克力的图片)]又或者是[薯片,薯片是由土豆制作而成,图片(巧克力的图片)]
自定义布局:在res/layout布局下自定义一个布局item,用于装载。后续在ListView中每一个List都是这个自定义布局,类似一种模板
数据源中的键数组:所需要的参数的变量名,列如商品中有名字、描述、图片,这三个,所以在键数组中填入"name","description","image"。
布局中的控件:在自定义布局中键数组对应的控件
二、功能实现的代码(模板):
下述是本功能实现的代码
1.Store主页面:
页面代码:
<?xml version="1.0" encoding="utf-8"?>
<androidx.constraintlayout.widget.ConstraintLayout xmlns:android="http://schemas.android.com/apk/res/android"
    xmlns:app="http://schemas.android.com/apk/res-auto"
    xmlns:tools="http://schemas.android.com/tools"
    android:id="@+id/main"
    android:layout_width="match_parent"
    android:layout_height="match_parent"
    android:fitsSystemWindows="true"
    tools:context=".Store">

    <ListView
        android:id="@+id/listView"
        android:layout_width="409dp"
        android:layout_height="729dp"
        tools:layout_editor_absoluteX="1dp"
        tools:layout_editor_absoluteY="1dp"
        tools:ignore="MissingConstraints" />
</androidx.constraintlayout.widget.ConstraintLayout>
Java代码:
package com.example.test03;

import android.os.Bundle;
import android.widget.ListView;
import android.widget.SimpleAdapter;
import androidx.activity.EdgeToEdge;
import androidx.appcompat.app.AppCompatActivity;
import java.util.ArrayList;
import java.util.HashMap;
import java.util.List;
import java.util.Map;

public class Store extends AppCompatActivity {

    @Override
    protected void onCreate(Bundle savedInstanceState) {
        super.onCreate(savedInstanceState);
        EdgeToEdge.enable(this);
        setContentView(R.layout.activity_store);
        //获取数据
        List<Map<String, Object>> productData = GetDate();
        //装配适配器
        SimpleAdapter adapter = new SimpleAdapter(
                this, // 上下文
                productData, // 数据源
                R.layout.item_commodity, // 自定义布局资源 item
                new String[]{"name", "description", "image"}, // 数据源中的键数组
                new int[]{R.id.productName, R.id.productDescription, R.id.productImage} // 布局文件中的视图 ID 数组
        );
        ListView listView = findViewById(R.id.listView);
        listView.setAdapter(adapter);
        //如果想要得到效果图中的功能的话,需要为他设置一个监听器,如下
        listView.setOnItemClickListener(new AdapterView.OnItemClickListener() {
            @Override
            public void onItemClick(AdapterView<?> parent, View view, int position, long id) {
                // 获取被点击项目的数据
                Map<String, Object> clickedItem = (Map<String, Object>) parent.getItemAtPosition(position);
                String productName = (String) clickedItem.get("name");
                String productDescription = (String) clickedItem.get("description");
                // 在这里处理点击事件,比如显示一个 Toast 消息
                Toast.makeText(Store.this, "你点击了 " + productName + "\n" + productDescription, Toast.LENGTH_LONG).show();
            }
        });
    }

    //用于获取数据
    private List<Map<String, Object>> GetDate() {
        List<Map<String, Object>> productData = new ArrayList<>();
        //根据数据源中的键数组来填充数据
        //new String[]{"name", "description", "image"},
        // 创建巧克力商品数据
        Map<String, Object> chocolate = new HashMap<>();
        chocolate.put("name", "巧克力");
        chocolate.put("description", "好吃的巧克力");
        chocolate.put("image", R.drawable.chocolate);
        productData.add(chocolate);

        // 创建薯片商品数据
        Map<String, Object> chips = new HashMap<>();
        chips.put("name", "薯片");
        chips.put("description", "薯片真好吃");
        chips.put("image", R.drawable.chips);
        productData.add(chips);

        // 创建饼干商品数据
        Map<String, Object> cookies = new HashMap<>();
        cookies.put("name", "曲奇");
        cookies.put("description", "哪里有曲奇");
        cookies.put("image", R.drawable.cookies);
        productData.add(cookies);

        // 可以继续添加更多商品数据...
        return productData;
    }
}
2.item_commodity模板界面:
<?xml version="1.0" encoding="utf-8"?>
<LinearLayout xmlns:android="http://schemas.android.com/apk/res/android"
    android:layout_width="match_parent"
    android:layout_height="wrap_content"
    android:orientation="horizontal"
    android:padding="10dp">

    <ImageView
        android:id="@+id/productImage"
        android:layout_width="80dp"
        android:layout_height="80dp"
        android:src="@drawable/ic_launcher_foreground" />

    <LinearLayout
        android:layout_width="0dp"
        android:layout_height="wrap_content"
        android:layout_weight="1"
        android:orientation="vertical"
        android:paddingStart="16dp"
        android:paddingEnd="16dp"
        android:gravity="center_vertical">

        <TextView
            android:id="@+id/productName"
            android:layout_width="wrap_content"
            android:layout_height="wrap_content"
            android:text="商品名"
            android:textSize="18sp"
            android:textColor="@android:color/black" />

        <TextView
            android:id="@+id/productDescription"
            android:layout_width="wrap_content"
            android:layout_height="wrap_content"
            android:text="描述"
            android:textSize="14sp"
            android:textColor="@android:color/darker_gray" />
    </LinearLayout>
</LinearLayout>
三、结语
本账号共为介绍适配器写了4篇文章(包括本文在内),相信你看完这几篇文章,你基本学会了适配器90%的使用了。其余三篇文章链接如下:
Android中使用自定义适配器完成对ListView的使用方法,附带可修改模板![]() https://blog.youkuaiyun.com/rawmeat/article/details/144251368?spm=1001.2014.3001.5501Android中在自定义适配器中使用多个item展示在ListView中,附带代码实现、框架模板
https://blog.youkuaiyun.com/rawmeat/article/details/144251368?spm=1001.2014.3001.5501Android中在自定义适配器中使用多个item展示在ListView中,附带代码实现、框架模板![]() https://blog.youkuaiyun.com/rawmeat/article/details/144284315?spm=1001.2014.3001.5501
https://blog.youkuaiyun.com/rawmeat/article/details/144284315?spm=1001.2014.3001.5501
本篇文章的分享就到这里了,制作不易,觉得实用的就点个收藏吧!


 905
905

 被折叠的 条评论
为什么被折叠?
被折叠的 条评论
为什么被折叠?
 到【灌水乐园】发言


