


本代码使用的Android版本:android-studio-2024.2.1.11-windows
如果需要后续在wx的信息页面填充信息的话,或者是如何在Fragment如何使用自定义适配器填充ListView内容,请看续写:
目录
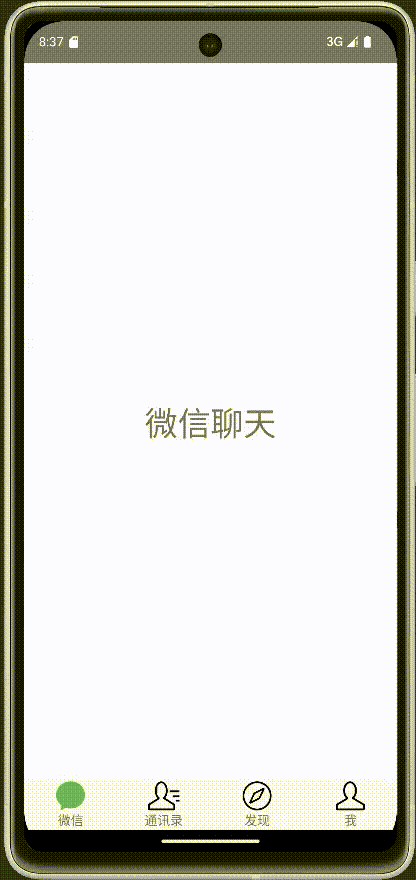
一、实现效果
废话不多说,先看效果图:
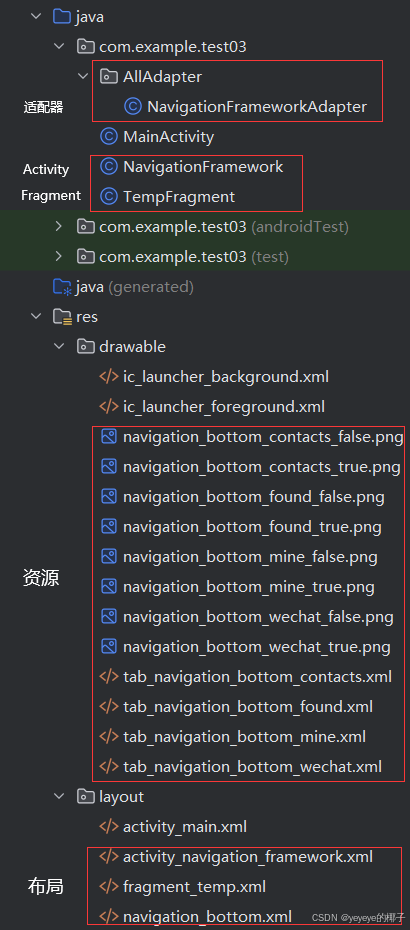
二、层级图
实现该功能的项目 层级图:
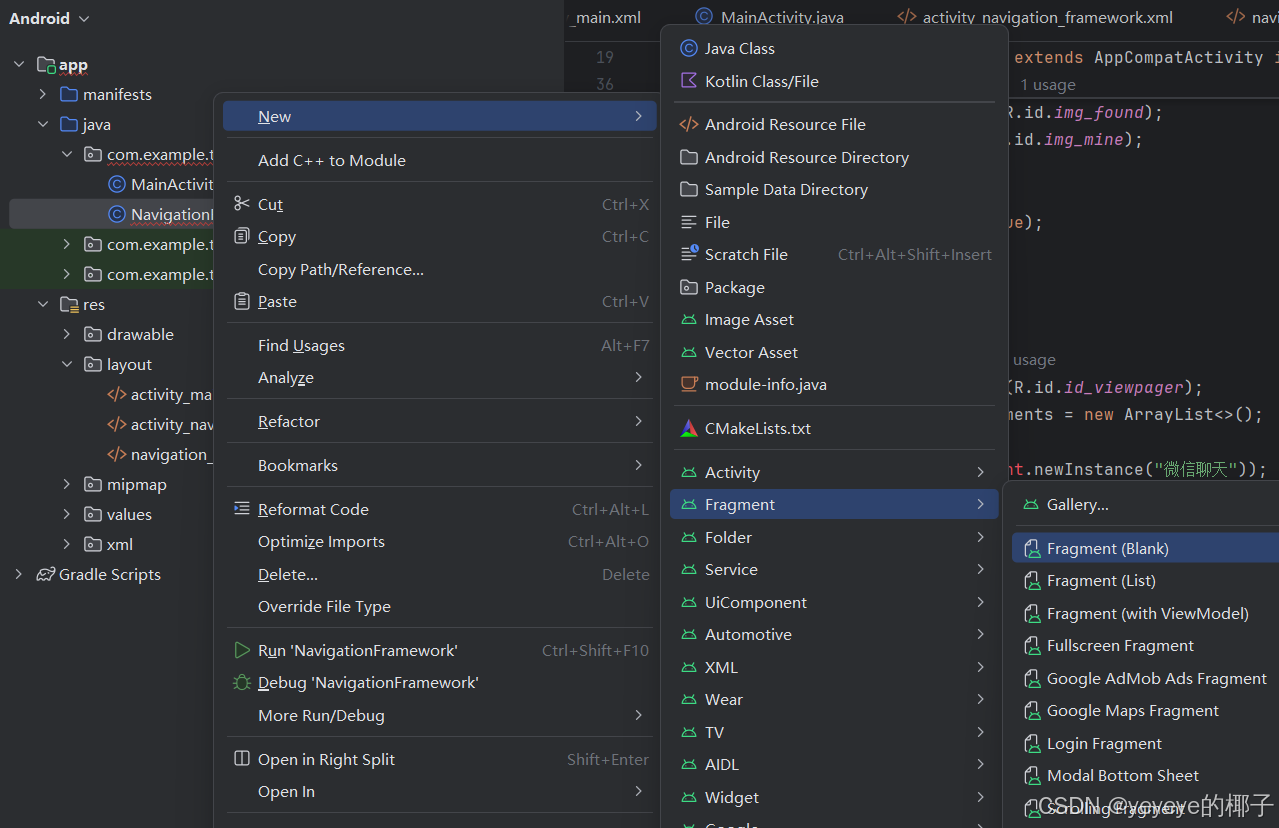
三、创建Activity和Fragment事项
首先在项目中创建Activity和Fragment等项目,实现比较简单,下面一笔带过
Activity中创建示例:在项目下的res/layout下创建名为NavigationFramework
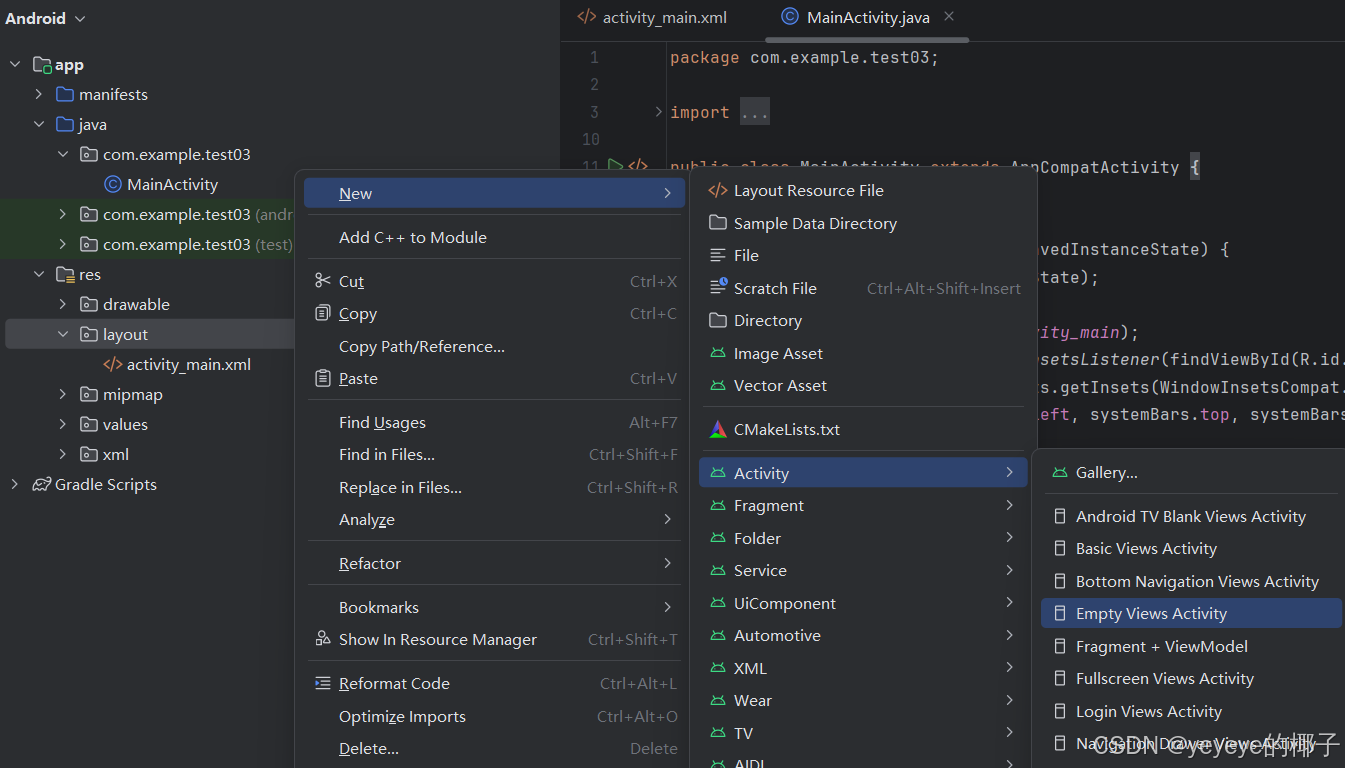
Fragment中创建示例:在项目下res/layout下创建一个空白的Fragment
四、源代码
接下来是代码:
1.NavigationFramework界面:
该页面是滑动功能的框架,如果将这个功能比作一个画布,那么这个界面就是一个画框,并且具有切换画布的功能。
页面代码:
主要由ViewPager2和一个导航栏布局构成
<?xml version="1.0" encoding="utf-8"?>
<LinearLayout xmlns:android="http://schemas.android.com/apk/res/android"
    xmlns:app="http://schemas.android.com/apk/res-auto"
    xmlns:tools="http://schemas.android.com/tools"
    android:id="@+id/main"
    android:orientation="vertical"
    android:layout_width="match_parent"
    android:layout_height="match_parent"
    tools:context=".NavigationFramework">
    <androidx.viewpager2.widget.ViewPager2
        android:layout_width="match_parent"
        android:layout_height="0dp"
        android:layout_weight="1"
        android:id="@+id/id_viewpager"/>
    <include layout="@layout/navigation_bottom"></include>
</LinearLayout>
Java代码:
主要的注释在其中表明的很清楚了,这里不多赘述
package com.example.test03;

import android.annotation.SuppressLint;
import android.content.Intent;
import android.os.Bundle;
import android.util.Log;
import android.view.View;
import android.widget.ImageView;
import android.widget.LinearLayout;
import androidx.appcompat.app.AppCompatActivity;
import androidx.fragment.app.Fragment;
import androidx.viewpager2.widget.ViewPager2;
import com.example.test03.AllAdapter.NavigationFrameworkAdapter;
import java.util.ArrayList;

public class NavigationFramework extends AppCompatActivity implements View.OnClickListener{
    //控件的声明
    ViewPager2 viewPager;
    private LinearLayout linWeChat, linContacts, linFound, linMine;
    private ImageView imgWeChat, imgContacts, imgFound, imgMine, imgCurrent;
    //当前账号Id,后续需要根据这个变量更换内容
    String CurrentAccountId;
    @Override
    protected void onCreate(Bundle savedInstanceState) {
        super.onCreate(savedInstanceState);
        setContentView(R.layout.activity_navigation_framework);
        //获取CurrentAccountId
        Intent intent = getIntent();
        CurrentAccountId=intent.getStringExtra("CurrentAccountId");//填写传递过来的值
        //初始化Pager
        initPager();
        //初始化导航栏
        initTabView();
    }
    //初始化导航栏
    private void initTabView() {
        linWeChat = findViewById(R.id.tab_navigation_bottom_wechat);
        linWeChat.setOnClickListener(this);
        linContacts = findViewById(R.id.tab_navigation_bottom_contacts);
        linContacts.setOnClickListener(this);
        linFound = findViewById(R.id.tab_navigation_bottom_found);
        linFound.setOnClickListener(this);
        linMine = findViewById(R.id.tab_navigation_bottom_mine);
        linMine.setOnClickListener(this);
        imgWeChat = findViewById(R.id.img_wechat);
        imgContacts = findViewById(R.id.img_contacts);
        imgFound = findViewById(R.id.img_found);
        imgMine = findViewById(R.id.img_mine);
        //默认选中微信
        imgWeChat.setSelected(true);
        imgCurrent = imgWeChat;

    }
    //初始化Pager
    private void initPager() {
        viewPager = findViewById(R.id.id_viewpager);
        //其中定义了四个Fragment,放入ArrayList中
        ArrayList<Fragment> fragments = new ArrayList<>();
        //四个fragments添加,暂时使用TempFragment页面做页面简单展示
        fragments.add(TempFragment.newInstance("微信聊天"));
        fragments.add(TempFragment.newInstance("通讯录"));
        fragments.add(TempFragment.newInstance("发现"));
        fragments.add(TempFragment.newInstance("我"));
        //装配NavigationFrameworkAdapter适配器
        NavigationFrameworkAdapter pagerAdapter = new NavigationFrameworkAdapter(getSupportFragmentManager(), getLifecycle(), fragments);
        Log.d("fragment", "setAdapterBefore: ");
        //绑定适配器
        viewPager.setAdapter(pagerAdapter);
        Log.d("fragment", "setAdapterAfter: ");

        //初始化viewPager的初始方法  用于实时监控这四个页面的切换状态
        viewPager.registerOnPageChangeCallback(new ViewPager2.OnPageChangeCallback() {
            @Override
            public void onPageScrolled(int position, float positionOffset, int positionOffsetPixels) {
                //正在滑动
                Log.d("Code", "onPageSelected: +你正在滑动,当前页面为"+position);
                super.onPageScrolled(position, positionOffset, positionOffsetPixels);
            }

            @Override
            public void onPageSelected(int position) {
                super.onPageSelected(position);
                //选择后,根据当前索引切换页面
                Log.d("Code", "onPageSelected: +你已更新ChangeTab 同时"+position);
                changeTab(position);
            }

            @Override
            public void onPageScrollStateChanged(int state) {
                //页面值更改后触发
                Log.d("Code", "onPageScrollStateChanged:页面值更改");
                super.onPageScrollStateChanged(state);
            }
        });
    }
    //页面切换方法,已经包含两种情况,滑动和点击切换
    @SuppressLint("NonConstantResourceId")
    private void changeTab(int position) {
        imgCurrent.setSelected(false);
        //数字是滑动后ViewPager返回的一个索引,
        //由于传入的是图片的Id点击是从R.id.xxxx中判断,
        //在android中使用switch case语句可能会出现报错冒红现象,请看最后的注意事项,可以解决这个问题
        switch (position) {
            case R.id.tab_navigation_bottom_wechat:
                //点击图片后,切换页面
                viewPager.setCurrentItem(0);
            case 0:
                //滑动到第一个界面(索引为0)触发被选中效果,即切换图标(从黑→绿)
                //imgWeChat.setSelected(true)这部分功能请看后面的tab_navigation__bottom部分
                imgWeChat.setSelected(true);
//                Log.d("xxx", "changeTab: ");
                imgCurrent = imgWeChat;
                break;
                //后面类似,不多赘述
            case R.id.tab_navigation_bottom_contacts:
                viewPager.setCurrentItem(1);
            case 1:
                imgContacts.setSelected(true);
                imgCurrent = imgContacts;
                break;
            case R.id.tab_navigation_bottom_found:
                viewPager.setCurrentItem(2);
            case 2:
                imgFound.setSelected(true);
                imgCurrent = imgFound;
                break;
            case R.id.tab_navigation_bottom_mine:
                viewPager.setCurrentItem(3);
            case 3:
                imgMine.setSelected(true);
                imgCurrent = imgMine;
                break;


        }

    }
    //点击导航栏时,将图片的ID传入changeTab,触发切换页面事件
    @Override
    public void onClick(View v) {
        Log.d("Code", "onClick: +你已更新ChangeTab点击");
        changeTab(v.getId());
    }
}
2.TempFragmen界面:
用于最简单的展示,就如前文所说,这个部分是一个画布,如果读者想要让这四个页面不那么单调,就请制作自己的Fragment页面或者填充这个TempFragment页面。
页面代码:
主要是一个TextView用于展示。
<?xml version="1.0" encoding="utf-8"?>
<FrameLayout xmlns:android="http://schemas.android.com/apk/res/android"
    xmlns:tools="http://schemas.android.com/tools"
    android:layout_width="match_parent"
    android:layout_height="match_parent"
    tools:context=".TempFragment">

    <!-- TODO: Update blank fragment layout -->
    <TextView
        android:layout_width="match_parent"
        android:layout_height="match_parent"
        android:text=""
        android:gravity="center"
        android:textSize="36sp"
        android:id="@+id/text" />

</FrameLayout>
Java代码:
Activity和Fragmen有非常多不一样的地方,我在制作这个功能时,发现最多就是Fragment没有自己的上下文环境,只能靠所依赖的Activity来提供上下文环境,来实现功能。
package com.example.test03;

import android.os.Bundle;
import androidx.fragment.app.Fragment;
import android.util.Log;
import android.view.LayoutInflater;
import android.view.View;
import android.view.ViewGroup;
import android.widget.TextView;

/**
 * A simple {@link Fragment} subclass.
 * Use the {@link TempFragment#newInstance} factory method to
 * create an instance of this fragment.
 */
public class TempFragment extends Fragment {
    // TODO: Rename parameter arguments, choose names that match
    // the fragment initialization parameters, e.g. ARG_ITEM_NUMBER
    private static final String ARG_TEXT = "param1";
    // TODO: Rename and change types of parameters
    private String mTextString;
    View rootView;

    public TempFragment() {
        // Required empty public constructor
    }
    /**
     * Use this factory method to create a new instance of
     * this fragment using the provided parameters.
     *
     * @param param1 Parameter 1.

     * @return A new instance of fragment BlankFragment.
     */
    // TODO: Rename and change types and number of parameters
    public static TempFragment newInstance(String param1) {
        //初始化Fragment,你可以理解为类似创建一个对象的构造函数
        //这边获取了传进来的param1的值
        Log.d("fragment", "newInstance: ");
        TempFragment fragment = new TempFragment();
        Bundle args = new Bundle();
        args.putString(ARG_TEXT, param1);
        fragment.setArguments(args);
        return fragment;
    }

    @Override
    public void onCreate(Bundle savedInstanceState) {
        super.onCreate(savedInstanceState);
        Log.d("fragment", "onCreate: ");
        //在这里对于该类中的变量mTextString进行赋值,方便后续使用
        if (getArguments() != null) {
            mTextString = getArguments().getString(ARG_TEXT);
        }
    }
    @Override
    public View onCreateView(LayoutInflater inflater, ViewGroup container,Bundle savedInstanceState) {
        Log.d("fragment", "onCreateView: ");
        //创建根视图,然后获取的页面模板为fragment_temp
        if(rootView ==null){
            rootView=inflater.inflate(R.layout.fragment_temp, container, false);}
        //初始化变量
        initView();
        //最后返回已经填充好的View
        return rootView;
    }
    private void initView() {
        Log.d("fragment", "initView: ");
        TextView textView=rootView.findViewById(R.id.text);
        textView.setText(mTextString);
    }

}
3.NavigationFrameworkAdapter适配器:
package com.example.test03.AllAdapter;

import androidx.annotation.NonNull;
import androidx.fragment.app.Fragment;
import androidx.fragment.app.FragmentManager;
import androidx.lifecycle.Lifecycle;
import androidx.viewpager2.adapter.FragmentStateAdapter;
import java.util.ArrayList;
import java.util.List;

public class NavigationFrameworkAdapter extends FragmentStateAdapter {
    List<Fragment> fragmentList = new ArrayList<>();

    public NavigationFrameworkAdapter(@NonNull FragmentManager fragmentManager, @NonNull Lifecycle lifecycle, List<Fragment> fragments) {
        super(fragmentManager, lifecycle);
        fragmentList = fragments;
    }

    @NonNull
    @Override
    public Fragment createFragment(int position) {
        //根据position来创建对应Fragment
        return fragmentList.get(position);
    }

    @Override
    public int getItemCount() {
        //页面数
        return fragmentList.size();
    }
}
4.navigation_bottom页面
导航栏布局:
<?xml version="1.0" encoding="utf-8"?>
<LinearLayout xmlns:android="http://schemas.android.com/apk/res/android"
    android:layout_width="match_parent"
    android:layout_height="55dp"
    android:background="#F5F5F5"
    android:orientation="horizontal">

    <LinearLayout
        android:id="@+id/tab_navigation_bottom_wechat"
        android:layout_width="0dp"
        android:layout_height="match_parent"
        android:layout_gravity="center"
        android:layout_weight="1"
        android:gravity="center"
        android:orientation="vertical">

        <ImageView
            android:id="@+id/img_wechat"
            android:layout_width="32dp"
            android:layout_height="32dp"
            android:background="@drawable/tab_navigation_bottom_wechat"/>

        <TextView
            android:id="@+id/text_wechat"
            android:layout_width="32dp"
            android:layout_height="wrap_content"
            android:gravity="center"
            android:text="微信" />

    </LinearLayout>

    <LinearLayout
        android:id="@+id/tab_navigation_bottom_contacts"
        android:layout_width="0dp"
        android:layout_height="match_parent"
        android:layout_gravity="center"
        android:layout_weight="1"
        android:gravity="center"
        android:orientation="vertical">

        <ImageView
            android:id="@+id/img_contacts"
            android:layout_width="35dp"
            android:layout_height="32dp"
            android:background="@drawable/tab_navigation_bottom_contacts"/>

        <TextView
            android:id="@+id/text_contacts"
            android:layout_width="wrap_content"
            android:layout_height="wrap_content"
            android:gravity="center"
            android:text="通讯录" />

    </LinearLayout>


    <LinearLayout
        android:id="@+id/tab_navigation_bottom_found"
        android:layout_width="0dp"
        android:layout_height="match_parent"
        android:layout_gravity="center"
        android:layout_weight="1"
        android:gravity="center"
        android:orientation="vertical">

        <ImageView
            android:id="@+id/img_found"
            android:layout_width="32dp"
            android:layout_height="32dp"
            android:background="@drawable/tab_navigation_bottom_found"/>

        <TextView
            android:id="@+id/text_found"
            android:layout_width="32dp"
            android:layout_height="wrap_content"
            android:gravity="center"
            android:text="发现" />

    </LinearLayout>


    <LinearLayout
        android:id="@+id/tab_navigation_bottom_mine"
        android:layout_width="0dp"
        android:layout_height="match_parent"
        android:layout_gravity="center"
        android:layout_weight="1"
        android:gravity="center"
        android:orientation="vertical">

        <ImageView
            android:id="@+id/img_mine"
            android:layout_width="32dp"
            android:layout_height="32dp"
            android:background="@drawable/tab_navigation_bottom_mine"/>

        <TextView
            android:id="@+id/text_mine"
            android:layout_width="32dp"
            android:layout_height="wrap_content"
            android:gravity="center"
            android:text="我" />

    </LinearLayout>
</LinearLayout>
5.tab_navigation_bottom_xxx资源:
该部分在drawable下创建:

前文中setselected部分其实是对图片中的属性进行设置,实现切换图标的功能
tab_navigation_bottom_contacts:
<?xml version="1.0" encoding="utf-8"?>
<selector xmlns:android="http://schemas.android.com/apk/res/android">
<item android:drawable="@drawable/navigation_bottom_contacts_true" android:state_selected="true"/>
    <item android:drawable="@drawable/navigation_bottom_contacts_false" android:state_selected="false"/>
</selector>
tab_navigation_bottom_found:
<?xml version="1.0" encoding="utf-8"?>
<selector xmlns:android="http://schemas.android.com/apk/res/android">
    <item android:drawable="@drawable/navigation_bottom_found_true" android:state_selected="true"/>
    <item android:drawable="@drawable/navigation_bottom_found_false" android:state_selected="false"/>
</selector>
tab_navigation_bottom_mine:
<?xml version="1.0" encoding="utf-8"?>
<selector xmlns:android="http://schemas.android.com/apk/res/android">
    <item android:drawable="@drawable/navigation_bottom_mine_true" android:state_selected="true"/>
    <item android:drawable="@drawable/navigation_bottom_mine_false" android:state_selected="false"/>
</selector>
tab_navigation_bottom_mine:
<?xml version="1.0" encoding="utf-8"?>
<selector xmlns:android="http://schemas.android.com/apk/res/android">
<item android:drawable="@drawable/navigation_bottom_wechat_true" android:state_selected="true"/>
    <item android:drawable="@drawable/navigation_bottom_wechat_false" android:state_selected="false"/>
</selector>
五、注意事项
1.wx的基础图片
素材在下面这个链接里了哇
下载wx基础图标的连接(8个图标)![]() https://download.youkuaiyun.com/download/rawmeat/90081684?spm=1001.2014.3001.5503
https://download.youkuaiyun.com/download/rawmeat/90081684?spm=1001.2014.3001.5503
2.Android中无法使用switch...case问题
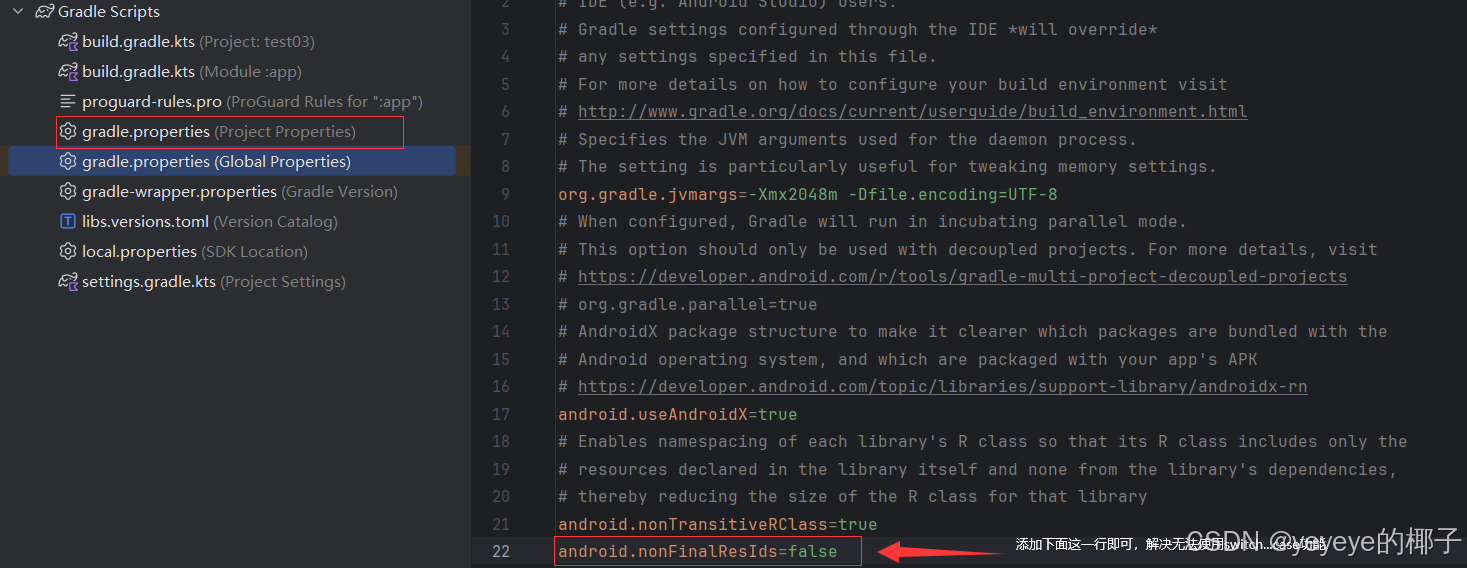
添加代码段:
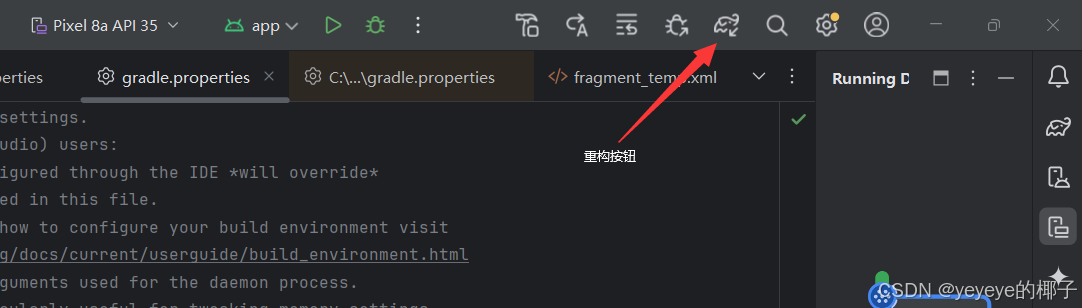
android.nonFinalResIds=false添加代码后,请点击重构(每次修改Gradle Scripts)都需要点击重构:
六、结语
本篇文章的分享就到这里了,制作不易,觉得实用的就点个收藏吧!


 1894
1894

 被折叠的 条评论
为什么被折叠?
被折叠的 条评论
为什么被折叠?
 到【灌水乐园】发言


