


 本文详细介绍了如何使用OpenCV的分水岭算法进行图像语义分割,从图像灰度化、二值化、距离变换到种子点生成,再到最终的分水岭变换,提供了一套完整的流程,并给出了分割鸡蛋的示例代码,适用于前景和背景分明但边缘难以精确标注的图像处理场景。
《使用OpenCV的分水岭算法》
之前利用watershed想对相对前背景较为明显的图像进行图像语义分割的预打标,因为虽然前景明显,但是边缘打标也是很困难的,可以用该方法对大部分的边缘进行获取,然后用pixel Annotation进行标注即可。
Key Words:分水岭算法、OpenCV、 图像分割
Beijing, 2020
作者:RaySue
Code:
分水岭算法原理
算法步骤:
- 构建图像梯度图像(构造边缘)。
- 通过一定规则生成 n 个最初的注水区域(先验知识或局部梯度最小值,种子)。
- 往注水区域内加水,当两注水区域即将合并时,记录下此时的边界。
- 当图像边缘彻底被分割成 n 个独立区域是算法结束。
OpenCV函数
void watershed( InputArray image, InputOutputArray markers );
cv2.watershed(image, markers)
使用流程
使用分水岭算法的通用步
-
自动生成种子
- 输入图像 -> 灰度 -> 二值化(二值化之后注意一下前景是 255 还是 0) -> 距离变换 -> 寻找种子 -> 生成Marker -> 分水岭变换 -> 输出图像
-
手动指定已经确定的前景(2)和背景(1)作为种子
分割鸡蛋为例
- 代码
import cv2
import numpy as np
import matplotlib.pyplot as plt
def watershed(image_path):
image_name = image_path.split("/")[-1]
image = cv2.imread(image_path)
# image = multiScaleSharpen(image, 5)
# 前提:降噪
# blurred = cv2.pyrMeanShiftFiltering(image, 25, 100)
gray = cv2.cvtColor(image, cv2.COLOR_BGR2GRAY)
# 第一步:灰度处理
# 第二步:二值化处理 + 反色处理 255 -> 0 | 0 -> 255
# ret, binary = cv2.threshold(gray, 0, 255, cv2.THRESH_BINARY_INV | cv2.THRESH_OTSU)
ret, binary = cv2.threshold(gray, 0, 255, cv2.THRESH_OTSU)
# 对二值化的结果执行开运算
# noise removal
kernel = np.ones((3, 3), np.uint8)
opening = cv2.morphologyEx(binary, cv2.MORPH_OPEN, kernel, iterations=2)
# sure background area
sure_bg = cv2.dilate(opening, kernel, iterations=3)
# Finding sure foreground area
dist_transform = cv2.distanceTransform(opening, cv2.DIST_L2, 5)
# 通过距离变换的结果取二值化,得到前景
ret, sure_fg = cv2.threshold(dist_transform, 0.5 * dist_transform.max(),
255, 0)
# Finding unknown region
sure_fg = np.uint8(sure_fg)
unknown = cv2.subtract(sure_bg, sure_fg)
# Marker labelling
ret, markers = cv2.connectedComponents(sure_fg)
# Add one to all labels so that sure background is not 0, but 1
markers = markers + 1
# Now, mark the region of unknown with zero
markers[unknown == 255] = 0
sure_bg[unknown == 255] = 0
sure_bg[sure_bg == 255] = 2
sure_bg = sure_bg.astype(np.int32)
# plt.figure(1)
# plt.title("sure_bg")
# plt.imshow(sure_bg)
# 分水岭只是对0的位置进行分割 1-背景 0-待分割 2-前景
result = cv2.watershed(image, markers=markers)
# 分水岭结果标记轮廓为红色
image[result == -1] = [255, 0, 0]
# cv2.imwrite("./watershed_res.jpg", result)
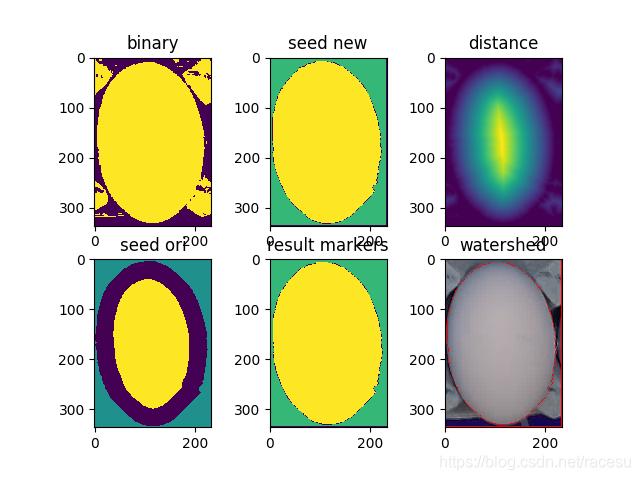
plt.figure(0)
plt.subplot(231)
plt.title("binary")
plt.imshow(binary)
plt.subplot(232)
plt.title("seed new")
plt.imshow(sure_bg)
plt.subplot(233)
plt.title("distance")
plt.imshow(dist_transform * 50)
plt.subplot(234)
plt.title("seed ori")
plt.imshow(markers)
plt.subplot(235)
plt.title("result markers")
plt.imshow(result)
plt.subplot(236)
plt.title("watershed")
plt.imshow(image)
# plt.savefig(os.path.join(output_dir, "watershed_" + image_name))
plt.show()
watershed("/Users/i/Desktop/Screenshot 2020-10-23_17-48-13-153.jpg")
参考
https://blog.youkuaiyun.com/HXG2006/article/details/80019736
https://blog.youkuaiyun.com/weixin_40647819/article/details/90231477


 1041
1041

 被折叠的 条评论
为什么被折叠?
被折叠的 条评论
为什么被折叠?
 到【灌水乐园】发言


