


 本文是关于SpringBoot基础的学习总结,包括引入依赖、启动文件配置、修改端口、控制器注解的使用。同时,详细介绍了Swagger插件的集成步骤,如配置文件设置、API注解说明,并提醒注意HTTP方法的大写规范。最后提到了Lombok插件的使用,它能简化Bean类的getter和setter生成。
SpringBoot基础学习总结
今天学习了大周老师的SpringBoot基础教程,总结一下,以备后需。
1、引入Springboot需要的包。
如果在项目中,springboot只是一个moudle,那么在springboot模块的pom文件中,可能会存在两个partent的标记,这时可以将下方的parent放在最外层的pom文件中。
<parent>
    <groupId>org.springframework.boot</groupId>
    <artifactId>spring-boot-starter-parent</artifactId>
    <version>2.1.6.RELEASE</version>
</parent>

<dependencies>
    <dependency>
        <groupId>org.springframework.boot</groupId>
        <artifactId>spring-boot-starter-web</artifactId>
    </dependency>
    <dependency>
        <groupId>org.springframework.boot</groupId>
        <artifactId>spring-boot-starter-test</artifactId>
        <scope>test</scope>
    </dependency>
<dependencies>
2、启动文件:Application.java
注解:@SpringBootApplication——标志该文件为springboot入口
如果该文件直接在java目录下,可以加上@ComponentScan(“package名称”)注解,标志controller的位置,不然会出现@ComponentScan的异常。
3、修改Springboot启动端口
如果默认的8080端口已被占用,则需要重新指定端口,可在resources目录下,创建application.properties文件,里面写上:server.port=${port:端口号}。
4、控制器文件常用注解:
@RestController:标记该类为控制器类
@RequestMapping:请求路径与对应处理函数的映射关系,可标记在控制器类或控制器中方法上方,用法:	        @RequestMapping(value="/v1",method=RequestMethod.POST)
@RequestParam: 标记函数入参为请求携带参数。标记后,在访问接口时函数自动获取对应请求值,如@RequestParam(value="请求参数名str",required=true),表示获取str值,并且是必传参数。
@RequestBody:在POST请求中,如果传参为json格式,则用此注解标记。
@PathVariable:标记请求路径中数据为函数入参;用此注解时,应在@RequestMapping的路径中标记对应的参数,如@RequestMapping(value="/v1/{start}/{end}"),其中start和end为被@PathVariable标记过的入参。
5、Swagger插件的使用
a.引入所需包
<dependency>
    <groupId>io.springfox</groupId>
    <artifactId>springfox-swagger-ui</artifactId>
    <version>2.6.1</version>
 </dependency>
 <dependency>
     <groupId>io.springfox</groupId>
     <artifactId>springfox-swagger2</artifactId>
     <version>2.6.1</version>
  </dependency>
b.创建配置文件
package com.jd.config;
import org.springframework.context.annotation.Bean;
import org.springframework.context.annotation.Configuration;
import springfox.documentation.builders.ApiInfoBuilder;
import springfox.documentation.builders.PathSelectors;
import springfox.documentation.service.ApiInfo;
import springfox.documentation.service.Contact;
import springfox.documentation.spi.DocumentationType;
import springfox.documentation.spring.web.plugins.Docket;
import springfox.documentation.swagger2.annotations.EnableSwagger2;

@Configuration
@EnableSwagger2
public class SwaggerConfig {
    @Bean
    public Docket api(){
        return new Docket(DocumentationType.SWAGGER_2).apiInfo(apiInfo()).pathMapping("/").select().paths(PathSelectors.regex("/.*")).build();

    }
    private ApiInfo apiInfo(){
        return new ApiInfoBuilder().title("我的接口文档").contact(new Contact("conca","","123456@qq.com")).description("swaggerUI生成的接口文档").version("1.0.0.0").build();
    }
}
其中,apiInfo函数可以指定swagger页面的标题、简介、作者以及联系方式等。
c.在控制器中使用注解
@Api(value = "/",description = "post方法请求")
标记在需要使用swagger插件的类上方
@ApiOperation(value = "登录接口,成功后获取cookie",httpMethod = "POST")
标记在对应的控制器方法上方,说明该方法的功能和采用的请求方式,最终会在swagger页面中展示出来,如下图:
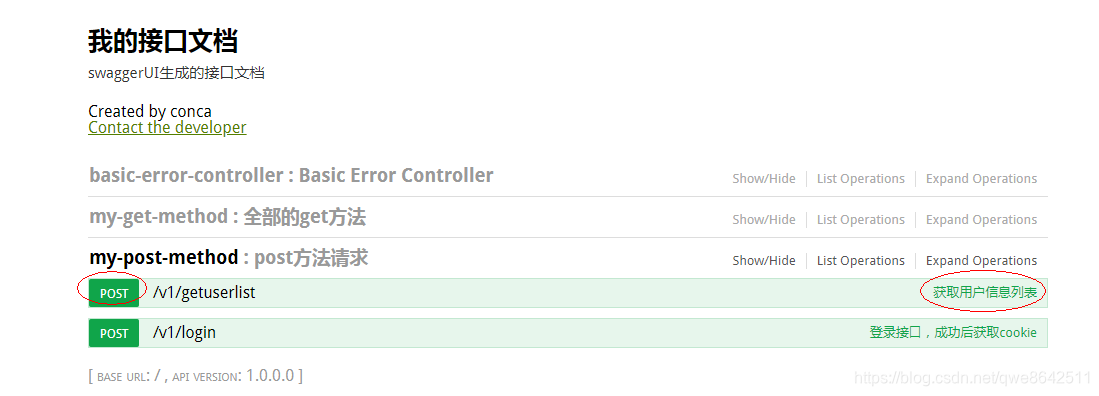
此处需要注意,httpMethod中的请求方法一定要用大写,不然springboot启动时会有问题。
6、lombok插件使用
这个插件可以使得bean结构相对简单,无需生成getter、setter等。只需在对应bean文件上面@Data即可,类中只需填写属性值。如果没有安装该插件,可以在setting中查找安装;如果还是未找到,可以点击“browse repositories”按钮,搜索之后点击安装即可。


 6342
6342

 被折叠的 条评论
为什么被折叠?
被折叠的 条评论
为什么被折叠?
 到【灌水乐园】发言


