


添加redis缓存的需求
冷启动与缓存预热
冷启动:服务刚刚启动时,Redis中并没有缓存,如果所有商品数据都在第一次查询时添加缓存,可能会给数据库带来较大压力。
缓存预热:在实际开发中,我们可以利用大数据统计用户访问的热点数据,在项目启动时将这些热点数据提前查询并保存到Redis中。
我们数据量较少,可以在启动时将所有数据都放入缓存中。
缓存预热
1、利用Docker安装Redis
docker run --name redis -p 6379:6379 -d redis redis-server --appendonly yes2、在item-service服务中引入Redis依赖
<dependency>
    <groupId>org.springframework.boot</groupId>
    <artifactId>spring-boot-starter-data-redis</artifactId>
</dependency>
3、配置Redis地址
spring:
  redis:
    host: 172.16.3.152
4、编写初始化类
缓存预热需要在项目启动时完成,并且必须是拿到RedisTemplate之后。这里我们利用InitializingBean接口来实现,因为InitializingBean可以在对象被Spring创建并且成员变量全部注入后执行。
package com.h.item.config;

import com.fasterxml.jackson.core.JsonProcessingException;
import com.fasterxml.jackson.databind.ObjectMapper;
import com.h.item.pojo.Item;
import com.h.item.pojo.ItemStock;
import com.h.item.service.IItemService;
import com.h.item.service.IItemStockService;
import org.springframework.beans.factory.InitializingBean;
import org.springframework.beans.factory.annotation.Autowired;
import org.springframework.data.redis.core.StringRedisTemplate;
import org.springframework.stereotype.Component;

import java.util.List;

@Component
public class RedisHandler implements InitializingBean {

    @Autowired
    private StringRedisTemplate redisTemplate;

    @Autowired
    private IItemService itemService;
    @Autowired
    private IItemStockService stockService;

    private static final ObjectMapper MAPPER = new ObjectMapper();

    @Override
    public void afterPropertiesSet() throws Exception {
        // 初始化缓存
        // 1.查询商品信息
        List<Item> itemList = itemService.list();
        // 2.放入缓存
        for (Item item : itemList) {
            // 2.1.item序列化为JSON
            String json = MAPPER.writeValueAsString(item);
            // 2.2.存入redis
            redisTemplate.opsForValue().set("item:id:" + item.getId(), json);
        }

        // 3.查询商品库存信息
        List<ItemStock> stockList = stockService.list();
        // 4.放入缓存
        for (ItemStock stock : stockList) {
            // 2.1.item序列化为JSON
            String json = MAPPER.writeValueAsString(stock);
            // 2.2.存入redis
            redisTemplate.opsForValue().set("item:stock:id:" + stock.getId(), json);
        }
    }
}
本地缓存API
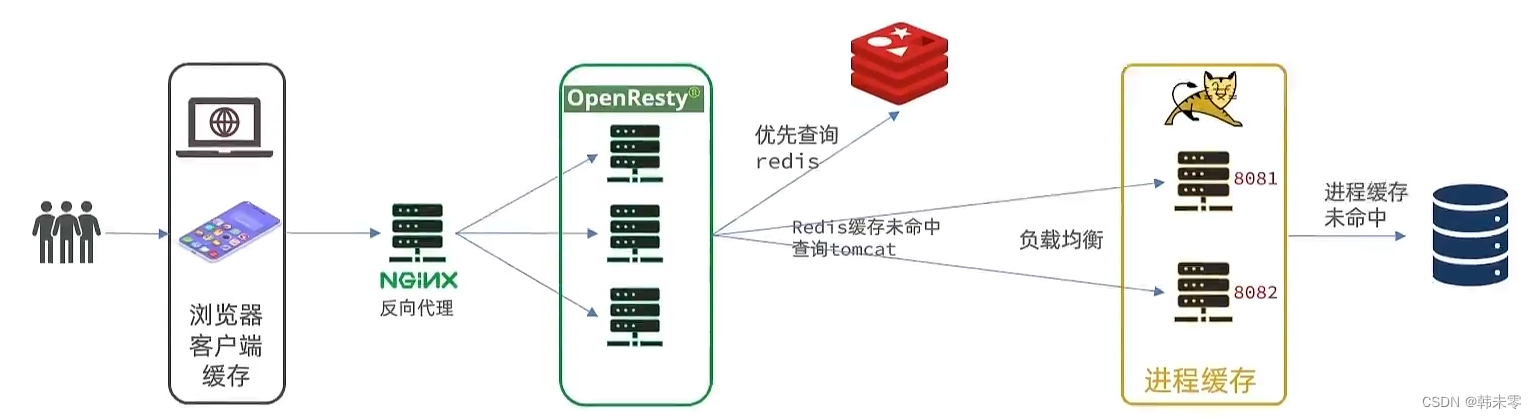
OpenResty为Nginx提供了shard dict的功能,可以在nginx的多个worker之间共享数据,实现缓存功能。
1)开启共享字典,在nginx.conf的http下添加配置:
 # 共享字典,也就是本地缓存,名称叫做:item_cache,大小150m
 lua_shared_dict item_cache 150m;
2)操作共享字典:
-- 获取本地缓存对象
local item_cache = ngx.shared.item_cache
-- 存储, 指定key、value、过期时间,单位s,默认为0代表永不过期
item_cache:set('key', 'value', 1000)
-- 读取
local val = item_cache:get('key')
实现本地缓存查询
1. 修改 '/usr/local/openresty/lua/item.lua' 文件,修改read_data查询函数,添加本地缓存逻辑:
-- 导入共享词典,本地缓存
local item_cache = ngx.shared.item_cache

-- 封装查询函数
function read_data(key, expire, path, params)
    -- 查询本地缓存
    local val = item_cache:get(key)
    if not val then
        ngx.log(ngx.ERR, "本地缓存查询失败,尝试查询Redis, key: ", key)
        -- 查询redis
        val = read_redis("127.0.0.1", 6379, key)
        -- 判断查询结果
        if not val then
            ngx.log(ngx.ERR, "redis查询失败,尝试查询http, key: ", key)
            -- redis查询失败,去查询http
            val = read_http(path, params)
        end
    end
    -- 查询成功,把数据写入本地缓存
    item_cache:set(key, val, expire)
    -- 返回数据
    return val
end
修改item.lua中查询商品和库存的业务,实现最新的read_data函数:

其实就是多了缓存时间参数,过期后nginx缓存会自动删除,下次访问即可更新缓存。这里给商品基本信息设置超时时间为30分钟,库存为1分钟。因为库存更新频率较高,如果缓存时间过长,可能与数据库差异较大。完整的item.lua文件:
-- 导入common函数库
local common = require('common')
local read_http = common.read_http
local read_redis = common.read_redis
-- 导入cjson库
local cjson = require('cjson')
-- 导入共享词典,本地缓存
local item_cache = ngx.shared.item_cache

-- 封装查询函数
function read_data(key, expire, path, params)
    -- 查询本地缓存
    local val = item_cache:get(key)
    if not val then
        ngx.log(ngx.ERR, "本地缓存查询失败,尝试查询Redis, key: ", key)
        -- 查询redis
        val = read_redis("127.0.0.1", 6379, key)
        -- 判断查询结果
        if not val then
            ngx.log(ngx.ERR, "redis查询失败,尝试查询http, key: ", key)
            -- redis查询失败,去查询http
            val = read_http(path, params)
        end
    end
    -- 查询成功,把数据写入本地缓存
    item_cache:set(key, val, expire)
    -- 返回数据
    return val
end

-- 获取路径参数
local id = ngx.var[1]

-- 查询商品信息
local itemJSON = read_data("item:id:" .. id, 1800,  "/item/" .. id, nil)
-- 查询库存信息
local stockJSON = read_data("item:stock:id:" .. id, 60, "/item/stock/" .. id, nil)

-- JSON转化为lua的table
local item = cjson.decode(itemJSON)
local stock = cjson.decode(stockJSON)
-- 组合数据
item.stock = stock.stock
item.sold = stock.sold

-- 把item序列化为json 返回结果
ngx.say(cjson.encode(item))


 518
518

 被折叠的 条评论
为什么被折叠?
被折叠的 条评论
为什么被折叠?
 到【灌水乐园】发言


