


前言
自前期介绍了SpringBoot框架,这期笔者将带领大家进入SpringCloud的领域,同时为了让大家更好的理解SpringCloud,笔者会将知识点讲的尽量通俗易懂,话不多说,我们开始吧!!!
SpringCloud
SpringCloud是一系列框架的有序集合,它在上SpringBoot的基础上,进行开发的,简化了分布式系统基础设施的开发,如服务注册,服务发现、配置中心、消息总线、负载均衡、断路器、数据监控等,在SpringBoot中,我们学到了“约定大于配置”,同样SpringCloud也能实现。简单来说,SpringCloud就是用来构建微服务开发和治理的框架集合,注意是集合,主要贡献来自于Netflix OSS。
SpringCloud中的主要模块
- Eureka:服务注册中心,用于服务管理。
- Ribbon:基于客户端的负载均衡组件。
- Hystrix:容错框架,能够防止服务的雪崩效应。
- Feign:Web服务客户端,能够简化HTTP接口的调用。
- Zuul:API网关,提供路由转发、请求过滤等功能。
- Config:分布式配置管理。
- Sleuth:服务跟踪。
- Stream:构建消息驱动的微服务应用程序的框架。
- Bus:消息代理的集群消息总线。
Eureka注册中心
注册中心的主要作用是为了实现服务治理功能。服务治理必须要有一个注册中心,除了使用Eureka外,我们还可以使用Consul、Etcd、Zookeeper等。服务治理我们简单理解一下,在我们程序需要调用一个服务的时候,会先去注册中心获取服务列表,查询服务状态等等。
在分布式系统中有一个CAP定理:C为数据一致性,A为服务可用性,P为服务对网络分区故障的容错性,这三个一致性最多同时满足2个.
注意:Eureka是基于AP原则构建的,而Zookeeper是基于CP原则构建的。
使用方法:
服务注册中心
1 pom.xml配置
<!-- Spring Boot -->
<parent>
    <groupId>org.springframework.boot</groupId>
    <artifactId>spring-boot-starter-parent</artifactId>
    <version>2.0.6.RELEASE</version>
    <relativePath />
</parent>

<dependencies>
    <!-- eureka -->
    <dependency>
        <groupId>org.springframework.cloud</groupId>
        <artifactId>spring-cloud-starter-netflix-eureka-server</artifactId>
    </dependency>
</dependencies>

<!-- Spring Cloud -->
<dependencyManagement>
    <dependencies>
        <dependency>
            <groupId>org.springframework.cloud</groupId>
            <artifactId>spring-cloud-dependencies</artifactId>
            <version>Finchley.SR2</version>
            <type>pom</type>
            <scope>import</scope>
        </dependency>
    </dependencies>
</dependencyManagement>
2 创建一个SpringCloud启动类EurekaServerApplication,这里的启动类跟之前一致,多了一个@EnableEurekaServer注解,表示开启Eureka Server。
@EnableEurekaServer
@SpringBootApplication
public class EurekaServerApplication {
    public static void main(String[] args) {
        SpringApplication.run(EurekaServerApplication.class, args);
    }
}
3 在src/main/resources下面创建一个application.properties,由于现在是设置自身服务,所以我们将注册服务和检索服务都设置为False
spring.application.name=eureka-server
server.port=8761
# 由于该应用为注册中心,所以设置为false,代表不向注册中心注册自己
eureka.client.register-with-eureka=false
# 由于注册中心的职责就是维护服务实例,它并不需要去检索服务,所以也设置为 false
eureka.client.fetch-registry=false
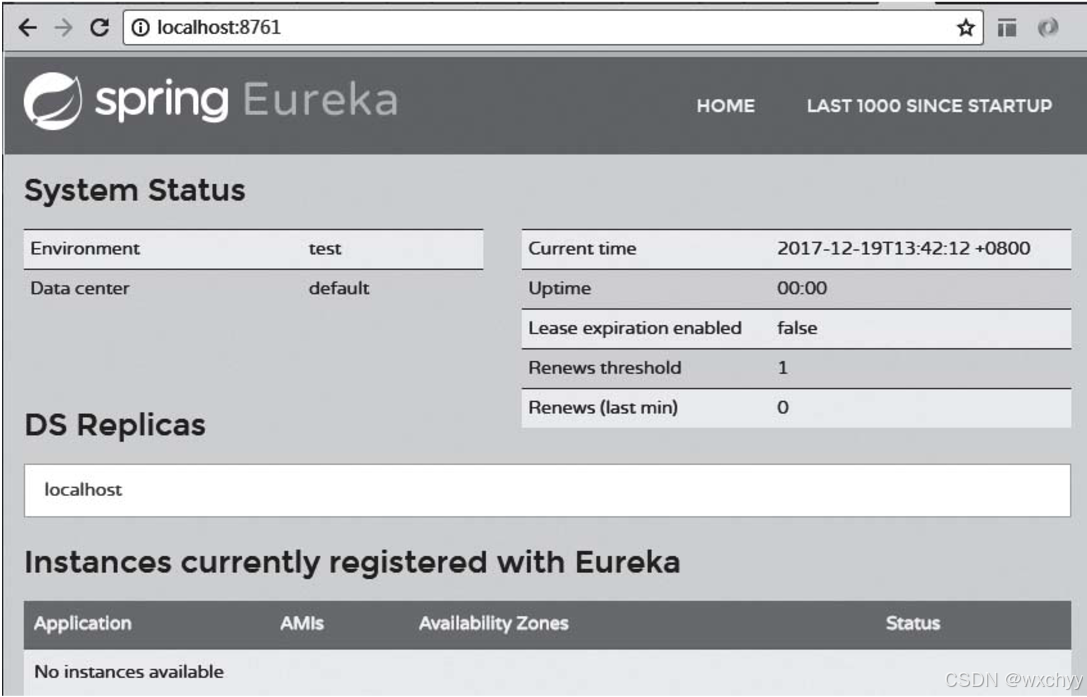
4 访问http://localhost:8761/,可以看到Eureka提供的Web控制台。
注册服务到Eureka
1 依赖配置
<!-- Spring Boot -->
<parent>
    <groupId>org.springframework.boot</groupId>
    <artifactId>spring-boot-starter-parent</artifactId>
    <version>2.0.6.RELEASE</version>
    <relativePath />
</parent>

<dependencies>
    <dependency>
            <groupId>org.springframework.boot</groupId>
            <artifactId>spring-boot-starter-web</artifactId>
    </dependency>

    <!-- eureka -->
    <dependency>
        <groupId>org.springframework.cloud</groupId>
        <artifactId>spring-cloud-starter-netflix-eureka-client</artifactId>
    </dependency>
</dependencies>

<!-- Spring Cloud -->
<dependencyManagement>
    <dependencies>
        <dependency>
            <groupId>org.springframework.cloud</groupId>
            <artifactId>spring-cloud-dependencies</artifactId>
            <version>Finchley.SR2</version>
            <type>pom</type>
            <scope>import</scope>
        </dependency>
    </dependencies>
</dependencyManagement>
2 创建启动类
@SpringBootApplication
@EnableDiscoveryClient
public class App {

    public static void main(String[] args) {
        SpringApplication.run(App.class, args);
    }
}
3 src/main/resources创建属性文件application.properties
spring.application.name= eureka-client-user-service
server.port=8081
eureka.client.serviceUrl.defaultZone=http://localhost:8761/eureka/
# 采用IP注册
eureka.instance.preferIpAddress=true
# 定义实例ID格式
eureka.instance.instance-id=${spring.application.name}:${spring.cloud.client.ip-address}:${server.port}
4 可以返回我们之前的Eureka的Web控制台,刷新页面,就可以看到新注册的服务信息了。

编写提供接口
创建一个Controller提供接口跟其他服务查询。
@RestController
public class UserController {
    @GetMapping("/user/hello")
    public String hello() {
        return “hello”;
    }
}
编写服务消费者
RestTemplate是Spring提供的用于访问远程Http服务的方法,我们通过配置RestTemplate来调用接口。
@Configuration
public class BeanConfiguration {

    @Bean
    public RestTemplate getRestTemplate() {
        return new RestTemplate();
    }
}
@RestController
public class ArticleController {
    @Autowired
    private RestTemplate restTemplate;

    @GetMapping("/article /callHello")
    public String callHello() {
        return restTemplate.getForObject( "http://localhost:8081/user/hello", String.class);
    }
}
通过Eureka消费接口
通过Eureka注册中心,在调用服务接口的时候,我们可以不用写固定地址,可以写出服务的名称,这个名称就是我们注册到Eureka中的名称,是属性文件中的spring.application.name。
@Configuration
public class BeanConfiguration {

    @Bean
    @LoadBalanced
    public RestTemplate getRestTemplate() {
        return new RestTemplate();
    }

}
@GetMapping("/article/callHello2")
public String callHello2() {
    return restTemplate.getForObject(
            "http://eureka-client-user-service/user/hello", String.class);
}
开启Eureka认证
对于Eureka的Web管理页面,我们加上权限认证。
1 pox.xml依赖配置
<dependency>
    <groupId>org.springframework.boot</groupId>
    <artifactId>spring-boot-starter-security</artifactId>
</dependency>
2 application.properties
spring.security.user.name=yinjihuan #用户名
spring.security.user.password=123456 #密码
3 添加配置类
@Configuration
@EnableWebSecurity
public class WebSecurityConfig extends WebSecurityConfigurerAdapter {
    @Override
    protected void configure(HttpSecurity http) throws Exception {
        //关闭csrf
          http.csrf().disable();
          // 支持httpBasic
          http.authorizeRequests()
          .anyRequest()
          .authenticated()
          .and()
          .httpBasic();
    }
}
CSRF即跨站请求伪造,由于我们的API服务不依赖于浏览器的会话机制,可以关闭CSRF保护。
- http.authorizeRequests():开启对请求授权规则的配置。
- anyRequest():表示对所有请求都应用后续的授权规则。
- authenticated():要求所有请求都必须经过身份验证才能访问。
- and():用于连接不同的配置项。
- httpBasic():启用 HTTP 基本认证。HTTP 基本认证是一种简单的认证方式,客户端会在 HTTP 请求的Authorization头中发送用户名和密码,服务器会对其进行验证。
同时在开启认证后,我们的客户端注册的配置也需要加上用户名和密码。
eureka.client.serviceUrl.defaultZone=http://yinjihuan:123456@localhost:8761/eureka/
Eureka集群搭建
单个的注册中心一般只适合本地开发使用,在生产环境中,必须搭建个Eureka集群保证高可用性。我们以二个节点(eureka-server-cluster和eureka-server)相互注册举例:
创建三个文件application-master.properties、application-slaveone.properties 和 application.properties,这三个文件都放在 src/main/resources 目录中
1 application-master.properties:
server.port=8761
# 指向你的从节点的Eureka
eureka.client.serviceUrl.defaultZone=http://用户名:密码@localhost:8762/eureka/
2 application-slaveone.properties:
server.port=8762
# 指向你的主节点的Eureka
eureka.client.serviceUrl.defaultZone=http://用户名:密码 @localhost:8761/eureka/
3 application.properties:
spring.application.name=eureka-server-cluster
# 由于该应用为注册中心,所以设置为false,代表不向注册中心注册自己
eureka.client.register-with-eureka=false
# 由于注册中心的职责就是维护服务实例,并不需要检索服务,所以也设置为 false
eureka.client.fetch-registry=false

spring.security.user.name=yinjihuan
spring.security.user.password=123456
- 在 A 机器上启动时,通过添加 --spring.profiles.active=master,所以会加载 application-master.properties 配置文件。该 Eureka 节点会监听 8761 端口,并且作为客户端将服务注册到 http://用户名:密码@localhost:8762/eureka/(即 B 机器上的 Eureka 节点)。
- 在 B 机器上启动时,通过添加 --spring.profiles.active=slaveone 参数,会加载 application-slaveone.properties 配置文件。该 Eureka 节点会监听 8762 端口,并且作为客户端将服务注册到 http://用户名:密码@localhost:8761/eureka/(即 A 机器上的 Eureka 节点)。
如果我们的注册中心有多个节点时,需要在注册服务的时候,添加多个注册中心节点,中间通过逗号隔开。
eureka.client.serviceUrl.defaultZone=http://yinjihuan:123456@localhost:8761/eureka/,http://yinjihuan:123456@localhost:8762/eureka/
Ribbon客户端负载均衡
目前主流的负载方案分为两种:一种是集中式负载均衡,在消费者和服务提供方中间使用独立的代理方式进行负载,如硬件的F5以及软件的Nginx,还有一种就是客户端自己做负载均衡。Ribbon 是 Netflix 开源的一款客户端负载均衡工具,核心功能是在微服务架构中实现客户端侧的负载均衡,即由服务消费者(客户端)根据自身逻辑主动选择要调用的服务实例。
Ribbon模块
Ribbon模块如下:
- ribbon-loadbalancer负载均衡模块,可独立使用,也可以和别的模块一起使用。
- Ribbon内置的负载均衡算法都实现在其中。
- ribbon-eureka:基于Eureka封装的模块,能够快速、方便地集成Eureka。
- ribbon-transport:基于Netty实现多协议的支持,比如HTTP、Tcp、Udp等。
- ribbon-httpclient:基于Apache HttpClient封装的REST客户端,集成了负载均衡模块,可以直接在项目中使用来调用接口。
- ribbon-example:Ribbon使用代码示例,通过这些示例能够让你的学习事半功倍。
- ribbon-core:一些比较核心且具有通用性的代码,客户端API的一些配置和其他API的定义。
使用Ribbon
我们使用Ribbon实现一个最简单的负载均衡调用功能,接口用之前提供的/user/hello接口,需要启动两个服务,一个是8081端口,一个是8083端口。我们调用5次服务来测试一下负载均衡效果。
1 pom.xml文件进行Maven配置
<dependency>
    <groupId>com.netflix.ribbon</groupId>
    <artifactId>ribbon</artifactId>
    <version>2.2.2</version>
</dependency>
<dependency>
    <groupId>com.netflix.ribbon</groupId>
    <artifactId>ribbon-core</artifactId>
    <version>2.2.2</version>
</dependency>
<dependency>
    <groupId>com.netflix.ribbon</groupId>
    <artifactId>ribbon-loadbalancer</artifactId>
    <version>2.2.2</version>
</dependency>
<dependency>
    <groupId>io.reactivex</groupId>
    <artifactId>rxjava</artifactId>
    <version>1.0.10</version>
</dependency>
2 java实现
- 定义服务列表
// 服务列表
List<Server> serverList = Lists.newArrayList(
                        new Server("localhost", 8081),
                        new Server("localhost", 8083));
- 构建负载均衡实例
// 构建负载实例
ILoadBalancer loadBalancer = LoadBalancerBuilder.newBuilder()
                        .buildFixedServerListLoadBalancer(serverList);
完整代码
// 服务列表
List<Server> serverList = Lists.newArrayList(
                        new Server("localhost", 8081),
                        new Server("localhost", 8083));
// 构建负载实例
ILoadBalancer loadBalancer = LoadBalancerBuilder.newBuilder()
                        .buildFixedServerListLoadBalancer(serverList);
// 调用 5 次来测试效果
for (int i = 0; i < 5; i++) {
    String result = LoadBalancerCommand.<String>builder()
            .withLoadBalancer(loadBalancer)
            .build()
            .submit(new ServerOperation<String>() {
                public Observable<String> call(Server server) {
                    try {
                        String addr = "http://" + server.getHost() + ":" + server. getPort () + "/user/hello";
                        System.out.println(" 调用地址:" + addr);
                        URL url = new URL(addr);
                        HttpURLConnection conn = (HttpURLConnection)
                                        url.openConnection();
                        conn.setRequestMethod("GET");
                        conn.connect();
                        InputStream in = conn.getInputStream();
                        byte[] data = new byte[in.available()];
                        in.read(data);
                        return Observable.just(new String(data));
                    } catch (Exception e) {
                        return Observable.error(e);
                    }
            }
    }).toBlocking().first(); System.out.println(" 调用结果:" + result);
}
输出结果:
调用地址:http://localhost:8083/user/hello
调用结果:Hello
调用地址:http://localhost:8081/user/hello
调用结果:Hello
调用地址:http://localhost:8083/user/hello
调用结果:Hello
调用地址:http://localhost:8081/user/hello
调用结果:Hello
调用地址:http://localhost:8083/user/hello
调用结果:Hello
从输出的结果中可以看到,负载起作用了,8083调用了3次,8081调用了2次。
RestTemplate与Ribbon
当客户端访问调用接口时,调用方通过注入的RestTemplate发起HTTP请求到目标服务(注册到Eureka中的名称),目标服务根据请求路径和参数返回对应的数据,RestTemplate解析数据,返回给调用方控制器,最终返回给客户端。配置代码如下:
1 RestTemplate配置
@Configuration
public class BeanConfiguration {

    @Bean
    @LoadBalanced // 关键注解,启用负载均衡
    public RestTemplate getRestTemplate() {
        return new RestTemplate();
    }

}
2 被调用接口HouseController
@GetMapping("/house/data")
public HouseInfo getData(@RequestParam("name") String name) {
    return new HouseInfo(1L, "上海" "虹口" "东体小区");
}
3 接口调用逻辑(使用 RestTemplate)
@GetMapping("/call/data")
public HouseInfo getData(@RequestParam("name") String name) {
        return restTemplate.getForObject(
    "http://ribbon-eureka-demo/house/data?name="+name, HouseInfo.class);
}
负载均衡策略
Ribbon 的负载均衡策略通过 IRule 接口定义,不同实现类对应不同的流量分配算法。
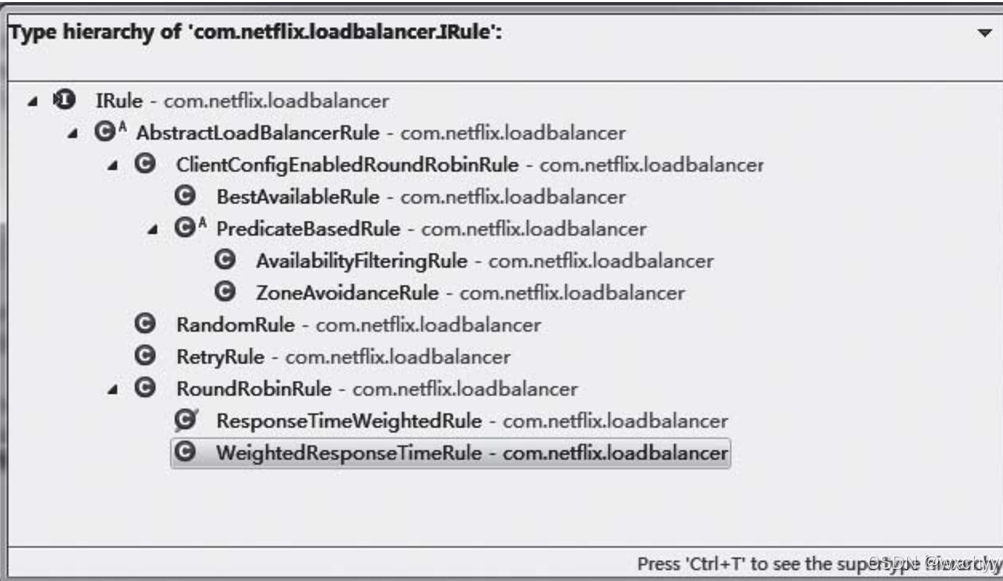
- BestAvailabl:选择一个最小的并发请求的Server,逐个考察Server,如果Server被标记为错误,则跳过,然后再选择ActiveRequestCount中最小的Server。
- AvailabilityFilteringRule:过滤掉那些一直连接失败的且被标记为circuit tripped的后端Server,并过滤掉那些高并发的后端Server或者使用一个AvailabilityPredicate来包含过滤Server的逻辑。其实就是检查Status里记录的各个Server的运行状态。
- ZoneAvoidanceRule:使用ZoneAvoidancePredicate和AvailabilityPredicate来判断是否选择某个Server,前一个判断判定一个Zone的运行性能是否可用,剔除不可用的Zone(的所有Server),AvailabilityPredicate用于过滤掉连接数过多的Server。
- RandomRule:随机选择一个Server。
- RoundRobinRule:轮询选择,轮询index,选择index对应位置的Server。
- RetryRule:对选定的负载均衡策略机上重试机制,也就是说当选定了某个策略进行请求负载时在一个配置时间段内若选择Server不成功,则一直尝试使用subRule的方式选择一个可用的Server。
- ResponseTimeWeightedRule:作用同WeightedResponseTimeRule,ResponseTime-Weighted Rule后来改名为WeightedResponseTimeRule。
- WeightedResponseTimeRule:根据响应时间分配一个Weight(权重),响应时间越长,Weight越小,被选中的可能性越低。
自定义
通过实现IRule接口可以自定义负载策略,主要的选择服务逻辑在choose方法中。
public class MyRule implements IRule {

    private ILoadBalancer lb;

    @Override
    public Server choose(Object key) {
        List<Server> servers = lb.getAllServers();
        for (Server server : servers) {
            System.out.println(server.getHostPort());
        }
        return servers.get(0);
    }

    @Override
    public void setLoadBalancer(ILoadBalancer lb){
        this.lb = lb;
    }

    @Override
    public ILoadBalancer getLoadBalancer(){
        return lb;
    }

}
通过配置的方式使用自定义的负载策略。
ribbon-config-demo.ribbon.NFLoadBalancerRuleClassName = com.cxytiandi.ribbon_eureka_demo.rule.MyRule
Feign声明式REST客户端
Feign是一个声明式的HTTP 客户端,用于简化微服务之间的 RESTful 接口调用。它通过接口和注解定义API 规范,底层自动实现网络请求的发送与响应解析,避免了手动编写复杂的网络调用代码。Feign 最初由 Netflix 开发,后整合到 Spring Cloud 中,与 Eureka(注册中心),Ribbon(负载均衡)、Hystrix(熔断降级)等组件无缝集成,成为微服务架构中服务间通信的核心工具。
集成Feign
1 依赖集成
<dependency>
    <groupId>org.springframework.cloud</groupId>
    <artifactId>spring-cloud-starter-openfeign</artifactId>
</dependency>
spring-cloud-starter-openfeign集成了Feign 核心库以及Ribbon 负载均衡。
Feign 核心库:提供声明式接口定义、动态代理生成、请求 / 响应处理等核心功能。
Ribbon 负载均衡:内置 spring-cloud-starter-netflix-ribbon,实现客户端负载均衡(如轮询、随机策略)。
2 启动类,由于启动类扫描的范围默认仅扫描启动类所在包及其子包,如果Feign接口不在此范围无法被自动发现,我们可以通过@EnableFeignClients指定扫描的包名。
@SpringBootApplication
@EnableDiscoveryClient
@EnableFeignClients(basePackages = "com.fangjia.api.client")
public class FshSubstitutionServiceApplication {
    public static void main(String[] args) {
        SpringApplication.run(FshSubstitutionServiceApplication.class,args);
    }
}
3 定义接口(Feign客户端定义)
@FeignClient(value = "eureka-client-user-service")

public interface UserRemoteClient {

    @GetMapping("/user/hello")
    String hello();

}
@FeignClient 注解:
- value/name 属性
指定远程服务的 逻辑名称(如 Eureka 中的服务名 eureka-client-user-service),而非固定 URL。Feign 会通过服务发现(如 Eureka)将此名称解析为实际的实例列表。 - url 属性(可选)
若不使用服务发现,可直接指定固定 URL(如 url = “http://localhost:8081”),但生产环境中通常与服务发现结合使用。
4 调用接口
@Autowired
private UserRemoteClient userRemoteClient;

@GetMapping("/callHello")
public String callHello() {
    //return restTemplate.getForObject("http://localhost:8083/house/hello",
                                        String.class);
    //String result =
    restTemplate.getForObject("http://eureka-client-user-service/user/hello",String.class);
    String result = userRemoteClient.hello();
    System.out.println("调用结果:" + result);
    return result;
}
整个代码完整调用流程如下:
客户端启动:
- @EnableFeignClients 扫描 com.fangjia.api.client 包,发现 UserRemoteClient 接口,生成代理 Bean。
- @EnableDiscoveryClient 从 Eureka 拉取 eureka-client-user-service 的实例列表(如 8081、8083)。
接口调用触发: - 当访问 /callHello 时,注入的userRemoteClient代理对象被调用。
负载均衡选择实例: - Ribbon 按轮询策略选择实例(第一次 8081,第二次 8083,依此类推)。
发送 HTTP 请求: - Feign构建请求(GET http://localhost:8081/user/hello),通过 HttpURLConnection发送。
远程服务响应: - 目标服务返回数据(如 Hello from 8081),Feign 解析响应并返回给调用方。
日志与监控: - Feign 支持日志级别配置(如 loggerLevel: FULL),记录请求细节(URL、Headers、响应状态)。
Feign日志配置
我们可以通过Feign进行日志配置,让Feign把请求信息输出来。
@Configuration
public class FeignConfiguration {
    /**
        *日志级别
        *@return
        */
        @Bean
        Logger.Level feignLoggerLevel() {
            return Logger.Level.FULL;
        }
}
日志等级分为4种:
- NONE:不输出日志。
- BASIC:只输出请求方法的URL和响应的状态码以及接口执行的时间。
- HEADERS:将BASIC信息和请求头信息输出。
- FULL:输出完整的请求信息。
契约配置
Spring Cloud在Feign的基础上做了扩展,可以让Feign支持Spring MVC的注解来调用。原生的Feign是不支持Spring MVC注解的。如果想在Spring Cloud中使用原生的注解方式来定义客户端也是可以的,通过配置契约来改变这个配置,Spring Cloud中默认的是SpringMvcContract。当我们想用原生注解的时候可以使用以下配置。
@Configuration
public class FeignConfiguration {

    @Bean
    public Contract feignContract() {
        return new feign.Contract.Default();
    }
}
Basic认证配置
在 Feign 中配置 Basic 认证,核心是通过请求拦截器向所有 Feign 请求添加 Authorization 头,包含 Base64 编码的用户名和密码。
实现逻辑:
- 客户端:在发送请求前,自动添加 Authorization 头(通过拦截器)。
- 服务端:解析请求头,验证用户名和密码是否合法(如通过 Spring Security)。
优点:简单通用,无需额外 Cookie 或 Token 存储;
缺点:密码 Base64 编码非加密,需配合 HTTPS 使用。
1 添加依赖
<dependency>
    <groupId>org.springframework.cloud</groupId>
    <artifactId>spring-cloud-starter-openfeign</artifactId>
</dependency>
配置实现拦截器有两种方式:1 内置 2 自定义,配置好后,当Feign去请求接口的时候,每次请求之前都会进入FeignBasicAuthRequestInterceptor的apply方法
2 方式一: 配置内置拦截器实现
@Configuration
public class FeignConfiguration {

    @Bean
    public BasicAuthRequestInterceptor basicAuthRequestInterceptor(){
        return new BasicAuthRequestInterceptor("user","password"); // 内置拦截器,直接使用
    }

}
BasicAuthRequestInterceptor 是Spring Cloud Feign 提供的内置拦截器,专门用于添加 Basic 认证头,无需手动实现编码逻辑。构造函数接收用户名和密码,内部自动完成 username:password 的 Base64 编码,并添加到请求头。
流程: 用户通过 @Bean 将 RequestInterceptor 类型的 Bean 注册到 Spring 容器,Feign 客户端初始化时,从 Spring 容器中获取所有 RequestInterceptor Bean,按 Bean 的加载顺序组成请求拦截链,每个 Feign 请求发送前,依次调用拦截链中的 apply 方法。
3 方式二:自定义拦截器实现
public class FeignBasicAuthRequestInterceptor implements RequestInterceptor {
    private final String username;
    private final String password;

    // 建议添加构造函数注入用户名和密码
    public FeignBasicAuthRequestInterceptor(String username, String password) {
        this.username = username;
        this.password = password;
    }

    @Override
    public void apply(RequestTemplate template) {
        // 手动拼接用户名和密码,进行 Base64 编码
        String auth = username + ":" + password;
        String encodedAuth = Base64.getEncoder().encodeToString(auth.getBytes());
        // 添加认证头(核心逻辑)
        template.header("Authorization", "Basic " + encodedAuth);
    }
}
4 注册自定义拦截器
@Configuration
public class FeignConfiguration {
    @Bean
    public FeignBasicAuthRequestInterceptor basicAuthRequestInterceptor() {
        // 注入时指定用户名和密码(从配置文件或环境变量获取更安全)
        return new FeignBasicAuthRequestInterceptor("user", "password");
    }
}
Feign常见配置
Feign中还有很多其他配置,这里简单介绍一下。
- 客户端基础配置:Feign 支持 全局配置(对所有 Feign 客户端生效)和 局部配置(针对特定服务客户端),可通过属性文件或 Java 配置类实现。
1 全局配置
在 application.yml 中配置 feign.client.config.default(default 表示全局默认):
feign:
  client:
    config:
      default:
        # 连接超时时间(毫秒)
        connectTimeout: 5000
        # 读取超时时间(毫秒)
        readTimeout: 10000
        # 日志级别(NONE, BASIC, HEADERS, FULL)
        loggerLevel: BASIC
        # 契约(默认使用 SpringMvcContract,解析@RequestMapping 注解)
        contract: org.springframework.cloud.openfeign.contract.SpringMvcContract
2 局部配置
针对某个 Feign 客户端(如服务名为 order-service):
feign:
  client:
    config:
      order-service:
        connectTimeout: 3000
        readTimeout: 8000
        loggerLevel: FULL
- 编解码器配置
Feign 支持自定义请求 / 响应的序列化 / 反序列化方式,默认使用 Spring 的 SpringEncoder 和 SpringDecoder(基于 Jackson)。
@Configuration
public class FeignCodecConfig {
    @Bean
    public Encoder feignEncoder() {
        return new GsonEncoder(); // 自定义编码器(如 GsonEncoder)
    }

    @Bean
    public Decoder feignDecoder() {
        return new CustomDecoder(); // 自定义解码器
    }
}
- 压缩配置
减少网络传输数据量,支持对请求和响应进行压缩,需配置压缩条件(如数据大小阈值)。
feign:
  compression:
    request:
      enabled: true       # 开启请求压缩
      mime-types: text/html,application/json  # 压缩的 MIME 类型
      min-request-size: 2048  # 触发压缩的最小请求大小(字节)
    response:
      enabled: true       # 开启响应压缩
- 负载均衡与重试配置
Feign 集成 Ribbon 实现负载均衡,可配置重试策略(默认不重试),结合 Hystrix(或 Resilience4j)实现熔断降级。
1 Ribbon 负载均衡配置(局部,针对服务):
order-service:
  ribbon:
    NFLoadBalancerRuleClassName: com.netflix.loadbalancer.RandomRule  # 随机负载均衡策略
    ConnectTimeout: 5000                                             # 连接超时
    ReadTimeout: 10000                                              # 读取超时
2 重试配置(通过 @Bean 注入 Retryer):
@Configuration
public class FeignRetryConfig {
    @Bean
    public Retryer feignRetryer() {
        // 自定义重试策略(默认 Retryer.NEVER_RETRY)
        return new DefaultRetryer(100, TimeUnit.SECONDS.toMillis(1), 3);
        // 参数:初始间隔(毫秒)、最大间隔(毫秒)、重试次数
    }
}
3 Hystrix 熔断配置(需引入 spring-cloud-starter-netflix-hystrix)(下期博客介绍)
feign:
  hystrix:
    enabled: true  # 开启 Hystrix
hystrix:
  command:
    default:
      execution:
        timeout:
          enabled: true
        isolation:
          strategy: SEMAPHORE  # 隔离策略(SEMAPHORE/THREAD)
          thread:
            timeoutInMilliseconds: 15000  # 熔断超时时间
- 通过扩展高级自定义配置
Feign 提供丰富的扩展接口,可通过 @Bean 注入自定义实现:

- 配置优先级
Feign 的配置优先级从高到低依次为:
1 局部配置(@FeignClient 中指定的 configuration 类)
2 服务特定配置(feign.client.config.服务名)
3 全局默认配置(feign.client.config.default)
4 Feign 默认值(如不配置则使用 Feign 内置的默认参数)
参考文献
Spring Cloud微服务:入门、实战与进阶 尹吉欢
总结
本期分模块介绍了SpringCloud中常用的组件包括Eureka, Ribbon 以及 Feign,下期会继续进行介绍Hystrix以及API网关Zuul。感谢的小伙伴可以关注一下博主,下期更精彩。
写在文末
有疑问的友友,欢迎在评论区交流,笔者看到会及时回复。
请大家一定一定要关注!!!
请大家一定一定要关注!!!
请大家一定一定要关注!!!
友友们,你们的支持是我持续更新的动力~


 1261
1261

 被折叠的 条评论
为什么被折叠?
被折叠的 条评论
为什么被折叠?
 到【灌水乐园】发言


