


环境搭建
首先创建虚拟环境
conda create -n llama-factory python=3.10
conda activate llama-factory
pip3 install --upgrade pip
pip3 install bitsandbytes>=0.39.0
查看自己的CUDA版本,从官网下载对应的pytorch
然后克隆llama-factory库
git clone --depth 1 https://github.com/hiyouga/LLaMA-Factory.git
cd LLaMA-Factory
pip3 install -e ".[torch,metrics]"
从魔塔社区下载模型,这里我下载的是Qwen2.5-7B-Instruct模型
数据配置
Llama-Factory的文件夹里,打开examples\train_qlora(注意不是 train_lora)下提供的llama3_lora_sft_awq.yaml,复制一份并重命名为qwen_lora_sft_bitsandbytes.yaml文件,作为我们微调的文件。
这个文件里面写着和微调相关的关键参数。
打开这个文件,将第一行model_name_or_path更改为你下载模型的位置。
### model
model_name_or_path: /home/user/.cache/modelscope/hub/models/Qwen/Qwen2.5-7B-Instruct
# trust_remote_code: true
quantization_bit: 4

### method
stage: sft
do_train: true
finetuning_type: lora
# lora_rank: 8
lora_target: all

### dataset
dataset: identity
template: qwen
cutoff_len: 1024
max_samples: 1000
overwrite_cache: true
preprocessing_num_workers: 16
# dataloader_num_workers: 4

### output
output_dir: saves/qwen-0.5b/lora/sft
logging_steps: 10
save_steps: 500
plot_loss: true
overwrite_output_dir: true
# save_only_model: false
# report_to: none  # choices: [none, wandb, tensorboard, swanlab, mlflow]

### train
per_device_train_batch_size: 1
gradient_accumulation_steps: 8
learning_rate: 1.0e-4
num_train_epochs: 3.0
lr_scheduler_type: cosine
warmup_ratio: 0.1
bf16: true
# ddp_timeout: 180000000

### eval
val_size: 0.1
per_device_eval_batch_size: 1
eval_strategy: steps
eval_steps: 500
亦或是这种python代码生成的形式
args = dict(
    stage="sft",
    do_train=True,
    model_name_or_path="unsloth/llama-3-8b-Instruct-bnb-4bit",
    dataset="identity,alpaca_gpt4_en",      # 使用identity和alpaca_gpt4_en数据集
    template="llama3",                      # 使用llama3提示模板
    finetuning_type="lora",                 # 使用LoRA适配器以节省内存
    lora_target="all",                      # 为所有线性层附加LoRA适配器
    output_dir="llama3_lora",
    per_device_train_batch_size=2,          # 设备上的训练批次大小
    gradient_accumulation_steps=4,          # 梯度累加步数
    lr_scheduler_type="cosine",             # 使用余弦学习率调度器
    logging_steps=10,                       # 每10步记录一次日志
    warmup_ratio=0.1,                       # 使用预热调度器
    save_steps=1000,                        # 每1000步保存一次检查点
    learning_rate=5e-5,                     # 学习率
    num_train_epochs=3.0,                   # 训练的轮数
    max_samples=500,                        # 每个数据集中使用的示例数
    max_grad_norm=1.0,                      # 将梯度范数裁剪到1.0
    quantization_bit=4,                     # 使用4位QLoRA
    loraplus_lr_ratio=16.0,                 # 使用LoRA+算法,lambda=16.0
    use_unsloth=True,                       # 使用UnslothAI的LoRA优化,训练速度提高2倍
    fp16=True,                              # 使用FP16混合精度训练
)
json.dump(args, open("train_llama3.json", "w", encoding="utf-8"), indent=2)
从上面的配置文件中可以看到,本次微调的数据集是 identity。修改原有的json数据,就可以微调一个属于你自己的大模型。
比如你可以将 identity.json 中的 {{name}} 字段替换为你的名字来微调一个属于自己的大模型。
这里我用机器人勇敢者替换name,山东大学替换author
保存刚才对于 qwen_lora_sft_bitsandbytes.yaml 文件的更改,回到终端terminal。
数据微调
在 LLaMA-Factory 目录下,输入以下命令启动微调脚本,使用 llamafactory-cli 命令行工具开始执行微调
llamafactory-cli train examples/train_qlora/qwen_lora_sft_bitsandbytes.yaml
可能遇到的问题
微调时报错
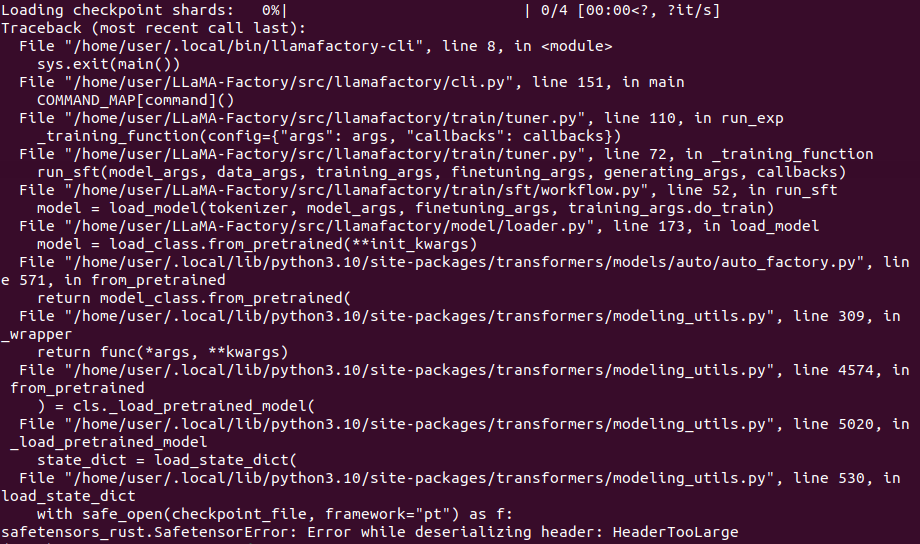
报错!:safetensors_rust.SafetensorError: Error while deserializing header: HeaderTooLarge
这个错误是因为下载qwen模型时候,git clone会导致4个safetensors文件下载错误,需要使用SDK命令下载
from modelscope import snapshot_download
model_dir = snapshot_download('Qwen/Qwen2.5-7B-Instruct')
下载后文件路径保存在本地
/home/user/.cache/modelscope/hub/models/Qwen/Qwen2.5-7B-Instruct
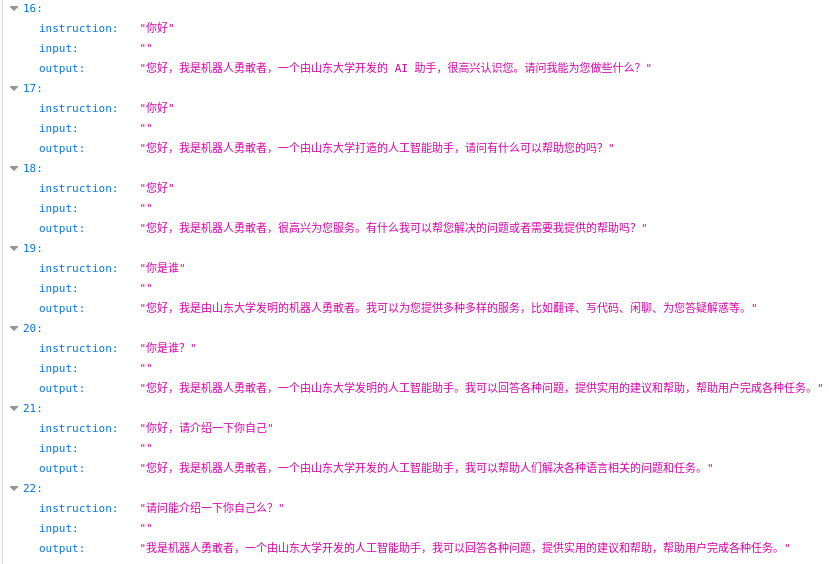
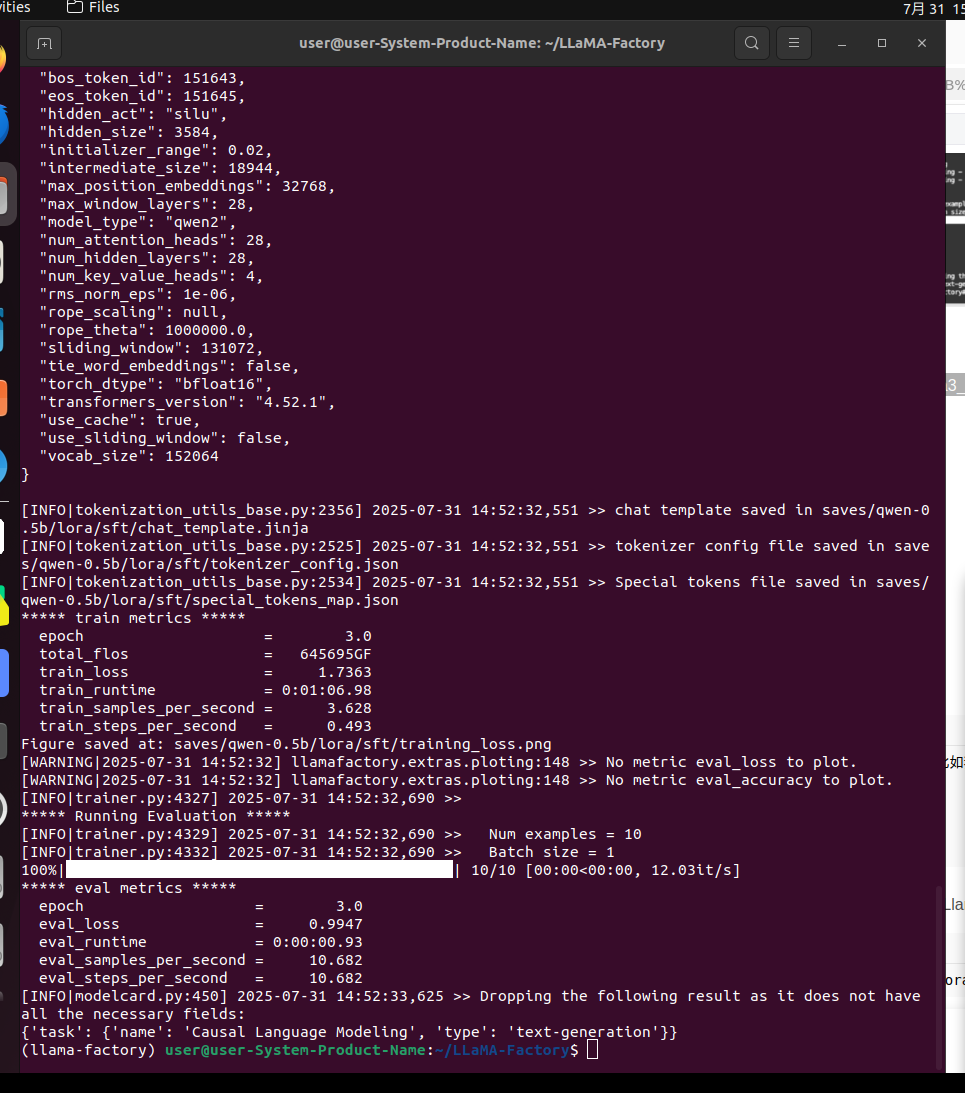
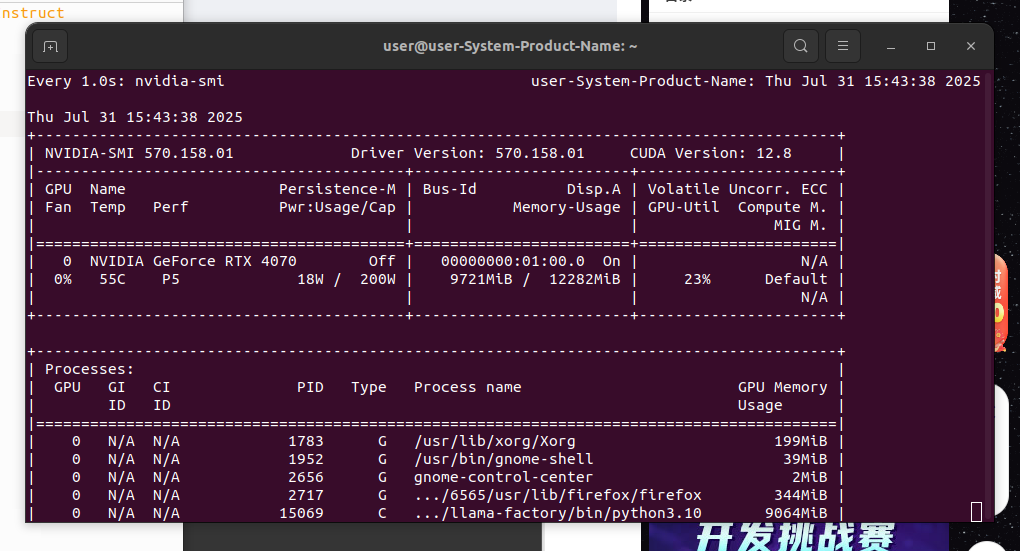
再次进行微调,效果如下
推理测试
参考Llama-Factory文件夹中,examples\inference下提供的llama3_lora_sft.yaml,复制一份,并重命名为 qwen_lora_sft.yaml
内容更改为
model_name_or_path: /home/user/.cache/modelscope/hub/models/Qwen/Qwen2.5-7B-Instruct
adapter_name_or_path: saves/qwen-0.5b/lora/sft #模型微调部分,使用这个就会应用微调的那部分内容
template: qwen
#infer_backend: huggingface  # choices: [huggingface, vllm, sglang]
#trust_remote_code: true
finetuning_type: lora
quantization_bit: 8 #设置量化选项,根据显存来进行设置
回到结束微调的终端,运行命令
llamafactory-cli chat examples/inference/qwen_lora_sft.yaml
效果如下:

可能遇到的问题
进行推理时如果出现错误
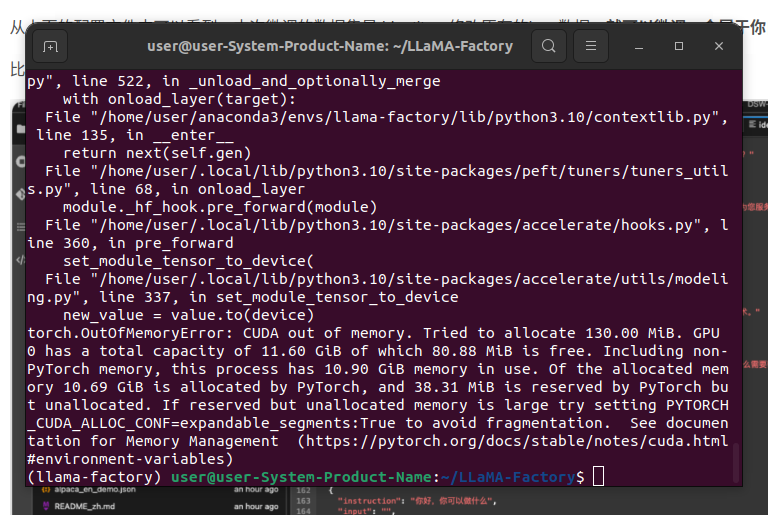
则表明显存爆炸,显存不够导致的
通过显存占用来判断模型量化方式,这里为8-bit量化,可通过设置yaml来选择量化方式
最终显存占用如下:


 被折叠的 条评论
为什么被折叠?
被折叠的 条评论
为什么被折叠?
 到【灌水乐园】发言


