


一 题目介绍
Linux驱动程序占内核代码一半以上,开发设计驱动程序是Linux内核编程的一项很重要的工作。过本次实验,应了解Linux的设备管理机制和驱动程序的框架结构:掌握Linux设备驱动程序的编写流程和加载方法,为从事具体的硬件设备驱动程序开发打下基础。
内容要求:
编写一个字符设备驱动程序。实现对该字符设备的打开、读、写、I/O控制和关闭五个基本操作。为了避免牵涉到汇编语言,字符设备并非一个真实的字符设备,而是用一段内核空间来模拟的。以模块的方式加载该驱动程序。
二 实验思路
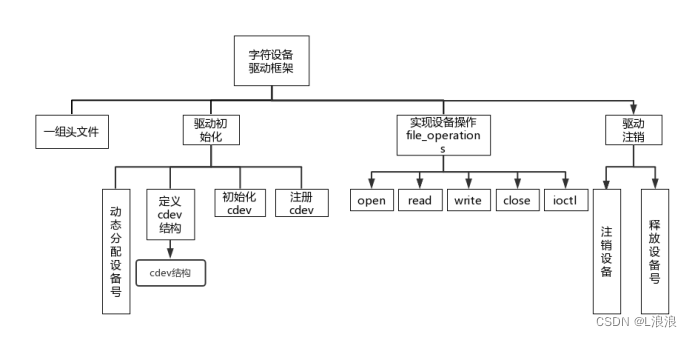
图1:字符设备驱动程序框架图
三 遇到问题及解决方法
1.对ioctl函数中的int cmd参数的构建方法不清楚,通过学习_IO(IOC_MAGIC, 0)宏构建了三个简单的cmd。
2.在华为云上编译的时候一直在报错,查阅资料之后发现是关于设备驱动的函数代码随着版本更新已经改变了,课本上的代码有一些错误,比如unlocked_ioctl的返回值类型变成了long,定义file_operations时要加 = 。
3.根据书本提到的设备初始化、注销的一系列API,在网上查阅资料,熟悉参数之后,都成功实现了功能。
四 核心代码及实验结果展示
- #include <linux/module.h>
- #include <linux/init.h>
- #include <linux/fs.h>
- #include <linux/kernel.h>
- #include <linux/slab.h>
- #include <linux/types.h>
- #include <linux/errno.h>
- #include <linux/cdev.h>
- #include <linux/uaccess.h>
- #include <linux/ioctl.h>
- #define MAX_BUF_SIZE 1024
- #define IOC_MAGIC 'c'
- #define IOCTEST0 _IO(IOC_MAGIC, 0)
- #define IOCTEST1 _IO(IOC_MAGIC, 1)
- #define IOCTEST2 _IO(IOC_MAGIC, 2)
- //#define _IO(type,nr) _IOC(_IOC_NONE,(type),(nr),0)
- //构造无参数的命令cmd编号
- /*
- | 设备类型 | 序列号 | 方向 | 数据尺寸 |
- |-------------|----------|-------|------------|
- | 8 bit | 8 bit | 2 bit | 8~14 bit|
- |-------------|----------|-------|------------|
- */
- static struct cdev my_cdev;
- int major = 0;
- static char *data = NULL;//指向为设备开辟的数据区的指针
- static int my_open(struct inode *inode, struct file *file)
- {
- data = (char*)kmalloc(sizeof(char) * MAX_BUF_SIZE, GFP_KERNEL);//GFP_KERNEL内核内存的通常分配方法
- if (!data)
- return -ENOMEM;//Out of memory
- memset(data, 0, MAX_BUF_SIZE);
- printk("device open.\n");
- return 0;
- }
- static int my_release(struct inode *inode, struct file *file)
- {
- if (data)
- {
- kfree(data);
- data = NULL;
- }
- printk("device release.\n");
- return 0;
- }
- static ssize_t my_read(struct file *file, char __user*buf, size_t count, loff_t *offp)
- {
- if (offp > 10)
- return 0;
- if (count < 0)
- return -EINVAL;//参数错误
- if (count > MAX_BUF_SIZE)
- count = MAX_BUF_SIZE;
- if (copy_to_user(buf, data, count) == EFAULT)
- return -EFAULT;
- printk("my_write\n");
- return count;
- }
- static long my_ioctl(struct file *filp, unsigned int cmd, unsigned long arg)
- {
- printk("my_ioctl\n");
- switch(cmd)
- {
- case IOCTEST0:
- printk("ioctl_test0\n");
- break;
- case IOCTEST1:
- printk("ioctl_test1\n");
- break;
- case IOCTEST2:
- printk("ioctl_test2\n");
- break;
- default:
- return -ENOTTY;
- }
- return 0;
- }
- static struct file_operations my_cdev_fops =
- {
- .owner = THIS_MODULE,
- .read = my_read,
- .write= my_write,
- .open = my_open,
- .release = my_release,
- .unlocked_ioctl = my_ioctl,
- };
- static int init_cdev(void)
- {
- dev_t dev = MKDEV(major, 0); //MKDEV(int major, int minor);
- int ret = alloc_chrdev_region(&dev, 0, 1, (char*)"my_cdev");//动态分配设备号
- if(ret < 0)
- {
- printk(KERN_WARNING"分配设备号失败\n");
- return ret;
- }
- major = MAJOR(dev);
- cdev_init(&my_cdev, &my_cdev_fops);
- my_cdev.owner = THIS_MODULE;
- int errno = cdev_add(&my_cdev, dev, 1); //注册cdev结构,将设备号和cdev结构体加入cdev_map散列表
- if(errno < 0)
- {
- printk(KERN_WARNING"cdev注册失败\n");
- return errno;
- }
- printk("my_cdev init\n");
- return 0;
- }
- static void exit_cdev(void)
- {
- cdev_del(&my_cdev);
- unregister_chrdev_region(MKDEV(major, 0), 1);//释放设备号
- printk("my_cdev exit\n");
- }
- module_init(init_cdev);
- module_exit(exit_cdev);
- MODULE_LICENSE("GPL");
驱动模块代码
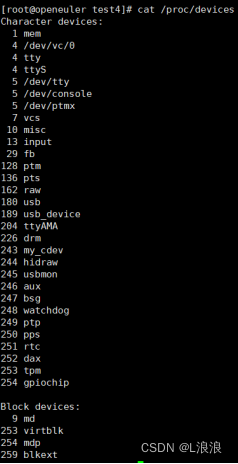
图1:通过insmod加载驱动模块后,cat /proc/devices可以看到my_cdev的major号为243

图2:手动建立设备节点,并给设备设置777的权限
![]()
图3:在/dev目录下就可以看到我们的设备了,权限也是我们刚刚设置的777
- #include <stdio.h>
- #include <stdlib.h>
- #include <string.h>
- #include <sys/stat.h>
- #include <sys/types.h>
- #include <unistd.h>
- #include <fcntl.h>
- #include <sys/ioctl.h>
- #define DEV_NAME "/dev/my_cdev"
- #define BUF_SIZE 1024
- #define IOC_MAGIC 'c'
- #define IOCTEST0 _IO(IOC_MAGIC, 0)
- #define IOCTEST1 _IO(IOC_MAGIC, 1)
- #define IOCTEST2 _IO(IOC_MAGIC, 2)
- int main(int argc, char const *argv[])
- {
- int fd;
- char buffer[BUF_SIZE];
- fd = open(DEV_NAME, O_RDWR);
- if (fd < 0)
- {
- perror("open dev fail!\n");
- return -1;
- }
- open(NULL, fd);
- read(fd, buffer, 1);
- write(fd, buffer, 1);
- ioctl(fd, IOCTEST0);
- ioctl(fd, IOCTEST1);
- ioctl(fd, IOCTEST2);
- return 0;
- }
编写一个简单的测试代码,主要通过printk验证功能
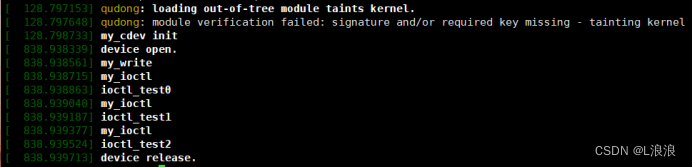
图4:设备可以正常运行


 1276
1276

 被折叠的 条评论
为什么被折叠?
被折叠的 条评论
为什么被折叠?
 到【灌水乐园】发言


