


 本文讨论了如何通过引入非线性激活函数,如ReLU,提升机器学习模型的复杂性和逼近能力。通过比较不同结构的神经网络(如添加中间矩阵),文章展示了如何利用非线性使矩阵尺寸增大从而增强模型性能,最终实现更精确的预测。
之前的模型在两个矩阵上,无论多少矩阵,相乘起来都是线性的模型。
How can we use this simplicity of linear algebra but have advanced models?
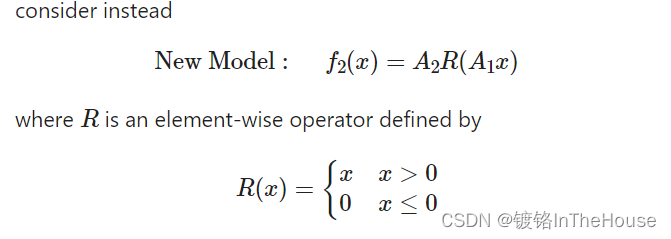
The Crux of Machine Learning: This lies in so-called activation functions, which add ever-so-slight non-linearities to a sequence of matrix transformations.
激活函数
- 激活函数的用途?
如果不用激励函数(其实相当于激励函数是f(x) = x),在这种情况下你每一层节点的输入都是上层输出的线性函数,很容易验证,无论你神经网络有多少层,输出都是输入的线性组合,与没有隐藏层效果相当,这种情况就是最原始的感知机(Perceptron)了,那么网络的逼近能力就相当有限。正因为上面的原因,我们决定引入非线性函数作为激励函数,这样深层神经网络表达能力就更加强大(不再是输入的线性组合,而是几乎可以逼近任意函数)。 - 有哪些激活函数,都有什么性质和特点?
早期研究神经网络主要采用sigmoid函数或者tanh函数,输出有界,很容易充当下一层的输入。近些年Relu函数及其改进型(如Leaky-ReLU、P-ReLU、R-ReLU等)在多层神经网络中应用比较多。
How much better does our model do with this simple adjustment?
class MyNeuralNet2(nn.Module):
    def __init__(self):
        super().__init__()
        self.Matrix1 = nn.Linear(2,8,bias=False)
        self.Matrix2 = nn.Linear(8,1,bias=False)
        self.R = nn.ReLU()"changed"
    def forward(self,x):
        x = self.R(self.Matrix1(x))"changed"
        x = self.Matrix2(x)
        return x.squeeze()
Slightly better. But the real advantage of this slight non-linearity is that we can make our matrices much larger. Lets make our matrices size 80x2 and 1x80. This only works because of our non-linearity function R(x):
class MyNeuralNet3(nn.Module):
    def __init__(self):
        super().__init__()
        self.Matrix1 = nn.Linear(2,80, bias=False)
        self.Matrix2 = nn.Linear(80,1, bias=False)
        self.R = nn.ReLU()
    def forward(self,x):
        x = self.R(self.Matrix1(x))
        x = self.Matrix2(x)
        return x.squeeze()
x = torch.tensor([[6,2],[5,2],[1,3],[7,6]]).float()
y = torch.tensor([1,5,2,5]).float()
f3 = MyNeuralNet3()

# Train model
f3, losses3 = train_model(x,y,f3, n_epochs=5000)
Closer, but still not exact. ADD BIAS.

class MyNeuralNet4(nn.Module):
    def __init__(self):
        super().__init__()
        self.Matrix1 = nn.Linear(2,80)"default bias=true"
        self.Matrix2 = nn.Linear(80,1)"default bias=true"
        self.R = nn.ReLU()
    def forward(self,x):
        x = self.R(self.Matrix1(x))
        x = self.Matrix2(x)
        return x.squeeze()
Better, but its still not getting us that close to y, however. What if we add another matrix in the middle?

class MyNeuralNet5(nn.Module):
    def __init__(self):
        super().__init__()
        self.Matrix1 = nn.Linear(2,80)
        self.Matrix2 = nn.Linear(80,80)"here!"
        self.Matrix3 = nn.Linear(80,1)
        self.R = nn.ReLU()
    def forward(self,x):
        x = self.R(self.Matrix1(x))
        x = self.R(self.Matrix2(x))"and here!"
        x = self.Matrix3(x)
        return x.squeeze()

x = torch.tensor([[6,2],[5,2],[1,3],[7,6]]).float()
y = torch.tensor([1,5,2,5]).float()
f5 = MyNeuralNet5()

# Train model
f5, losses5 = train_model(x,y,f5, n_epochs=5000)
tensor([1., 5., 2., 5.])
tensor([0.9995, 4.9961, 1.9994, 4.9981], grad_fn=)
Its predicting y almost exactly
The “Sequential” Neural Network


 162
162

 被折叠的 条评论
为什么被折叠?
被折叠的 条评论
为什么被折叠?
 到【灌水乐园】发言


