


 本文介绍了一种基于深度相机的端到端MotionPolicyNetworks(MπNets),在未知环境中生成实时且无碰撞的机器人运动轨迹。通过大规模数据集和神经网络模型,MπNets在各种场景中表现出46%的成功率提升,同时解决了传统方法的局限性,如速度、流畅性和复杂环境下的路径规划问题。
Motion Policy Networks
- cuRobo: Parallelized Collision-Free Minimum-Jerk Robot Motion Generation
- CabiNet: Scaling Neural Collision Detection for Object Rearrangement with Procedural Scene Generation.
Keywords
Robotics; Motion Planning; Imitation Learning; End-to-end Learning
abstract
未知环境下的无碰撞的运动轨迹生成。
- 实时的→需要快速的生成速度
- 可靠的
提出了:端到端的Motion Policy Networks(MπNets)[仅依赖一个深度相机]。
what we do
-
工作量大:超过300万个motion planning problems, 涉及三种类型场景中超过50万个实例,比以前的工作大300倍。
-
reactive, end-to-end neural policy. In (point clouds) → moves to task space targets → avoid obstacles.
faster than baseline.
-
dataset benchmarks: MπNets 46% more successful.
-
sim2real.


Related research
Global planning
机器人运动规划通常分为三个阵营:搜索、采样和基于优化的规划。
-
Search: A*
- discrete domains
-
Sampling: RRT
- continuous domains
-
Optimization-based planning
- can produce smooth paths to a goal
- per-task basis
Local Control
用于生成collision-free motions.
优先考虑速度和流畅性,但是面对复杂环境难以生成有效路径。
Imitation Learning
- Inverse Reinforcement Learning
- Behavior Cloning
我们的方法旨在通过专门设计一个可学习的专家,增加数据的规模和变化,并使用足够表达力的策略模型,以克服行为克隆的常见挑战。
Problem
Input
-
机器人配置 q t . q_t. qt.(normalize, the limits for the corresponding joint)
q t → q t ∥ ⋅ ∥ q _ { t } \rightarrow q _ { t } ^ { \| \cdot \| } qt→qt∥⋅∥ [-1,1]
-
分割、校准的点云 z t . z_t. zt.
Prediction
Network produces a displacement within normalized configuration space q t ˙ ∥ ⋅ ∥ \dot{q_t}^{\| \cdot \|} qt˙∥⋅∥.
Next predicted state:
q
^
t
+
1
=
q
t
∥
⋅
∥
+
q
t
˙
∥
⋅
∥
\hat{q}_{t+1} = {q_t}^{\| \cdot \|} + \dot{q_t}^{\| \cdot \|}
q^t+1=qt∥⋅∥+qt˙∥⋅∥
Model Architecture
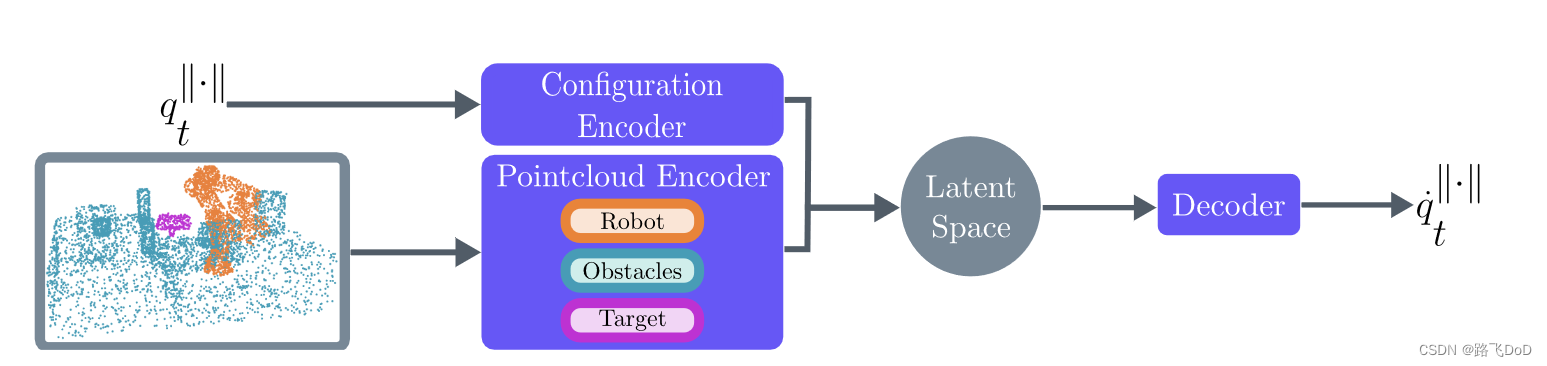
Configuration and Decoder are both fully connected multilayer perceptron.
"""
Constructs the model
"""
super().__init__()
self.point_cloud_encoder = MPiNetsPointNet()
self.feature_encoder = nn.Sequential(
    nn.Linear(7, 32),
    nn.LeakyReLU(),
    nn.Linear(32, 64),
    nn.LeakyReLU(),
    nn.Linear(64, 128),
    nn.LeakyReLU(),
    nn.Linear(128, 128),
    nn.LeakyReLU(),
    nn.Linear(128, 64),
)
self.decoder = nn.Sequential(
    nn.Linear(2048 + 64, 512),
    nn.LeakyReLU(),
    nn.Linear(512, 256),
    nn.LeakyReLU(),
    nn.Linear(256, 128),
    nn.LeakyReLU(),
    nn.Linear(128, 7),
)
def forward(self, xyz: torch.Tensor, q: torch.Tensor) -> torch.Tensor:  # type: ignore[override]
        """
        Passes data through the network to produce an output

        :param xyz torch.Tensor: Tensor representing the point cloud. Should
                                      have dimensions of [B x N x 4] where B is the batch
                                      size, N is the number of points and 4 is because there
                                      are three geometric dimensions and a segmentation mask
        :param q torch.Tensor: The current robot configuration normalized to be between
                                    -1 and 1, according to each joint's range of motion
        :rtype torch.Tensor: The displacement to be applied to the current configuration to get
                     the position at the next step (still in normalized space)
        """
        pc_encoding = self.point_cloud_encoder(xyz)
        feature_encoding = self.feature_encoder(q)
        x = torch.cat((pc_encoding, feature_encoding), dim=1)
        return self.decoder(x)
PointNet++
class MPiNetsPointNet(pl.LightningModule):
    def __init__(self):
        super().__init__()
        self._build_model()

    def _build_model(self):
        """
        Assembles the model design into a ModuleList
        """
        self.SA_modules = nn.ModuleList()
        self.SA_modules.append(
            PointnetSAModule(
                npoint=512,		# 采样的点数,即每次从输入点云中随机选择的点的数量
                radius=0.05,	# 用于确定每个采样点的邻域半径,即在该半径范围内的点将用于采样
                nsample=128,	# 每个采样点在邻域内选择的点的数量
                mlp=[1, 64, 64, 64],	# 多层感知机(MLP)的结构,定义了特征提取的网络结构
                bn=False,		# 是否使用批归一化(Batch Normalization)
            )
        )
        self.SA_modules.append(
            PointnetSAModule(
                npoint=128,
                radius=0.3,
                nsample=128,
                mlp=[64, 128, 128, 256],
                bn=False,
            )
        )
        self.SA_modules.append(PointnetSAModule(mlp=[256, 512, 512, 1024], bn=False))

        self.fc_layer = nn.Sequential(
            nn.Linear(1024, 4096),
            nn.GroupNorm(16, 4096),		# nn.GroupNorm(num_groups, num_channels, eps=1e-05, affine=True)
            nn.LeakyReLU(inplace=True),
            nn.Linear(4096, 2048),
            nn.GroupNorm(16, 2048),
            nn.LeakyReLU(inplace=True),
            nn.Linear(2048, 2048),
        )

    @staticmethod
    def _break_up_pc(pc: torch.Tensor) -> Tuple[torch.Tensor, torch.Tensor]:
        """
        Breaks up the point cloud into the xyz coordinates and segmentation mask

        :param pc torch.Tensor: Tensor with shape [B, N, M] where M is larger than 3.
                                The first three dimensions along the last axis will be x, y, z
        :rtype Tuple[torch.Tensor, torch.Tensor]: Two tensors, one with just xyz
            and one with the corresponding features
        """
        xyz = pc[..., 0:3].contiguous()
        features = pc[..., 3:].transpose(1, 2).contiguous()
        return xyz, features

    def forward(self, point_cloud: torch.Tensor) -> torch.Tensor:  # type: ignore[override]
        """
        Forward pass of the network

        :param point_cloud torch.Tensor: Has dimensions (B, N, 4)
                                              B is the batch size
                                              N is the number of points
                                              4 is x, y, z, segmentation_mask
                                              This tensor must be on the GPU (CPU tensors not supported)
        :rtype torch.Tensor: The output from the network
        """
        assert point_cloud.size(2) == 4
        xyz, features = self._break_up_pc(point_cloud)
		# xyz->(B,N,3) features->(B,1,N)
        for module in self.SA_modules:
            xyz, features = module(xyz, features)

        return self.fc_layer(features.squeeze(-1))
Loss Function
Geometric Loss for Behavior Cloning

def point_match_loss(input_pc: torch.Tensor, target_pc: torch.Tensor) -> torch.Tensor:
    """
    A combination L1 and L2 loss to penalize large and small deviations between
    two point clouds

    :param input_pc torch.Tensor: Point cloud sampled from the network's output.
                                  Has dim [B, N, 3]
    :param target_pc torch.Tensor: Point cloud sampled from the supervision
                                   Has dim [B, N, 3]
    :rtype torch.Tensor: The single loss value
    """
    return F.mse_loss(input_pc, target_pc, reduction="mean") + F.l1_loss(
        input_pc, target_pc, reduction="mean"
    )
Collision Loss

signed-distance functions (SDF).
def collision_loss(
    input_pc: torch.Tensor,
    cuboid_centers: torch.Tensor,
    cuboid_dims: torch.Tensor,
    cuboid_quaternions: torch.Tensor,
    cylinder_centers: torch.Tensor,
    cylinder_radii: torch.Tensor,
    cylinder_heights: torch.Tensor,
    cylinder_quaternions: torch.Tensor,
) -> torch.Tensor:
    """
    Calculates the hinge loss, calculating whether the robot (represented as a
    point cloud) is in collision with any obstacles in the scene. Collision
    here actually means within 3cm of the obstacle--this is to provide stronger
    gradient signal to encourage the robot to move out of the way. Also, some of the
    primitives can have zero volume (i.e. a dim is zero for cuboids or radius or height is zero for cylinders).
    If these are zero volume, they will have infinite sdf values (and therefore be ignored by the loss).

    :param input_pc torch.Tensor: Points sampled from the robot's surface after it
                                  is placed at the network's output prediction. Has dim [B, N, 3]
    :param cuboid_centers torch.Tensor: Has dim [B, M1, 3]
    :param cuboid_dims torch.Tensor: Has dim [B, M1, 3]
    :param cuboid_quaternions torch.Tensor: Has dim [B, M1, 4]. Quaternion is formatted as w, x, y, z.
    :param cylinder_centers torch.Tensor: Has dim [B, M2, 3]
    :param cylinder_radii torch.Tensor: Has dim [B, M2, 1]
    :param cylinder_heights torch.Tensor: Has dim [B, M2, 1]
    :param cylinder_quaternions torch.Tensor: Has dim [B, M2, 4]. Quaternion is formatted as w, x, y, z.
    :rtype torch.Tensor: Returns the loss value aggregated over the batch
    """

    cuboids = TorchCuboids(
        cuboid_centers,
        cuboid_dims,
        cuboid_quaternions,
    )
    cylinders = TorchCylinders(
        cylinder_centers,
        cylinder_radii,
        cylinder_heights,
        cylinder_quaternions,
    )
    sdf_values = torch.minimum(cuboids.sdf(input_pc), cylinders.sdf(input_pc))
    return F.hinge_embedding_loss(
        sdf_values,
        -torch.ones_like(sdf_values),
        margin=0.03,
        reduction="mean",
    )
Procedural Data Generation
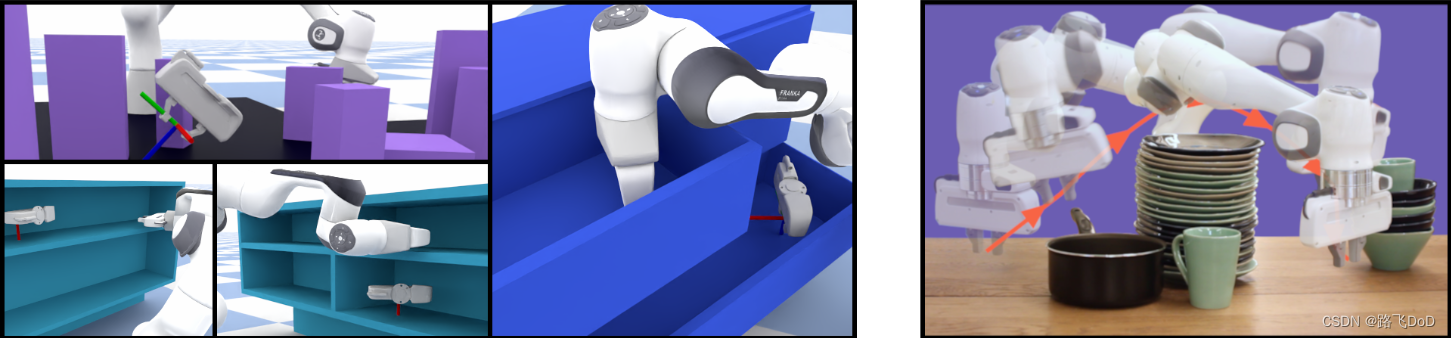
planning problem: 1. the scene geometry 2. the start configuration 3. the goal pose.
3.27million problems over 575,000 environments.
Expert Pipeline
产生高质量的演示数据:平滑、一致的运动和短程路径的轨迹。
考虑两个专家候选者:
- Global Planner: a typical SOTA configuration space planning pipeline.配置空间规划
- Hybrid Planner: generate consistent motion in task space.任务空间规划
对于这两个规划器,作者拒绝了任何产生碰撞、超出关节限制、表现出异常行为(即高加速度),或者具有发散运动(即最终任务空间姿态与目标之间的距离超过 5cm)的轨迹。
Limitations
-
limited by the quality of the expert supervisor
-
it needs a large, diverse dataset of training examples
-
计算成本高
-
泛化限制


 309
309

 被折叠的 条评论
为什么被折叠?
被折叠的 条评论
为什么被折叠?
 到【灌水乐园】发言


