


输电线路巡检机器人电机上位机开发(第一版)
目录
项目概述
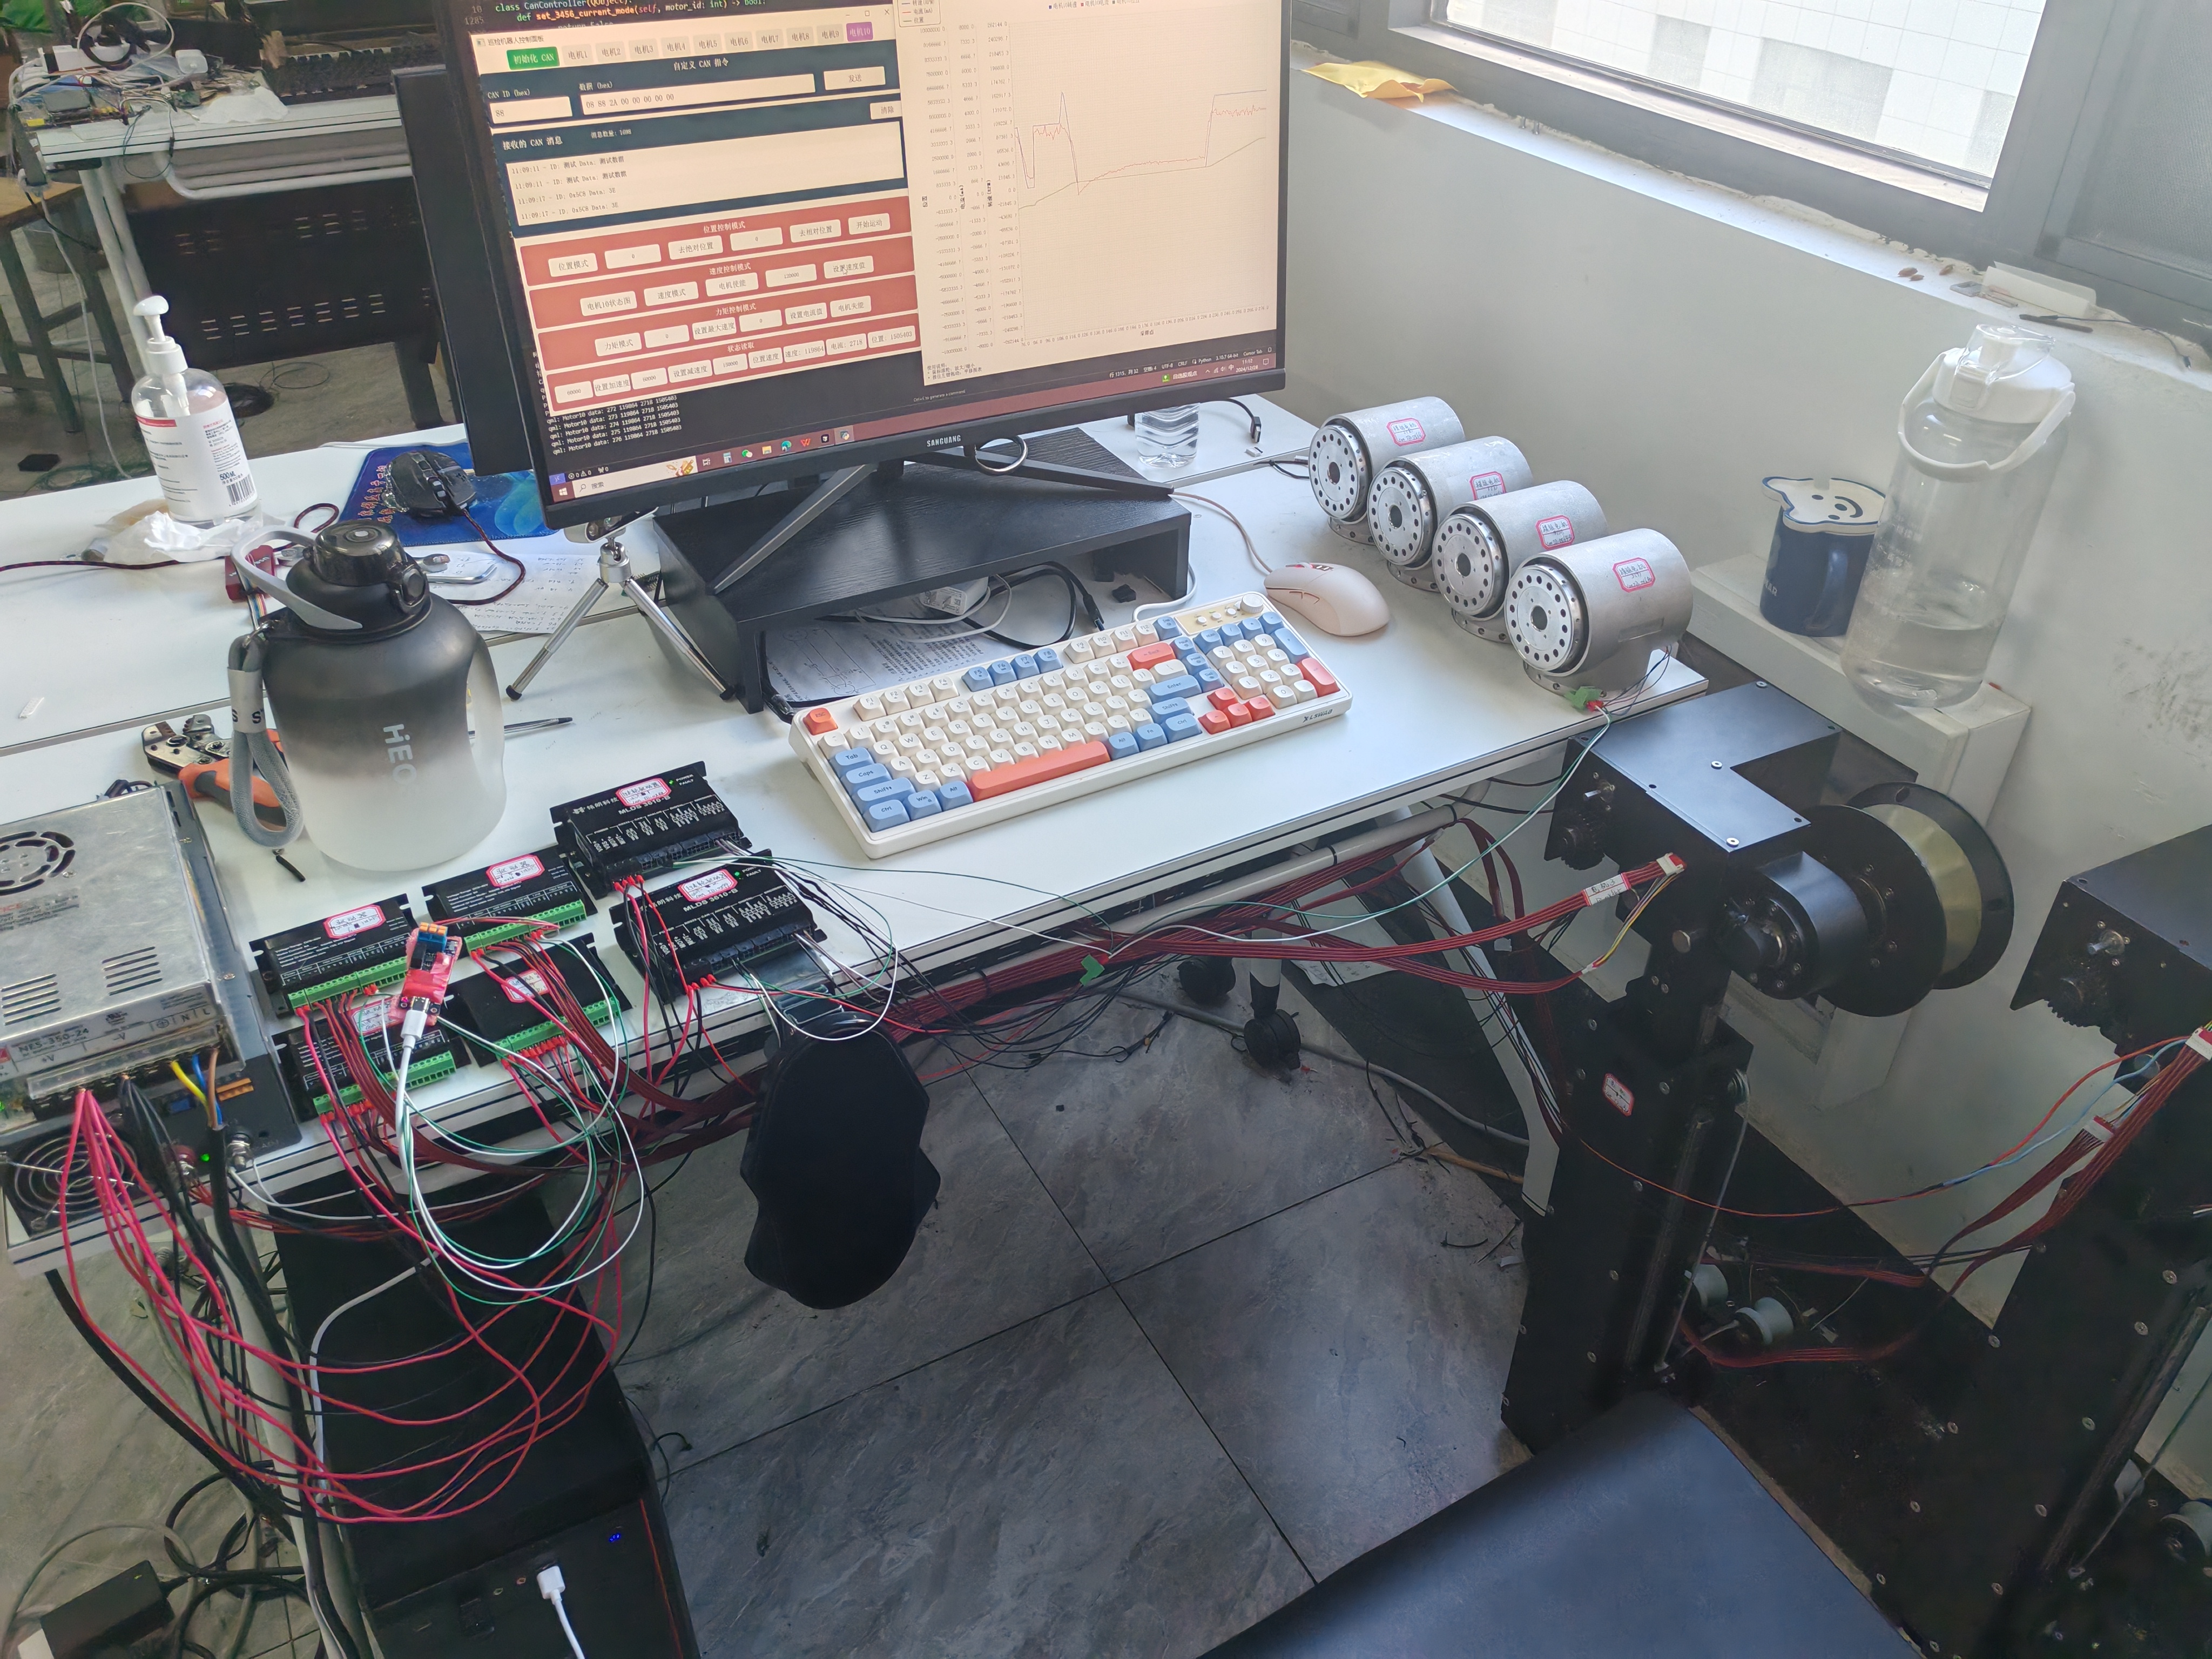
这是一个基于Python和QML开发的综合性机器人电机控制系统,旨在通过CAN总线协议实现对多电机系统的精确控制和监控。该系统支持多达10个不同类型电机的同时控制,并提供了实时状态监测、数据可视化和紧急停止等功能,适用于各类巡检机器人和工业自动化设备。
核心功能
1. 多电机控制与管理:
支持同时控制和监控10个不同型号、不同工作模式的电机;
每个电机可独立配置工作模式(速度模式、位置模式、力矩模式、PWM模式);
实时调整电机参数(速度、位置、电流、PWM占空比)。
2. 实时参数监测:
监控电机速度、电流、位置等关键参数;
数据实时更新和显示;
异常状态检测和警报。
3. 位置保护系统:
可配置的位置保护范围,防止电机超出安全运行范围;
自动紧急停止功能,确保系统安全;
位置超出范围时视觉警报提示。
4. 直观用户界面:
采用QML开发的现代化图形界面;
每个电机独立控制面板,支持标签页切换;
实时数据图表可视化。
5. 手动控制功能:
支持自定义CAN指令发送;
紧急停止按钮(快捷键支持);
电机使能/失能控制。
6. 数据可视化:
电机参数实时曲线图;
可缩放、拖动的图表界面;
历史数据趋势分析。
技术架构
1. 前端界面:
基于Qt/QML构建的响应式用户界面;
独立的电机控制面板和状态显示;
实时数据可视化组件。
2. 后端控制:
Python基础架构,使用PyQt5框架;
基于信号-槽机制的事件处理;
多线程设计确保UI响应和数据采集同时进行。
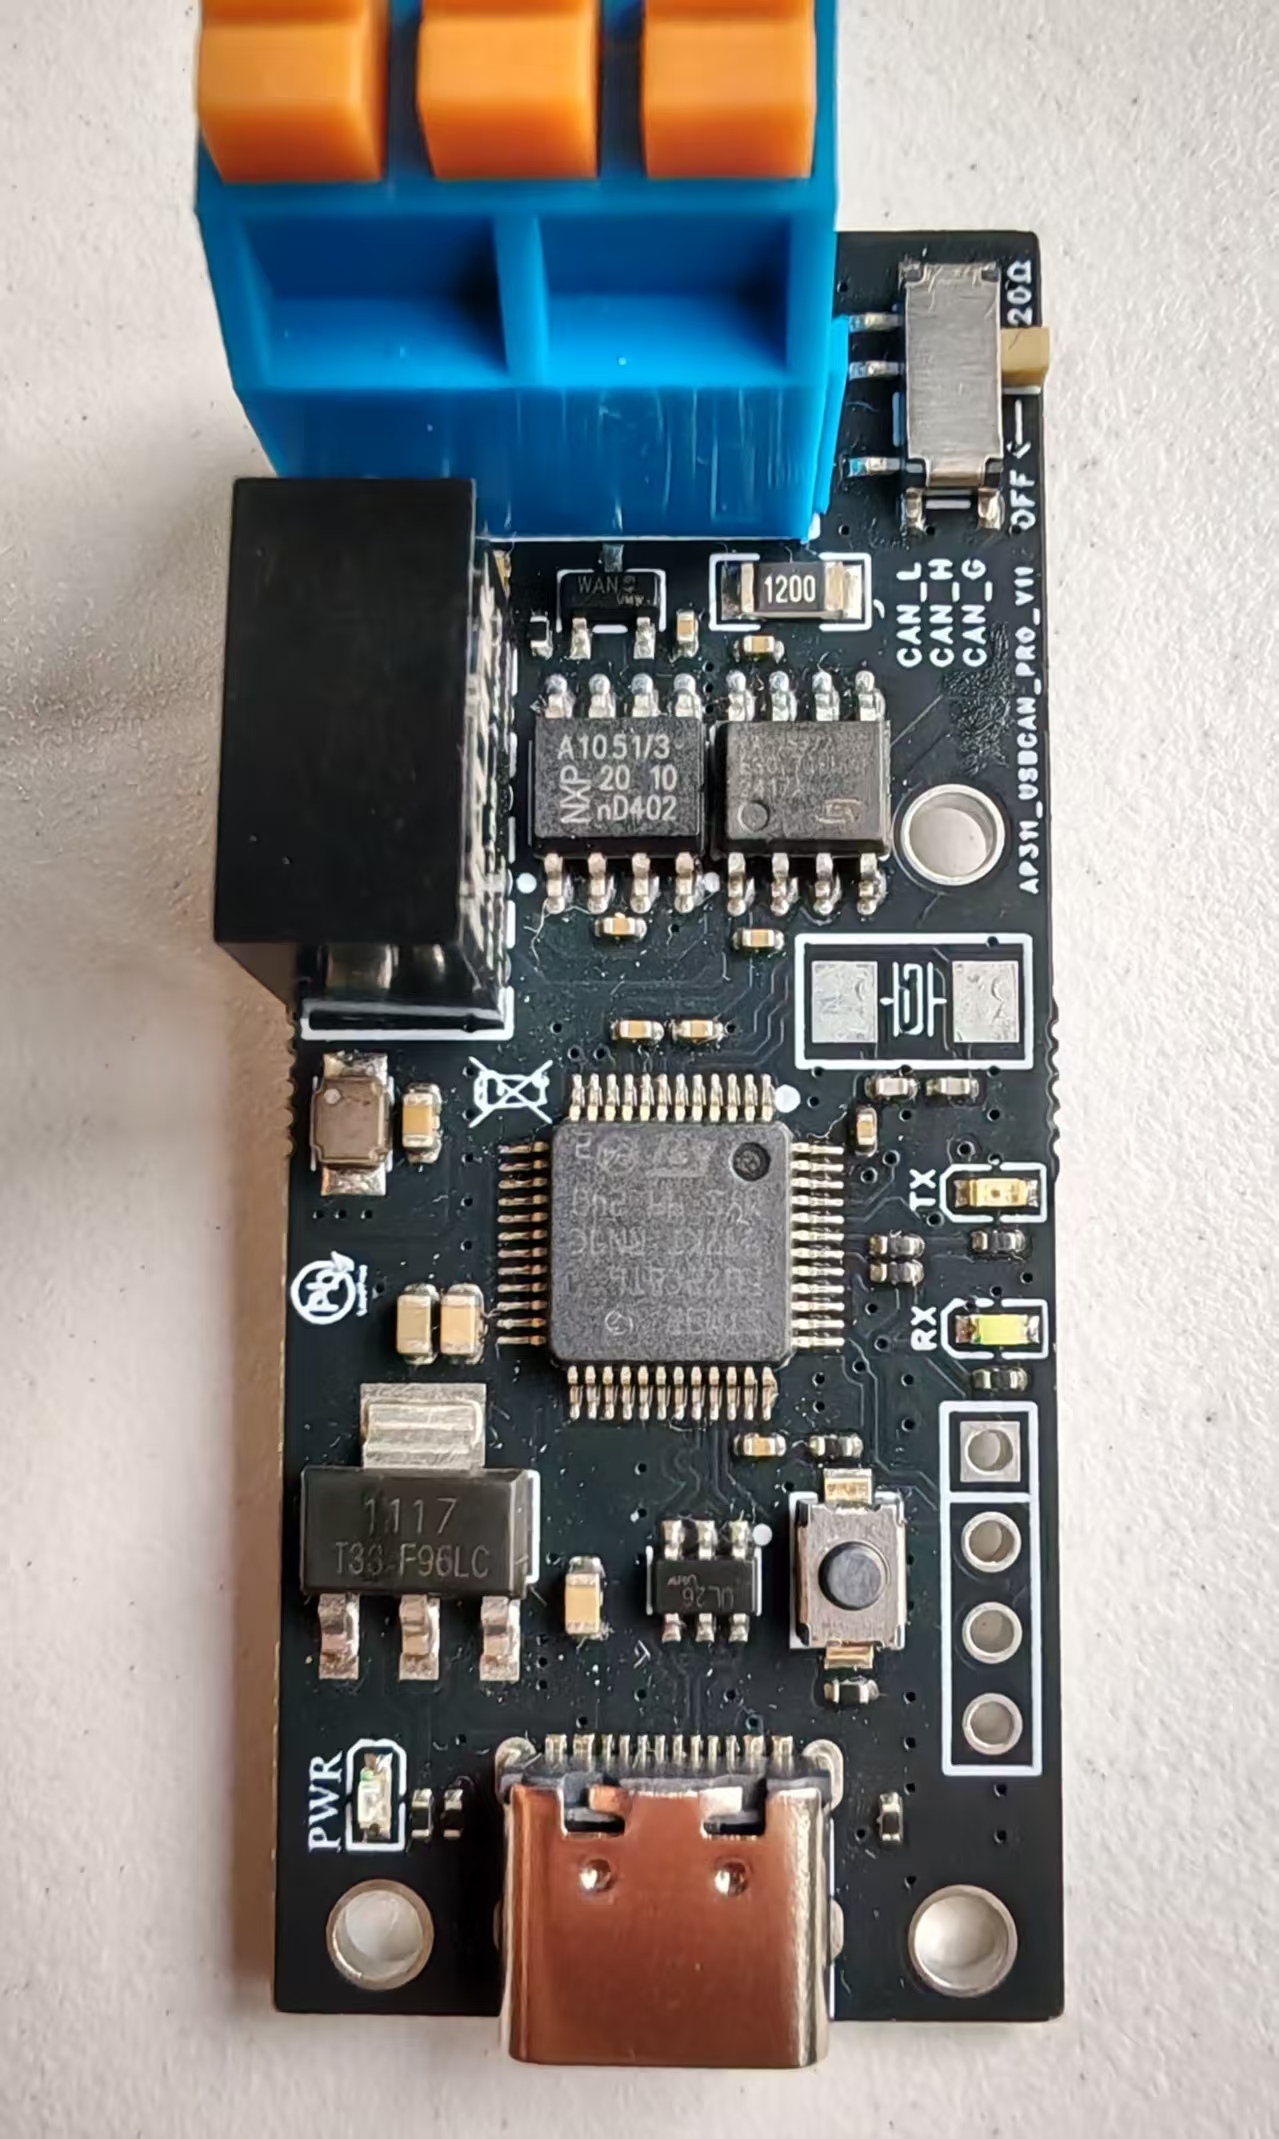
3. 通信协议:
基于CAN总线协议与电机驱动器通信;
使用Kvaser CANlib库进行CAN通信;
支持多种型号电机的特定通信指令。
4. 安全机制:
位置限位保护;
通信异常检测和恢复;
一键急停功能(支持Ctrl键快捷触发)。
项目应用的具体对象
PyQt5框架
一个创建GUI应用程序的Python绑定库,它封装了Qt框架(C++库)。PyQt允许Python开发者使用Qt的全部功能创建桌面应用程序。(GUI 应用程序是指图形用户界面(Graphical User Interface)应用程序,它是一种通过视觉元素(如窗口、按钮、菜单、图标等)与用户交互的软件程序)
代码中的PyQt使用
1. 信号与槽机制
# 信号定义

current1Changed = pyqtSignal(int)  # 定义一个发送整数的信号

canMessageReceived = pyqtSignal(str, str)  # 定义带两个字符串参数的信号


# 槽函数定义

@pyqtSlot(int)

def enable_motor(self, motor_id: int) -> bool:

    # 实现槽函数
信号(Signal)是在特定事件发生时发出的通知,槽(Slot)是响应这些信号的函数。这种机制让GUI组件可以松散耦合。
2. QObject基类
class CanController(QObject):

# 类实现
QObject是PyQt中大多数类的基类,提供了信号与槽机制的支持。
3. 属性系统
# 定义属性

@pyqtProperty(int, notify=motor10SpeedChanged)

def motor10Speed(self):

    return self._motor10Speed
PyQt的属性系统允许将类属性暴露给Qt的元对象系统,可以在QML中使用,实现数据绑定。
Qt信号机制实现实时数据更新
Qt的信号机制是观察者模式的一种实现,CanController类利用此机制实现实时数据更新的流程如下:
1.信号定义
current1Changed = pyqtSignal(int)

motorSpeedChanged = pyqtSignal(int, int)  # 参数:(motor_id, speed)

motorPositionChanged = pyqtSignal(int, int)# 参数:(motor_id, position)
每个信号代表一种可能发生变化的数据,括号内的类型表示信号传递的参数类型。
2.私有属性与属性访问器
# 私有属性

self._current1 = 0

self._motorPosition = {}


# 属性访问器(getter和setter)

def get_current1(self):

    return self._current1


def set_current1(self, value):

    if self._current1 != value:

        self._current1 = value

        self.current1Changed.emit(value)
这里体现了数据变化触发信号发射的模式:私有变量存储实际数据;setter方法在数据变化时发射信号
3.Qt属性定义
current1 = pyqtProperty(int, get_current1, set_current1, notify=current1Changed)

motorPosition = pyqtProperty(int, lambda self: self._motorPosition.get(3, 0),  notify=motorPositionChanged)
pyqtProperty定义了Qt属性,它有几个关键参数:
类型:属性的数据类型
getter:读取属性值的函数
setter:设置属性值的函数(可选)
notify:属性值变化时发射的信号
这使得属性可以在QML中被绑定,当属性值变化时UI会自动更新。
4. 实时数据更新流程
以读取电机位置为例,整个数据流程是:
@pyqtSlot(int)

def read_motor_position(self, motor_id: int) -> int:

    # 省略CAN通信代码...


    # 当收到响应时,解析位置数据

    position = int.from_bytes(response.data[4:8], byteorder='little', signed=True)


    # 存储位置值

    self._motorPosition[motor_id] = position


    # 发射信号,通知UI组件位置已更新

    self.motorPositionChanged.emit(motor_id, position)


    # 更新特定电机的专用属性

    if motor_id == 4:

        self._motor4Position = position

        self.motor4PositionChanged.emit(motor_id, position)
这个流程展示了:从硬件获取数据、更新内部数据模型、发射信号通知UI更新
5.CAN消息接收和处理
def _receive_messages(self):

    while self.running:

        try:

            msg = self.ch.read(timeout=100)

            if msg:

                # 通知消息处理器

                for handler in self._message_handlers[:]:

                    handler(msg)


                # 发送原始CAN消息信号

                can_id = f"0x{msg.id:03X}"

                data = ' '.join([f"{x:02X}" for x in msg.data[:msg.dlc]])

                self.canMessageReceived.emit(can_id, data)
这个接收线程持续监听CAN总线,当收到消息时:通知所有已注册的消息处理器、发射信号将原始CAN消息传递给UI
6.信号与QML界面的集成
def updateMessage(self, can_id: str, data: str):

    # 使用QMetaObject在主线程中调用QML方法

    QMetaObject.invokeMethod(

        self.root_object,

        "addMessage",

        Qt.ConnectionType.QueuedConnection,

        Q_ARG(str, current_time),

        Q_ARG(str, can_id),

        Q_ARG(str, data)

    )
这个方法展示了如何从Python向QML发送数据,实现Python后端和QML前端的交互。
7.核心机制总结
CanController作为核心控制类实现实时数据更新的机制可以总结为:
信号定义:为每种可能变化的数据定义对应的信号
数据封装:使用私有变量存储数据,通过getter/setter控制访问
属性绑定:使用pyqtProperty将数据与信号关联,使QML能够绑定
数据获取:通过CAN通信从硬件获取最新数据
状态更新:数据变化时更新内部状态并发射信号
UI通知:信号被QML界面捕获,触发UI更新
这种设计使得数据流动是单向的、可预测的:硬件 → CanController → UI,同时UI响应是自动的,无需手动刷新
线程的概念及主要特点
线程是程序执行的最小单元,是操作系统能够进行运算调度的最小单位。一个进程可以包含多个线程,它们共享进程的资源(如内存空间),但有各自独立的执行路径。
线程的主要特点:
1.并发执行:多个线程可以同时执行不同的代码段;
2.共享资源:同一进程内的线程共享内存和文件句柄等资源;
3.轻量级:线程的创建和销毁比进程更轻量级;
4.独立的调度单位:操作系统可以独立调度每个线程。
CAN消息接收需要多线程的理由
在GUI应用程序中,主线程(又称UI线程)负责处理用户交互和界面更新。如果在主线程中执行耗时的I/O操作(如等待CAN消息),会导致界面卡顿,影响用户体验。
CAN通信的特点:
1.CAN消息接收是阻塞操作,需要等待消息到达;
2.CAN总线上的消息到达时间不确定;
3.需要连续监听CAN总线以捕获所有消息。
因此,将CAN消息接收放入单独的线程是一种解决方案。这样主线程可以继续处理UI事件,而接收线程可以专注于监听CAN总线。
代码中的多线程实现
1. 线程的创建和启动
@pyqtSlot()

def start_receiving(self):

    """启动CAN消息接收"""

    if not self.ch:

        print("CAN通道未初始化,无法启动接收线程")

        return


    if self._receive_thread and self._receive_thread.is_alive():

        print("接收线程已经在运行")

        return


    print("准备启动接收线程...")  # 添加调试信息

    import threading

    self.running = True

    self._receive_thread = threading.Thread(target=self._receive_messages)

    self._receive_thread.daemon = True

    self._receive_thread.start()

    print("CAN消息接收线程已启动")
关键步骤解析:
(1)创建线程对象:使用threading.Thread创建线程对象,并指定目标函数_receive_messages;
(2)设置守护线程:daemon=True表示这是一个守护线程,当主线程结束时,守护线程会自动终止;
(3)启动线程:start()方法启动线程,此时新线程开始执行_receive_messages函数;
2. 线程函数实现
def _receive_messages(self):

    """接收CAN消息的线程函数"""

    print("接收线程开始运行")

    while self.running:

        try:

            msg = self.ch.read(timeout=100)

            if msg:

                # 通知所有消息处理器

                for handler in self._message_handlers[:]:

                    try:

                        handler(msg)

                    except Exception as e:

                        print(f"消息处理器错误: {e}")


                # 处理并发送消息

                can_id = f"0x{msg.id:03X}"

                data_bytes = [f"{x:02X}" for x in msg.data[:msg.dlc]]

                data = ' '.join(data_bytes)

                self.canMessageReceived.emit(can_id, data)


        except canlib.CanNoMsg:

            continue

        except Exception as e:

            print(f"接收消息错误: {e}")

            import traceback

            print(traceback.format_exc())

            time.sleep(0.1)
关键步骤解析:
1.循环监听:使用while self.running循环持续监听CAN消息;
2.非阻塞读取:ch.read(timeout=100)设置100毫秒超时,防止完全阻塞;
3.消息处理:收到消息后,首先通知已注册的处理器,然后格式化消息内容;
4.信号发射:使用canMessageReceived.emit()将消息发送到主线程.
5.异常处理:
canlib.CanNoMsg异常表示暂时没有消息,继续循环;其他异常记录日志并短暂暂停,避免CPU占用过高
3. 线程间通信:PyQt信号机制
当接收线程收到CAN消息后,需要将数据传递给主线程处理。这里使用了PyQt的信号机制实现线程间通信:
# 信号定义

canMessageReceived = pyqtSignal(str, str)  # 参数:(can_id, data)


# 信号发射(在接收线程中)

self.canMessageReceived.emit(can_id, data)


# 信号处理(在主线程中)

def on_can_message(can_id, data):

    print(f"Python收到CAN消息: ID={can_id}, Data={data}")


controller.canMessageReceived.connect(on_can_message)
PyQt信号机制的特点:
1.线程安全:PyQt信号是线程安全的,允许从任何线程发射信号;
2.队列处理:信号会被放入队列中,由接收端线程(通常是主线程)处理;
3.解耦合:发送方不需要知道接收方是谁,实现了代码解耦。
4. 线程终止
def cleanup(self):

    self.running = False

    if self._receive_thread:

        self._receive_thread.join(timeout=1.0)

    if self.ch:

        self.ch.busOff()

        self.ch.close()

        print("CAN通道已关闭")
关键步骤解析:
1.设置标志:设置self.running = False使接收线程跳出循环;
2.等待终止:join(timeout=1.0)等待线程最多1秒钟终止;
3.资源释放:关闭CAN通道,释放资源。
多线程实现的技术要点
1. 线程同步与资源竞争
当多个线程访问共享资源时,需要注意线程同步问题。在代码中:使用切片复制消息处理器列表,避免迭代时修改:for handler in self._message_handlers[:]
使用PyQt信号机制传递数据,避免直接操作UI元素
2. 守护线程的使用
self._receive_thread.daemon = True守护线程的特点是当主线程结束时自动终止。这确保了即使接收线程卡在某个位置,也不会阻止程序退出。
3. 异常处理和健壮性
代码中包含了多层异常处理:
1.捕获特定的canlib.CanNoMsg异常,区分正常无消息和异常情况;
2.捕获并记录消息处理器的异常,防止一个处理器失败影响整体功能;
3.捕获一般异常并记录堆栈跟踪,方便调试。
4. 与QML界面集成
接收线程收到消息后,通过canMessageReceived信号将数据传递给主线程,然后在主线程中使用QMetaObject.invokeMethod调用QML方法:
QMetaObject.invokeMethod(

    self.root_object,

    "addMessage",

    Qt.ConnectionType.QueuedConnection,

    Q_ARG(str, current_time),

    Q_ARG(str, can_id),

    Q_ARG(str, data)

)
这确保了QML操作在主线程中执行,避免了多线程访问UI的问题。
键盘过滤器
键盘过滤器是PyQt和QML中处理键盘输入的重要机制,在这个机器人控制系统中,它主要用于捕获Ctrl键作为紧急停止功能。该系统实现了三层键盘事件处理机制,提供了冗余保障,确保关键的紧急停止功能能够被可靠触发。
1.Python端的键盘过滤器实现
在Python端,键盘过滤器通过继承QObject并实现eventFilter方法来创建:
class KeyFilter(QObject):

    def __init__(self, controller):

        super().__init__()

        self.controller = controller


    def eventFilter(self, obj, event):

        if event.type() == event.KeyPress:

            if event.key() == Qt.Key_Control:

                print("Ctrl key pressed through event filter")

                self.controller.emergency_stop()

                return True

        return False
这个过滤器的关键组成部分包括:
1.继承QObject:所有事件过滤器都必须继承QObject
2.初始化:保存对控制器对象的引用,以便调用其方法
3.eventFilter方法:接收两个参数:被监听的对象和事件;检查事件类型是否为KeyPress;检查按键是否为Ctrl键;如果满足条件,调用紧急停止功能并返回True表示事件已被处理;否则返回False让事件继续传播
2.安装事件过滤器
在Python端,事件过滤器需要被安装到窗口和应用程序对象上才能生效:
key_filter = KeyFilter(controller)

window.installEventFilter(key_filter)

app.installEventFilter(key_filter)
这里使用了两层安装:
1.安装到窗口对象:捕获窗口内的按键事件;
2.安装到应用程序对象:捕获应用程序范围内的按键事件,即使窗口没有焦点
3.QML端的键盘事件处理;
在QML端,实现了两种不同的键盘事件处理机制:
(1)全局快捷键
Shortcut {

    sequences: [StandardKey.Cancel, "Ctrl"]  // 同时监听Cancel和Ctrl键

    context: Qt.ApplicationShortcut  // 设置为应用程序级快捷键

    onActivated: {

        console.log("Ctrl key pressed - Emergency Stop triggered")

        controller.emergency_stop()

    }

}
Shortcut是QML中处理快捷键的高级组件:sequences定义了触发快捷键的按键序列
context设置为应用程序级别,使其在整个应用中都有效
onActivated处理快捷键被触发时的动作
(2)焦点项的键盘事件处理
Item {

    focus: true

    Keys.onPressed: function(event) {

        if (event.key === Qt.Key_Control) {

            console.log("Control key pressed via Keys handler")

            controller.emergency_stop();

            event.accepted = true;

        }

    }

}
这种方式使用了QML的Item对象和Keys附加属性:
focus: true确保该Item可以接收键盘焦点;Keys.onPressed定义按键按下时的处理函数;检查是否为Ctrl键,并相应地调用紧急停止功能;event.accepted = true表示事件已被处理,防止传播
4.三层处理机制的优势
这个系统实现了三层键盘事件处理:
1.Python端的事件过滤器(窗口级别);
2.Python端的事件过滤器(应用程序级别);
3.QML端的两种不同机制(Shortcut和Keys处理)。
这种冗余设计确保了:
1.无论用户界面处于什么状态,紧急停止功能都能被触发;
2.即使某一层处理机制失效,其他层仍能捕获关键事件;
3.适应不同的操作系统和窗口管理器行为差异。
5.事件处理流程
当用户按下Ctrl键时,事件处理的流程如下:
1.事件首先进入应用程序的事件循环;
2.应用程序级别的事件过滤器获得处理机会;
3.如果应用程序级别没有处理,窗口级别的事件过滤器获得处理机会;
4.如果窗口级别没有处理,QML的Shortcut组件检查是否匹配;
5.最后,如果事件仍未被处理,且焦点Item可见,则Keys.onPressed获得处理机会。
这种多层次的事件处理确保了关键安全功能的可靠性,无论界面处于什么状态,紧急停止功能都可以被触发,保障机器人系统的安全运行
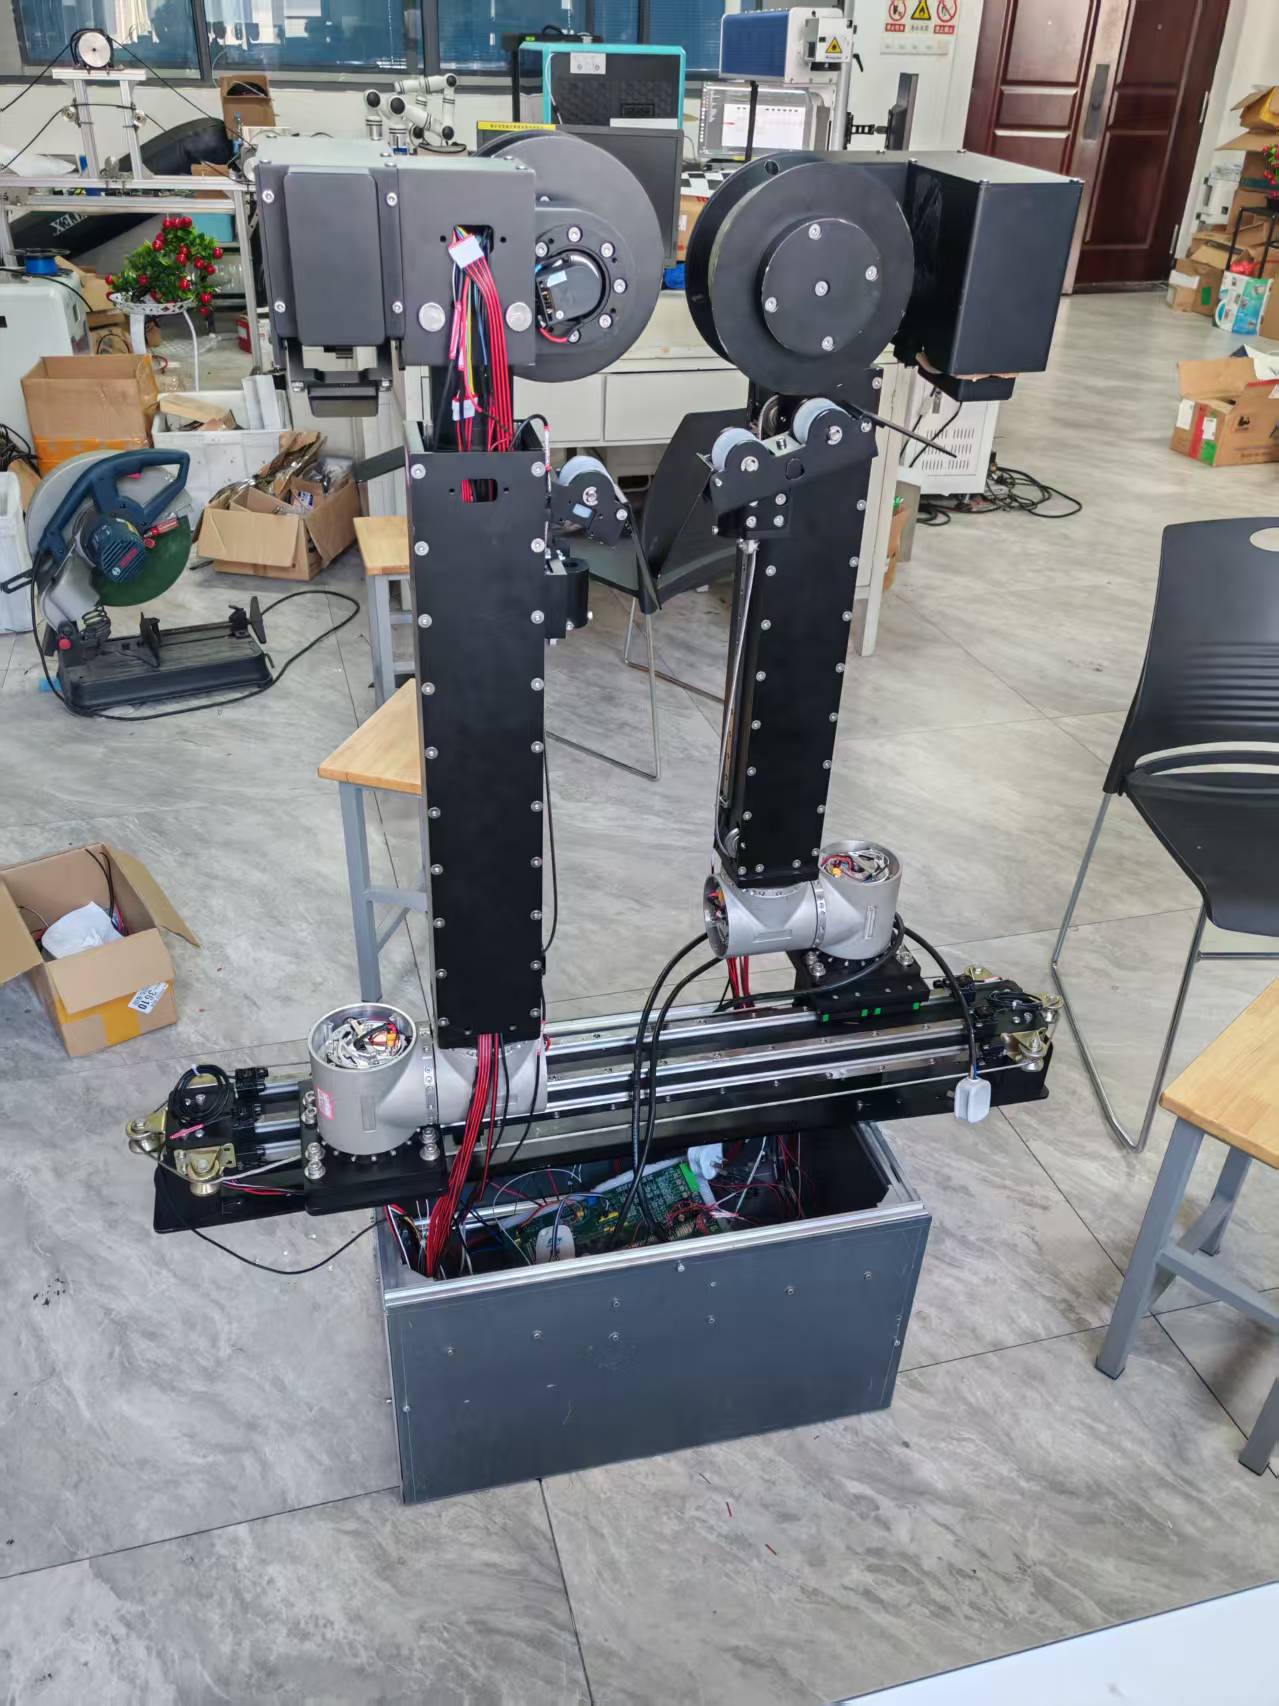
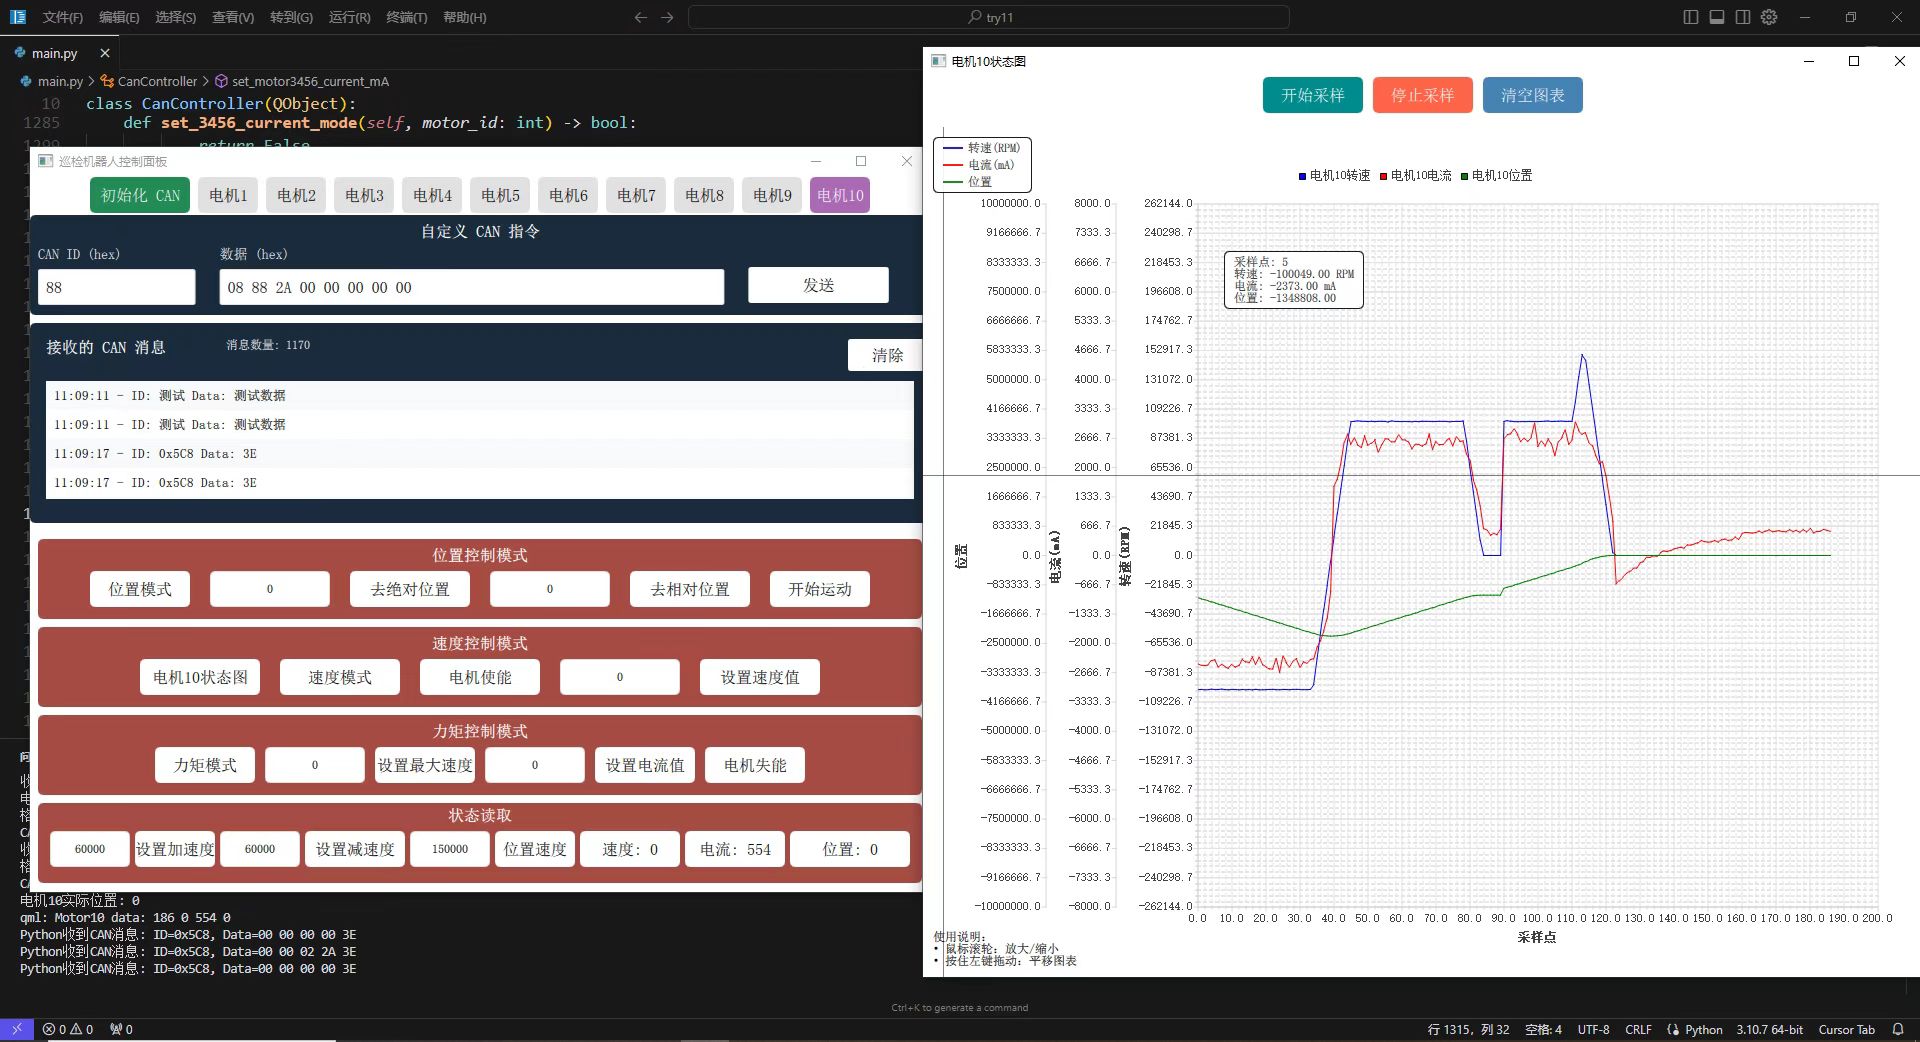
上位机最终实际应用效果
项目完整代码展示
main.py
from PyQt5.QtCore import QUrl, pyqtSlot, QObject, pyqtProperty, pyqtSignal, QMetaObject, Qt, Q_ARG, QTimer
from PyQt5.QtWidgets import QApplication
from PyQt5.QtGui import QKeySequence
from PyQt5.QtWidgets import QShortcut
from canlib import canlib
import sys
import os
import time
from PyQt5.QtQml import QQmlApplicationEngine
class CanController(QObject):
# 添加信号定义
current1Changed = pyqtSignal(int)
current2Changed = pyqtSignal(int)
canMessageReceived = pyqtSignal(str, str) # 参数:(can_id, data)
workModeChanged = pyqtSignal(str) # 参数:(work_mode)
averageSpeed1Changed = pyqtSignal(int)
averageSpeed2Changed = pyqtSignal(int)
speedError1Changed = pyqtSignal(int)
speedError2Changed = pyqtSignal(int)
setSpeed1Changed = pyqtSignal(int)
setSpeed2Changed = pyqtSignal(int)
positionErrorChanged = pyqtSignal(int)
currentPositionChanged = pyqtSignal(int)
workMode1Changed = pyqtSignal(str) # 电机1工作模式信号
workMode2Changed = pyqtSignal(str) # 电机2工作模式信号
# 添加新的信号
motorSpeedChanged = pyqtSignal(int, int) # 参数:(motor_id, speed)
motorPwmChanged = pyqtSignal(int, int) # 参数:(motor_id, pwm)
motorCurrentChanged = pyqtSignal(int, int) # 参数:(motor_id, current)
motorPositionChanged = pyqtSignal(int, int)# 参数:(motor_id, position)
# 为电机4、5、6添加信号
motor4SpeedChanged = pyqtSignal(int, int)
motor4PwmChanged = pyqtSignal(int, int)
motor4CurrentChanged = pyqtSignal(int, int)
motor4PositionChanged = pyqtSignal(int, int)
motor5SpeedChanged = pyqtSignal(int, int)
motor5PwmChanged = pyqtSignal(int, int)
motor5CurrentChanged = pyqtSignal(int, int)
motor5PositionChanged = pyqtSignal(int, int)
motor6SpeedChanged = pyqtSignal(int, int)
motor6PwmChanged = pyqtSignal(int, int)
motor6CurrentChanged = pyqtSignal(int, int)
motor6PositionChanged = pyqtSignal(int, int)
# 添加区分的信号
positionError1Changed = pyqtSignal(int)
positionError2Changed = pyqtSignal(int)
currentPosition1Changed = pyqtSignal(int)
currentPosition2Changed = pyqtSignal(int)
# 添加新的信号
motorSpeedModeStatusChanged = pyqtSignal(int, bool) # 电机ID, 是否为速度模式
motorEnableStatusChanged = pyqtSignal(int, bool) # 电机ID, 是否使能
# 添加力矩模式相关信号
motorTorqueModeStatusChanged = pyqtSignal(int, bool) # 电机ID, 是否为力矩模式
motorMaxSpeedChanged = pyqtSignal(int, int) # 电机ID, 最大速度值
motorTargetCurrentChanged = pyqtSignal(int, int) # 电机ID, 目标电流值
motor7SpeedChanged = pyqtSignal(int, int)
motor7CurrentChanged = pyqtSignal(int, int)
motor7PositionChanged = pyqtSignal(int, int)
# 1. 添加电机8的信号
motor8SpeedChanged = pyqtSignal(int, int)
motor8CurrentChanged = pyqtSignal(int, int)
motor8PositionChanged = pyqtSignal(int, int)
# 2. 添加电机9的信号
motor9SpeedChanged = pyqtSignal(int, int)
motor9CurrentChanged = pyqtSignal(int, int)
motor9PositionChanged = pyqtSignal(int, int)
# 3. 添加电机10的信号
motor10SpeedChanged = pyqtSignal(int, int)
motor10CurrentChanged = pyqtSignal(int, int)
motor10PositionChanged = pyqtSignal(int, int)
# 添加新的信号
positionOutOfRangeError = pyqtSignal(int, int) # 参数:(motor_id, current_position)
def __init__(self):
super().__init__()
self.ch = None
# 添加电流值属性的私有变量
self._current1 = 0
self._current2 = 0
# 定义电机CAN ID字典
self.MOTOR_IDS = {
1: 0x88, # 电机1的CAN ID
2: 0x99, # 电机2的CAN ID
3: 0x655, # 电机3的CAN ID
4: 0x644, # 电机4的CAN ID
5: 0x666, # 电机5的CAN ID
6: 0x611, # 电机6的CAN ID
7: 0x656, # 电机7的CAN ID
8: 0x661, # 电机8的CAN ID
9: 0x680, # 电机9的CAN ID
10: 0x648, # 电机10的CAN ID
}
self.running = False # 用于控制接收线程
self._receive_thread = None
print("CanController 初始化完成") # 添加调试信息
# 添加新的属性
self._average_speed = 0
self._speed_error = 0
self._set_speed = 0
# 添加新的属性定义
self._averageSpeed1 = 0
self._averageSpeed2 = 0
self._speedError1 = 0
self._speedError2 = 0
self._setSpeed1 = 0
self._setSpeed2 = 0
self._positionError = 0
self._currentPosition = 0
self._message_handlers = [] # 添加消息处理器列表
self._workMode1 = "未初始化"
self._workMode2 = "未初始化"
# 添加新的属性
self._motorSpeed = {}
self._motorPwm = {}
self._motorCurrent = {}
self._motorPosition = {}
# 添加新的属性
self._motor4Speed = 0
self._motor4Pwm = 0
self._motor4Current = 0
self._motor4Position = 0
self._motor5Speed = 0
self._motor5Pwm = 0
self._motor5Current = 0
self._motor5Position = 0
self._motor6Speed = 0
self._motor6Pwm = 0
self._motor6Current = 0
self._motor6Position = 0
# 添加区分的属性
self._positionError1 = 0
self._positionError2 = 0
self._currentPosition1 = 0
self._currentPosition2 = 0
# 添加属性初始化
self._motor7Speed = 0
self._motor7Current = 0
self._motor7Position = 0
# 3. 添加电机8的属性
self._motor8Speed = 0
self._motor8Current = 0
self._motor8Position = 0
# 4. 添加电机9的属性
self._motor9Speed = 0
self._motor9Current = 0
self._motor9Position = 0
# 5. 添加电机10的属性
self._motor10Speed = 0
self._motor10Current = 0
self._motor10Position = 0
# 添加位置保护范围常量
self.POSITION_MIN = 150000
self.POSITION_MAX = 350000
# 添加位置保护标志
self._position_protection_enabled = True
# 添加位置监控定时器
self._position_monitor_timer = QTimer(self)
self._position_monitor_timer.setInterval(100) # 100ms检查一次
self._position_monitor_timer.timeout.connect(self._check_motors_position)
self._position_monitor_timer.start()
self._monitoring_enabled = True # 添加监控状态标志
# 添加属性的 getter 和 setter
def get_current1(self):
return self._current1
def set_current1(self, value):
if self._current1 != value:
self._current1 = value
self.current1Changed.emit(value)
def get_current2(self):
return self._current2
def set_current2(self, value):
if self._current2 != value:
self._current2 = value
self.current2Changed.emit(value)
# 添加 Property 定义
current1 = pyqtProperty(int, get_current1, set_current1, notify=current1Changed)
current2 = pyqtProperty(int, get_current2, set_current2, notify=current2Changed)
averageSpeed1 = pyqtProperty(int, lambda self: self._averageSpeed1, notify=averageSpeed1Changed)
averageSpeed2 = pyqtProperty(int, lambda self: self._averageSpeed2, notify=averageSpeed2Changed)
speedError1 = pyqtProperty(int, lambda self: self._speedError1, notify=speedError1Changed)
speedError2 = pyqtProperty(int, lambda self: self._speedError2, notify=speedError2Changed)
setSpeed1 = pyqtProperty(int, lambda self: self._setSpeed1, notify=setSpeed1Changed)
setSpeed2 = pyqtProperty(int, lambda self: self._setSpeed2, notify=setSpeed2Changed)
positionError = pyqtProperty(int, lambda self: self._positionError, notify=positionErrorChanged)
currentPosition = pyqtProperty(int, lambda self: self._currentPosition, notify=currentPositionChanged)
@pyqtProperty(str, notify=workMode1Changed)
def workMode1(self):
return self._workMode1
@pyqtProperty(str, notify=workMode2Changed)
def workMode2(self):
return self._workMode2
# 添加属性方法
@pyqtProperty(int, notify=motorSpeedChanged)
def motorSpeed(self):
return self._motorSpeed.get(3, 0) # 默认返回电机3的速度
@pyqtProperty(int, notify=motorPwmChanged)
def motorPwm(self):
return self._motorPwm.get(3, 0) # 默认返回电机3的PWM
@pyqtProperty(int, notify=motorCurrentChanged)
def motorCurrent(self):
return self._motorCurrent.get(3, 0) # 默认返回电机3的电流
@pyqtProperty(int, notify=motorPositionChanged)
def motorPosition(self):
return self._motorPosition.get(3, 0) # 默认返回电机3的位置
# 电机4的属性访问器
@pyqtProperty(int, notify=motor4SpeedChanged)
def motor4Speed(self):
return self._motor4Speed
@pyqtProperty(int, notify=motor4PwmChanged)
def motor4Pwm(self):
return self._motor4Pwm
@pyqtProperty(int, notify=motor4CurrentChanged)
def motor4Current(self):
return self._motor4Current
@pyqtProperty(int, notify=motor4PositionChanged)
def motor4Position(self):
return self._motor4Position
# 电机5的属性访问器
@pyqtProperty(int, notify=motor5SpeedChanged)
def motor5Speed(self):
return self._motor5Speed
@pyqtProperty(int, notify=motor5PwmChanged)
def motor5Pwm(self):
return self._motor5Pwm
@pyqtProperty(int, notify=motor5CurrentChanged)
def motor5Current(self):
return self._motor5Current
@pyqtProperty(int, notify=motor5PositionChanged)
def motor5Position(self):
return self._motor5Position
# 电机6的属性访问器
@pyqtProperty(int, notify=motor6SpeedChanged)
def motor6Speed(self):
return self._motor6Speed
@pyqtProperty(int, notify=motor6PwmChanged)
def motor6Pwm(self):
return self._motor6Pwm
@pyqtProperty(int, notify=motor6CurrentChanged)
def motor6Current(self):
return self._motor6Current
@pyqtProperty(int, notify=motor6PositionChanged)
def motor6Position(self):
return self._motor6Position
# 添加区分的属性访问器
@pyqtProperty(int, notify=positionError1Changed)
def positionError1(self):
return self._positionError1
@pyqtProperty(int, notify=positionError2Changed)
def positionError2(self):
return self._positionError2
@pyqtProperty(int, notify=currentPosition1Changed)
def currentPosition1(self):
return self._currentPosition1
@pyqtProperty(int, notify=currentPosition2Changed)
def currentPosition2(self):
return self._currentPosition2
@pyqtProperty(int, notify=motor7SpeedChanged)
def motor7Speed(self):
return self._motor7Speed
@pyqtProperty(int, notify=motor7CurrentChanged)
def motor7Current(self):
return self._motor7Current
@pyqtProperty(int, notify=motor7PositionChanged)
def motor7Position(self):
return self._motor7Position
# 4. 添加电机8的属性访问器
@pyqtProperty(int, notify=motor8SpeedChanged)
def motor8Speed(self):
return self._motor8Speed
@pyqtProperty(int, notify=motor8CurrentChanged)
def motor8Current(self):
return self._motor8Current
@pyqtProperty(int, notify=motor8PositionChanged)
def motor8Position(self):
return self._motor8Position
# 4. 添加电机9的属性访问器
@pyqtProperty(int, notify=motor9SpeedChanged)
def motor9Speed(self):
return self._motor9Speed
@pyqtProperty(int, notify=motor9CurrentChanged)
def motor9Current(self):
return self._motor9Current
@pyqtProperty(int, notify=motor9PositionChanged)
def motor9Position(self):
return self._motor9Position
# 5. 添加电机10的属性访问器
@pyqtProperty(int, notify=motor10SpeedChanged)
def motor10Speed(self):
return self._motor10Speed
@pyqtProperty(int, notify=motor10CurrentChanged)
def motor10Current(self):
return self._motor10Current
@pyqtProperty(int, notify=motor10PositionChanged)
def motor10Position(self):
return self._motor10Position
@pyqtSlot()
def initialize_can(self):
"""初始化CAN通道"""
try:
# 获取可用的CAN通道数量
num_channels = canlib.getNumberOfChannels()
print(f"发现 {num_channels} 个CAN通道")
# 打开通道0
self.ch = canlib.openChannel(channel=0)
# 设置比特率为1M
self.ch.setBusParams(canlib.canBITRATE_1M)
# 启动CAN通道
self.ch.busOn()
print("CAN通道已初始化成功")
# 发送一个测试信号
self.canMessageReceived.emit("测试", "测试数据")
# 启动接收线程
self.start_receiving()
# 初始化后立即读取电机1和电机2的工作模式
print("正在读取电机工作模式...")
self.read_work_mode(1) # 读取电机1工作模式
self.read_work_mode(2) # 读取电机2工作模式
return True
except Exception as e:
print(f"初始化错误: {e}")
return False
@pyqtSlot()
def start_receiving(self):
"""启动CAN消息接收"""
if not self.ch:
print("CAN通道未初始化,无法启动接收线程")
return
if self._receive_thread and self._receive_thread.is_alive():
print("接收线程已经在运行")
return
print("准备启动接收线程...") # 添加调试信息
import threading
self.running = True
self._receive_thread = threading.Thread(target=self._receive_messages)
self._receive_thread.daemon = True
self._receive_thread.start()
print("CAN消息接收线程已启动")
def _receive_messages(self):
"""接收CAN消息的线程函数"""
print("接收线程开始运行")
while self.running:
try:
msg = self.ch.read(timeout=100)
if msg:
# 通知所有消息处理器
for handler in self._message_handlers[:]: # 使用切片复制避免迭代时修改
try:
handler(msg)
except Exception as e:
print(f"消息处理器错误: {e}")
# 原有的消息处理逻辑
can_id = f"0x{msg.id:03X}"
data_bytes = [f"{x:02X}" for x in msg.data[:msg.dlc]]
data = ' '.join(data_bytes)
print(f"收到原始CAN消息 - ID: {can_id}, DLC: {msg.dlc}, Raw Data: {[hex(x) for x in msg.data]}")
print(f"格式化后的消息 - ID: {can_id}, Data: {data}")
# 对于 PyQt5,直接使用信号发送更简单
self.canMessageReceived.emit(can_id, data)
print(f"CAN消息已发送 - ID: {can_id}, Data: {data}")
except canlib.CanNoMsg:
continue
except Exception as e:
print(f"接收消息错误: {e}")
import traceback
print(traceback.format_exc())
time.sleep(0.1)
@pyqtSlot(str, str)
def updateMessage(self, can_id: str, data: str):
"""在主线程中更新消息"""
try:
print(f"准备发送信号到QML - ID: {can_id}, Data: {data}")
# 添加时间戳
current_time = time.strftime("%H:%M:%S", time.localtime())
# 使用 QMetaObject 在主线程中调用 QML 方法
QMetaObject.invokeMethod(
self.root_object, # 需要添加 root_object 属性
"addMessage",
Qt.ConnectionType.QueuedConnection,
Q_ARG(str, current_time),
Q_ARG(str, can_id),
Q_ARG(str, data)
)
print(f"信号已发送到QML")
except Exception as e:
print(f"发送信号错误: {e}")
import traceback
print(traceback.format_exc())
def set_root_object(self, root):
"""设置 QML root object"""
self.root_object = root
#电机1和2相关底层python配置——开始
@pyqtSlot(int, int)
def set_work_mode(self, motor_id: int, mode: int) -> bool:
"""
设置电机工作模式
Args:
motor_id: 电机ID
mode: 工作模式 (0:速度模式, 1:位置模式, 2:力矩模式)
"""
if not self.ch:
print("CAN通道未初始化")
return False
try:
can_id = self.MOTOR_IDS[motor_id]
data = [0x08, 0x88, 0x2A, 0x00, 0x00, mode, 0x00, 0x00]
self.ch.write_raw(id_=can_id, msg=bytearray(data), dlc=8)
mode_names = {0: "速度", 1: "位置", 2: "力矩"}
print(f"电机{motor_id}已设置为{mode_names.get(mode, '未知')}模式")
return True
except Exception as e:
print(f"设置工作模式失败: {e}")
return False
def _set_motor_current(self, motor_id: int, current_ma: int) -> bool:
"""通用的电机电流设置方法"""
if not self.ch:
print("CAN通道未初始化")
return False
if motor_id not in self.MOTOR_IDS:
print(f"无效的电机ID: {motor_id}")
return False
try:
can_id = self.MOTOR_IDS[motor_id]
# 将电流值转换为CAN数据格式
if current_ma >= 0:
# 正电流值处理
high_byte = current_ma // 256
low_byte = current_ma % 256
data = [0x08, 0x88, 0x96, 0x00, low_byte, high_byte, 0x00, 0x00]
else:
# 负电流值处理
abs_current = abs(current_ma)
high_byte = 0xFF - (abs_current - 1) // 256
remainder = abs_current - (0xFF - high_byte) * 256
low_byte = 256 - remainder
data = [0x08, 0x88, 0x96, 0x00, low_byte, high_byte, 0xFF, 0xFF]
# 发送CAN指令
self.ch.write_raw(id_=can_id, msg=bytearray(data), dlc=8)
print(f"行走轮{motor_id}电流设置为: {current_ma}mA")
# 打印十六进制数据用于调试
hex_data = ' '.join([f'0x{x:02X}' for x in data])
print(f"发送的CAN数据: {hex_data}")
return True
except canlib.CanError as e:
print(f"发送消息失败: {e}")
return False
@pyqtSlot(int)
def set_wheel_current(self, current_ma):
"""设置电机1的电流"""
self._set_motor_current(1, current_ma)
@pyqtSlot(int)
def set_wheel2_current(self, current_ma):
"""设置电机2的电流"""
self._set_motor_current(2, current_ma)
def _read_motor_current(self, motor_id: int) -> int:
"""
读取指定电机的实时电流值
"""
if not self.ch:
print("CAN通道未初始化")
return 0
if motor_id not in self.MOTOR_IDS:
print(f"无效的电机ID: {motor_id}")
return 0
try:
can_id = self.MOTOR_IDS[motor_id]
data = [0x04, 0x88, 0xD0, 0x00]
print(f"发送读取电流指令: {[f'0x{x:02X}' for x in data]}")
self.ch.write_raw(id_=can_id, msg=bytearray(data), dlc=4)
response_id = 0x01
timeout_ms = 500
start_time = time.time()
while (time.time() - start_time) * 1000 < timeout_ms:
try:
msg = self.ch.read(timeout=10)
print(f"收到CAN消息 - ID: 0x{msg.id:X}, 数据: {[f'0x{x:02X}' for x in msg.data]}")
if msg.id == response_id:
# 解析电流值
low_byte = msg.data[4]
high_byte = msg.data[5]
if high_byte == 0xFF: # 负值
current = -(256 - low_byte)
elif high_byte > 0xF0: # 的负值
current = -((0xFF - high_byte) * 256 + (256 - low_byte))
else: # 正值
current = low_byte + high_byte * 256
print(f"电机{motor_id}当前电流: {current}mA")
return current
except canlib.CanNoMsg:
continue
print(f"读取电机{motor_id}电流时 - 未收到响应")
return 0
except canlib.CanError as e:
print(f"读取电流失败: {e}")
return 0
@pyqtSlot(int, result=int)
def read_wheel_current(self, motor_id):
"""读取指定电机的电流值,供QML调用"""
current = self._read_motor_current(motor_id)
# 更新对应的属性
if motor_id == 1:
self.set_current1(current)
elif motor_id == 2:
self.set_current2(current)
return current
@pyqtSlot(int, str, result=bool)
def send_custom_can_command(self, can_id: int, hex_string: str) -> bool:
"""
发送自定义CAN指令
"""
if not self.ch:
print("CAN通道未初始化")
return False
try:
# 解析十六进制字符串
hex_values = hex_string.strip().split()
if len(hex_values) > 8:
print("数据长度超过8字节")
return False
# 转换为字节数组
data = []
for hex_val in hex_values:
try:
data.append(int(hex_val, 16))
except ValueError:
print(f"无效的十六进制值: {hex_val}")
return False
# 获取实际数据长度
dlc = len(data)
# 发送CAN指令
self.ch.write_raw(id_=can_id, msg=data, dlc=dlc)
# 打印调试信息
hex_data = ' '.join([f'0x{x:02X}' for x in data])
print(f"发送自定义CAN指令 ID: 0x{can_id:X}, DLC: {dlc}, 数据: {hex_data}")
return True
except canlib.CanError as e:
print(f"发送消息失败: {e}")
return False
@pyqtSlot(int)
def read_work_mode(self, motor_id: int) -> str:
"""
读取电机驱动器的工作模式和信号源
"""
if not self.ch:
print("CAN通道未初始化")
return "未初始化"
if motor_id not in self.MOTOR_IDS:
print(f"无效的电机ID: {motor_id}")
return "无效电机ID"
try:
can_id = self.MOTOR_IDS[motor_id]
# 发送读取工作模式指令
data = [0x04, 0x88, 0x2B, 0x00]
print(f"发送读取工作模式指令: {[f'0x{x:02X}' for x in data]}")
self.ch.write_raw(id_=can_id, msg=bytearray(data), dlc=4)
# 等待响应
timeout_ms = 500
start_time = time.time()
while (time.time() - start_time) * 1000 < timeout_ms:
try:
msg = self.ch.read(timeout=10)
print(f"收到CAN消息 - ID: 0x{msg.id:X}, 数据: {[f'0x{x:02X}' for x in msg.data]}")
if msg.id == 0x01: # 假设响应ID为0x01,需要根据实际情况调整
# 解析信号源(第5字节)
source_byte = msg.data[4]
source = "数字指令" if source_byte == 0x00 else f"未知信号源(0x{source_byte:02X})"
# 解析工作模式(第6字节)
mode_byte = msg.data[5]
modes = {
0x00: "速度控制模式",
0x01: "位置控制模式",
0x02: "电流控制模式"
}
mode = modes.get(mode_byte, f"未知模式(0x{mode_byte:02X})")
# 在返回结果时添加电机编号
result = f"电机{motor_id} - {mode}, 信号源: {source}"
print(f"电机{motor_id} - {result}")
if motor_id == 1:
self._workMode1 = result
self.workMode1Changed.emit(result)
else:
self._workMode2 = result
self.workMode2Changed.emit(result)
return result
except canlib.CanNoMsg:
continue
print(f"读取电机{motor_id}工作模式超时")
return "读取超时"
except canlib.CanError as e:
print(f"读取工作模式失败: {e}")
return f"读取错误: {str(e)}"
@pyqtSlot(int, int)
def set_motor_speed(self, motor_id: int, speed: int) -> bool:
"""设置电机速度"""
if not self.ch:
print("CAN通道未初始化")
return False
try:
can_id = self.MOTOR_IDS[motor_id]
# 将速度值转换为CAN数据格式
if speed >= 0:
# 正速度值处理
high_byte = speed // 256
low_byte = speed % 256
data = [0x08, 0x88, 0x90, 0x00, low_byte, high_byte, 0x00, 0x00]
else:
# 负速度值处理
abs_speed = abs(speed)
high_byte = 0xFF - (abs_speed - 1) // 256
remainder = abs_speed - (0xFF - high_byte) * 256
low_byte = 256 - remainder
data = [0x08, 0x88, 0x90, 0x00, low_byte, high_byte, 0xFF, 0xFF]
# 发送CAN指令
self.ch.write_raw(id_=can_id, msg=bytearray(data), dlc=8)
print(f"电机{motor_id}速度设置为: {speed}")
# 打印十六进制数据用于调试
hex_data = ' '.join([f'0x{x:02X}' for x in data])
print(f"发送的CAN数据: {hex_data}")
return True
except canlib.CanError as e:
print(f"设置速度失败: {e}")
return False
@pyqtSlot(int)
def read_average_speed(self, motor_id: int) -> int:
"""读取平均速度"""
if not self.ch:
print("CAN通道未初始化")
return 0
try:
can_id = self.MOTOR_IDS[motor_id]
data = [0x04, 0x88, 0x91, 0x00]
self.ch.write_raw(id_=can_id, msg=bytearray(data), dlc=4)
response = self._wait_for_response()
if response:
# 修改速度值的解析逻辑
low_byte = response.data[4]
high_byte = response.data[5]
# 处理负值的情况
if high_byte > 0x7F: # 最高位为1表示负数
speed = -((0xFF - high_byte) * 256 + (256 - low_byte))
else:
speed = low_byte + (high_byte << 8)
if motor_id == 1:
self._averageSpeed1 = speed
self.averageSpeed1Changed.emit(speed)
else:
self._averageSpeed2 = speed
self.averageSpeed2Changed.emit(speed)
return speed
return 0
except canlib.CanError as e:
print(f"读取平均速度失败: {e}")
return 0
@pyqtSlot(int)
def read_speed_error(self, motor_id: int) -> int:
"""读取速度误差"""
if not self.ch:
print("CAN通道未初始化")
return 0
try:
can_id = self.MOTOR_IDS[motor_id]
data = [0x04, 0x88, 0x92, 0x00]
self.ch.write_raw(id_=can_id, msg=bytearray(data), dlc=4)
response = self._wait_for_response()
if response:
# 修改误差值的解析逻辑
low_byte = response.data[4]
high_byte = response.data[5]
# 处理负值的情况
if high_byte > 0x7F: # 最高位为1表示负数
error = -((0xFF - high_byte) * 256 + (256 - low_byte))
else:
error = low_byte + (high_byte << 8)
if motor_id == 1:
self._speedError1 = error
self.speedError1Changed.emit(error)
else:
self._speedError2 = error
self.speedError2Changed.emit(error)
return error
return 0
except canlib.CanError as e:
print(f"读取速度误差失败: {e}")
return 0
@pyqtSlot(int)
def set_absolute_position_origin(self, motor_id: int) -> bool:
"""设置当前位置为绝对位置原点"""
if not self.ch:
print("CAN通道未初始化")
return False
try:
can_id = self.MOTOR_IDS[motor_id]
data = [0x08, 0x88, 0x98, 0x00, 0x00, 0x00, 0x00, 0x00]
self.ch.write_raw(id_=can_id, msg=bytearray(data), dlc=8)
print(f"电机{motor_id}设置绝对位置原点")
return True
except canlib.CanError as e:
print(f"设置绝对位置原点失败: {e}")
return False
@pyqtSlot(int, int)
def move_to_absolute_position(self, motor_id: int, position: int) -> bool:
"""设置电机向绝对位置运动"""
if not self.ch:
print("CAN通道未初始化")
return False
try:
can_id = self.MOTOR_IDS[motor_id]
if position >= 0:
# 正数:直接转换为32位值,注意字节顺序
byte3 = 0x00 # 最高字节始终为0
byte2 = (position >> 16) & 0xFF # 次高字节
byte1 = (position >> 8) & 0xFF # 次低字节
byte0 = position & 0xFF # 最低字节
else:
# 负数:特殊处理方式
abs_val = abs(position)
# 计算补码(修正后的转换规则)
byte0 = (~abs_val + 1) & 0xFF # 最低字节
byte1 = ((~abs_val + 1) >> 8) & 0xFF # 次低字节
byte2 = ((~abs_val + 1) >> 16) & 0xFF # 次高字节
byte3 = ((~abs_val + 1) >> 24) & 0xFF # 最高字节
# 组装CAN消息数据
data = [0x08, 0x88, 0x9A, 0x00, byte0, byte1, byte2, byte3]
# 发送CAN消息
self.ch.write_raw(id_=can_id, msg=bytearray(data), dlc=8)
print(f"电机{motor_id}移动到绝对位置: {position}")
# 调试信息:打印十六进制数据
hex_data = ' '.join([f'0x{x:02X}' for x in data])
print(f"发送的CAN数据: {hex_data}")
return True
except canlib.CanError as e:
print(f"移动到绝对位置失败: {e}")
return False
@pyqtSlot(int, int)
def move_by_relative_position(self, motor_id: int, position: int) -> bool:
"""设置电机移动相对位置"""
if not self.ch:
print("CAN通道未初始化")
return False
try:
can_id = self.MOTOR_IDS[motor_id]
if position >= 0:
# 正数:直接转换为32位值,注意字节顺序
byte3 = 0x00 # 最高字节始终为0
byte2 = (position >> 16) & 0xFF # 次高字节
byte1 = (position >> 8) & 0xFF # 次低字节
byte0 = position & 0xFF # 最低字节
else:
# 负数:特殊处理方式
abs_val = abs(position)
# 计算补码(修正后的转换规则)
byte0 = (~abs_val + 1) & 0xFF # 最低字节
byte1 = ((~abs_val + 1) >> 8) & 0xFF # 次低字节
byte2 = ((~abs_val + 1) >> 16) & 0xFF # 次高字节
byte3 = ((~abs_val + 1) >> 24) & 0xFF # 最高字节
# 组装CAN消息数据
data = [0x08, 0x88, 0x9A, 0x00, byte0, byte1, byte2, byte3]
# 发送CAN消息
self.ch.write_raw(id_=can_id, msg=bytearray(data), dlc=8)
print(f"电机{motor_id}移动相对位置: {position}")
# 调试信息:打印十六进制数据
hex_data = ' '.join([f'0x{x:02X}' for x in data])
print(f"发送的CAN数据: {hex_data}")
return True
except canlib.CanError as e:
print(f"移动相对位置失败: {e}")
return False
@pyqtSlot(int)
def read_current_position(self, motor_id: int) -> int:
"""读取电机实际位置"""
if not self.ch:
print("CAN通道未初始化")
return 0
try:
can_id = self.MOTOR_IDS[motor_id]
data = [0x04, 0x88, 0x9B, 0x00]
self.ch.write_raw(id_=can_id, msg=bytearray(data), dlc=4)
response = self._wait_for_response()
if response:
# 使用小端序读取4个字节计算位置
value = (response.data[4] +
(response.data[5] << 8) +
(response.data[6] << 16) +
(response.data[7] << 24))
# 检查最高位是否为1(负数)
if value & 0x80000000:
# 负数:将补码转换回原码
# 1. 取反
# 2. 加1
# 3. 加负号
position = -((~value + 1) & 0xFFFFFFFF)
else:
# 正数:直接使用
position = value
# 根据电机ID更新相应的属性
if motor_id == 1:
self._currentPosition1 = position
self.currentPosition1Changed.emit(position)
elif motor_id == 2:
self._currentPosition2 = position
self.currentPosition2Changed.emit(position)
return position
return 0
except canlib.CanError as e:
print(f"读取实际位置失败: {e}")
return 0
@pyqtSlot(int)
def read_position_error(self, motor_id: int) -> int:
"""读取实时位置误差"""
if not self.ch:
print("CAN通道未初始化")
return 0
try:
can_id = self.MOTOR_IDS[motor_id]
data = [0x04, 0x88, 0x9F, 0x00]
self.ch.write_raw(id_=can_id, msg=bytearray(data), dlc=4)
response = self._wait_for_response()
if response:
# 使用小端序读取4个字节计算误差
value = (response.data[4] +
(response.data[5] << 8) +
(response.data[6] << 16) +
(response.data[7] << 24))
# 检查最高位是否为1(负数)
if value & 0x80000000:
# 负数:将补码转换回原码
# 1. 取反
# 2. 加1
# 3. 加负号
error = -((~value + 1) & 0xFFFFFFFF)
else:
# 正数:直接使用
error = value
# 根据电机ID更新相应的属性
if motor_id == 1:
self._positionError1 = error
self.positionError1Changed.emit(error)
elif motor_id == 2:
self._positionError2 = error
self.positionError2Changed.emit(error)
return error
return 0
except canlib.CanError as e:
print(f"读取位置误差失败: {e}")
return 0
#电机1和2相关底层python配置——结束
#电机3、4、5和6相关底层python配置——开始
@pyqtSlot(int)
def set_pwm_mode(self, motor_id: int) -> bool:
"""设置电机为PWM模式"""
if not self.ch:
print("CAN通道未初始化")
return False
try:
can_id = self.MOTOR_IDS[motor_id]
data = [0x2F, 0x00, 0x20, 0x00, 0x00, 0x00, 0x00, 0x00]
self.ch.write_raw(id_=can_id, msg=bytearray(data), dlc=8)
print(f"电机{motor_id}已设置为PWM模式")
return True
except Exception as e:
print(f"设置PWM模式失败: {e}")
return False
@pyqtSlot(int, float)
def set_pwm_duty(self, motor_id: int, duty_cycle: float) -> bool:
"""
设置电机PWM占空比
:param motor_id: 电机ID
:param duty_cycle: 占空比值 (-100.0 到 100.0)
"""
if not self.ch:
print("CAN通道未初始化")
return False
try:
can_id = self.MOTOR_IDS[motor_id]
# 将占空比转换为实际值(乘以0.1)
actual_duty = int(duty_cycle * 10) # 例如:98.5 * 10 = 985
# 根据正负值构造数据
if actual_duty >= 0:
# 正值处理
low_byte = actual_duty & 0xFF
high_byte = (actual_duty >> 8) & 0xFF
data = [0x2B, 0x01, 0x20, 0x00, low_byte, high_byte, 0x00, 0x00]
else:
# 负值处理:使用二进制补码
actual_duty = -actual_duty # 先取绝对值
# 取补码:取反加一
actual_duty = ((~actual_duty + 1) & 0xFFFF)
low_byte = actual_duty & 0xFF
high_byte = (actual_duty >> 8) & 0xFF
data = [0x2B, 0x01, 0x20, 0x00, low_byte, high_byte, 0xFF, 0xFF]
self.ch.write_raw(id_=can_id, msg=bytearray(data), dlc=8)
print(f"电机{motor_id}设置PWM占空比: {duty_cycle}%")
# 打印十六进制数据用于调试
hex_data = ' '.join([f'0x{x:02X}' for x in data])
print(f"发送的CAN数据: {hex_data}")
return True
except Exception as e:
print(f"设置PWM占空比失败: {e}")
return False
@pyqtSlot(int)
def read_motor_speed(self, motor_id: int) -> int:
"""读取电机实时转速"""
if not self.ch:
print("CAN通道未初始化")
return 0
try:
can_id = self.MOTOR_IDS[motor_id]
data = [0x40, 0x0A, 0x21, 0x00, 0x00, 0x00, 0x00, 0x00]
self.ch.write_raw(id_=can_id, msg=bytearray(data), dlc=8)
response = self._wait_for_response()
if response:
# 修改速度值的解析逻辑
low_byte = response.data[4]
high_byte = response.data[5]
# 处理负值的情况
if high_byte > 0x7F: # 最高位为1表示负数
speed = -((0xFF - high_byte) * 256 + (256 - low_byte))
else:
speed = low_byte + (high_byte << 8)
# 存储并发送信号
self._motorSpeed[motor_id] = speed
self.motorSpeedChanged.emit(motor_id, speed)
# 更新电机4的属性和发送信号
if motor_id == 4:
self._motor4Speed = speed
self.motor4SpeedChanged.emit(motor_id, speed)
# 更新电机4的属性和发送信号
if motor_id == 5:
self._motor5Speed = speed
self.motor5SpeedChanged.emit(motor_id, speed)
# 更新电机6的属性和发送信号
if motor_id == 6:
self._motor6Speed = speed
self.motor6SpeedChanged.emit(motor_id, speed)
return speed
return 0
except canlib.CanError as e:
print(f"读取实时转速失败: {e}")
return 0
@pyqtSlot(int)
def read_motor_pwm(self, motor_id: int) -> int:
"""读取电机实时PWM"""
if not self.ch:
print("CAN通道未初始化")
return 0
try:
can_id = self.MOTOR_IDS[motor_id]
data = [0x40, 0x20, 0x40, 0x00, 0x00, 0x00, 0x00, 0x00]
self.ch.write_raw(id_=can_id, msg=bytearray(data), dlc=8)
response = self._wait_for_response()
if response:
# 修改PWM值的解析逻辑
low_byte = response.data[4]
high_byte = response.data[5]
# 处理负值的情况
if high_byte > 0x7F: # 最高位为1表示负数
pwm = -((0xFF - high_byte) * 256 + (256 - low_byte))
else:
pwm = low_byte + (high_byte << 8)
# 存储并发送信号
self._motorPwm[motor_id] = pwm
self.motorPwmChanged.emit(motor_id, pwm)
return pwm
return 0
except canlib.CanError as e:
print(f"读取实时PWM失败: {e}")
return 0
@pyqtSlot(int)
def read_motor_current(self, motor_id: int) -> int:
"""读取电机实时电流"""
if not self.ch:
print("CAN通道未初始化")
return 0
try:
can_id = self.MOTOR_IDS[motor_id]
data = [0x40, 0x21, 0x40, 0x00, 0x00, 0x00, 0x00, 0x00]
self.ch.write_raw(id_=can_id, msg=bytearray(data), dlc=8)
response = self._wait_for_response()
if response:
# 修改电流值的解析逻辑
low_byte = response.data[4]
high_byte = response.data[5]
# 处理负值的情况
if high_byte > 0x7F: # 最高位为1表示负数
current = -((0xFF - high_byte) * 256 + (256 - low_byte))
else:
current = low_byte + (high_byte << 8)
# 存储并发送信号
self._motorCurrent[motor_id] = current
self.motorCurrentChanged.emit(motor_id, current)
# 更新电机4的属性和发送信号
if motor_id == 4:
self._motor4Current = current
self.motor4CurrentChanged.emit(motor_id, current)
# 更新电机5的属性和发送信号
if motor_id == 5:
self._motor5Current = current
self.motor5CurrentChanged.emit(motor_id, current)
# 更新电机6的属性和发送信号
if motor_id == 6:
self._motor6Current = current
self.motor6CurrentChanged.emit(motor_id, current)
return current
return 0
except canlib.CanError as e:
print(f"读取实时电流失败: {e}")
return 0
@pyqtSlot(int)
def read_motor_position(self, motor_id: int) -> int:
"""读取电机实时位置"""
if not self.ch:
print("CAN通道未初始化")
return 0
try:
can_id = self.MOTOR_IDS[motor_id]
# 使用单条指令读取位置
data = [0x40, 0x05, 0x21, 0x00, 0x00, 0x00, 0x00, 0x00]
self.ch.write_raw(id_=can_id, msg=bytearray(data), dlc=8)
response = self._wait_for_response()
if response:
# 解析32位位置值
position = int.from_bytes(response.data[4:8], byteorder='little', signed=True)
self._motorPosition[motor_id] = position
self.motorPositionChanged.emit(motor_id, position)
# 更新电机4的属性和发送信号
if motor_id == 4:
self._motor4Position = position
self.motor4PositionChanged.emit(motor_id, position)
# 更新电机5的属性和发送信号
if motor_id == 5:
self._motor5Position = position
self.motor5PositionChanged.emit(motor_id, position)
# 更新电机6的属性和发送信号
if motor_id == 6:
self._motor6Position = position
self.motor6PositionChanged.emit(motor_id, position)
return position
return 0
except Exception as e:
print(f"读取实时位置失败: {e}")
return 0
@pyqtSlot(int)
def set_speed_mode(self, motor_id: int) -> bool:
"""设置电机为闭环调速模式"""
if not self.ch:
print("CAN通道未初始化")
return False
try:
can_id = self.MOTOR_IDS[motor_id]
data = [0x2F, 0x00, 0x20, 0x00, 0x01, 0x00, 0x00, 0x00]
self.ch.write_raw(id_=can_id, msg=bytearray(data), dlc=8)
print(f"电机{motor_id}已设置为闭环调速模式")
return True
except Exception as e:
print(f"设置闭环调速模式失败: {e}")
return False
@pyqtSlot(int, int)
def set_motor_speed_rpm(self, motor_id: int, speed_rpm: int) -> bool:
"""
设置电机转速
:param motor_id: 电机ID
:param speed_rpm: 目标转速(RPM)
"""
if not self.ch:
print("CAN通道未初始化")
return False
try:
can_id = self.MOTOR_IDS[motor_id]
if speed_rpm >= 0:
# 正速度值处理
high_byte = speed_rpm // 256
low_byte = speed_rpm % 256
data = [0x2B, 0x01, 0x20, 0x00, low_byte, high_byte, 0x00, 0x00]
else:
# 负速度值处理
abs_speed = abs(speed_rpm)
high_byte = 0xFF - (abs_speed - 1) // 256
remainder = abs_speed - (0xFF - high_byte) * 256
low_byte = 256 - remainder
data = [0x2B, 0x01, 0x20, 0x00, low_byte, high_byte, 0xFF, 0xFF]
# 发送CAN指令
self.ch.write_raw(id_=can_id, msg=bytearray(data), dlc=8)
print(f"电机{motor_id}转速设置为: {speed_rpm} RPM")
# 打印十六进制数据用于调试
hex_data = ' '.join([f'0x{x:02X}' for x in data])
print(f"发送的CAN数据: {hex_data}")
return True
except Exception as e:
print(f"设置转速失败: {e}")
return False
@pyqtSlot(int)
def set_3456_current_mode(self, motor_id: int) -> bool:
"""设置电机为力矩模式"""
if not self.ch:
print("CAN通道未初始化")
return False
try:
can_id = self.MOTOR_IDS[motor_id]
data = [0x2F, 0x00, 0x20, 0x00, 0x02, 0x00, 0x00, 0x00]
self.ch.write_raw(id_=can_id, msg=bytearray(data), dlc=8)
print(f"电机{motor_id}已设置为力矩模式")
return True
except Exception as e:
print(f"设置力矩模式失败: {e}")
return False
@pyqtSlot(int, int)
def set_motor3456_current_mA(self, motor_id: int, current_mA: int) -> bool:
"""
设置电机转矩
:param motor_id: 电机ID
:param current_mA: 目标电流(mA)
"""
if not self.ch:
print("CAN通道未初始化")
return False
try:
can_id = self.MOTOR_IDS[motor_id]
if current_mA >= 0:
# 正速度值处理
high_byte = current_mA // 256
low_byte = current_mA % 256
data = [0x2B, 0x01, 0x20, 0x00, low_byte, high_byte, 0x00, 0x00]
else:
# 负速度值处理
abs_current = abs(current_mA)
high_byte = 0xFF - (abs_current - 1) // 256
remainder = abs_current - (0xFF - high_byte) * 256
low_byte = 256 - remainder
data = [0x2B, 0x01, 0x20, 0x00, low_byte, high_byte, 0xFF, 0xFF]
# 发送CAN指令
self.ch.write_raw(id_=can_id, msg=bytearray(data), dlc=8)
print(f"电机{motor_id}转矩设置为: {current_mA} mA")
# 打印十六进制数据用于调试
hex_data = ' '.join([f'0x{x:02X}' for x in data])
print(f"发送的CAN数据: {hex_data}")
return True
except Exception as e:
print(f"设置转矩失败: {e}")
return False
@pyqtSlot(int)
def set_position_mode(self, motor_id: int) -> bool:
"""设置电机为位置控制模式"""
if not self.ch:
print("CAN通道未初始化")
return False
try:
can_id = self.MOTOR_IDS[motor_id]
data = [0x2F, 0x00, 0x20, 0x00, 0x03, 0x00, 0x00, 0x00]
self.ch.write_raw(id_=can_id, msg=bytearray(data), dlc=8)
print(f"电机{motor_id}已设置为位置控制模式")
return True
except Exception as e:
print(f"设置位置控制模式失败: {e}")
return False
@pyqtSlot(int)
def set_absolute_position_mode(self, motor_id: int) -> bool:
"""设置为绝对位置模式"""
if not self.ch:
print("CAN通道未初始化")
return False
try:
can_id = self.MOTOR_IDS[motor_id]
# 新的绝对位置模式指令
data = [0x2F, 0x02, 0x20, 0x00, 0x00, 0x00, 0x00, 0x00]
self.ch.write_raw(id_=can_id, msg=bytearray(data), dlc=8)
print(f"电机{motor_id}已设置为绝对位置模式")
return True
except Exception as e:
print(f"设置绝对位置模式失败: {e}")
return False
@pyqtSlot(int)
def set_relative_position_mode(self, motor_id: int) -> bool:
"""设置为相对位置模式"""
if not self.ch:
print("CAN通道未初始化")
return False
try:
can_id = self.MOTOR_IDS[motor_id]
# 新的相对位置模式指令
data = [0x2F, 0x02, 0x20, 0x00, 0x01, 0x00, 0x00, 0x00]
self.ch.write_raw(id_=can_id, msg=bytearray(data), dlc=8)
print(f"电机{motor_id}已设置为相对位置模式")
return True
except Exception as e:
print(f"设置相对位置模式失败: {e}")
return False
@pyqtSlot(int, int)
def set_target_position(self, motor_id: int, position: int) -> bool:
"""设置目标位置"""
if not self.ch:
print("CAN通道未初始化")
return False
try:
can_id = self.MOTOR_IDS[motor_id]
# 新的目标位置设置格式:一次性发送32位位置值
data = [0x23, 0x03, 0x20, 0x00,
position & 0xFF, # 最低字节
(position >> 8) & 0xFF, # 次低字节
(position >> 16) & 0xFF, # 次高字节
(position >> 24) & 0xFF] # 最高字节
self.ch.write_raw(id_=can_id, msg=bytearray(data), dlc=8)
print(f"电机{motor_id}目标位置设置为: {position}")
print(f"发送的数据: {[f'0x{x:02X}' for x in data]}")
return True
except Exception as e:
print(f"设置目标位置失败: {e}")
return False
#电机3、4、5和6相关底层python配置——结束
#电机7、8、9和10相关底层python配置——开始
@pyqtSlot(int)
def set_speed_control_mode(self, motor_id: int) -> bool:
"""设置电机为速度控制模式"""
if not self.ch:
print("CAN通道未初始化")
return False
try:
can_id = self.MOTOR_IDS[motor_id]
# 1. 设置控制模式为速度控制
data = [0x00, 0x4E, 0x00, 0x00, 0x00, 0x02]
self.ch.write_raw(id_=can_id, msg=bytearray(data), dlc=6)
print(f"电机{motor_id}设置速度控制模式")
time.sleep(0.1)
# 2. 设置控制源为不使用
data = [0x01, 0x12, 0x00, 0x00, 0x00, 0x00]
self.ch.write_raw(id_=can_id, msg=bytearray(data), dlc=6)
print(f"电机{motor_id}设置控制源为不使用")
time.sleep(0.1)
# 3. 设置模拟量类型为内部使用
data = [0x01, 0xFD, 0x00, 0x00, 0x00, 0x00]
self.ch.write_raw(id_=can_id, msg=bytearray(data), dlc=6)
print(f"电机{motor_id}设置模拟量类型为内部使用")
self.motorSpeedModeStatusChanged.emit(motor_id, True)
return True
except Exception as e:
print(f"设置速度控制模式失败: {e}")
return False
@pyqtSlot(int)
def enable_motor(self, motor_id: int) -> bool:
"""电机使能"""
if not self.ch:
print("CAN通道未初始化")
return False
try:
can_id = self.MOTOR_IDS[motor_id]
data = [0x01, 0x00, 0x00, 0x00, 0x00, 0x01]
self.ch.write_raw(id_=can_id, msg=bytearray(data), dlc=6)
print(f"电机{motor_id}已使能")
self.motorEnableStatusChanged.emit(motor_id, True)
return True
except Exception as e:
print(f"电机使能失败: {e}")
return False
@pyqtSlot(int, int)
def set_target_speed(self, motor_id: int, speed: int) -> bool:
"""设置目标速度值"""
if not self.ch:
print("CAN通道未初始化")
return False
try:
can_id = self.MOTOR_IDS[motor_id]
if speed >= 0: # 处理正数情况
if speed <= 65535: # 处理小于等于0xFFFF的值
data = [0x01, 0xFE, 0x00, 0x00,
(speed >> 8) & 0xFF,
speed & 0xFF]
else: # 处理大于0xFFFF的值
data = [0x01, 0xFE, 0x00,
(speed >> 16) & 0xFF,
(speed >> 8) & 0xFF,
speed & 0xFF]
else: # 处理负数情况
# 对于负数,前三位固定为 01 FE FF
# 后三位使用补码表示
neg_value = abs(speed)
data = [0x01, 0xFE, 0xFF,
~((neg_value >> 16) & 0xFF) & 0xFF,
~((neg_value >> 8) & 0xFF) & 0xFF,
(~neg_value & 0xFF) + 1]
self.ch.write_raw(id_=can_id, msg=bytearray(data), dlc=6)
print(f"电机{motor_id}目标速度设置为: {speed} count/s")
# 打印调试信息
hex_data = ' '.join([f'0x{x:02X}' for x in data])
print(f"发送的CAN数据: {hex_data}")
return True
except Exception as e:
print(f"设置目标速度失败: {e}")
return False
@pyqtSlot(int)
def set_torque_mode(self, motor_id: int) -> bool:
"""设置电机为力矩控制模式"""
if not self.ch:
print("CAN通道未初始化")
return False
try:
can_id = self.MOTOR_IDS[motor_id]
# 1. 设置控制模式为力矩控制
data = [0x00, 0x4E, 0x00, 0x00, 0x00, 0x01]
self.ch.write_raw(id_=can_id, msg=bytearray(data), dlc=6)
print(f"电机{motor_id}设置力矩控制模式")
time.sleep(0.1)
# 2. 设置控制源为不使用
data = [0x01, 0x12, 0x00, 0x00, 0x00, 0x00]
self.ch.write_raw(id_=can_id, msg=bytearray(data), dlc=6)
print(f"电机{motor_id}设置控制源为不使用")
time.sleep(0.1)
# 3. 设置模拟量类型为内部使用
data = [0x01, 0xFD, 0x00, 0x00, 0x00, 0x00]
self.ch.write_raw(id_=can_id, msg=bytearray(data), dlc=6)
print(f"电机{motor_id}设置模拟量类型为内部使用")
# 发送信号通知UI
self.motorTorqueModeStatusChanged.emit(motor_id, True)
return True
except Exception as e:
print(f"设置力矩控制模式失败: {e}")
return False
@pyqtSlot(int, int)
def set_max_speed(self, motor_id: int, max_speed: int) -> bool:
"""设置最大速度限制"""
if not self.ch:
print("CAN通道未初始化")
return False
try:
can_id = self.MOTOR_IDS[motor_id]
if max_speed >= 0: # 处理正数情况
if max_speed <= 65535: # 处理小于等于0xFFFF的值
data = [0x02, 0x04, 0x00, 0x00,
(max_speed >> 8) & 0xFF,
max_speed & 0xFF]
else: # 处理大于0xFFFF的值
data = [0x02, 0x04, 0x00,
(max_speed >> 16) & 0xFF,
(max_speed >> 8) & 0xFF,
max_speed & 0xFF]
else: # 处理负数情况
# 对于负数,前三位固定为 02 04 FF
neg_value = abs(max_speed)
data = [0x02, 0x04, 0xFF,
~((neg_value >> 16) & 0xFF) & 0xFF,
~((neg_value >> 8) & 0xFF) & 0xFF,
(~neg_value & 0xFF) + 1]
self.ch.write_raw(id_=can_id, msg=bytearray(data), dlc=6)
print(f"电机{motor_id}最大速度限制设置为: {max_speed} count/s")
# 打印调试信息
hex_data = ' '.join([f'0x{x:02X}' for x in data])
print(f"发送的CAN数据: {hex_data}")
# 发送信号通知UI
self.motorMaxSpeedChanged.emit(motor_id, max_speed)
return True
except Exception as e:
print(f"设置最大速度限制失败: {e}")
return False
@pyqtSlot(int, int)
def set_target_current(self, motor_id: int, current: int) -> bool:
"""设置目标电流值"""
if not self.ch:
print("CAN通道未初始化")
return False
try:
can_id = self.MOTOR_IDS[motor_id]
if current >= 0: # 处理正数情况
data = [0x01, 0xFE, 0x00, 0x00,
(current >> 8) & 0xFF,
current & 0xFF]
else: # 处理负数情况
# 对于负数,前四位固定为 01 FE FF FF
neg_value = abs(current)
data = [0x01, 0xFE, 0xFF, 0xFF,
~((neg_value >> 8) & 0xFF) & 0xFF,
(~neg_value & 0xFF) + 1]
self.ch.write_raw(id_=can_id, msg=bytearray(data), dlc=6)
print(f"电机{motor_id}目标电流设置为: {current} mA")
# 打印调试信息
hex_data = ' '.join([f'0x{x:02X}' for x in data])
print(f"发送的CAN数据: {hex_data}")
# 发送信号通知UI
self.motorTargetCurrentChanged.emit(motor_id, current)
return True
except Exception as e:
print(f"设置目标电流失败: {e}")
return False
@pyqtSlot(int)
def disable_motor(self, motor_id: int) -> bool:
"""电机失能"""
if not self.ch:
print("CAN通道未初始化")
return False
try:
can_id = self.MOTOR_IDS[motor_id]
data = [0x01, 0x00, 0x00, 0x00, 0x00, 0x00]
self.ch.write_raw(id_=can_id, msg=bytearray(data), dlc=6)
print(f"电机{motor_id}已失能")
return True
except Exception as e:
print(f"电机失能失败: {e}")
return False
@pyqtSlot(int)
def read_extended_motor_speed(self, motor_id: int) -> int:
"""读取扩展电机的实际速度"""
if not self.ch:
print("CAN通道未初始化")
return 0
try:
can_id = self.MOTOR_IDS[motor_id]
data = [0x00, 0x05, 0x00, 0x01]
self.ch.write_raw(id_=can_id, msg=bytearray(data), dlc=4)
response = self._wait_for_response()
if response:
speed_bytes = response.data[0:4]
if len(speed_bytes) == 4:
speed = int.from_bytes(speed_bytes, byteorder='big', signed=True)
# 根据电机ID更新对应的属性
if motor_id == 7:
self._motor7Speed = speed
self.motor7SpeedChanged.emit(motor_id, speed)
elif motor_id == 8:
self._motor8Speed = speed
self.motor8SpeedChanged.emit(motor_id, speed)
elif motor_id == 9:
self._motor9Speed = speed
self.motor9SpeedChanged.emit(motor_id, speed)
elif motor_id == 10:
self._motor10Speed = speed
self.motor10SpeedChanged.emit(motor_id, speed)
print(f"电机{motor_id}实际速度: {speed}")
return speed
return 0
except Exception as e:
print(f"读取电机{motor_id}实际速度失败: {e}")
return 0
@pyqtSlot(int)
def read_extended_motor_current(self, motor_id: int) -> int:
"""读取扩展电机的实际电流"""
if not self.ch:
print("CAN通道未初始化")
return 0
try:
can_id = self.MOTOR_IDS[motor_id]
data = [0x00, 0x08]
self.ch.write_raw(id_=can_id, msg=bytearray(data), dlc=2)
response = self._wait_for_response()
if response:
current_bytes = response.data[0:4]
if len(current_bytes) == 4:
current = int.from_bytes(current_bytes, byteorder='big', signed=True)
if motor_id == 7:
self._motor7Current = current
self.motor7CurrentChanged.emit(motor_id, current)
elif motor_id == 8:
self._motor8Current = current
self.motor8CurrentChanged.emit(motor_id, current)
elif motor_id == 9:
self._motor9Current = current
self.motor9CurrentChanged.emit(motor_id, current)
elif motor_id == 10:
self._motor10Current = current
self.motor10CurrentChanged.emit(motor_id, current)
print(f"电机{motor_id}实际电流: {current}mA")
return current
return 0
except Exception as e:
print(f"读取电机{motor_id}实际电流失败: {e}")
return 0
@pyqtSlot(int)
def read_extended_motor_position(self, motor_id: int) -> int:
"""读取扩展电机的实际位置"""
if not self.ch:
print("CAN通道未初始化")
return 0
try:
can_id = self.MOTOR_IDS[motor_id]
data = [0x00, 0x02]
self.ch.write_raw(id_=can_id, msg=bytearray(data), dlc=2)
response = self._wait_for_response()
if response:
position_bytes = response.data[0:4]
if len(position_bytes) == 4:
position = int.from_bytes(position_bytes, byteorder='big', signed=True)
if motor_id == 7:
self._motor7Position = position
self.motor7PositionChanged.emit(motor_id, position)
elif motor_id == 8:
self._motor8Position = position
self.motor8PositionChanged.emit(motor_id, position)
elif motor_id == 9:
self._motor9Position = position
self.motor9PositionChanged.emit(motor_id, position)
elif motor_id == 10:
self._motor10Position = position
self.motor10PositionChanged.emit(motor_id, position)
return position
return 0
except Exception as e:
print(f"读取电机{motor_id}实际位置失败: {e}")
return 0
@pyqtProperty(bool)
def position_protection_enabled(self):
return self._position_protection_enabled
@position_protection_enabled.setter
def position_protection_enabled(self, value):
self._position_protection_enabled = value
def check_position_limits(self, motor_id: int, position: int) -> bool:
"""检查位置是否在允许范围内"""
if not self._position_protection_enabled:
return True
if motor_id in [7, 8, 9, 10]:
if position < self.POSITION_MIN or position > self.POSITION_MAX:
print(f"电机{motor_id}位置{position}超出允许范围({self.POSITION_MIN}-{self.POSITION_MAX})")
self.positionOutOfRangeError.emit(motor_id, position)
self.emergency_stop() # 触发紧急停止
return False
return True
def _check_motors_position(self):
"""定时检查电机7-10的位置"""
if not self.ch or not self._position_protection_enabled or not self._monitoring_enabled:
return
try:
for motor_id in [7, 8, 9, 10]:
# 使用现有的读取方法,但不更新UI
position = self._read_position_without_ui_update(motor_id)
# 只进行位置检查
if position != 0: # 0表示读取失败
if position < self.POSITION_MIN or position > self.POSITION_MAX:
print(f"位置监控:电机{motor_id}位置{position}超出允许范围")
self.positionOutOfRangeError.emit(motor_id, position)
self.emergency_stop()
return
# 添加小延时,避免CAN总线负载过高
time.sleep(0.01)
except Exception as e:
print(f"位置监控检查失败: {e}")
def _read_position_without_ui_update(self, motor_id: int) -> int:
"""读取位置但不更新UI(供监控使用)"""
if not self.ch:
return 0
try:
can_id = self.MOTOR_IDS[motor_id]
data = [0x00, 0x02]
self.ch.write_raw(id_=can_id, msg=bytearray(data), dlc=2)
response = self._wait_for_response()
if response:
position_bytes = response.data[0:4]
if len(position_bytes) == 4:
return int.from_bytes(position_bytes, byteorder='big', signed=True)
return 0
except Exception as e:
print(f"读取电机{motor_id}位置失败: {e}")
return 0
@pyqtSlot()
def reset_protection(self):
"""重置保护状态,重新启用监控"""
self._monitoring_enabled = True
@pyqtSlot(int, int)
def set_acceleration(self, motor_id: int, acceleration: int) -> bool:
"""设置加速度"""
if not self.ch:
print("CAN通道未初始化")
return False
try:
can_id = self.MOTOR_IDS[motor_id]
if acceleration <= 65535: # 处理小于等于0xFFFF的值
# 例如30000 (0x7530)
data = [0x00, 0x88, 0x00, 0x00,
(acceleration >> 8) & 0xFF, # 0x75
acceleration & 0xFF] # 0x30
else: # 处理大于0xFFFF的值
# 例如200000 (0x30D40)
data = [0x00, 0x88, 0x00,
(acceleration >> 16) & 0xFF, # 0x03
(acceleration >> 8) & 0xFF, # 0x0D
acceleration & 0xFF] # 0x40
self.ch.write_raw(id_=can_id, msg=bytearray(data), dlc=6)
# 打印调试信息
hex_data = ' '.join([f'0x{x:02X}' for x in data])
print(f"电机{motor_id}加速度设置为: {acceleration} count/s²")
print(f"发送的CAN数据: {hex_data}")
return True
except Exception as e:
print(f"设置加速度失败: {e}")
return False
@pyqtSlot(int, int)
def set_deceleration(self, motor_id: int, deceleration: int) -> bool:
"""设置减速度"""
if not self.ch:
print("CAN通道未初始化")
return False
try:
can_id = self.MOTOR_IDS[motor_id]
if deceleration <= 65535: # 处理小于等于0xFFFF的值
# 例如30000 (0x7530)
data = [0x00, 0x89, 0x00, 0x00,
(deceleration >> 8) & 0xFF, # 0x75
deceleration & 0xFF] # 0x30
else: # 处理大于0xFFFF的值
# 例如200000 (0x30D40)
data = [0x00, 0x89, 0x00,
(deceleration >> 16) & 0xFF, # 0x03
(deceleration >> 8) & 0xFF, # 0x0D
deceleration & 0xFF] # 0x40
self.ch.write_raw(id_=can_id, msg=bytearray(data), dlc=6)
print(f"电机{motor_id}减速度设置为: {deceleration} count/s²")
# 打印调试信息
hex_data = ' '.join([f'0x{x:02X}' for x in data])
print(f"发送的CAN数据: {hex_data}")
return True
except Exception as e:
print(f"设置减速度失败: {e}")
return False
@pyqtSlot(int, int)
def set_position_speed(self, motor_id: int, speed: int) -> bool:
"""设置位置速度"""
if not self.ch:
print("CAN通道未初始化")
return False
try:
can_id = self.MOTOR_IDS[motor_id]
if speed <= 65535: # 处理小于等于0xFFFF的值
# 例如30000 (0x7530)
data = [0x00, 0x8A, 0x00, 0x00,
(speed >> 8) & 0xFF, # 0x75
speed & 0xFF] # 0x30
else: # 处理大于0xFFFF的值
# 例如200000 (0x30D40)
data = [0x00, 0x8A, 0x00,
(speed >> 16) & 0xFF, # 0x03
(speed >> 8) & 0xFF, # 0x0D
speed & 0xFF] # 0x40
self.ch.write_raw(id_=can_id, msg=bytearray(data), dlc=6)
print(f"电机{motor_id}位置速度设置为: {speed} count/s")
# 打印调试信息
hex_data = ' '.join([f'0x{x:02X}' for x in data])
print(f"发送的CAN数据: {hex_data}")
return True
except Exception as e:
print(f"设置位置速度失败: {e}")
return False
@pyqtSlot(int)
def set_position_mode(self, motor_id: int) -> bool:
"""设置位置控制模式"""
if not self.ch:
print("CAN通道未初始化")
return False
try:
can_id = self.MOTOR_IDS[motor_id]
# 1. 设置控制模式为位置控制
data = [0x00, 0x4E, 0x00, 0x00, 0x00, 0x03]
self.ch.write_raw(id_=can_id, msg=bytearray(data), dlc=6)
print(f"电机{motor_id}设置为位置控制模式")
time.sleep(0.1)
# 2. 设置运动模式为目标绝对位置模式
data = [0x00, 0x8D, 0x00, 0x00, 0x00, 0x01]
self.ch.write_raw(id_=can_id, msg=bytearray(data), dlc=6)
print(f"电机{motor_id}设置为目标绝对位置模式")
time.sleep(0.1)
# 3. 设置相对位置为0
data = [0x00, 0x87, 0x00, 0x00, 0x00, 0x00]
self.ch.write_raw(id_=can_id, msg=bytearray(data), dlc=6)
print(f"电机{motor_id}相对位置设置为0")
return True
except Exception as e:
print(f"设置位置控制模式失败: {e}")
return False
@pyqtSlot(int, int)
def set_absolute_position(self, motor_id: int, position: int) -> bool:
"""设置目标绝对位置"""
if not self.ch:
print("CAN通道未初始化")
return False
try:
can_id = self.MOTOR_IDS[motor_id]
if position >= 0: # 处理正数情况
if position <= 65535: # 处理小于等于0xFFFF的值
data = [0x00, 0x86, 0x00, 0x00,
(position >> 8) & 0xFF,
position & 0xFF]
else: # 处理大于0xFFFF的值
data = [0x00, 0x86, 0x00,
(position >> 16) & 0xFF,
(position >> 8) & 0xFF,
position & 0xFF]
else: # 处理负数情况
# 对于负数,前三位固定为 00 86 FF
neg_value = abs(position)
data = [0x00, 0x86, 0xFF,
~((neg_value >> 16) & 0xFF) & 0xFF,
~((neg_value >> 8) & 0xFF) & 0xFF,
(~neg_value & 0xFF) + 1]
self.ch.write_raw(id_=can_id, msg=bytearray(data), dlc=6)
print(f"电机{motor_id}目标绝对位置设置为: {position}")
# 打印调试信息
hex_data = ' '.join([f'0x{x:02X}' for x in data])
print(f"发送的CAN数据: {hex_data}")
return True
except Exception as e:
print(f"设置目标绝对位置失败: {e}")
return False
@pyqtSlot(int)
def start_motion(self, motor_id: int) -> bool:
"""开始运动"""
if not self.ch:
print("CAN通道未初始化")
return False
try:
can_id = self.MOTOR_IDS[motor_id]
data = [0x00, 0x83]
self.ch.write_raw(id_=can_id, msg=bytearray(data), dlc=2)
print(f"电机{motor_id}开始运动")
return True
except Exception as e:
print(f"开始运动失败: {e}")
return False
@pyqtSlot(int, int)
def set_relative_position(self, motor_id: int, position: int) -> bool:
"""设置目标相对位置"""
if not self.ch:
print("CAN通道未初始化")
return False
try:
can_id = self.MOTOR_IDS[motor_id]
if position >= 0: # 处理正数情况
if position <= 65535: # 处理小于等于0xFFFF的值
data = [0x00, 0x87, 0x00, 0x00,
(position >> 8) & 0xFF,
position & 0xFF]
else: # 处理大于0xFFFF的值
data = [0x00, 0x87, 0x00,
(position >> 16) & 0xFF,
(position >> 8) & 0xFF,
position & 0xFF]
else: # 处理负数情况
# 对于负数,前三位固定为 00 87 FF
neg_value = abs(position)
data = [0x00, 0x87, 0xFF,
~((neg_value >> 16) & 0xFF) & 0xFF,
~((neg_value >> 8) & 0xFF) & 0xFF,
(~neg_value & 0xFF) + 1]
self.ch.write_raw(id_=can_id, msg=bytearray(data), dlc=6)
print(f"电机{motor_id}目标相对位置设置为: {position}")
# 打印调试信息
hex_data = ' '.join([f'0x{x:02X}' for x in data])
print(f"发送的CAN数据: {hex_data}")
return True
except Exception as e:
print(f"设置目标相对位置失败: {e}")
return False
#电机7、8、9和10相关底层python配置——结束
@pyqtSlot()
def emergency_stop(self) -> bool:
"""所有电机紧急停止"""
if not self.ch:
print("CAN通道未初始化")
try:
# 尝试重新初始化CAN通道
self.initialize_can()
except Exception as e:
print(f"重新初始化CAN通道失败: {e}")
return False
try:
# 禁用位置监控,避免重复触发
self._monitoring_enabled = False
# 处理电机7、8、9和10
for motor_id in [7, 8, 9, 10]:
can_id = self.MOTOR_IDS[motor_id]
# 1. 电机失能
data = [0x01, 0x00, 0x00, 0x00, 0x00, 0x00]
self.ch.write_raw(id_=can_id, msg=bytearray(data), dlc=6)
time.sleep(0.001)
# 2. 设置控制模式为速度模式
data = [0x00, 0x4E, 0x00, 0x00, 0x00, 0x02]
self.ch.write_raw(id_=can_id, msg=bytearray(data), dlc=6)
time.sleep(0.001)
# 3. 设置控制源为不使用
data = [0x01, 0x12, 0x00, 0x00, 0x00, 0x00]
self.ch.write_raw(id_=can_id, msg=bytearray(data), dlc=6)
time.sleep(0.001)
# 4. 设置模拟量为内部使用
data = [0x01, 0xFD, 0x00, 0x00, 0x00, 0x00]
self.ch.write_raw(id_=can_id, msg=bytearray(data), dlc=6)
time.sleep(0.001)
# 5. 设置模拟量值
data = [0x01, 0xFE, 0x00, 0x00, 0x00, 0x00]
self.ch.write_raw(id_=can_id, msg=bytearray(data), dlc=6)
time.sleep(0.001)
# 处理电机1和2
for motor_id in [1, 2]:
can_id = self.MOTOR_IDS[motor_id]
data = [0x08, 0x88, 0x84, 0x00, 0x00, 0x00, 0x00, 0x00]
self.ch.write_raw(id_=can_id, msg=bytearray(data), dlc=8)
time.sleep(0.001)
# 处理电机3、4、5和6
for motor_id in [3, 4, 5, 6]:
can_id = self.MOTOR_IDS[motor_id]
data = [0x2F, 0x00, 0x20, 0x00, 0x11, 0x00, 0x00, 0x00]
self.ch.write_raw(id_=can_id, msg=bytearray(data), dlc=8)
time.sleep(0.001)
print("所有电机已紧急停止")
# 确保CAN通道保持活跃状态
try:
if not self.ch.getBusStatus() & canlib.canSTAT_BUS_ACTIVE:
self.ch.busOn()
except Exception as e:
print(f"重新激活CAN总线失败: {e}")
# 尝试重新初始化
self.initialize_can()
return True
except Exception as e:
print(f"紧急停止失败: {e}")
# 发生错误时尝试重新初始化CAN通道
try:
self.ch.busOff()
time.sleep(0.1)
self.ch.busOn()
except:
self.initialize_can()
return False
@pyqtSlot(int)
def release_emergency_stop(self, motor_id: int) -> bool:
"""解除电机急停状态"""
if not self.ch:
print("CAN通道未初始化")
return False
try:
can_id = self.MOTOR_IDS[motor_id]
data = [0x08, 0x88, 0x85, 0x00, 0x00, 0x00, 0x00, 0x00]
self.ch.write_raw(id_=can_id, msg=bytearray(data), dlc=8)
print(f"电机{motor_id}已解除急停状态")
# 打印调试信息
hex_data = ' '.join([f'0x{x:02X}' for x in data])
print(f"发送的CAN数据: {hex_data}")
return True
except Exception as e:
print(f"解除急停状态失败: {e}")
return False
def _wait_for_response(self, expected_id=None, timeout_ms=500):
"""
等待指定ID的CAN响应
Args:
expected_id: 期望的响应ID (如果为None,则接受0x01或0x5D5)
timeout_ms: 超时时间(毫秒)
Returns:
canlib.Frame 或 None
"""
if not self._receive_thread or not self._receive_thread.is_alive():
print("接收线程未运行")
return None
from threading import Event
response_event = Event()
response_data = [None]
def message_handler(msg):
# 如果没有指定expected_id,则接受两种ID
if expected_id is None and msg.id in [0x01, 0x5D5, 0x5C4, 0x5E6, 0x591, 0x5D6, 0x5E1, 0x600, 0x5C8]:
response_data[0] = msg
response_event.set()
# 如果指定了expected_id,则只接受指定ID
elif expected_id is not None and msg.id == expected_id:
response_data[0] = msg
response_event.set()
# 临时订阅消息
self._message_handlers.append(message_handler)
try:
# 等待响应或超时
if response_event.wait(timeout_ms / 1000.0):
return response_data[0]
return None
finally:
# 移除临时订阅
self._message_handlers.remove(message_handler)
def cleanup(self):
self.running = False
if self._receive_thread:
self._receive_thread.join(timeout=1.0)
if self.ch:
self.ch.busOff()
self.ch.close()
print("CAN通道已关闭")
# 停止位置监控定时器
if hasattr(self, '_position_monitor_timer'):
self._position_monitor_timer.stop()
def main():
app = QApplication(sys.argv)
# 设置应用程序名称和窗口标题
app.setApplicationName("巡检机器人控制面板")
controller = CanController()
# 添加信号测试
def on_can_message(can_id, data):
print(f"Python收到CAN消息: ID={can_id}, Data={data}")
controller.canMessageReceived.connect(on_can_message)
# 创建 QML 引擎
engine = QQmlApplicationEngine()
# 在加载 QML 之前设置上下文属性
engine.rootContext().setContextProperty("controller", controller)
# 加载 QML 文件
engine.load(QUrl.fromLocalFile("qmls/main.qml"))
if not engine.rootObjects():
print("QML文件加载失败")
return -1
# 获取主窗口
window = engine.rootObjects()[0]
# 添加事件过滤器
class KeyFilter(QObject):
def __init__(self, controller):
super().__init__()
self.controller = controller
def eventFilter(self, obj, event):
if event.type() == event.KeyPress:
if event.key() == Qt.Key_Control:
print("Ctrl key pressed through event filter")
self.controller.emergency_stop()
return True
return False
# 安装事件过滤器
key_filter = KeyFilter(controller)
window.installEventFilter(key_filter)
app.installEventFilter(key_filter)
app.aboutToQuit.connect(controller.cleanup)
return app.exec_()
if __name__ == "__main__":
main()
main.qml
import QtCharts 2.15
import QtQuick 2.15
import QtQuick.Controls 2.14
ApplicationWindow {
id: mainWindow
visible: true
width: 900
height: 715
// 确保窗口可以接收键盘事件
flags: Qt.Window | Qt.WindowSystemMenuHint | Qt.WindowTitleHint | Qt.WindowCloseButtonHint
// 添加全局快捷键处理
Shortcut {
sequences: [StandardKey.Cancel, "Ctrl"] // 同时监听 Cancel 和 Ctrl 键
context: Qt.ApplicationShortcut // 设置为应用程序级快捷键
onActivated: {
console.log("Ctrl key pressed - Emergency Stop triggered")
controller.emergency_stop()
}
}
// 添加焦点处理
Item {
focus: true
Keys.onPressed: function(event) {
if (event.key === Qt.Key_Control) {
console.log("Control key pressed via Keys handler")
controller.emergency_stop();
event.accepted = true;
}
}
}
QtObject {
id: style
property color primaryColor: "#AA69B4"
}
Column {
anchors.fill: parent
spacing: 8
Row {
anchors.horizontalCenter: parent.horizontalCenter
spacing: 8
height: 30
Rectangle {
width: 100
height: 36
radius: 5
color: "#228B55"
Text {
anchors.centerIn: parent
text: "初始化 CAN"
color: "white"
font.pixelSize: 16
}
MouseArea {
anchors.fill: parent
onClicked: controller.initialize_can()
}
}
Rectangle {
width: 100
height: 36
radius: 5
color: positionProtectionEnabled ? "#228B55" : "#E0E0E0" // 开启时绿色,关闭时灰色
property bool positionProtectionEnabled: true // 默认开启
Text {
anchors.centerIn: parent
text: "位置保护"
color: "white"
font.pixelSize: 16
}
MouseArea {
anchors.fill: parent
onClicked: {
parent.positionProtectionEnabled = !parent.positionProtectionEnabled
controller.position_protection_enabled = parent.positionProtectionEnabled
}
}
}
Rectangle {
width: 60
height: 36
radius: 5
color: sw.currentIndex === 0 ? style.primaryColor : "#E0E0E0"
Text {
anchors.centerIn: parent
text: "电机1"
color: sw.currentIndex === 0 ? "white" : "black"
font.pixelSize: 16
}
MouseArea {
anchors.fill: parent
onClicked: sw.setCurrentIndex(0)
}
}
Rectangle {
width: 60
height: 36
radius: 5
color: sw.currentIndex === 1 ? style.primaryColor : "#E0E0E0"
Text {
anchors.centerIn: parent
text: "电机2"
color: sw.currentIndex === 1 ? "white" : "black"
font.pixelSize: 16
}
MouseArea {
anchors.fill: parent
onClicked: sw.setCurrentIndex(1)
}
}
Rectangle {
width: 60
height: 36
radius: 5
color: sw.currentIndex === 2 ? style.primaryColor : "#E0E0E0"
Text {
anchors.centerIn: parent
text: "电机3"
color: sw.currentIndex === 2 ? "white" : "black"
font.pixelSize: 16
}
MouseArea {
anchors.fill: parent
onClicked: sw.setCurrentIndex(2)
}
}
Rectangle {
width: 60
height: 36
radius: 5
color: sw.currentIndex === 3 ? style.primaryColor : "#E0E0E0"
Text {
anchors.centerIn: parent
text: "电机4"
color: sw.currentIndex === 3 ? "white" : "black"
font.pixelSize: 16
}
MouseArea {
anchors.fill: parent
onClicked: sw.setCurrentIndex(3)
}
}
Rectangle {
width: 60
height: 36
radius: 5
color: sw.currentIndex === 4 ? style.primaryColor : "#E0E0E0"
Text {
anchors.centerIn: parent
text: "电机5"
color: sw.currentIndex === 4 ? "white" : "black"
font.pixelSize: 16
}
MouseArea {
anchors.fill: parent
onClicked: sw.setCurrentIndex(4)
}
}
Rectangle {
width: 60
height: 36
radius: 5
color: sw.currentIndex === 5 ? style.primaryColor : "#E0E0E0"
Text {
anchors.centerIn: parent
text: "电机6"
color: sw.currentIndex === 5 ? "white" : "black"
font.pixelSize: 16
}
MouseArea {
anchors.fill: parent
onClicked: sw.setCurrentIndex(5)
}
}
Rectangle {
width: 60
height: 36
radius: 5
color: sw.currentIndex === 6 ? style.primaryColor : "#E0E0E0"
Text {
anchors.centerIn: parent
text: "电机7"
color: sw.currentIndex === 6 ? "white" : "black"
font.pixelSize: 16
}
MouseArea {
anchors.fill: parent
onClicked: sw.setCurrentIndex(6)
}
}
Rectangle {
width: 60
height: 36
radius: 5
color: sw.currentIndex === 7 ? style.primaryColor : "#E0E0E0"
Text {
anchors.centerIn: parent
text: "电机8"
color: sw.currentIndex === 7 ? "white" : "black"
font.pixelSize: 16
}
MouseArea {
anchors.fill: parent
onClicked: sw.setCurrentIndex(7)
}
}
Rectangle {
width: 60
height: 36
radius: 5
color: sw.currentIndex === 8 ? style.primaryColor : "#E0E0E0"
Text {
anchors.centerIn: parent
text: "电机9"
color: sw.currentIndex === 8 ? "white" : "black"
font.pixelSize: 16
}
MouseArea {
anchors.fill: parent
onClicked: sw.setCurrentIndex(8)
}
}
Rectangle {
width: 60
height: 36
radius: 5
color: sw.currentIndex === 9 ? style.primaryColor : "#E0E0E0"
Text {
anchors.centerIn: parent
text: "电机10"
color: sw.currentIndex === 9 ? "white" : "black"
font.pixelSize: 16
}
MouseArea {
anchors.fill: parent
onClicked: sw.setCurrentIndex(9)
}
}
}
// 自定义CAN指令区域
Rectangle {
width: parent.width
height: 100
color: "#1A2B3C"
radius: 5
Column {
spacing: 8
anchors {
fill: parent
margins: 8
}
// 标题行
Row {
anchors.horizontalCenter: parent.horizontalCenter
spacing: 8
Text {
text: "自定义 CAN 指令"
color: "white"
font {
pixelSize: 16
bold: true
}
}
Item { // 弹性空间
width: 100 // 固定间距
height: 1
}
Rectangle {
width: 80
height: 24
radius: 4
color: "white"
Text {
anchors.centerIn: parent
text: "重置保护"
color: "black"
font.pixelSize: 14
}
MouseArea {
anchors.fill: parent
onClicked: controller.reset_protection()
}
}
}
Row {
width: parent.width
spacing: 8
Column {
width: (parent.width - 16) * 0.2
spacing: 8
Text {
text: "CAN ID (hex)"
font.pixelSize: 14
color: "white"
}
Rectangle {
width: parent.width - 16
height: 36
radius: 5 / 2
border.color: canIdInput.activeFocus ? style.primaryColor : "#E0E0E0"
TextInput {
id: canIdInput
text: "88"
font.pixelSize: 16
verticalAlignment: Text.AlignVCenter
selectByMouse: true
anchors {
fill: parent
margins: 8
}
}
}
}
Column {
width: (parent.width - 16) * 0.6
spacing: 8
Text {
text: "数据 (hex)"
font.pixelSize: 14
color: "white"
}
Rectangle {
width: parent.width - 16
height: 36
radius: 5 / 2
border.color: canDataInput.activeFocus ? style.primaryColor : "#E0E0E0"
TextInput {
id: canDataInput
text: "08 88 2A 00 00 00 00 00"
font.pixelSize: 16
verticalAlignment: Text.AlignVCenter
selectByMouse: true
anchors {
fill: parent
margins: 8
}
}
}
}
Item {
width: 20
}
Column {
width: (parent.width - 32) * 0.2
spacing: 8
Text {
text: " "
font.pixelSize: 12
}
Rectangle {
width: parent.width-30
height: 36
radius: 5 / 2
color: "white"
Text {
anchors.centerIn: parent
text: "发送"
color: "black"
font.pixelSize: 16
}
MouseArea {
id: sendMouseArea
anchors.fill: parent
onClicked: {
var canId = parseInt(canIdInput.text, 16);
controller.send_custom_can_command(canId, canDataInput.text);
}
}
}
}
}
}
}
// CAN消息显示区域
Rectangle {
width: parent.width
height: 200
color: "#1A2B3C"
radius: 5
Column {
spacing: 10
anchors {
fill: parent
margins: 16
}
Row {
spacing: 10
width: parent.width
Text {
text: "接收的 CAN 消息"
color: "white"
font {
pixelSize: 16
bold: true
}
}
Text {
id: messageCount
leftPadding: 50 // 添加左边距
text: "消息数量: 0"
color: "white"
font.pixelSize: 12
}
Item {
width: parent.width - 350
height: 1
}
Rectangle {
width: 80
height: 32
radius: 5 / 2
color: "white"
Text {
anchors.centerIn: parent
text: "清除"
color: "black"
font.pixelSize: 16
}
MouseArea {
id: clearMouseArea
anchors.fill: parent
onClicked: {
messageModel.clear();
messageCount.text = "消息数量: 0";
}
}
}
}
ListView {
width: parent.width
height: parent.height - 50
clip: true
model: ListModel {
id: messageModel
}
delegate: Rectangle {
width: ListView.view.width
height: messageText.height + 16
color: index % 2 === 0 ? "#F8F9FA" : "#FFFFFF"
Text {
id: messageText
text: model.time + " - ID: " + model.canId + " Data: " + model.data
font.pixelSize: 13
wrapMode: Text.Wrap
color: "black"
anchors {
left: parent.left
right: parent.right
verticalCenter: parent.verticalCenter
margins: 8
}
}
}
}
}
}
SwipeView {
id: sw
width: parent.width
height: parent.height - 50
interactive: true
DianJi_1 {
id: dianJi1
}
DianJi_2 {
id: dianJi2
}
DianJi_3 {
id: dianJi3
}
DianJi_4 {
id: dianJi4
}
DianJi_5 {
id: dianJi5
}
DianJi_6 {
id: dianJi6
}
DianJi_7 {
id: dianJi7
}
DianJi_8 {
id: dianJi8
}
DianJi_9 {
id: dianJi9
}
DianJi_10 {
id: dianJi10
}
}
// 位置保护错误提示对话框
Dialog {
id: positionErrorDialog
title: "位置保护警告"
modal: true
standardButtons: Dialog.Ok
x: (parent.width - width) / 2
y: (parent.height - height) / 2
property int motorId: 0
property int position: 0
Text {
text: "电机" + positionErrorDialog.motorId +
"位置(" + positionErrorDialog.position +
")超出允许范围(150000-350000)\n已触发紧急停止!"
color: "red"
font.pixelSize: 14
}
}
}
Component.onCompleted: {
// 连接位置保护错误信号
controller.positionOutOfRangeError.connect(function(motorId, position) {
positionErrorDialog.motorId = motorId;
positionErrorDialog.position = position;
positionErrorDialog.open();
});
}
}
Dianji_1.qml
import QtQuick 2.15
import QtQuick.Controls 2.15
Rectangle {
id: root
// 添加通用属性
property int standardMargin: 8
property int standardSpacing: 10
property real buttonHeight: 36
property string primaryColor: "#228B99"
Column {
spacing: standardMargin
anchors {
fill: parent
margins: standardMargin
}
// 创建通用的标题文本组件
component TitleText: Text {
color: "white"
font.pixelSize: 16
font.bold: true
anchors.horizontalCenter: parent.horizontalCenter
}
// 创建通用的按钮组件
component StandardButton: Rectangle {
height: buttonHeight
radius: 2.5
color: "white"
property alias text: buttonText.text
Text {
id: buttonText
anchors.centerIn: parent
color: "black"
font.pixelSize: 14
}
}
// 电机电流控制
Rectangle {
width: parent.width
height: 75
color: primaryColor
radius: 5
Column {
spacing: standardMargin
anchors {
fill: parent
margins: standardMargin
}
TitleText {
text: "行走轮电机1控制"
}
Row {
anchors.horizontalCenter: parent.horizontalCenter
spacing: standardSpacing
// 添加按钮以打开电机状态图窗口
Rectangle {
width: 120
height: 36
radius: 5
color: "white"
Text {
anchors.centerIn: parent
text: "电机1状态图"
color: "black"
font.pixelSize: 16
}
MouseArea {
anchors.fill: parent
onClicked: {
var component = Qt.createComponent("Motor_Status_Chart.qml");
if (component.status === Component.Ready) {
var window = component.createObject(mainWindow);
window.show();
} else {
console.log("Error loading component:", component.errorString());
}
}
}
}
// 添加力矩模式按钮
Rectangle {
width: 100
height: 36
radius: 5
color: "white"
Text {
anchors.centerIn: parent
text: "力矩模式"
color: "black"
font.pixelSize: 16
}
MouseArea {
anchors.fill: parent
onClicked: controller.set_work_mode(1, 2) // 2表示力矩模式
}
}
Rectangle {
width: 100
height: 36
radius: 5 / 2
border.color: "#E0E0E0"
TextInput {
id: current1Input
text: "0"
verticalAlignment: Text.AlignVCenter
selectByMouse: true
font.pixelSize: 16
anchors {
fill: parent
margins: standardMargin
}
}
}
Rectangle {
width: 100
height: 36
radius: 5 / 2
color: "white"
Text {
anchors.centerIn: parent
text: "设置电流"
color: "black"
font.pixelSize: 16
}
MouseArea {
id: motor1SetCurrentArea
anchors.fill: parent
onClicked: controller.set_wheel_current(parseInt(current1Input.text))
}
}
Rectangle {
width: 180
height: 36
color: "white"
opacity: 0.9
radius: 5
Text {
anchors.centerIn: parent
text: "当前电流: " + (controller ? controller.current1 : 0) + "mA"
font.pixelSize: 16
}
}
Rectangle {
width: 32
height: 32
radius: 5 / 2
color: motor1RefreshArea.pressed ? "#E0E0E0" : "#F5F5F5"
border.color: "#E0E0E0"
Text {
anchors.centerIn: parent
text: "↻"
}
MouseArea {
id: motor1RefreshArea
anchors.fill: parent
onClicked: controller.read_wheel_current(1)
}
}
}
}
}
// 电机速度控制
Rectangle {
width: parent.width
height: 75
color: primaryColor
radius: 5
Column {
spacing: standardMargin
anchors {
fill: parent
margins: standardMargin
}
TitleText {
text: "行走轮电机1速度控制"
}
Row {
anchors.horizontalCenter: parent.horizontalCenter
spacing: standardSpacing
// 添加速度模式按钮
Rectangle {
width: 100
height: 36
radius: 5
color: "white"
Text {
anchors.centerIn: parent
text: "速度模式"
color: "black"
font.pixelSize: 16
}
MouseArea {
anchors.fill: parent
onClicked: controller.set_work_mode(1, 0) // 0表示速度模式
}
}
Rectangle {
width: 100
height: 36
radius: 5 / 2
border.color: "#E0E0E0"
TextInput {
id: speed1Input
text: "0"
verticalAlignment: Text.AlignVCenter
selectByMouse: true
font.pixelSize: 16
anchors {
fill: parent
margins: standardMargin
}
}
}
Rectangle {
width: 100
height: 36
radius: 5 / 2
color: "white"
Text {
anchors.centerIn: parent
text: "设置速度"
color: "black"
font.pixelSize: 16
}
MouseArea {
id: setSpeed1Area
anchors.fill: parent
onClicked: controller.set_motor_speed(1, parseInt(speed1Input.text))
}
}
Rectangle {
width: 150
height: 36
color: "white"
opacity: 0.9
radius: 5
Text {
anchors.centerIn: parent
text: "平均速度: " + (controller ? controller.averageSpeed1 : 0)
font.pixelSize: 16
}
}
Rectangle {
width: 150
height: 36
color: "white"
opacity: 0.9
radius: 5
Text {
anchors.centerIn: parent
text: "速度误差: " + (controller ? controller.speedError1 : 0)
font.pixelSize: 16
}
}
Rectangle {
width: 32
height: 32
radius: 5 / 2
color: motor1RefreshArea.pressed ? "#E0E0E0" : "#F5F5F5"
border.color: "#E0E0E0"
Text {
anchors.centerIn: parent
text: "↻"
}
MouseArea {
id: refreshSpeed1Area
anchors.fill: parent
onClicked: {
controller.read_average_speed(1);
controller.read_speed_error(1);
}
}
}
}
}
}
//位置控制区域
Rectangle {
width: parent.width
height: 120
anchors.horizontalCenter: parent.horizontalCenter
color: primaryColor
radius: 5
Column {
spacing: standardMargin
anchors {
fill: parent
margins: standardMargin
topMargin: standardMargin // 增加顶部边距,让标题离顶部更远一些
}
TitleText {
text: "行走轮电机1位置控制"
}
// 位置控制区域的 Row 布局修改(第一行按钮)
Row {
anchors.horizontalCenter: parent.horizontalCenter
spacing: standardSpacing
// 绝对位置控制
Rectangle {
width: 120
height: buttonHeight
radius: 2.5
border.color: "#E0E0E0"
TextInput {
id: absolutePos1Input
text: "0"
verticalAlignment: Text.AlignVCenter
selectByMouse: true
font.pixelSize: 16
anchors {
fill: parent
margins: standardMargin
}
validator: IntValidator {}
}
}
Rectangle {
width: 140
height: buttonHeight
radius: 2.5
color: "white"
Text {
anchors.centerIn: parent
text: "移动到绝对位置"
color: "black"
font.pixelSize: 16
}
MouseArea {
id: moveAbsolute1Area
anchors.fill: parent
onClicked: controller.move_to_absolute_position(1, parseInt(absolutePos1Input.text))
}
}
// 相对位置控制
Rectangle {
width: 120
height: buttonHeight
radius: 2.5
border.color: "#E0E0E0"
TextInput {
id: relativePos1Input
text: "0"
verticalAlignment: Text.AlignVCenter
selectByMouse: true
font.pixelSize: 16
anchors {
fill: parent
margins: standardMargin
}
validator: IntValidator {}
}
}
Rectangle {
width: 130
height: buttonHeight
radius: 2.5
color: "white"
Text {
anchors.centerIn: parent
text: "移动相对位置"
color: "black"
font.pixelSize: 16
}
MouseArea {
id: moveRelative1Area
anchors.fill: parent
onClicked: controller.move_by_relative_position(1, parseInt(relativePos1Input.text))
}
}
// 设置原点按钮
Rectangle {
width: 140
height: buttonHeight
radius: 2.5
color: "white"
Text {
anchors.centerIn: parent
text: "设置当前位置为原点"
color: "black"
font.pixelSize: 14
}
MouseArea {
anchors.fill: parent
onClicked: controller.set_absolute_position_origin(1)
}
}
}
// 添加新的一行用于显示位置信息
Row {
anchors.horizontalCenter: parent.horizontalCenter
spacing: standardSpacing
// 添加位置模式按钮
Rectangle {
width: 100
height: 36
radius: 5
color: "white"
Text {
anchors.centerIn: parent
text: "位置模式"
color: "black"
font.pixelSize: 16
}
MouseArea {
anchors.fill: parent
onClicked: controller.set_work_mode(1, 1) // 1表示位置模式
}
}
// 读取实时位置误差按钮
Rectangle {
width: 120
height: buttonHeight
radius: 2.5
color: "white"
Text {
anchors.centerIn: parent
text: "读取位置误差"
color: "black"
font.pixelSize: 16
}
MouseArea {
anchors.fill: parent
onClicked: controller.read_position_error(1)
}
}
// 显示位置误差
Rectangle {
width: 150
height: 36
color: "white"
opacity: 0.9
radius: 5
Text {
anchors.centerIn: parent
text: "位置误差: " + (controller ? controller.positionError1 : 0)
font.pixelSize: 16
}
}
// 读取实际位置按钮
Rectangle {
width: 120
height: buttonHeight
radius: 2.5
color: "white"
Text {
anchors.centerIn: parent
text: "读取实际位置"
color: "black"
font.pixelSize: 16
}
MouseArea {
anchors.fill: parent
onClicked: controller.read_current_position(1)
}
}
// 显示实际位置
Rectangle {
width: 200
height: 36
color: "white"
opacity: 0.9
radius: 5
Text {
anchors.centerIn: parent
text: "实际位置: " + (controller ? controller.currentPosition1 : 0)
font.pixelSize: 16
}
}
}
}
}
// 电机工作模式区域
Rectangle {
width: parent.width
height: 50
color: primaryColor
radius: 5
Row {
anchors.centerIn: parent
spacing: standardSpacing * 2
// 添加解除急停按钮
Rectangle {
width: 120
height: 36
radius: 5 / 2
color: "white"
Text {
anchors.centerIn: parent
text: "解除急停"
color: "black"
font.pixelSize: 16
}
MouseArea {
anchors.fill: parent
onClicked: controller.release_emergency_stop(1)
}
}
Rectangle {
width: 120
height: 36
radius: 5 / 2
color: "white"
Text {
anchors.centerIn: parent
text: "读取电机1模式"
color: "black"
font.pixelSize: 16
}
MouseArea {
id: readMode1MouseArea
anchors.fill: parent
onClicked: controller.read_work_mode(1)
}
}
Text {
id: workMode1Display
anchors.verticalCenter: parent.verticalCenter
text: controller ? controller.workMode1 : "电机1 - 未初始化"
color: "white"
font.pixelSize: 16
}
}
}
}
// 在 QML 中连接信号
Connections {
function onCanMessageReceived(canId, data) {
// 添加消息到 ListView
messageModel.append({
"time": new Date().toLocaleTimeString(),
"canId": canId,
"data": data
});
// 更新消息计数
messageCount.text = "消息数量: " + messageModel.count;
}
target: controller
}
}
Motor_Status_Chart.qml
import QtQuick 2.15
import QtQuick.Controls 2.15
import QtCharts 2.15
ApplicationWindow {
visible: true
width: 1000
height: 900
title: "行走轮电机1状态图"
Column {
anchors.fill: parent
spacing: 10
// 控制按钮行
Row {
anchors.horizontalCenter: parent.horizontalCenter
spacing: 20 // 增加间距
height: 40
Rectangle {
width: 100
height: 36
radius: 5
color: "#008B8B"
Text {
anchors.centerIn: parent
text: "开始采样"
color: "white"
font.pixelSize: 16
}
MouseArea {
anchors.fill: parent
onClicked: dataTimer.running = true
}
}
Rectangle {
width: 100
height: 36
radius: 5
color: "#FF6347"
Text {
anchors.centerIn: parent
text: "停止采样"
color: "white"
font.pixelSize: 16
}
MouseArea {
anchors.fill: parent
onClicked: dataTimer.running = false
}
}
Rectangle {
width: 100
height: 36
radius: 5
color: "#4682B4"
Text {
anchors.centerIn: parent
text: "清空图表"
color: "white"
font.pixelSize: 16
}
MouseArea {
anchors.fill: parent
onClicked: {
// 开始新一轮显示前,清除之前的数据
motor1Series.clear()
speed1Series.clear()
position1Series.clear()
// 重置X轴范围
axisX.min = 0
axisX.max = 200
}
}
}
}
// 图表视图
ChartView {
id: chartView
width: parent.width
height: parent.height - 50
antialiasing: true
// 修改缩放相关属性
animationOptions: ChartView.NoAnimation // 禁用动画以提高性能
theme: ChartView.ChartThemeLight // 使用浅色主题
// 启用缩放功能 - 修正属性名称
ValueAxis {
id: axisX
min: 0
max: 200 // 这个值将动态调整
titleText: "采样点"
tickCount: 21
minorTickCount: 4
gridVisible: true
}
ValueAxis {
id: axisYCurrent
min: -8000
max: 8000
titleText: "电流(mA)"
tickCount: 13
minorTickCount: 4
gridVisible: true
}
ValueAxis {
id: axisYSpeed
min: -8000
max: 8000
titleText: "转速(RPM)"
tickCount: 13
minorTickCount: 4
gridVisible: true
}
ValueAxis {
id: axisYPosition
min: -20000000
max: 20000000
titleText: "位置"
tickCount: 15
minorTickCount: 4
gridVisible: true
}
// 添加缩放使用说明
Text {
anchors {
left: parent.left
bottom: parent.bottom
margins: 10
}
text: "使用说明:\n" +
"• 鼠标滚轮:放大/缩小\n" +
"• 按住左键拖动:平移图表"
color: "black"
font.pixelSize: 12
}
// 添加十字线
Rectangle {
id: vLine
width: 1
color: "black"
opacity: 0.5
visible: false
y: 0
height: parent.height
}
Rectangle {
id: hLine
height: 1
color: "black"
opacity: 0.5
visible: false
x: 0
width: parent.width
}
// 数据标签
Rectangle {
id: dataLabel
color: "white"
border.color: "black"
border.width: 1
radius: 5
opacity: 0.9
visible: false
width: dataText.width + 20
height: dataText.height + 10
Text {
id: dataText
anchors.centerIn: parent
color: "black"
font.pixelSize: 12
}
}
// 图例标签
Rectangle {
id: legendBox
color: "white"
border.color: "black"
border.width: 1
radius: 5
opacity: 0.9
x: 10
y: 10
width: legendColumn.width + 20
height: legendColumn.height + 10
Column {
id: legendColumn
x: 10
y: 5
spacing: 5
Row {
spacing: 5
Rectangle {
width: 20
height: 2
color: "blue"
anchors.verticalCenter: parent.verticalCenter
}
Text {
text: "电流(mA)"
color: "black"
font.pixelSize: 12
}
}
Row {
spacing: 5
Rectangle {
width: 20
height: 2
color: "green"
anchors.verticalCenter: parent.verticalCenter
}
Text {
text: "转速(RPM)"
color: "black"
font.pixelSize: 12
}
}
Row {
spacing: 5
Rectangle {
width: 20
height: 2
color: "red"
anchors.verticalCenter: parent.verticalCenter
}
Text {
text: "位置"
color: "black"
font.pixelSize: 12
}
}
}
}
// 合并所有鼠标事件处理一个 MouseArea
MouseArea {
anchors.fill: parent
acceptedButtons: Qt.LeftButton
hoverEnabled: true
property point lastMousePos
property bool isDragging: false
// 鼠标滚轮缩放
onWheel: {
var zoomFactor = 1.15
var mouseX = wheel.x
var mouseY = wheel.y
// X轴缩放
var centerX = (axisX.max + axisX.min) / 2
var rangeX = axisX.max - axisX.min
// Y轴缩放
var centerYCurrent = (axisYCurrent.max + axisYCurrent.min) / 2
var rangeYCurrent = axisYCurrent.max - axisYCurrent.min
var centerYSpeed = (axisYSpeed.max + axisYSpeed.min) / 2
var rangeYSpeed = axisYSpeed.max - axisYSpeed.min
var centerYPosition = (axisYPosition.max + axisYPosition.min) / 2
var rangeYPosition = axisYPosition.max - axisYPosition.min
if (wheel.angleDelta.y > 0) {
// 放大
rangeX /= zoomFactor
rangeYCurrent /= zoomFactor
rangeYSpeed /= zoomFactor
rangeYPosition /= zoomFactor
} else {
// 缩小
rangeX *= zoomFactor
rangeYCurrent *= zoomFactor
rangeYSpeed *= zoomFactor
rangeYPosition *= zoomFactor
}
// 更新X轴范围
axisX.min = centerX - rangeX / 2
axisX.max = centerX + rangeX / 2
// 更新Y轴范围
axisYCurrent.min = centerYCurrent - rangeYCurrent / 2
axisYCurrent.max = centerYCurrent + rangeYCurrent / 2
axisYSpeed.min = centerYSpeed - rangeYSpeed / 2
axisYSpeed.max = centerYSpeed + rangeYSpeed / 2
axisYPosition.min = centerYPosition - rangeYPosition / 2
axisYPosition.max = centerYPosition + rangeYPosition / 2
wheel.accepted = true
}
// 鼠标按下开始拖动
onPressed: {
lastMousePos = Qt.point(mouse.x, mouse.y)
isDragging = true
cursorShape = Qt.ClosedHandCursor
}
// 鼠标拖动和数据显示
onPositionChanged: {
if (isDragging) {
var dx = mouse.x - lastMousePos.x
// 只处理X轴的平移
var rangeX = axisX.max - axisX.min
var moveX = -dx * rangeX / width
// 只更新X轴范围
axisX.min += moveX
axisX.max += moveX
lastMousePos = Qt.point(mouse.x, mouse.y)
}
// 数据显示逻辑
if (containsMouse) {
var chartPos = chartView.mapToValue(Qt.point(mouse.x, mouse.y))
// 更新十字线位置
vLine.x = mouse.x
hLine.y = mouse.y
vLine.visible = true
hLine.visible = true
// 查找最近的数据点
var index = Math.round(chartPos.x)
if (index >= 0 && index < motor1Series.count) {
var currentValue = motor1Series.at(index).y
var speedValue = speed1Series.at(index).y
var positionValue = position1Series.at(index).y
// 更新数据标签
dataText.text = "采样点: " + index + "\n" +
"电流: " + currentValue.toFixed(2) + " mA\n" +
"转速: " + speedValue.toFixed(2) + " RPM\n" +
"位置: " + positionValue.toFixed(2)
dataLabel.x = Math.min(mouse.x + 10, parent.width - dataLabel.width - 10)
dataLabel.y = Math.min(mouse.y + 10, parent.height - dataLabel.height - 10)
dataLabel.visible = true
}
}
}
// 鼠标释放结束拖动
onReleased: {
isDragging = false
cursorShape = Qt.ArrowCursor
}
// 鼠标离开
onExited: {
vLine.visible = false
hLine.visible = false
dataLabel.visible = false
}
}
// 添加 ToolTip 定义
ToolTip {
id: tooltip
visible: false
delay: 0
timeout: 5000
background: Rectangle {
color: "white"
border.color: "black"
radius: 5
opacity: 0.9
}
contentItem: Text {
color: "black"
font.pixelSize: 12
}
}
LineSeries {
id: motor1Series
name: "电机1电流"
color: "blue"
axisX: axisX
axisY: axisYCurrent
onHovered: {
if (state) {
tooltip.text = `采样点: ${Math.round(point.x)}\n电流: ${Math.round(point.y)} mA`
tooltip.x = chartView.mapToPosition(point, motor1Series).x + 10
tooltip.y = chartView.mapToPosition(point, motor1Series).y + 10
tooltip.visible = true
} else {
tooltip.visible = false
}
}
}
LineSeries {
id: speed1Series
name: "电机1转速"
color: "green"
axisX: axisX
axisY: axisYSpeed
onHovered: {
if (state) {
tooltip.text = `采样点: ${Math.round(point.x)}\n转速: ${Math.round(point.y)}`
tooltip.x = chartView.mapToPosition(point, speed1Series).x + 10
tooltip.y = chartView.mapToPosition(point, speed1Series).y + 10
tooltip.visible = true
} else {
tooltip.visible = false
}
}
}
// 添加位置数据序列
LineSeries {
id: position1Series
name: "电机1位置"
color: "red"
axisX: axisX
axisY: axisYPosition
onHovered: {
if (state) {
tooltip.text = `采样点: ${Math.round(point.x)}\n位置: ${Math.round(point.y)}`
tooltip.x = chartView.mapToPosition(point, position1Series).x + 10
tooltip.y = chartView.mapToPosition(point, position1Series).y + 10
tooltip.visible = true
} else {
tooltip.visible = false
}
}
}
}
}
Timer {
id: dataTimer
interval: 300
running: false
repeat: true
onTriggered: {
// 主动读取电机1的电流值、转速和位置
controller.read_wheel_current(1)
controller.read_average_speed(1)
controller.read_current_position(1)
// 添加电机1的数据
motor1Series.append(motor1Series.count, controller.current1)
speed1Series.append(speed1Series.count, controller.averageSpeed1)
position1Series.append(position1Series.count, controller.currentPosition1)
// 动态调整X轴显示范围,始终显示最新的200个数据点
if (motor1Series.count > axisX.max) {
axisX.min = motor1Series.count - 200
axisX.max = motor1Series.count
}
}
}
}项目代码存在的不足之处:
1. 代码重复严重
项目中存在大量重复代码,特别是在电机控制逻辑中:
(1) 各个电机控制函数高度相似,如`set_wheel_current`和`set_wheel2_current`几乎完全相同,只是电机ID不同;
(2) QML界面中每个电机的控制面板(DianJi_1.qml至DianJi_10.qml)内容高度重复;
(3)电机状态图表文件(Motor_Status_Chart.qml, Motor2_Status_Chart.qml等)代码几乎相同。
2. 缺乏面向对象设计
(1) `CanController`类过于庞大(2300多行),职责不清晰;
(2)没有为不同类型的电机创建专门的类,而是在一个类中混合处理所有电机;
(3)重复的信号定义(如motor1SpeedChanged到motor10SpeedChanged).
3. 配置硬编码
(1)电机ID和CAN ID的映射硬编码在类的`__init__`方法中;
(2)位置保护范围(POSITION_MIN/POSITION_MAX)硬编码为固定值;
(3)没有集中的配置管理机制。
4. 错误处理不完善
(1)许多函数简单打印错误而不是采用结构化的错误处理方式;
(2)缺少统一的日志系统,调试信息直接使用print输出;
(3) 异常处理不够全面,如CAN通信中断等情况处理不完善。
改进建议
1. 重构代码结构
robotcontrol/
├── config/                 # 配置文件目录
│   └── motor_config.json   # 电机配置
├── models/                 # 数据模型
│   ├── motor_model.py      # 电机模型基类
│   ├── type1_motor.py      # 类型1电机
│   └── type2_motor.py      # 类型2电机
├── controllers/            # 控制器
│   ├── can_controller.py   # CAN通信控制器
│   ├── motor_controller.py # 电机控制基类
│   └── robot_controller.py # 机器人总控制器
├── ui/                     # UI相关
│   ├── components/         # 可复用组件
│   │   ├── motor_panel.qml # 电机面板组件
│   │   └── status_chart.qml# 状态图表组件
│   └── main_window.qml     # 主窗口
├── utils/                  # 工具函数
│   ├── can_utils.py        # CAN通信工具
│   └── logger.py           # 日志工具
└── main.py                 # 主入口
2. 实现面向对象设计
创建电机基类和派生类:
class MotorBase:
    """电机基类,定义共同接口"""
    def __init__(self, motor_id, can_id):
        self.motor_id = motor_id
        self.can_id = can_id
        # 共同属性

    def set_current(self, current):
        """设置电流"""
        pass

    def read_current(self):
        """读取电流"""
        pass

class Type1Motor(MotorBase):
    """类型1电机实现"""
    def set_current(self, current):
        # 类型1特定实现

class Type2Motor(MotorBase):
    """类型2电机实现"""
    def set_current(self, current):
        # 类型2特定实现
封装CAN通信:
class CanCommunicator:
    """处理CAN通信的类"""
    def __init__(self):
        self.ch = None

    def initialize(self):
        """初始化CAN通道"""
        pass

    def send_message(self, can_id, data, dlc=8):
        """发送CAN消息"""
        pass

    def read_message(self, timeout=100):
        """读取CAN消息"""
        pass
使用配置文件
创建JSON配置文件存储电机参数:
{
  "motors": [
    {
      "id": 1,
      "can_id": "0x88",
      "type": "type1",
      "position_limits": [150000, 350000],
      "max_current": 5000
    },
    {
      "id": 2,
      "can_id": "0x99",
      "type": "type1",
      "position_limits": [150000, 350000],
      "max_current": 5000
    }
  ]
}
改进错误处理和日志系统
import logging

# 配置日志系统
logging.basicConfig(
    level=logging.INFO,
    format='%(asctime)s - %(name)s - %(levelname)s - %(message)s',
    handlers=[
        logging.FileHandler("robot_control.log"),
        logging.StreamHandler()
    ]
)

logger = logging.getLogger("RobotControl")

# 使用日志而非print
logger.info("CAN通道已初始化成功")
logger.error(f"初始化错误: {e}")
改进UI组件复用
1. 创建可复用的电机控制面板组件:
// MotorPanel.qml
import QtQuick 2.15
import QtQuick.Controls 2.15

Rectangle {
    id: root

    // 属性接口
    property int motorId: 1
    property string motorName: "电机" + motorId
    property color panelColor: "#228B99"

    // 信号定义
    signal setCurrentRequested(int motorId, int current)
    signal setSpeedRequested(int motorId, int speed)
    signal readCurrentRequested(int motorId)

    width: parent.width
    height: 75
    color: panelColor
    radius: 5

    // 面板内容...

    // 处理事件
    function onSetCurrentClicked() {
        setCurrentRequested(motorId, parseInt(currentInput.text))
    }
}

// 使用组件
MotorPanel {
    motorId: 1
    motorName: "行走轮电机1"
    panelColor: "#228B99"

    onSetCurrentRequested: function(motorId, current) {
        controller.set_motor_current(motorId, current)
    }
}
2. 创建可复用的状态图表:
// StatusChart.qml
import QtQuick 2.15
import QtCharts 2.15

ChartView {
    property int motorId: 1
    property string motorName: "电机" + motorId

    // 图表实现...
}
3.进一步改进想法
实现观察者模式监控电机状态
class MotorObserver:
    """电机观察者接口"""
    def update(self, motor_id, param_name, value):
        pass

class DataLogger(MotorObserver):
    """数据记录器"""
    def __init__(self, log_file):
        self.log_file = log_file

    def update(self, motor_id, param_name, value):
        # 将数据写入日志文件
        with open(self.log_file, 'a') as f:
            f.write(f"{time.time()},{motor_id},{param_name},{value}\n")

class AlarmMonitor(MotorObserver):
    """报警监控器"""
    def __init__(self, alarm_callback):
        self.alarm_callback = alarm_callback
        self.thresholds = {}  # 存储参数阈值

    def set_threshold(self, motor_id, param_name, min_val, max_val):
        """设置阈值"""
        self.thresholds[(motor_id, param_name)] = (min_val, max_val)

    def update(self, motor_id, param_name, value):
        """检查参数是否超出阈值"""
        key = (motor_id, param_name)
        if key in self.thresholds:
            min_val, max_val = self.thresholds[key]
            if value < min_val or value > max_val:
                self.alarm_callback(motor_id, param_name, value, min_val, max_val)

class MotorSubject:
    """可被观察的电机主题"""
    def __init__(self):
        self.observers = []

    def add_observer(self, observer):
        if observer not in self.observers:
            self.observers.append(observer)

    def remove_observer(self, observer):
        if observer in self.observers:
            self.observers.remove(observer)

    def notify_observers(self, motor_id, param_name, value):
        for observer in self.observers:
            observer.update(motor_id, param_name, value)
使用工厂模式创建电机对象
class MotorFactory:
    """电机工厂类,根据配置创建不同类型的电机"""
    @staticmethod
    def create_motor(config):
        motor_type = config['type']
        motor_id = config['id']
        can_id = config['can_id']

        if motor_type == 'type1':
            return Type1Motor(motor_id, can_id)
        elif motor_type == 'type2':
            return Type2Motor(motor_id, can_id)
        elif motor_type == 'type3':
            return Type3Motor(motor_id, can_id)
        else:
            raise ValueError(f"不支持的电机类型: {motor_type}")

    @staticmethod
    def create_motors_from_config(config_file):
        """从配置文件创建多个电机"""
        with open(config_file, 'r') as f:
            config = json.load(f)

        motors = {}
        for motor_config in config['motors']:
            motor = MotorFactory.create_motor(motor_config)
            motors[motor.motor_id] = motor

        return motors
QML组件化和数据绑定优化
创建电机状态模型:
// MotorStates.qml
QtObject {
    id: motorStates

    // 创建一个模型来管理所有电机状态
    property var motorModel: ListModel {
        // 为每个电机添加一个初始状态
        ListElement {
            motorId: 1
            current: 0
            speed: 0
            position: 0
            mode: "未初始化"
        }
        // 其他电机...
    }

    // 根据ID获取电机状态
    function getMotorState(id) {
        for(var i = 0; i < motorModel.count; i++) {
            if(motorModel.get(i).motorId === id) {
                return motorModel.get(i);
            }
        }
        return null;
    }

    // 更新电机状态
    function updateMotorParameter(id, param, value) {
        for(var i = 0; i < motorModel.count; i++) {
            if(motorModel.get(i).motorId === id) {
                motorModel.setProperty(i, param, value);
                return;
            }
        }
    }
}
改进电机控制面板组件:
// MotorControl.qml - 通用电机控制组件
import QtQuick 2.15
import QtQuick.Controls 2.15

Item {
    id: root
    width: parent.width
    height: childrenRect.height

    // 导出属性
    property int motorId: 1
    property string motorName: "电机" + motorId
    property string panelColor: "#228B99"

    // 绑定到数据模型
    property var motorState: motorStates.getMotorState(motorId)

    // 布局包含所有控制组件
    Column {
        width: parent.width
        spacing: 10

        // 电流控制面板
        CurrentPanel {
            motorId: root.motorId
            current: motorState.current
            onCurrentChanged: controller.set_motor_current(motorId, current)
        }

        // 速度控制面板
        SpeedPanel {
            motorId: root.motorId
            speed: motorState.speed
            onSpeedChanged: controller.set_motor_speed(motorId, speed)
        }

        // 位置控制面板
        PositionPanel {
            motorId: root.motorId
            position: motorState.position
            onPositionChanged: controller.set_target_position(motorId, position)
        }
    }

    // 监听数据变化
    Connections {
        target: controller

        function onMotorParameterChanged(id, param, value) {
            if(id === motorId) {
                motorStates.updateMotorParameter(id, param, value);
            }
        }
    }
}


 被折叠的 条评论
为什么被折叠?
被折叠的 条评论
为什么被折叠?
 到【灌水乐园】发言


