


核心配置与注解
一、全局配置文件
介绍
全局配置文件 可以对一些默认配置值进行修改。spring boot使用application.properties 或者 application.yaml 作为全局配置文件。=> 定义spring boot项目的相关属性,包括:系统属性、环境变量、命令参数等信息,也可以是自定义配置文件名称和位置。
1. application.properties配置文件
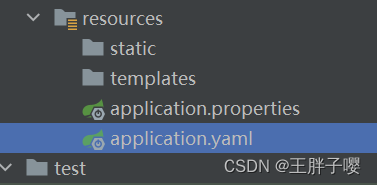
用spring initializr构建项目时,会在src/main/resources目录下自动生成application.properties,并在项目启动时自动加载该配置文件
1.1 编写实体类
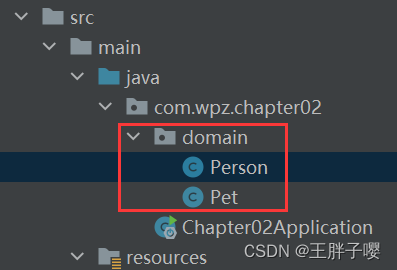
在主程序启动类所在的包下,创建domain(装实体类的包),里面创建两个实体类:Pet和Person
编写Pet类
package com.wpz.chapter02.domain;

/**
 * @author 王胖子
 * @version 1.0
 * 普通实体类:为了给Person类使用
 */
public class Pet {
    private String type;
    private String name;

    public String getType() {
        return type;
    }

    public void setType(String type) {
        this.type = type;
    }

    public String getName() {
        return name;
    }

    public void setName(String name) {
        this.name = name;
    }

    @Override
    public String toString() {
        return "Pet{" +
                "type='" + type + '\'' +
                ", name='" + name + '\'' +
                '}';
    }
}
编写Person类
- 需求:在配置文件中自定义属性值 注入到 Person实体类的属性中
- 步骤:
①@Component:把Person类作为Spring容器的组件。
& 目的:让spring boot可以自动扫描到该组件,然后对该组件进行其它功能的实现(比如:属性被@ConfigurationProperties注解赋值)
& 说明:除了@Component,还可以使用@Configuration、@Controller、@Service、@Repository等
②ConfigurationProperties(prefix="person")
目的:将配置文件中以person开头的key的value值 通过setter()方法 注入到 实体类对应的属性中
package com.wpz.chapter02.domain;

import org.springframework.boot.context.properties.ConfigurationProperties;
import org.springframework.stereotype.Component;

import java.util.Arrays;
import java.util.List;
import java.util.Map;

/**
 * @author 王胖子
 * @version 1.0
 * 1. 需求:在配置文件中自定义属性值 注入到 Person实体类的属性中
 * 2. 步骤:
 * ① @Component:把Person类作为Spring容器的组件。
 * 目的:让spring boot可以自动扫描到该组件,然后对该组件进行其它功能的实现(比如:属性被@ConfigurationProperties注解赋值)
 * 说明:除了@Component,还可以使用@Configuration、@Controller、@Service、@Repository等
 * ② ConfigurationProperties(prefix="person")
 * 目的:将配置文件中以person开头的key的value值 通过setter()方法 注入到 实体类对应的属性中
 */
//把Person类作为组件加入spring容器
@Component
//配置:通过配置文件给Person类的属性赋值
@ConfigurationProperties(prefix = "person")
public class Person {
    private int id;
    private String name;
    private List<String> hobby;//爱好
    private String[] family;//家庭成员
    private Map<String, String> map;
    private Pet pet;//宠物

    public int getId() {
        return id;
    }

    public void setId(int id) {
        this.id = id;
    }

    public String getName() {
        return name;
    }

    public void setName(String name) {
        this.name = name;
    }

    public List<String> getHobby() {
        return hobby;
    }

    public void setHobby(List<String> hobby) {
        this.hobby = hobby;
    }

    public String[] getFamily() {
        return family;
    }

    public void setFamily(String[] family) {
        this.family = family;
    }

    public Map<String, String> getMap() {
        return map;
    }

    public void setMap(Map<String, String> map) {
        this.map = map;
    }

    public Pet getPet() {
        return pet;
    }

    public void setPet(Pet pet) {
        this.pet = pet;
    }

    @Override
    public String toString() {
        return "Person{" +
                "id=" + id +
                ", name='" + name + '\'' +
                ", hobby=" + hobby +
                ", family=" + Arrays.toString(family) +
                ", map=" + map +
                ", pet=" + pet +
                '}';
    }
}
1.1.1引申:解决Spring Boot Configuration Annotation Processor not configured 未配置Spring引导配置注释处理器以及在配置时想出现代码提示

在pom.xml中编写后,需要重新运行项目启动类,或者按Ctrl+f9重构当前项目
<!--配置处理器依赖:spring-boot-configuration-processor-->
<!--在配置文件中配置Person对象的属性值时,spring boot无法自动识别,不会有任何书写提示,为了出现代码提示,就要写这个依赖-->
<dependency>
    <groupId>org.springframework.boot</groupId>
    <artifactId>spring-boot-configuration-processor</artifactId>
    <optional>true</optional>
</dependency>
重构项目后,编写配置文件就有提示了
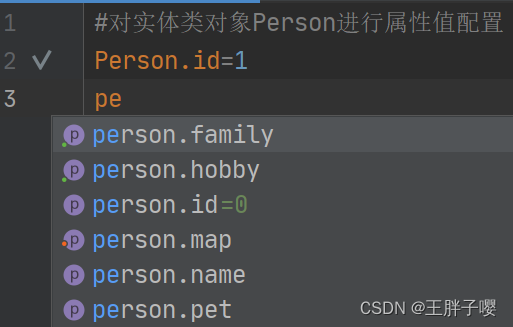
1.2 编写application.properties
打开src/main/resouces/application.properties
#对实体类对象Person进行属性值配置
#字符串不需要额外加双引号
person.id=1
person.name=wpz
person.hobby=play,read,sleep
person.family=father,mother,sister
person.map.k1=v1
person.map.k2=v2
person.pet.type=cat
person.pet.name=mimi
1.3 编写测试类:测试是否配置成功
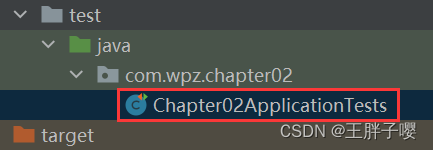
package com.wpz.chapter02;

import com.wpz.chapter02.domain.Person;
import org.junit.jupiter.api.Test;
import org.springframework.beans.factory.annotation.Autowired;
import org.springframework.boot.test.context.SpringBootTest;

@SpringBootTest
class Chapter02ApplicationTests {
    @Autowired
    private Person person;//通过@Autowired注入

    @Test
    void contextLoads() {
        System.out.println(person);
    }
}
1.4 输出结果
运行测试类中的测试方法
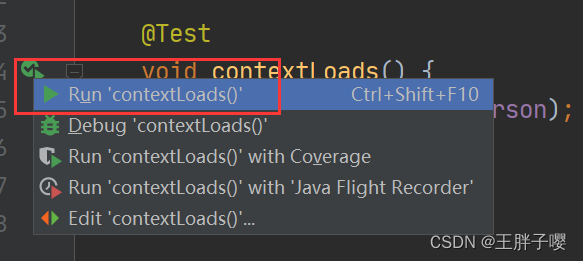
控制台输出:


2. application.yaml配置文件(推荐)
介绍
YAML文件格式是springboot支持的一种json超集文件格式,以数据为核心,是一种更直观且容易被计算机识别的数据序列化格式。=> 更简洁方便
yaml配置属性时的写法
yaml文件配置属性的格式:key:(空格)value,使用缩进控制层级关系,对于String类型的属性值,不需要额外添加双引号
① 普通数据类型(数字、字符串、布尔等)
server:
	port:8081
	path:/hello
② 数组和单列集合
有两种写法:缩进式和行内式
- 其中缩进式又有两种表示形式:
①"-(空格)属性值"
② 直接赋值并使用英文逗号隔开属性值
缩进式
#person为前缀,对person对象内的hobby赋值
person:
  hobby:
    - play
    - read
    - sleep
或者
person:
  hobby:
    play,
    read,
    sleep
行内式(对缩进式进行简化) => [ ]可以省略
person:
  hobby:[play,read,sleep]
③ Map集合和对象
缩进式
person:
  map:
    k1:v1
    k2:v2
行内式 => 属性值用{ }包住
person:
  map:{k1:v1,k2:v2}
2.1 编写application.yaml
还是引用前面的代码,使用前面的两个实体类和测试类
注意: 要将前面application.properties内容注释掉,因为application.properties的优先级高于application.yaml
在resources中新建application.yaml
编写yaml文件
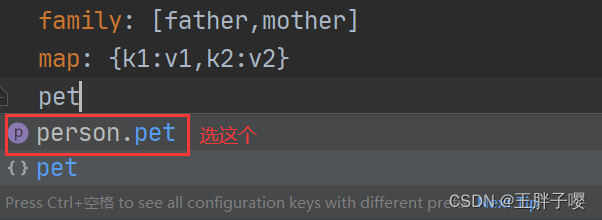
#person为前缀,对person对象内的hobby赋值
person:
  id: 2
  name: 王胖子
  hobby: [sing,read,sleep]
  family: [father,mother]
  map: {k1:v1,k2:v2}
  pet: {type:cat,name:zhuzhu}
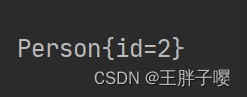
2.2 测试输出
运行测试类中的测试方法

二、配置文件中配置自定义的属性值
介绍
如果配置的属性是spring boot默认提供的属性,则spring boot会自动扫描并读取属性值
如果配置的属性是用户自定义的属性,则需要
①通过注解使类成为spring容器的组件:让springboot能扫描到该类
②再通过注解,来从配置文件中读取该类需要的属性值,然后注入到类的属性中
1. @ConfigurationProperties注入自定义属性
-
介绍:快速方便的将配置文件中自定义属性值批量注入某个Bean对象的多个对用属性中
-
三个必须:①@Component(或者其它) ②@ConfigurationProperties(prefix = “person”) ③setter()方法
-
保证:配置文件中的属性与对应实体类的属性名一致,否则无法正确获取并注入属性值
@Component
@ConfigurationProperties(prefix = "person")
public class Person {
    private int id;
   //setter()方法
   public void setId(int id) {
        this.id = id;
    }
}
2. @Value注入注入自定义属性
- 介绍:@Value注解是spring框架提供的,用来读取配置文件中的属性值并逐个注入bean对象的对应属性中。spring boot对@Value进行了默认继承,所以在spring boot中也可以使用。
- 两个必须:①@Component ②Value
- 注意:
①@Value 可以按配置文件把属性值注入到Person的属性,也可以直接为属性赋值
②但是@Value只能给普通数据类型注入属性值
@Component
public class Person {
    @Value("${person.id}")
    private int id;
    //省略toString()=>为了测试输出结果
}
输出结果
对比:@ComponentProperties 和 @Value
| 对比点 | @ComponentProperties | @Value |
|---|---|---|
| 底层框架 | spring boot | spring |
| 功能 | 批量注入配置文件中的属性 | 单个注入 |
| setter() | Y | N |
| 复杂属性注入 | Y | N |
| 松散绑定 | Y | N |
| JSR303数据校验 | Y | N |
| spEL表达式 | N | Y |
解读:
- setter():
①@ComponentProperties中:如果配置文件中没有配置属性值,则自动将对应的Bean属性设置为空
②@Value中:如果配置文件中没有配置属性值,则进行属性注入时程序自动报错,因为该注解先通过表达式读取配置文件中指定的属性值,然后自动注入到下方的Bean属性上。
③也就是该注解是指定表达式进行读取,如果配置文件中没有这个表达式,那就肯定报错了
④而上一个注解没有特定,只指定了前缀,那么在配置文件中读取时,只读取这个前缀的属性就好了,如果bean类中的某个属性没有在配置文件中设置过它的值,那它还是它的默认值,没有改变 - 松散绑定
person.firstName=person.first-Name=person.first_Name
=person.FIRST_NAME(常量) - JSR303数据校验
校验配置文件中注入对应Bean属性的值是否符合相关值的规则(但是我这里不能用)
@Component
@ConfigurationProperties(prefix = "person")
//进行数据校验:引入spring框架支持的数据校验规则
@Validated
public class Person {
    //对属性进行规则匹配:邮件规则校验
	@Email
    private String  email;
    //setter()方法
    public void setEmail(String  email) {
        this.email = email;
    }
}
- spEl表达式
“#{XX}”=> 直接赋值
@Value("#{5*2}")
private int id;
两个注解的选择
- 如果只针对某一个业务需求,要引入配置文件中的个别属性值,推荐用@Value
- 如果针对某个Bean类,需要批量注入属性值,推荐使用@ComponentProperties
三、自定义配置文件
介绍
spring boot会在启动时自动加载全局配置文件,但是spring boot无法识别我们自定义的配置文件,这时就需要我们手动加载了。
1. 使用@PropertySource加载自定义配置文件
使用
@PropertySource+@Configuration+@EnableConfigurationProperties)注解加载自定义配置文件
1.1 编写配置类
@Configuration:
标记当前类为自定义配置类,该类会作为Bean添加到spring容器中,这里等同于@Component@PropertySource:
指定自定义配置文件的位置和名称
@PropertySource("classpath:test.properties")@ConfigurationProperties:将配置文件中以test开头的属性值注入到配置类的属性中
@ConfigurationProperties(prefix = "test")- @EnableConfigurationProperties(MyProperties.class):
开启配置类MyProperties的属性注入功能,该注解配合@Configuration使用,
使用@Component时,可以省略这个注解
@EnableConfigurationProperties(MyProperties.class)
package com.wpz.chapter02.domain;
import org.springframework.boot.context.properties.ConfigurationProperties;
import org.springframework.boot.context.properties.EnableConfigurationProperties;
import org.springframework.context.annotation.Configuration;
import org.springframework.context.annotation.PropertySource;
//@Configuration:标记当前类为自定义配置类,该类会作为Bean添加到spring容器中,这里等同于@Component
@Configuration
//@PropertySource:指定自定义配置文件的位置和名称
@PropertySource("classpath:test.properties")
//@ConfigurationProperties:将配置文件中以test开头的属性值注入到配置类的属性中
@ConfigurationProperties(prefix = "test")
//@EnableConfigurationProperties(MyProperties.class):开启配置类MyProperties的属性注入功能,该注解配合@Configuration使用,
// 使用@Component时,可以省略这个注解
@EnableConfigurationProperties(MyProperties.class)
public class MyProperties {
private int id;
private String name;
public int getId() {
return id;
}
public void setId(int id) {
this.id = id;
}
public String getName() {
return name;
}
public void setName(String name) {
this.name = name;
}
@Override
public String toString() {
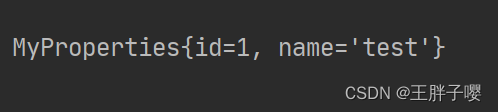
return "MyProperties{" +
"id=" + id +
", name='" + name + '\'' +
'}';
}
}
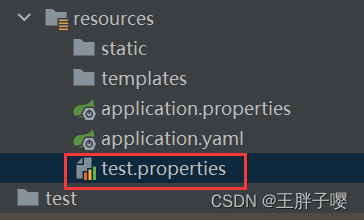
1.2 编写自定义配置文件
新建配置文件test.properties
编写
test.id=1
test.name=test
1.3 编写测试类
package com.wpz.chapter02;

import com.wpz.chapter02.domain.MyProperties;
import org.junit.jupiter.api.Test;
import org.springframework.beans.factory.annotation.Autowired;
import org.springframework.boot.test.context.SpringBootTest;

@SpringBootTest
class Chapter02ApplicationTests {
    @Autowired
    private MyProperties myProperties;
    @Test
    void myPropertiesTest(){
        System.out.println(myProperties);
    }
}
1.4 测试输出
运行myPropertiesTest()单元测试方法
2. @ImportResource加载xml配置文件
由于这个只在特殊情况下使用,一般使用配置类代替,所以这里简单介绍它的使用方式就好了
- 前提:
spring boot中默认不再使用xml配置文件,且xml配置文件不会加载到spring容器中。- 那如何将xml文件加载到项目中?
使用 @ImportResource加载xml配置文件 或者 使用 @Configuration编写自定义配置类
模拟一下,不写代码
需求:用xml文件将MyService类作为组件加入到spring容器
注意:@ImportResource注解要加在主程序启动类上
① 写一个类MyService,里面什么都不写
② 编写xml文件,将MyService类作为组件加入到spring容器
<bean id="myService" class="XXX.XXX.XXX.MyService"/>
③ 在主程序启动类上面加@ImportResource:因为springboot不会自动加载xml文件到spring容器中,所以需要注解来加载xml配置文件
④ 编写测试方法,测试容器中是否包含id为"myService"的组件=>测试结果为true
//用@Autowired注入了applicationContext对象
System.out.println(applicationContext.containsBean(myService));
3. @Configuration编写自定义配置类
- 用自定义配置类来实现@ImportResource中的案例,将类作为组件加入Spring容器
- 需求:用MyConfig自定义配置类 来实现 将MyService类作为组件加入到spring容器中 => 用自定义配置类代替xml文件
- 解读:
① 用@Configuration声明的MyConfig自定义配置类 类似与声明了一个xml配置文件,且能被spring boot自动扫描识别(相当于@ImportProperties加载xml文件,使springboot能够扫描到引入的xml文件)
②@Bean注解的myService()方法,其返回值对象作为组件添加到spring容器中,方法名为组件id(类似与XMl配置文件中的<bean id="myService" class="XXX.XXX.XXX.MyService"/>)- 概括:
@Configuration替代引入xml文件
@Bean替代xml文件中的内容<bean id="myService" class="XXX.XXX.XXX.MyService"/>
3.1 @Configuration+@Bean编写自定义配置类
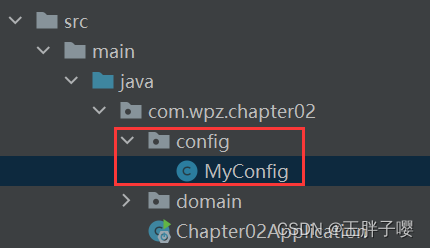
在chapter02项目代码的基础上,创建MyConfig类和MyService类
MyService类什么都不写
编写配置类
@Configuration+@Bean编写自定义配置类
package com.wpz.chapter02.config;

import org.springframework.context.annotation.Bean;
import org.springframework.context.annotation.Configuration;

//使用@Configuration将MyConfig类声明为一个配置类
@Configuration
public class MyConfig {
    //配置类中的@Bean注解标注的方法
    //- 方法返回值:返回值对象作为Bean组件注入spring容器
    //- 方法名:组件的组件名(id)
    @Bean
    public MyService myService() {
        return new MyService();
    }
}
3.2 编写测试方法
注意ApplicationContext导入的包:import org.springframework.context.ApplicationContext;
package com.wpz.chapter02;
import org.junit.jupiter.api.Test;
import org.springframework.beans.factory.annotation.Autowired;
import org.springframework.boot.test.context.SpringBootTest;
import org.springframework.context.ApplicationContext;
@SpringBootTest
class Chapter02ApplicationTests {
@Autowired
private ApplicationContext applicationContext;
@Test
void myConfigTest() {
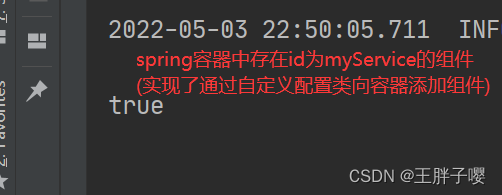
//判断spring容器中是否有id为myService的组件
System.out.println(applicationContext.containsBean("myService"));
}
}
3.3 测试输出
运行myConfigTest()方法
3.4 总结
- 我们想把某类注入spring容器,以前是通过xml文件配置的,现在通过自定义配置类来实现
- 使用@Configuration+@Bean进行配置,使得某类注入spring容器
- spring boot项目启动时,会自动加载自定义配置类,不用导入xml文件再用@ImportProperties来手动加载xml文件了


 被折叠的 条评论
为什么被折叠?
被折叠的 条评论
为什么被折叠?
 到【灌水乐园】发言


