


 本文档展示了一个WPF应用程序的实现,该程序能够通过IP摄像头DLL库控制摄像头,并使用配置的IP地址、用户名和密码进行连接。同时,程序通过串口通信模块实现了对远程风扇的开关控制,包括打开和关闭风扇的功能。代码中包含了UI设计、事件处理和串口操作的相关细节。
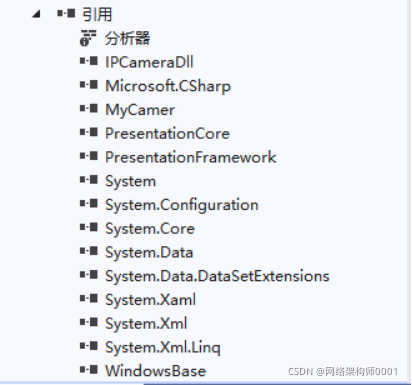
1:添加引用IPCameraDll.dll和System.Configuration,并且把MyCamer.dll复制到bin目录下
2:在MainWindow.xaml中添加代码

<Window x:Class="Demo10.MainWindow"
        xmlns="http://schemas.microsoft.com/winfx/2006/xaml/presentation"
        xmlns:x="http://schemas.microsoft.com/winfx/2006/xaml"
        Title="MainWindow" Height="457" Width="750">
    <Grid>
        <Grid.Background>
            <ImageBrush ImageSource="bg_main_menu.png"/>
        </Grid.Background>
        <Grid.ColumnDefinitions>
            <ColumnDefinition Width="546*"/>
            <ColumnDefinition Width="100*"/>
        </Grid.ColumnDefinitions>
        <Image Grid.Column="0" HorizontalAlignment="Left" Name="img"  Margin="17,17,0,61.722" Width="476.389" Stretch="Fill" Source="NoPic.png"/>
        <Grid Grid.Column="1">
            <Image Grid.Column="0" HorizontalAlignment="Left" x:Name="img1"    Stretch="Fill"/>
            <Button x:Name="btnStart" Content="开始" HorizontalAlignment="Left"  VerticalAlignment="Top" Width="75" Click="btnStart_Click" Tag="0" Margin="10,41,0,0"/>

        </Grid>
    </Grid>
</Window>
3:在MainWindow.xam.cs中添加代码


using System;
using System.Collections.Generic;
using System.Linq;
using System.Text;
using System.Threading.Tasks;
using System.Windows;
using System.Windows.Controls;
using System.Windows.Data;
using System.Windows.Documents;
using System.Windows.Input;
using System.Windows.Media;
using System.Windows.Media.Imaging;
using System.Windows.Navigation;
using System.Windows.Shapes;

using IPCameraDll;
using MyCamerN;
using System.Configuration;


namespace Demo10
{
    /// <summary>
    /// MainWindow.xaml 的交互逻辑
    /// </summary>
    public partial class MainWindow : Window
    {
        /// <summary>
        /// //摄像头操作类
        /// </summary>
        private IPCamera _VedioAndController;

        public MainWindow()
        {
            InitializeComponent();
        }

        /// <summary>
        /// 开始按钮处理按钮
        /// </summary>
        /// <param name="sender"></param>
        /// <param name="e"></param>
        private void btnStart_Click(object sender, RoutedEventArgs e)
        {
            //判断btnStart按钮的Tag属性值,若为0则表示摄像头为关闭窗台,则开启,否则关闭
            if (btnStart.Tag.ToString() == "0")
            {
                //若_VedioAndController摄像头操作类为null。表示未实例化,则初始化摄像头操作类
                if (_VedioAndController == null)
                    _VedioAndController = new IpCameraHelper(ConfigurationManager.AppSettings["RoundVedioIp"].ToString(), ConfigurationManager.AppSettings["RoundVedioUserName"].ToString(), ConfigurationManager.AppSettings["RoundVedioPassWord"].ToString(),
                        new Action<ImageEventArgs>((arg) =>
                        {
                            //arg.FrameReadyEventArgs.BitmapImage为摄像头返回的图像,将其赋值给img图片控件,用于显示图片
                            img.Source = arg.FrameReadyEventArgs.BitmapImage;
                        }));
                //开始显示摄像头图像
                _VedioAndController.StartProcessing();

                //将btnStart按钮的Content属性(按钮显示的文字)设置为关闭
                btnStart.Content = "关闭";
                //将btnStart按钮的Tag属性设置为1,表示摄像头为打开状态
                btnStart.Tag = "1";
            }
            else
            {
                //若_VedioAndController摄像头操作类不为null。表示已实例化
                if (_VedioAndController != null)
                    _VedioAndController.StopProcessing();//关闭摄像头

                //将btnStart按钮的Content属性(按钮显示的文字)设置为打开
                btnStart.Content = "打开";
                //将btnStart按钮的Tag属性设置为0,表示摄像头为关闭状态
                btnStart.Tag = "0";
            }
        }
    }
}
4:在APP.config中配制视频IP地址,登入账号和密码
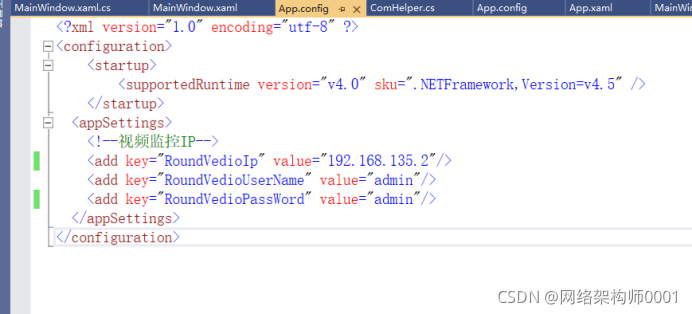
<?xml version="1.0" encoding="utf-8" ?>
<configuration>
    <startup>
        <supportedRuntime version="v4.0" sku=".NETFramework,Version=v4.5" />
    </startup>
  <appSettings>
    <!--视频监控IP-->
    <add key="RoundVedioIp" value="192.168.135.2"/>
    <add key="RoundVedioUserName" value="admin"/>
    <add key="RoundVedioPassWord" value="admin"/>
  </appSettings>
</configuration>
远程风扇模块控制
5:新建串口帮助类”ComHelper.cs”,实现打开,关闭,读,写等功能
namespace Demo8_11
{
    public class ComHelper
    {
        public SerialPort CurrentSerialPort = null;
        public object mOpenLock = new object();

        /// <summary>
        /// 构造函数
        /// </summary>
        /// <param name="strCom">串口</param>
        /// <param name="baudRate">波特率</param>
        public ComHelper(string strCom = "COM1", int baudRate = 9600)
        {
            CurrentSerialPort = new SerialPort();
            CurrentSerialPort.PortName = strCom;
            CurrentSerialPort.BaudRate = baudRate;
        }
        /// <summary>
        /// 打开串口
        /// </summary>
        /// <param name="strCom"></param>
        /// <param name="baudRate"></param>
        public bool Open()
        {
            if (!CurrentSerialPort.IsOpen)
            {
                //打开串口
                lock (mOpenLock)
                {
                    if (!CurrentSerialPort.IsOpen)
                    {
                        try
                        {
                            CurrentSerialPort.Open();
                        }
                        catch (Exception ex)
                        {
                            System.Windows.MessageBox.Show(ex.Message);
                            return false;
                        }
                    }
                }
            }
            return CurrentSerialPort.IsOpen;
        }

        /// <summary>
        /// 关闭串口
        /// </summary>
        public void Close()
        {
            if (CurrentSerialPort.IsOpen)
            {
                lock (mOpenLock)
                {
                    if (CurrentSerialPort.IsOpen)
                    {
                        CurrentSerialPort.Close();
                    }
                }
            }
        }

        /// <summary>
        /// 写入数据
        /// </summary>
        /// <param name="buffer"></param>
        /// <param name="offs"></param>
        /// <param name="count"></param>
        public void Write(byte[] buffer, int offs, int count)
        {
            //清除缓冲区
            CurrentSerialPort.DiscardInBuffer();
            CurrentSerialPort.Write(buffer, offs, count);
        }

        /// <summary>
        /// 获取串口数据
        /// </summary>
        /// <returns></returns>
        private byte[] GetByteData()
        {
            Open();
            int bufferSize = CurrentSerialPort.BytesToRead;
            if (bufferSize <= 0)
                return null;

            byte[] readBuffer = new byte[bufferSize];
            int count = CurrentSerialPort.Read(readBuffer, 0, bufferSize);
            Close();
            return readBuffer;
        }


        private char[] ToBinary7(int value)
        {
            char[] chars = new char[7];
            value = value & 0xFF;
            for (int i = 6; i >= 0; i--)
            {
                chars[i] = (value % 2 == 1) ? '1' : '0';
                value /= 2;
            }
            return chars;
        }
    }
}
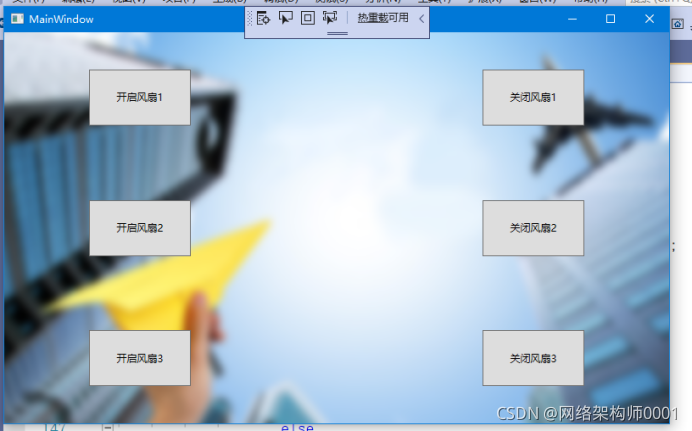
6:在“MainWindow.xaml”中添加代码,完成界面制作
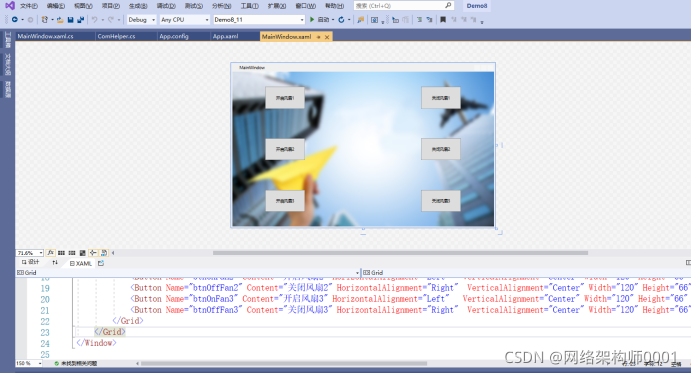
<Window x:Class="Demo8_11.MainWindow"
        xmlns="http://schemas.microsoft.com/winfx/2006/xaml/presentation"
        xmlns:x="http://schemas.microsoft.com/winfx/2006/xaml"
        Title="MainWindow" Height="500" Width="800">
    <Grid>
        <Grid.Background>
            <ImageBrush ImageSource="Images/bg_main_menu.png"/>
        </Grid.Background>
        <Grid>
            <Grid.RowDefinitions>

                <RowDefinition Height="80*"/>
                <RowDefinition Height="80*"/>
                <RowDefinition Height="80*"/>
            </Grid.RowDefinitions>
            <Button Name="btnOnFan1" Content="开启风扇1" HorizontalAlignment="Left"   VerticalAlignment="Center" Width="120" Height="66" Click="btnOnFan1_Click" Margin="100,0"/>
            <Button Name="btnOffFan1" Content="关闭风扇1" HorizontalAlignment="Right"  VerticalAlignment="Center" Width="120" Height="66" Click="btnOffFan1_Click"   Margin="100,0"/>
            <Button Name="btnOnFan2" Content="开启风扇2" HorizontalAlignment="Left"   VerticalAlignment="Center" Width="120" Height="66" Click="btnOnFan2_Click" Grid.Row="1" Margin="100,0"/>
            <Button Name="btnOffFan2" Content="关闭风扇2" HorizontalAlignment="Right"  VerticalAlignment="Center" Width="120" Height="66" Click="btnOffFan2_Click" Grid.Row="1" Margin="100,0"/>
            <Button Name="btnOnFan3" Content="开启风扇3" HorizontalAlignment="Left"   VerticalAlignment="Center" Width="120" Height="66" Click="btnOnFan3_Click" Grid.Row="2" Margin="100,0"/>
            <Button Name="btnOffFan3" Content="关闭风扇3" HorizontalAlignment="Right"  VerticalAlignment="Center" Width="120" Height="66" Click="btnOffFan3_Click" Grid.Row="2" Margin="100,0"/>
        </Grid>
    </Grid>
</Window>
7::在MainWindow.xam.cs中添加代码
using System;
using System.Collections.Generic;
using System.Linq;
using System.Text;
using System.Threading.Tasks;
using System.Windows;
using System.Windows.Controls;
using System.Windows.Data;
using System.Windows.Documents;
using System.Windows.Input;
using System.Windows.Media;
using System.Windows.Media.Imaging;
using System.Windows.Navigation;
using System.Windows.Shapes;
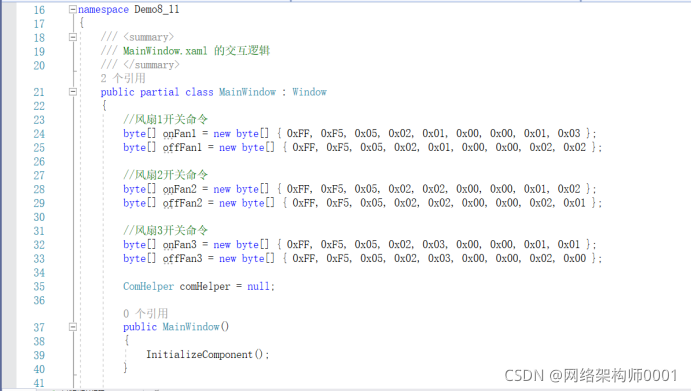
namespace Demo8_11
{
/// <summary>
/// MainWindow.xaml 的交互逻辑
/// </summary>
public partial class MainWindow : Window
{
//风扇1开关命令
byte[] onFan1 = new byte[] { 0xFF, 0xF5, 0x05, 0x02, 0x01, 0x00, 0x00, 0x01, 0x03 };
byte[] offFan1 = new byte[] { 0xFF, 0xF5, 0x05, 0x02, 0x01, 0x00, 0x00, 0x02, 0x02 };
//风扇2开关命令
byte[] onFan2 = new byte[] { 0xFF, 0xF5, 0x05, 0x02, 0x02, 0x00, 0x00, 0x01, 0x02 };
byte[] offFan2 = new byte[] { 0xFF, 0xF5, 0x05, 0x02, 0x02, 0x00, 0x00, 0x02, 0x01 };
//风扇3开关命令
byte[] onFan3 = new byte[] { 0xFF, 0xF5, 0x05, 0x02, 0x03, 0x00, 0x00, 0x01, 0x01 };
byte[] offFan3 = new byte[] { 0xFF, 0xF5, 0x05, 0x02, 0x03, 0x00, 0x00, 0x02, 0x00 };
ComHelper comHelper = null;
public MainWindow()
{
InitializeComponent();
}
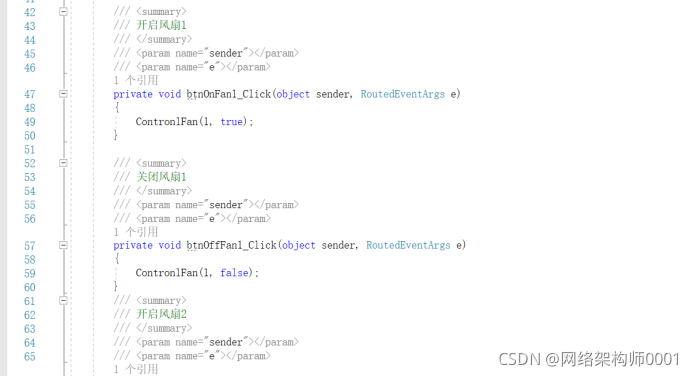
/// <summary>
/// 开启风扇1
/// </summary>
/// <param name="sender"></param>
/// <param name="e"></param>
private void btnOnFan1_Click(object sender, RoutedEventArgs e)
{
ContronlFan(1, true);
}
/// <summary>
/// 关闭风扇1
/// </summary>
/// <param name="sender"></param>
/// <param name="e"></param>
private void btnOffFan1_Click(object sender, RoutedEventArgs e)
{
ContronlFan(1, false);
}
/// <summary>
/// 开启风扇2
/// </summary>
/// <param name="sender"></param>
/// <param name="e"></param>
private void btnOnFan2_Click(object sender, RoutedEventArgs e)
{
ContronlFan(2, true);
}
/// <summary>
/// 关闭风扇2
/// </summary>
/// <param name="sender"></param>
/// <param name="e"></param>
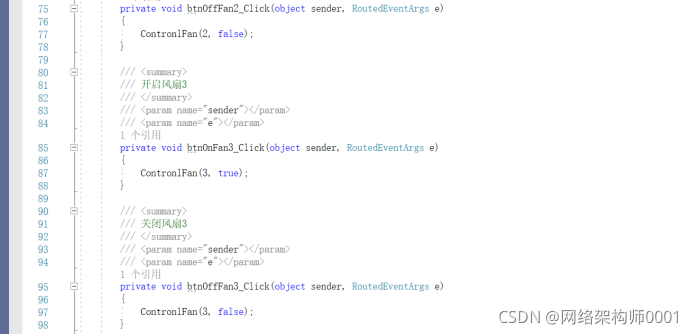
private void btnOffFan2_Click(object sender, RoutedEventArgs e)
{
ContronlFan(2, false);
}
/// <summary>
/// 开启风扇3
/// </summary>
/// <param name="sender"></param>
/// <param name="e"></param>
private void btnOnFan3_Click(object sender, RoutedEventArgs e)
{
ContronlFan(3, true);
}
/// <summary>
/// 关闭风扇3
/// </summary>
/// <param name="sender"></param>
/// <param name="e"></param>
private void btnOffFan3_Click(object sender, RoutedEventArgs e)
{
ContronlFan(3, false);
}
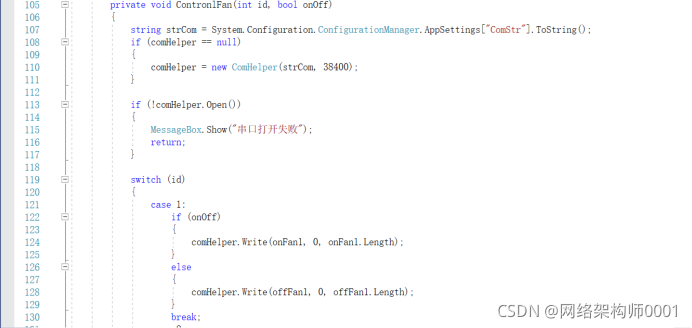
/// <summary>
/// 控制串口
/// </summary>
/// <param name="id"></param>
/// <param name="onOff">开关</param>
private void ContronlFan(int id, bool onOff)
{
string strCom = System.Configuration.ConfigurationManager.AppSettings["ComStr"].ToString();
if (comHelper == null)
{
comHelper = new ComHelper(strCom, 38400);
}
if (!comHelper.Open())
{
MessageBox.Show("串口打开失败");
return;
}
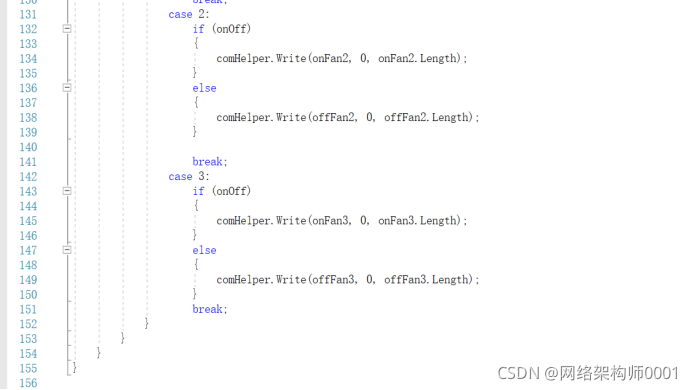
switch (id)
{
case 1:
if (onOff)
{
comHelper.Write(onFan1, 0, onFan1.Length);
}
else
{
comHelper.Write(offFan1, 0, offFan1.Length);
}
break;
case 2:
if (onOff)
{
comHelper.Write(onFan2, 0, onFan2.Length);
}
else
{
comHelper.Write(offFan2, 0, offFan2.Length);
}
break;
case 3:
if (onOff)
{
comHelper.Write(onFan3, 0, onFan3.Length);
}
else
{
comHelper.Write(offFan3, 0, offFan3.Length);
}
break;
}
}
}
}
8:启动项目进行测试


 4443
4443

 被折叠的 条评论
为什么被折叠?
被折叠的 条评论
为什么被折叠?
 到【灌水乐园】发言


