


前言
双非IC工作难找,简历已投,无人问津,已听天命,顺便补一下功课。
一 题目
在【牛客网VL33】中有着题目:
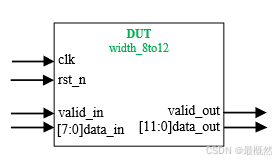
“实现数据位宽转换电路,实现8bit数据输入转换为12bit数据输出。其中,先到的数据应置于输出的高bit位。电路的接口如下图所示。valid_in用来指示数据输入data_in的有效性,valid_out用来指示数据输出data_out的有效性;clk是时钟信号;rst_n是异步复位信号。”

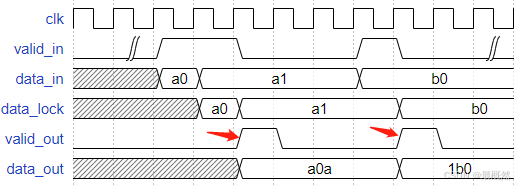
个人当时觉得这图是有问题的,在解答区中看到如下图认为较合适,作为解题参考图:
二 解答
详细解答不做解释,参考链接:非整数倍数据位宽转换8to12_牛客题霸_牛客网 (nowcoder.com)
对于DUT,这里的代码为
// /dut/width_8to12.v
module width_8to12(
	input clk 		,
	input rst_n		,
	input valid_in	,
	input [7:0] data_in	,

 	output reg valid_out,
	output reg [11:0] data_out
);
reg [1:0]cnt;
reg [7:0]data_i_r;


always@(posedge clk or negedge rst_n)begin
	if(!rst_n) begin
		cnt<=0;
	end else begin
		if(valid_in) begin
			if(cnt==2'd2)
				cnt<=0;
			else
				cnt<=cnt+2'd1;
		end
	end
end

always@(posedge clk or negedge rst_n)begin
	if(!rst_n) begin
		data_i_r<=0;
	end else begin
		if(valid_in)
			data_i_r<=data_in;
		else
			data_i_r<=data_i_r;
	end
end

always@(posedge clk or negedge rst_n)begin
	if(!rst_n) begin
		data_out<=0;
	end else begin
		if(valid_in)
			if(cnt==2'd1)
				data_out<={data_i_r,data_in[7:4]};
			else if(cnt==2'd2)
				data_out<={data_i_r[3:0],data_in};
			else
				data_out<=data_out;
	end
end

always@(posedge clk or negedge rst_n)begin
	if(!rst_n) begin
		valid_out<=0;
	end else begin
		if(valid_in&& cnt==2'd1)
			valid_out<=1;
		else if(valid_in&& cnt==2'd2)
			valid_out<=1;
		else
			valid_out<=0;
	end
end


endmodule
实现的图示如
三 搭建UVM平台
适用于初学者。首先搭建UVM几大组件。
1. 组件(框架)
1.transaction
transaction类实现的是UVM平台中流动的事务。类比其他语言,我理解的是一帧数据的打包,类比于UART中的一个字节对应的8bit顺序代表的含义,类比于ModBus中的一帧数据。便于其他组件对数据进行解包和使用。这里给出代码均放在tb文件夹下,后续的组件和模块命名规则为类名m_xxx,文件名为my_xxx.sv。
代码里定义了流动的数据,起到一个“声明”的作用。后续的几行是UVM的factory机制,将变量注册到平台中,有利于后续的格式化打印和调试。
// tb/m_transaction.sv
class m_transaction extends uvm_sequence_item;

    // 变量
    rand bit valid_in;
    rand bit [7:0] data_in;
    rand bit valid_out;
    rand bit [11:0] data_out;

    // factory机制
    `uvm_object_utils_begin(m_transaction)
        `uvm_field_int(valid_in,UVM_ALL_ON)
        `uvm_field_int(data_in,UVM_ALL_ON)
        `uvm_field_int(valid_out,UVM_ALL_ON)
        `uvm_field_int(data_out,UVM_ALL_ON)
    `uvm_object_utils_end

    function new(string name="m_transaction");
        super.new(name);
        `uvm_info("m_transaction","new func is called",UVM_MEDIUM)
    endfunction

endclass
2.Interface
与前者的区别,接口是静态的,是约束通信两方的信号通信标准。两国边境大家各说各的语言,谁也听不懂,但是大家都转变为英文或许两方都能理解其含义。对接口而言,将这些变量的方向根据特定场景分类好,后续的使用就不易出错。
时钟块(clocking)的作用我也没理解到位,等我学习到位了再分享。
// tb/my_interface.sv
interface m_interface(input logic clk);
    logic rst_n;
    logic valid_in;
    logic [7:0] data_in;
    logic valid_out;
    logic [11:0] data_out;

    clocking driver_cb@(posedge clk);
    default input #1 output #0;
        output rst_n;
        output valid_in;
        output data_in;
    endclocking

    clocking m_monitor_cb@(posedge clk);
    default input #1 output #0;
        input rst_n;
        input valid_in;
        input data_in;
    endclocking

    clocking s_monitor_cb@(posedge clk);
    default input #1 output #0;
        input rst_n;
        input valid_out;
        input data_out;
    endclocking

endinterface //m_interface
这是Interface所“分化”出的三种方向的“簇”,这样在后续的使用中直接使用这三者就可以实现信息的传递。

3.Sequence
Sequence,序列,是数据的顺序所代表的含义。类比于UART中的一个字节中的顺序代表的含义,类比于ModBus中的一帧数据中每个位置代表的含义。其中body任务是事务产生的环节,我们将在后续对其填充更多内容。
//  tb/my_sequence.sv
class m_sequence extends uvm_sequence #(m_transaction);
    `uvm_object_utils(m_sequence)

    function new(string name="m_sequence");
        super.new(name);
        `uvm_info("m_sequence","new func is called",UVM_MEDIUM)
    endfunction

    virtual task body();
        `uvm_info("m_sequence","body func is called",UVM_MEDIUM)
    endtask

endclass
4.Sequencer
Sequencer,序列发生器,他是一个实打实的组件,很多功能被内置了,导致他看起来就只像一个转发器。
// tb/my_sequencer.sv
class m_sequencer extends uvm_sequencer #(m_transaction);
    `uvm_component_utils(m_sequencer)
    function new(string name="m_sequencer",uvm_component parent=null);
        super.new(name,parent);
        `uvm_info("m_sequencer","new func is called",UVM_LOW)
    endfunction
endclass
5.Driver
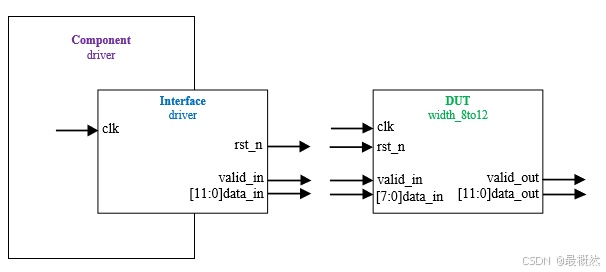
driver,驱动器,是将打包的数据(事务transaction)拆解为Pin级信号传递给DUT的执行者,是干最累最苦的活。按照搭建逻辑,我们先搭建基本框架,等后文再继续填充。
// tb/my_driver.sv
class m_driver extends uvm_driver#(m_transaction);
`uvm_component_utils(m_driver)
function new(string name="m_driver",uvm_component parent=null);
super.new(name,parent);
`uvm_info("m_driver","new func is called",UVM_LOW)
endfunction
virtual function void build_phase(uvm_phase phase);
super.build_phase(phase);
`uvm_info("m_driver","build_phase func is called",UVM_LOW)
endfunction
virtual task reset_phase(uvm_phase phase);
super.reset_phase(phase);
`uvm_info("m_driver","reset_phase func is called",UVM_LOW)
endtask
virtual task run_phase(uvm_phase phase);
super.run_phase(phase);
`uvm_info("m_driver","run_phase func is called",UVM_LOW)
endtask
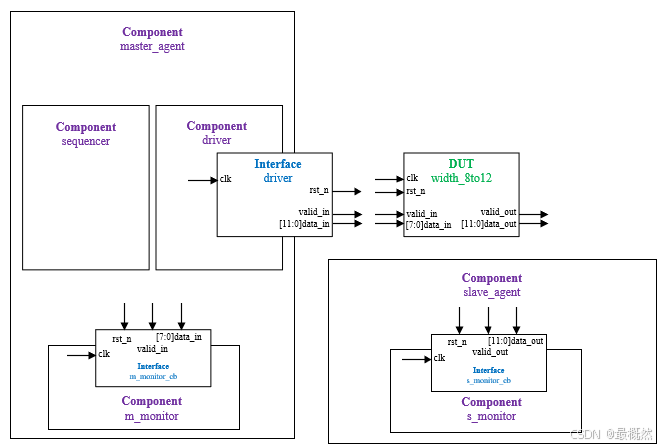
endclass层级关系如图所示,driver是UVM的组件,已经摆脱了Pin级信号的烦恼,开始走向“层级逻辑”的方式。
6.Monitor
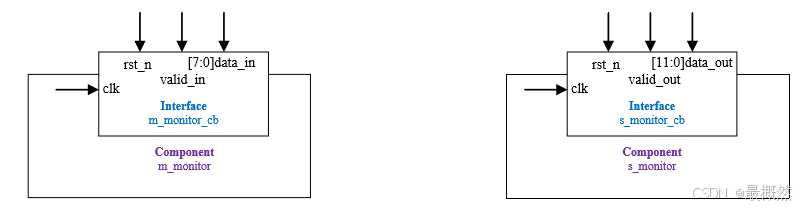
montor,监视器,每个组件都被赋予了自己独特的专精的功能,这个是用于获取针对DUT而言的输入和输出的数据采集的作用。由于对DUT的输入的信号是随机的,所以我们也不知道在任意时刻到底发了什么,因此,捕获DUT的输入和输出的信号是必须的。
// tb/my_monitor.sv
class m_monitor extends uvm_monitor;
    `uvm_component_utils(m_monitor)
    function new(string name="m_monitor",uvm_component parent=null);
        super.new(name,parent);
        `uvm_info("m_monitor","new func is called",UVM_LOW)
    endfunction

    virtual function void build_phase(uvm_phase phase);
        super.build_phase(phase);
        `uvm_info("m_monitor","build_phase func is called",UVM_LOW)
    endfunction

    virtual task run_phase(uvm_phase phase);
        super.run_phase(phase);
        `uvm_info("m_monitor","run_phase func is called",UVM_LOW)
    endtask

endclass
这里需要对monitor分个类,因为对DUT输入的监视器而言,它只需要关心给DUT输入的信号,对DUT输出的监视器而言,它只需要关心DUT输出的信号。因此,两个监视器我们给命名m_monitor和s_monitor。同时,这两个monitor刚好用上我们之前定义的Interface分化出的两种接口。于是,其层级结构如图所示。
7.Agent
agent,代理?这个词我也没理解到位。理解上反正是一层封装,类似将多个不同的学生分为一个班级的封装。其将driver、sequencer和monitor封装在了一起。同时又分为active模式和passive模式,顾名思义一个可以主动,另一个就只能被动了。具体而言,active模式中将例化driver、sequencer和monitor三者,并赋予其任务要去执行。而passive模式只需要例化monitor即可,处在一个“被动”接收数据的作用。因此,相关代码为:
// tb/m_agent.sv
class m_agent extends uvm_agent;
`uvm_component_utils(m_agent)
m_sequencer m_seqr;
m_driver m_drv;
m_monitor m_mon;
// 自定义一个模式寄存器 UVM_ACTIVE UVM_PASSIVE
bit is_active=UVM_ACTIVE;
function new(string name="m_agent",uvm_component parent=null);
super.new(name,parent);
`uvm_info("m_agent","new func is called",UVM_LOW)
endfunction
virtual function void build_phase(uvm_phase phase);
super.build_phase(phase);
`uvm_info("m_agent","build_phase func is called",UVM_LOW)
// factory 机制
if(is_active==UVM_ACTIVE) begin
m_seqr = m_sequencer::type_id::create("m_seqr",this);
m_drv = m_driver::type_id::create("m_drv",this);
end
m_mon = m_monitor::type_id::create("m_mon",this);
endfunction
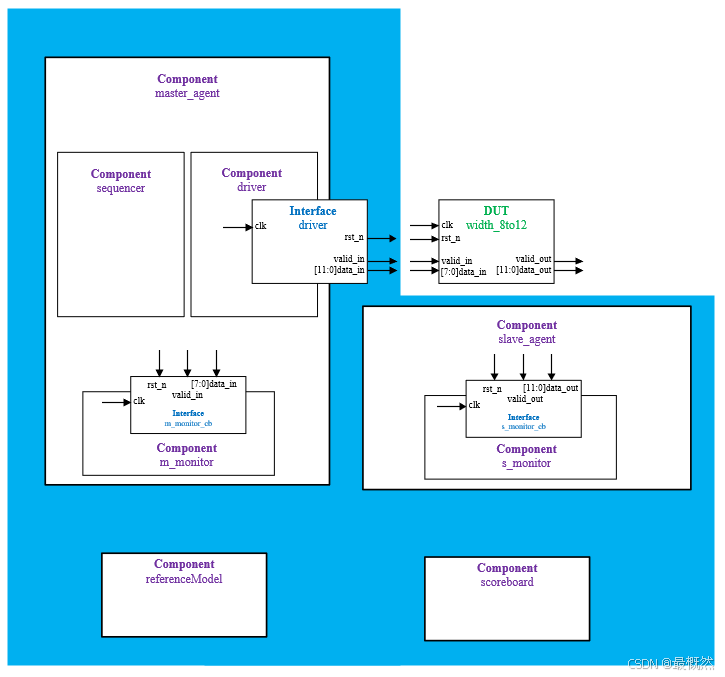
endclass这里出现了第一次实例化之前出现的组件,同时这种实例化的方式很特殊,这里只表示它是一种factory机制,想了解更多请自行查阅。懒得查阅的就先记住吧。因此,层级结构如图。
8.Reference model
简称rm,叫参考模型又叫黄金模型。作用是将之前输入给DUT的信号同时也输入给它,让它也计算一遍,以获得正确的答案。但是吧,我也一直很好奇,都是人写的,谁又能保证谁对谁错呢。这里rm的优点是可以使用sv,相比于v,其高级了一些,所以认为其程序出错对的概率小点吧。这点尚不明确,等客官详解。
没想好咋写,先占着位吧。
// tb/my_referencemodel.sv
class m_referencemodel extends uvm_component;
    `uvm_component_utils(m_referencemodel)

    function new(string name="m_referencemodel", uvm_component parent);
        super.new(name,parent);
        `uvm_info("m_referencemodel","new func is called",UVM_LOW)
    endfunction

endclass
9.Scoreboard
计分板,也叫checker,检查器。作用是针对同一个事务,将rm输出的正确数据和DUT输出的数据进行判断。理论上DUT输出的数据若与rm输出的数据相同,则没有问题,若是不同,那DUT就存在BUG,应该生成对应的报告了。
// tb/my_scoreboard.sv
class m_scoreboard extends uvm_scoreboard;
    `uvm_component_utils(m_scoreboard)

    function new(string name="m_scoreboard",uvm_component parent=null);
        super.new(name,parent);
        `uvm_info("m_scoreboard","new func is called",UVM_LOW)
    endfunction

    virtual task run_phase(uvm_phase phase);
        super.run_phase(phase);
        `uvm_info("m_scoreboard","run_phase func is called",UVM_LOW)
    endtask

endclass
10.Env
env,环境,emmm,反正又是一层封装,将agent、refencemodel和scoreboard封装在一起了。同时也将例化三者。
// tb/my_env.sv
class m_env extends uvm_env;
    `uvm_component_utils(m_env)
    m_agent m_agt;
    m_referencemodel m_ref;
    m_scoreboard m_sb;

    function new(string name="m_env",uvm_component parent=null);
        super.new(name,parent);
        `uvm_info("m_env","new func is called",UVM_LOW)
    endfunction

    virtual function void build_phase(uvm_phase phase);
        super.build_phase(phase);
        `uvm_info("m_env","build_phase func is called",UVM_LOW)
        m_agt = m_agent::type_id::create("m_agt",this);
        m_ref = m_referencemodel::type_id::create("m_ref",this);
        m_sb = m_scoreboard::type_id::create("m_sb",this);
    endfunction

endclass
此时,我们又拥有了新的层级关系:
11.testcase top
又是两层封装,但还都有些独特的用途。在testcase中实例化env。
// tb/my_test.sv
class m_test extends uvm_test;
    `uvm_component_utils(m_test)
    m_env m_envr;

    function new(string name="m_test",uvm_component parent=null);
        super.new(name,parent);
        `uvm_info("m_test","new func is called",UVM_LOW)
    endfunction

    virt
最低0.47元/天 解锁文章


 被折叠的 条评论
为什么被折叠?
被折叠的 条评论
为什么被折叠?
 到【灌水乐园】发言


