


 本文详细介绍Vue Router的手动配置过程,包括安装、导入、创建及使用路由,以及路由嵌套和参数传递的方法。同时,探讨自动配置的优势,讲解如何通过vue-cli简化配置流程。此外,深入解析导航守卫的应用,实现动态配置页面标题。
一、手动配置
1、安装路由
npm install --save vue-router
2、在模块化工程中使用
(1)、在index.js中导入路由,并调用
import Vue from 'vue'
import VueRouter from 'vue-router'

Vue.use(VueRouter)
(2)、路由配置(index.js)
const routes = [ // 路由和组件之间的关系
  {
    path: '/',
    name: 'Home',
    component: Home
  },
]
(3)、创建VueRouter对象 (index.js)
const router =new VueRouter({
	// 配置路由和组件之间的应用关系
	router,
	mode:'history' ,//设置路由模式
	linkActiveClass:'active'
})
(4)、配置路径信息(index.js)
import Home from '../views/Home.vue' //'路径'

const routes = [
  {
    path: '/',  // 页面要跳转的地址,
    name: 'Home',  //"这个路由的名字",
    component: Home
  },
]
(5)在组件中使用
<!-- 跳转 -->
<router-link :to="{ path: `/home` }"></router-link>
<!-- 渲染路由 -->
<router-view></router-view>
(5)、在 main.js 中全局注册
import router from './router/index'
	new Vue ({
		el:'#app',
		router:router, // 把路由全局注册
	})
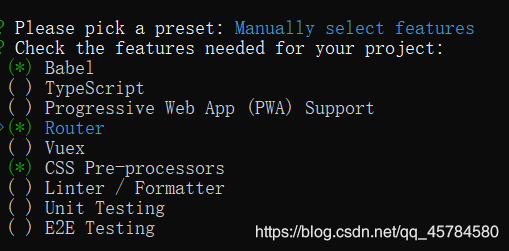
二、自动配置
当我们用vue-cli创建项目时,可以直接把router这项选择上,选中之后上面的配置就不用弄了,直接给创建好了(nice~)
路由嵌套
	配置路由嵌套
const routes = [
	{
		path:'/'
		redirect:'hom' // 路由重定向
		children:[ // 子路由
			{
				path:'new'  // 在子路由中不能 写 /
				component: new
			},
			{
				path:'news'  // 在子路由中不能 写 /
				component: news
			}
		]
	}
]
// 跳转
	<router-link :to="/home/new" tag="button" replace>
	<router-link :to="/home/news" tag="button" replace>
路由参数
两种类型
params的类型
- 路由配置格式:/route/:id
- 传递的方式 在path后面跟上对应的值
- 传递:this.reuter.push(’@/home’+this.id)
- 传递后的形形成的路径:/router/123, /routre/abc
query 的类型
- 配置路由格式:/router 普通配置
- 传递的方式:对象中使用query的key作为传递的方式
- 传递:
this.router.push({ path:’@/hom’,query{
name:zs,
id:18
}) - 传递后形成的路径 /router?id=123,/retuter/?id=abc
导航守卫
在router index.js文件配置导航守卫 (动态配置title)
router.beforEach((to,from,next)=>{  // 前置钩子函数  需要 添加 next
	document.title=to.matched[0].meta.title
	next()
})
//从form 页面页面   跳到 to 页面
const routes = [  //配置路由
	 {
		path:'/index'
		component:index,
		meta:{ //如果想动态配置title 需要在路由规则内添加 meta对象进行设置
		title:'首页'
		}
	}
]
后置钩子函数
afterEach((to,from)=>{
})


 597
597

 被折叠的 条评论
为什么被折叠?
被折叠的 条评论
为什么被折叠?
 到【灌水乐园】发言


