


简介
springSecurity跟shiro都是较为常用的安全管理框架,springSecurity具有更丰富的功能和社区资源,一般中大型项目更倾向于springSecurity,而shiro更倾向于配置简单的小型项目,简单来说就是为了实现认证和授权两个功能。
认证:确认当前用户是否为本系统用户。
授权:确认此用户在系统中有哪些权利。
流程
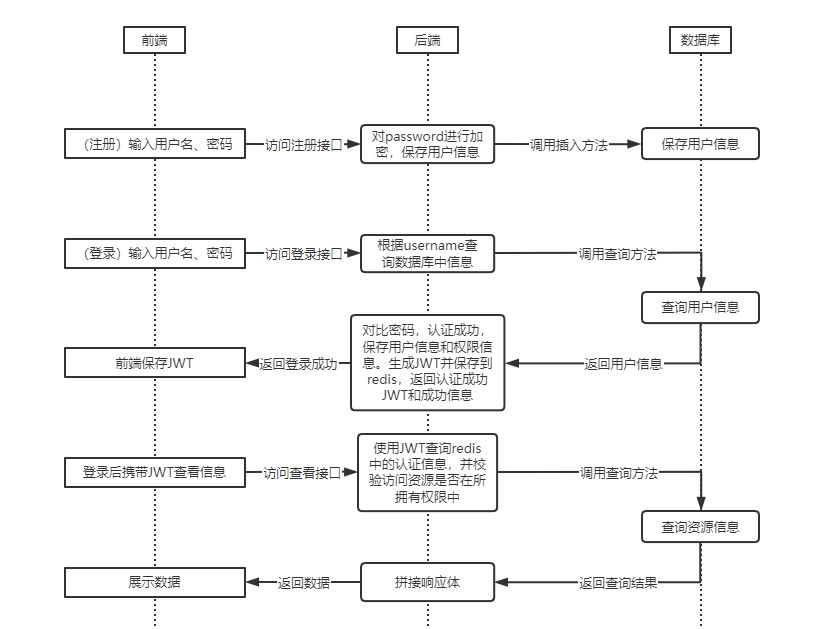
- 首先,我们需要注册用户,将用户信息保存到数据库中,为了安全起见我们需要对密码进行加密处理。
- 然后输入用户名、密码登录用户,这时后端需要根据用户名查询数据库中本用户信息,包括密码、权限等等。然后与输入密码对比,密码正确后,我们要根据用户id生成一个唯一token,然后将token保存到redis中,将查询的用户信息保存到内存中,并将此次登录的唯一token返回给前端。
- 前端收到登录成功的token后,就可以携带着token访问接口了,当后端接收到请求后,我们会获取请求头中携带的token,根据token查询redis确认是否登录或登录是否过期,token验证通过后,我们再验证访问的接口是否被包含在用户已有的权限中,包含则允许访问并返回相应信息。
流程图:
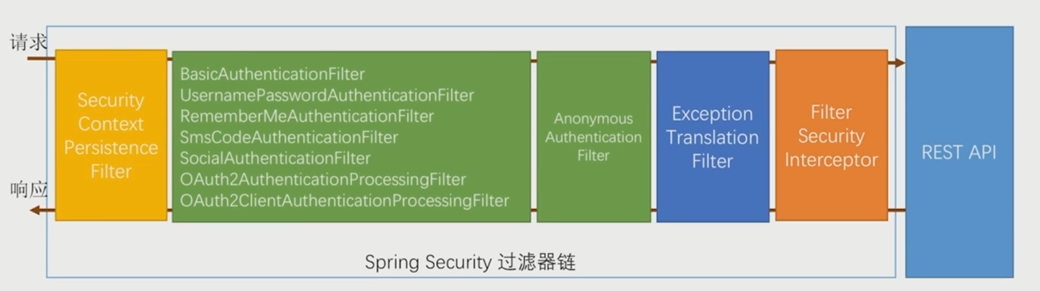
原理
springSecurity的主要部分其实是一条过滤器链,我们只要实现相应的接口、继承相应的类、重写相应的方法、新增相应的过滤器就能实现定制化功能。
实战
首先我们创建一个springboot项目,引入本项目所需依赖。
    <parent>
        <groupId>org.springframework.boot</groupId>
        <artifactId>spring-boot-starter-parent</artifactId>
        <version>2.5.6</version>
    </parent>
    <dependencies>
        <dependency>
            <groupId>org.springframework.boot</groupId>
            <artifactId>spring-boot-starter-web</artifactId>
        </dependency>
        <dependency>
            <groupId>org.projectlombok</groupId>
            <artifactId>lombok</artifactId>
            <optional>true</optional>
        </dependency>
        <dependency>
            <groupId>org.springframework.boot</groupId>
            <artifactId>spring-boot-starter-security</artifactId>
        </dependency>
        <dependency>
            <groupId>org.springframework.boot</groupId>
            <artifactId>spring-boot-starter-data-redis</artifactId>
        </dependency>
        <dependency>
            <groupId>com.alibaba</groupId>
            <artifactId>fastjson</artifactId>
            <version>1.2.60</version>
        </dependency>
        <dependency>
            <groupId>io.jsonwebtoken</groupId>
            <artifactId>jjwt</artifactId>
            <version>0.9.1</version>
        </dependency>
        <dependency>
            <groupId>cn.hutool</groupId>
            <artifactId>hutool-all</artifactId>
            <version>5.7.5</version>
        </dependency>
        <dependency>
            <groupId>com.baomidou</groupId>
            <artifactId>mybatis-plus-boot-starter</artifactId>
            <version>3.4.1</version>
        </dependency>
        <dependency>
            <groupId>mysql</groupId>
            <artifactId>mysql-connector-java</artifactId>
        </dependency>
        <dependency>
            <groupId>org.springframework.boot</groupId>
            <artifactId>spring-boot-starter-test</artifactId>
        </dependency>
        <dependency>
            <groupId>commons-lang</groupId>
            <artifactId>commons-lang</artifactId>
            <version>2.6</version>
        </dependency>
    </dependencies>
创建application.yml文件并配置数据库及端口等信息。
server:
  port: 8888
spring:
  datasource:
    url: jdbc:mysql://localhost:3306/security?charactorEncoding=utf-8&serverTimezone=UTC
    username: root
    password: '1234'
    driver-class-name: com.mysql.cj.jdbc.Driver
mybatis-plus:
  mapper-locations: classpath*:/mapper/**/*.xml
用户信息及其权限,我们遵循RBAC权限模型,建表SQL文末项目自取。项目使用到的一些配置类、工具类、请求体、响应体、实体类等不在文中展示,文末项目中自取。
注册
注册主要就是对密码进行加密的操作,我们可以使用到springSecurity自带的加密方法(BCryptPasswordEncoder.encode(password))。
我们只需要创建一个SecurityConfig配置类并继承WebSecurityConfigurerAdapter,将BCryptPasswordEncoder注入到spring容器中,springSecurity就会使用此加密方法进行密码验证,同时也是我们用此方法加密的原因。
@Configuration
@EnableGlobalMethodSecurity(prePostEnabled = true)  //开启spring方法级安全
public class SecurityConfig extends WebSecurityConfigurerAdapter {
    @Bean
    public PasswordEncoder passwordEncoder(){
        return new BCryptPasswordEncoder();
    }
}
登录
登录时,springSecurity中的方法默认查询内存中的信息。我们只需要继承查询方法的接口(UserDetailsService)并重写查询方法(loadUserByUsername),将信息从数据库中查询出即可。
@Service
public class userDetailsServiceImpl implements UserDetailsService {

    @Autowired
    UserMapper userMapper;

    @Autowired
    MenuMapper menuMapper;

    @Override
    public UserDetails loadUserByUsername(String username) throws UsernameNotFoundException {
        User user = userMapper.selectOne(new LambdaQueryWrapper<User>()
                .eq(StringUtils.isNotBlank(username), User::getUsername, username));
        if (Objects.isNull(user)){
            throw new RuntimeException("账号不存在");
        }
        List<String> list = menuMapper.selectPermsByUserId(user.getId());
        System.out.println(user);
        return new LoginUser(user, list);
    }
}
因为该方法返回值为接口UserDetails,我们需要实现此接口,并在实现类中增加我们的用户信息,这样springSecurity才能获取到用户信息。
@Data
@NoArgsConstructor
public class LoginUser implements UserDetails {

    private User user;

    private List<String> permissions;

    @JSONField(serialize = false)
    private List<GrantedAuthority> authorities;

    public LoginUser(User user, List<String> permissions) {
        this.user = user;
        this.permissions = permissions;
    }

    @Override
    public Collection<? extends GrantedAuthority> getAuthorities() {
        if (CollectionUtils.isEmpty(authorities)){
            authorities = permissions.stream()
                    .map(SimpleGrantedAuthority::new)
                    .collect(Collectors.toList());
        }
        return authorities;
    }

    @Override
    public String getPassword() {
        return user.getPassword();
    }

    @Override
    public String getUsername() {
        return user.getUsername();
    }

    @Override
    public boolean isAccountNonExpired() {
        return true;
    }

    @Override
    public boolean isAccountNonLocked() {
        return true;
    }

    @Override
    public boolean isCredentialsNonExpired() {
        return true;
    }

    @Override
    public boolean isEnabled() {
        return true;
    }
}
到此,springSecurity获取到了此用户数据库中的信息,接下来我们需要在登录接口实现类中,对用户信息进行处理。首先验证账号密码,然后根据用户id生成唯一token,将token保存到redis后,返回给前端。
@Override
    public ResponseResult login(User user) {
        UsernamePasswordAuthenticationToken token = new UsernamePasswordAuthenticationToken(user.getUsername(), user.getPassword());
        Authentication authenticate = authenticationManager.authenticate(token);
        if (Objects.isNull(authenticate)){
            throw new RuntimeException("登录失败");
        }
        LoginUser loginUser = (LoginUser) authenticate.getPrincipal();
        String userId = loginUser.getUser().getId().toString();
        String jwt = JwtUtil.createJWT(userId);
        HashMap<String, String> map = new HashMap<>();
        map.put("token", jwt);
        redisCache.setCacheObject("login:" + userId, loginUser);
        return new ResponseResult(200, "登陆成功", map);
    }
为了能够在上述登录方法中进行密码认证,需要在springSecurity添加相应的配置,重写方法并注入到spring容器中。同时为了登录接口可以匿名访问,也需要重写在WebSecurityConfigurerAdapter的方法并注入到spring容器中。
@Bean
    @Override
    public AuthenticationManager authenticationManagerBean() throws Exception {
        return super.authenticationManagerBean();
    }

    @Override
    protected void configure(HttpSecurity http) throws Exception {
        http
                .csrf().disable()
                .sessionManagement().sessionCreationPolicy(SessionCreationPolicy.STATELESS)
                .and()
                .authorizeRequests()
                .antMatchers("/user/login", "/user/register").anonymous()
                .anyRequest().authenticated()
    }
访问
登录后访问接口时,前端会携带登录时生成的token,在访问接口前需要通过这个token确认用户登录状态,因为就需要创建一个对token进行认证处理token过滤器,并将其放置到springSecurity的过滤器链中。
首先创建JwtAuthenticationTokenFilter并继承OncePerRequestFilter实现其方法,实现方法中主要有两个任务。
- 判断token状态是否合法。
- 将用户状态及用户权限保存到SecurityContextHolder,其他的过滤器都会通过SecurityContextHolder的信息进行处理
@Component
public class JwtAuthenticationTokenFilter extends OncePerRequestFilter {

    @Autowired
    RedisCache redisCache;

    @Override
    protected void doFilterInternal(HttpServletRequest request, HttpServletResponse response, FilterChain filterChain) throws ServletException, IOException {
//        filterChain.doFilter(request, response);
        String token = request.getHeader("token");
        if (StringUtils.isBlank(token)) {
            filterChain.doFilter(request, response);
            return;
        }

        String userid;
        try {
            Claims claims = JwtUtil.parseJWT(token);
            userid = claims.getSubject();
        } catch (Exception e) {
            e.printStackTrace();
            throw new RuntimeException("token非法");
        }
        String redisKey = "login:" + userid;
        LoginUser loginUser = redisCache.getCacheObject(redisKey);
        if (Objects.isNull(loginUser)){
            throw new RuntimeException("用户未登录");
        }

        // TODO 校验权限
        UsernamePasswordAuthenticationToken authenticationToken =
                new UsernamePasswordAuthenticationToken(loginUser, null, loginUser.getAuthorities());
        SecurityContextHolder.getContext().setAuthentication(authenticationToken);

        filterChain.doFilter(request, response);
    }
}
然后在springSecurity将JwtAuthenticationTokenFilter添加到过滤器链中。
@Override
    protected void configure(HttpSecurity http) throws Exception {
        http
                .csrf().disable()
                .sessionManagement().sessionCreationPolicy(SessionCreationPolicy.STATELESS)
                .and()
                .authorizeRequests()
                .antMatchers("/user/login", "/user/register").anonymous()
                .anyRequest().authenticated()
                .and().addFilterBefore(jwtAuthenticationTokenFilter, UsernamePasswordAuthenticationFilter.class);
    }
当请求通过过滤器链后,访问接口时,在接口上添加注解@PreAuthorize(“hasAuthority(‘sys:user:list’)”),这时就会判断用户拥有的权限是否包含注解允许访问的权限。
    @PostMapping("/hello")
    @PreAuthorize("hasAuthority('sys:user:list')")
    public ResponseResult hello(){
        return new ResponseResult(200, "hello");
    }


 1748
1748

 被折叠的 条评论
为什么被折叠?
被折叠的 条评论
为什么被折叠?
 到【灌水乐园】发言


