


 本文详细介绍了如何在SpringBoot项目中整合Mybatis,包括创建实体类、Mapper和Controller,以及测试接口。同时,讲解了YAML配置文件的使用,包括语法规则、数组数据和数据读取。此外,讨论了多环境启动配置和Druid数据源的整合,包括添加依赖、基础使用和自定义配置,最后提到了通过访问Druid监控页面进行数据库监控。
icon: edit
date: 2022-08-08
category:
- note
tag: - Java
- SpringBoot
整合Mybatis
导入依赖

sql文件
SET NAMES utf8mb4;
SET FOREIGN_KEY_CHECKS = 0;

-- ----------------------------
-- Table structure for student
-- ----------------------------
DROP TABLE IF EXISTS `student`;
CREATE TABLE `student`  (
  `id` int(11) NOT NULL AUTO_INCREMENT,
  `name` varchar(255) CHARACTER SET utf8mb4 COLLATE utf8mb4_general_ci DEFAULT NULL,
  `sex` varchar(25) CHARACTER SET utf8mb4 COLLATE utf8mb4_general_ci DEFAULT NULL,
  PRIMARY KEY (`id`) USING BTREE
) ENGINE = InnoDB AUTO_INCREMENT = 3 CHARACTER SET = utf8mb4 COLLATE = utf8mb4_general_ci ROW_FORMAT = Dynamic;

-- ----------------------------
-- Records of student
-- ----------------------------
INSERT INTO `student` VALUES (1, '张三', '男');
INSERT INTO `student` VALUES (2, '李四', '女');

SET FOREIGN_KEY_CHECKS = 1;
idea连接数据库


配置文件中配置数据库
application.yml
spring:
  datasource:
    username: root
    password: root
    url: jdbc:mysql://localhost:3306/study?serverTimezone=UTC&useUnicode=true&characterEncoding=utf-8&useSSL=false
    driver-class-name: com.mysql.cj.jdbc.Driver
1.入门案例
1.1.创建实体类
entity.Student
@Data
public class Student {
    private String name;
    private String sex;
}
1.2.创建mapper
mapper.StudentMapper
@Mapper
public interface StudentMapper {

    @Select("select * from student where id = #{id}")
    Student selectStudent(int id);

}
1.3.编写controller
@RestController
@RequestMapping("/student")
public class MainController {
    @Resource
    private StudentMapper studentMapper;

    @GetMapping("/{id}")
        public Student index(@PathVariable int id) {
            return studentMapper.selectStudent(id);
        }
}
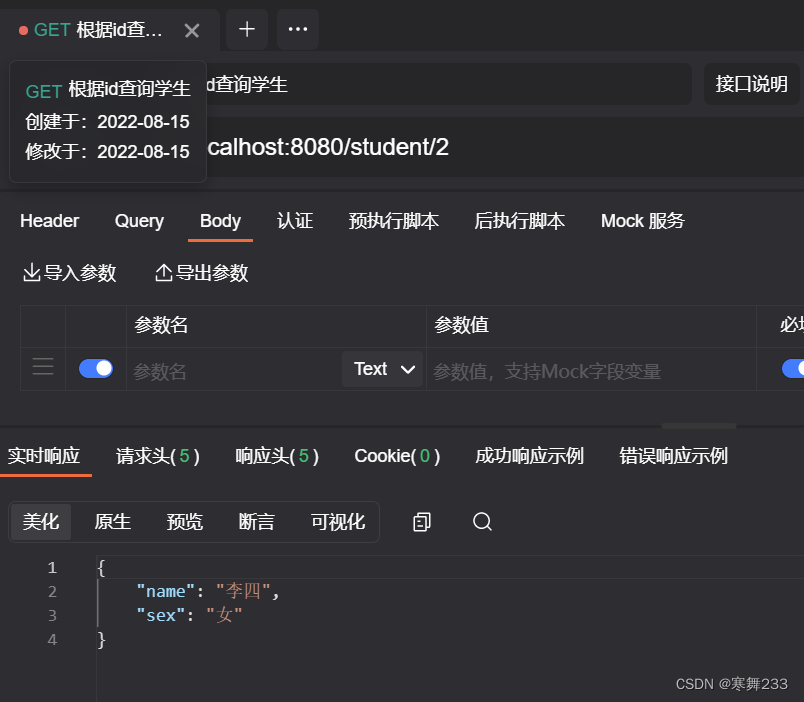
1.4.测试接口
2. yaml
什么是yaml,和properties有什么区别?
- YAML(YAML Ain’t Markup Language),一种数据序列化格式
- 优点:
- 容易阅读
- 容易与脚本语言交互
- 以数据为核心,重数据轻格式
- YAML文件扩展名
- .yml(主流)
- .yaml
2.1 yaml语法规则
- 大小写敏感
- 属性层级关系使用多行描述,每行结尾使用冒号结束
- 使用缩进表示层级关系,同层级左侧对齐,只允许使用空格(不允许使用Tab键)
- 属性值前面添加空格(属性名与属性值之间使用冒号+空格作为分隔)
- #表示注释
- 核心规则:数据前面要加空格与冒号隔开
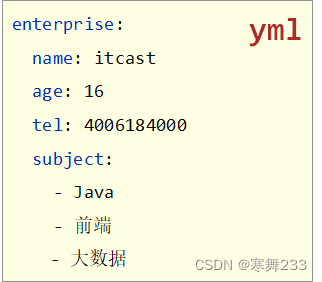
2.2 yaml数组数据
- 数组数据在数据书写位置的下方使用减号作为数据开始符号,每行书写一个数据,减号与数据间空格分隔
2.3 yaml数据读取
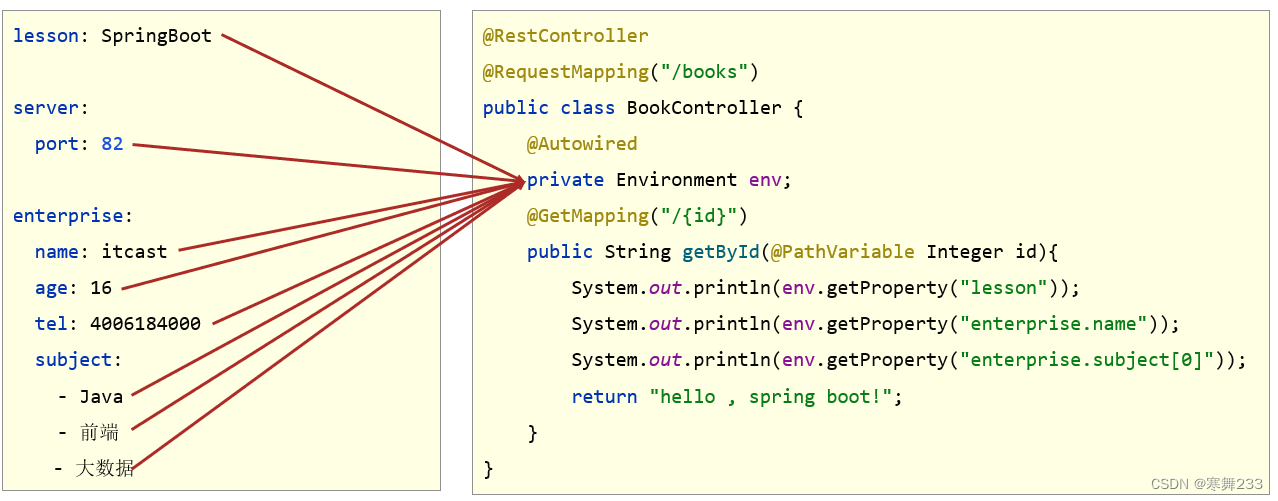
- 使用@Value读取单个数据,属性名引用方式:${一级属性名.二级属性名……}

- 封装全部数据到Environment对象
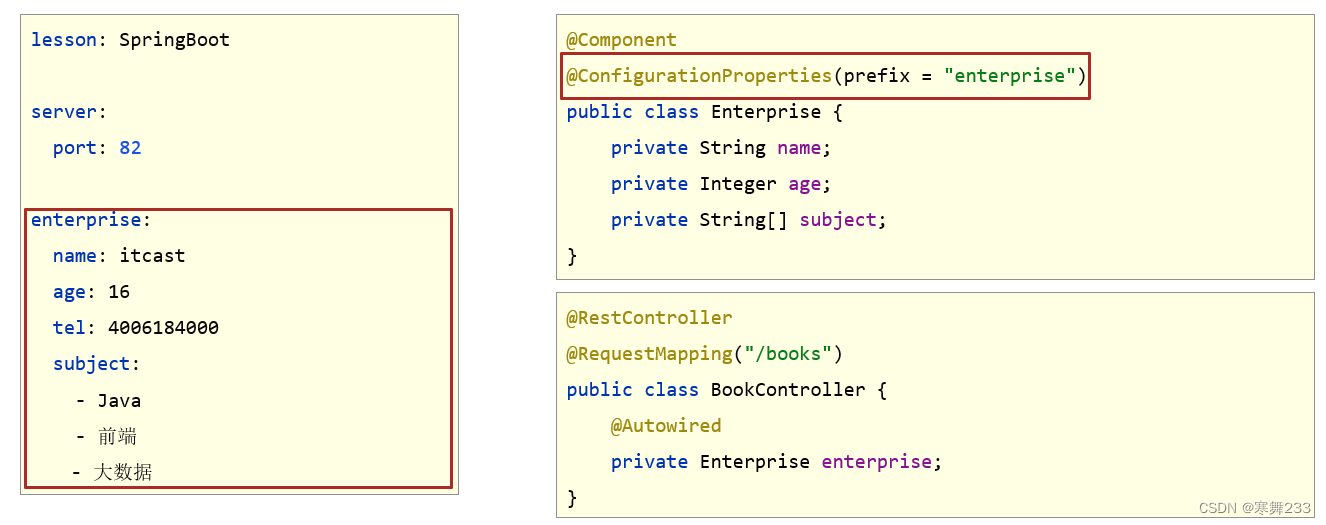
- 自定义对象封装指定数据【常用】
public class Enterprise {
    private String name;
    private Integer age;
    private String tel;
    private String[] subject;
    //自行添加getter、setter、toString()等方法
}
- 自定义对象封装数据警告解决方案

<dependency>
    <groupId>org.springframework.boot</groupId>
    <artifactId>spring-boot-configuration-processor</artifactId>
    <optional>true</optional>
</dependency>
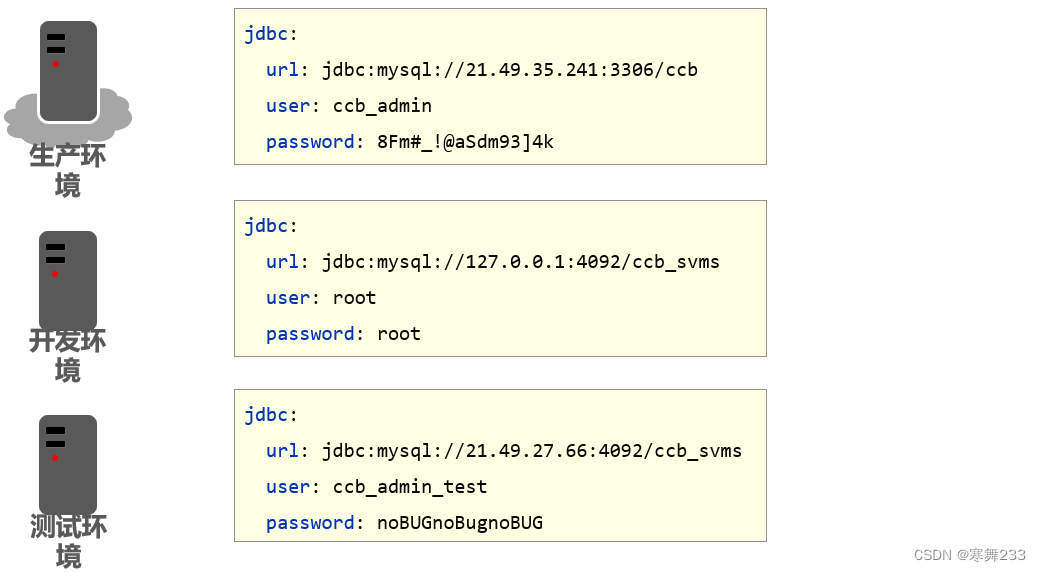
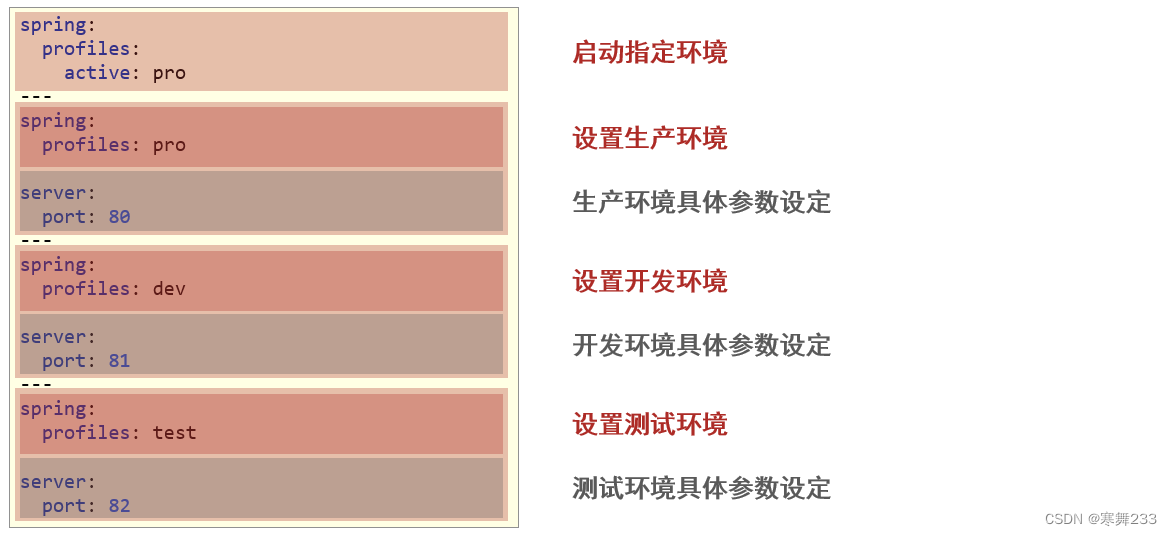
3.1 多环境启动配置
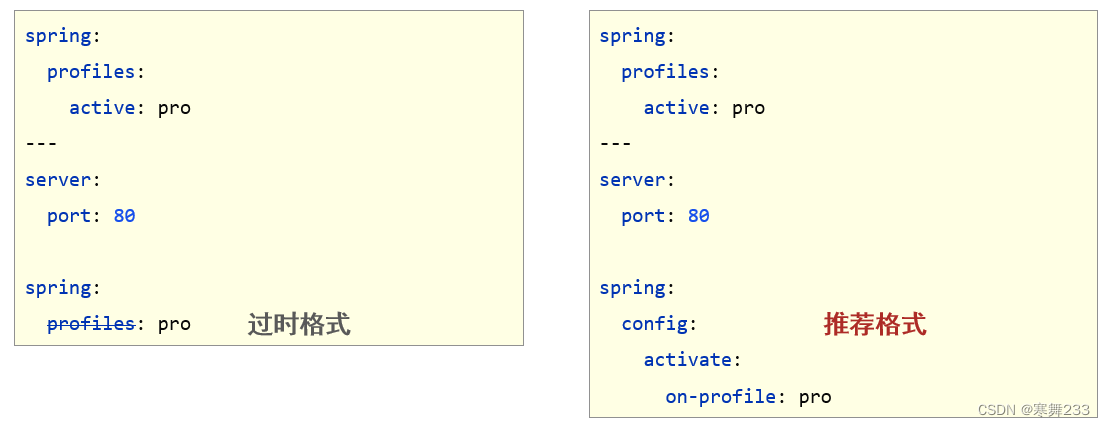
- yaml文件多环境启动
- properties文件多环境启动
#主启动配置文件 application.properties
spring.profiles.active=pro
#环境分类配置文件 application-pro.properties
server.port=80
#环境分类配置文件 application-dev.properties
server.port=81
#环境分类配置文件application-test.properties
server.port=82
3.2 多环境启动命令格式
- 带参数启动SpringBoot
java –jar springboot.jar --spring.profiles.active=test
java –jar springboot.jar --server.port=88
java –jar springboot.jar --server.port=88 --spring.profiles.active=test
- 参数加载优先顺序
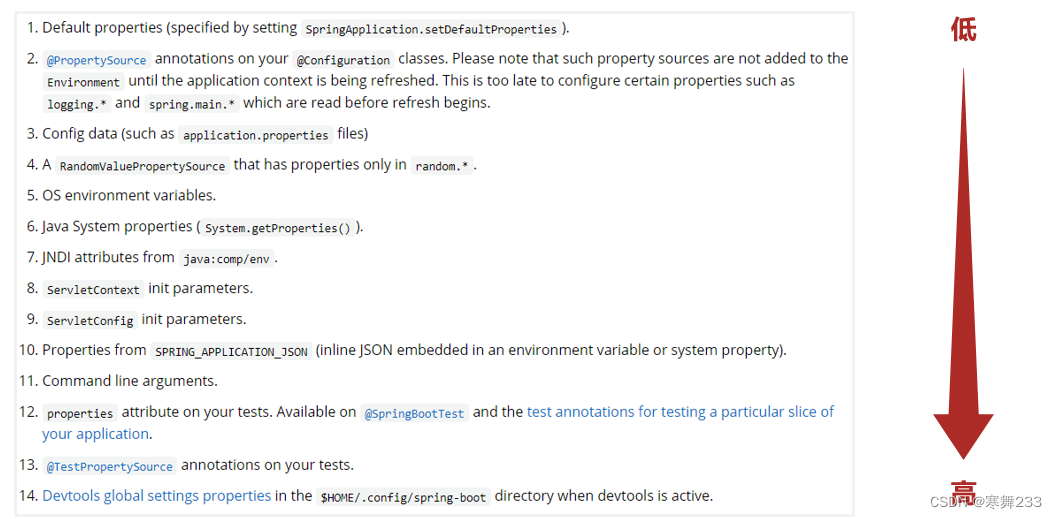
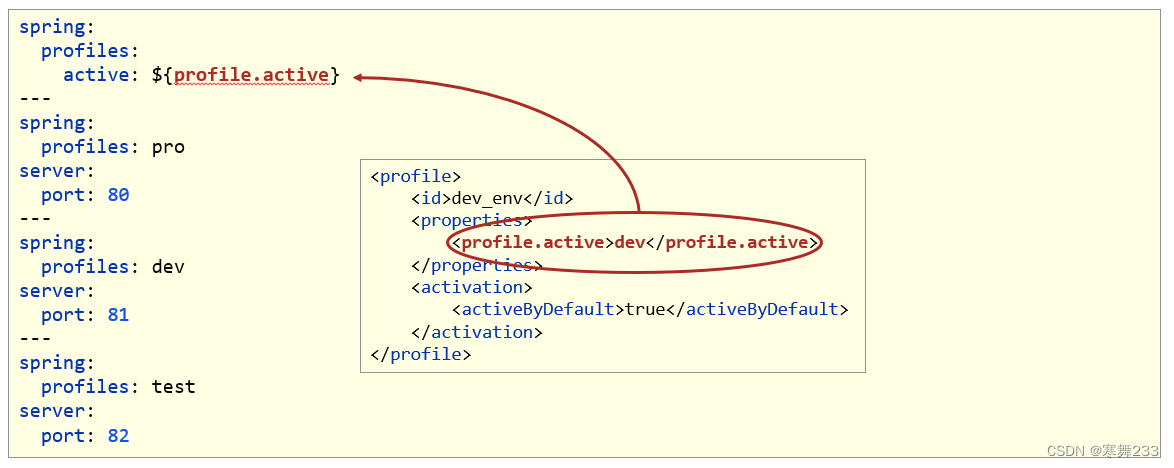
3.3 多环境开发控制
Maven与SpringBoot多环境兼容(步骤)
①:Maven中设置多环境属性
<profiles>
    <profile>
        <id>dev_env</id>
        <properties>
            <profile.active>dev</profile.active>
        </properties>
        <activation>
            <activeByDefault>true</activeByDefault>
        </activation>
    </profile>
    <profile>
        <id>pro_env</id>
        <properties>
            <profile.active>pro</profile.active>
        </properties>
    </profile>
    <profile>
        <id>test_env</id>
        <properties>
            <profile.active>test</profile.active>
        </properties>
    </profile>
</profiles>
②:SpringBoot中引用Maven属性
③:执行Maven打包指令
- Maven指令执行完毕后,生成了对应的包,其中类参与编译,但是配置文件并没有编译,而是复制到包中

- 解决思路:对于源码中非java类的操作要求加载Maven对应的属性,解析${}占位符
④:对资源文件开启对默认占位符的解析
<build>
    <plugins>
        <plugin>
            <artifactId>maven-resources-plugin</artifactId>
            <configuration>
                <encoding>utf-8</encoding>
                <useDefaultDelimiters>true</useDefaultDelimiters>
            </configuration>
        </plugin>
    </plugins>
</build>
- Maven打包加载到属性,打包顺利通过

4.整合druid
Druid是一个关系型数据库连接池,是阿里巴巴的一个开源项目,地址:https://github.com/alibaba/druid。Druid不但提供连接池的功能,还提供监控功能,可以实时查看数据库连接池和SQL查询的工作情况。
常见问题 · alibaba/druid Wiki (github.com)

springBoot默认使用hikari数据源
4.1 添加依赖
        <dependency>
            <groupId>com.alibaba</groupId>
            <artifactId>druid-spring-boot-starter</artifactId>
            <version>1.2.11</version>
        </dependency>
4.2. 基础使用
spring:
  datasource:
    type: com.alibaba.druid.pool.DruidDataSource
    druid:
      username: root
      password: root
      url: jdbc:mysql://localhost:3306/study?serverTimezone=UTC&useUnicode=true&characterEncoding=utf-8&useSSL=false
      driver-class-name: com.mysql.cj.jdbc.Driver

4.3 自定义配置
spring:
  datasource:
    type: com.alibaba.druid.pool.DruidDataSource
    druid:
      username: root
      password: root
      url: jdbc:mysql://localhost:3306/study?serverTimezone=UTC&useUnicode=true&characterEncoding=utf-8&useSSL=false
      driver-class-name: com.mysql.cj.jdbc.Driver
      initial-size: 5                                       # 初始化大小
      min-idle: 10                                          # 最小连接数
      max-active: 20                                        # 最大连接数
      max-wait: 60000                                       # 获取连接时的最大等待时间
      min-evictable-idle-time-millis: 300000                # 一个连接在池中最小生存的时间,单位是毫秒
      time-between-eviction-runs-millis: 60000              # 多久才进行一次检测需要关闭的空闲连接,单位是毫秒
      filters: stat,wall                                    # 配置扩展插件:stat-监控统计,log4j-日志,wall-防火墙(防止SQL注入),去掉后,监控界面的sql无法统计
      validation-query: SELECT 1                            # 检测连接是否有效的 SQL语句,为空时以下三个配置均无效
      test-on-borrow: true                                  # 申请连接时执行validationQuery检测连接是否有效,默认true,开启后会降低性能
      test-on-return: true                                  # 归还连接时执行validationQuery检测连接是否有效,默认false,开启后会降低性能
      test-while-idle: true                                 # 申请连接时如果空闲时间大于timeBetweenEvictionRunsMillis,执行validationQuery检测连接是否有效,默认false,建议开启,不影响性能
      stat-view-servlet:
        enabled: true                                       # 是否开启 StatViewServlet
        allow: 127.0.0.1                                    # 访问监控页面 白名单,默认127.0.0.1
        #deny: 192.168.56.1                                  # 访问监控页面 黑名单
        login-username: admin                               # 访问监控页面 登陆账号
        login-password: admin                               # 访问监控页面 登陆密码
      filter:
        stat:
          enabled: true                                     # 是否开启 FilterStat,默认true
          log-slow-sql: true                                # 是否开启 慢SQL 记录,默认false
          slow-sql-millis: 5000                             # 慢 SQL 的标准,默认 3000,单位:毫秒
          merge-sql: false                                  # 合并多个连接池的监控数据,默认fals
访问: http://localhost:8080/druid/index.html 登录查看数据源

查看sql监控


 4万+
4万+

 被折叠的 条评论
为什么被折叠?
被折叠的 条评论
为什么被折叠?
 到【灌水乐园】发言


