


python操作word
文章目录
pip install python-docx
一:新建word的相关处理
1:新建一个空白文档
import docx


def create_docx(file_name):
    document = docx.Document()  # 创建一个word文档对象
    document.save(file_name)  # 保存文档到指定文件名
    print("Word文档创建成功!")


if __name__ == '__main__':
    file_name = "word01.docx"
    create_docx(file_name)
2:标题设置
add_header(text=??? level=[0~9])
import docx
def create_docx(file_name):
document = docx.Document() # 创建一个word文档对象
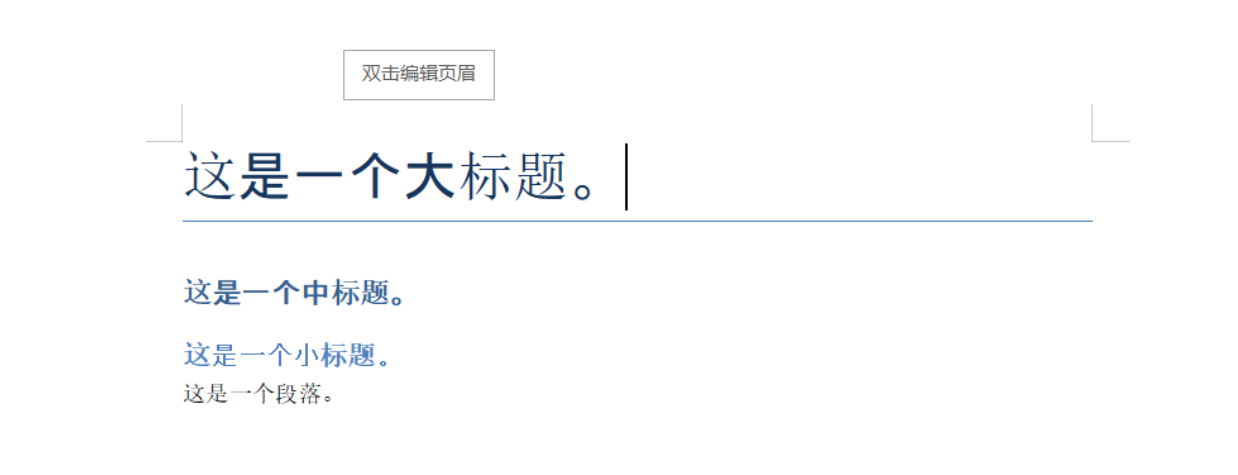
document.add_heading('这是一个大标题。', level=0)
# level -> 0表示大标题,1表示中标题,2表示小标题 0 ~ 9
document.add_heading('这是一个中标题。', level=1)
document.add_heading('这是一个小标题。', level=2)
document.add_paragraph('这是一个段落。')
document.save(file_name) # 保存文档到指定文件名
print("Word文档创建成功!")
if __name__ == '__main__':
file_name = "word01.docx"
create_docx(file_name)
3:段落的创建
add_paragraph(text)
import docx
def create_paragraph(file_name):
document = docx.Document() # 创建一个word文档对象
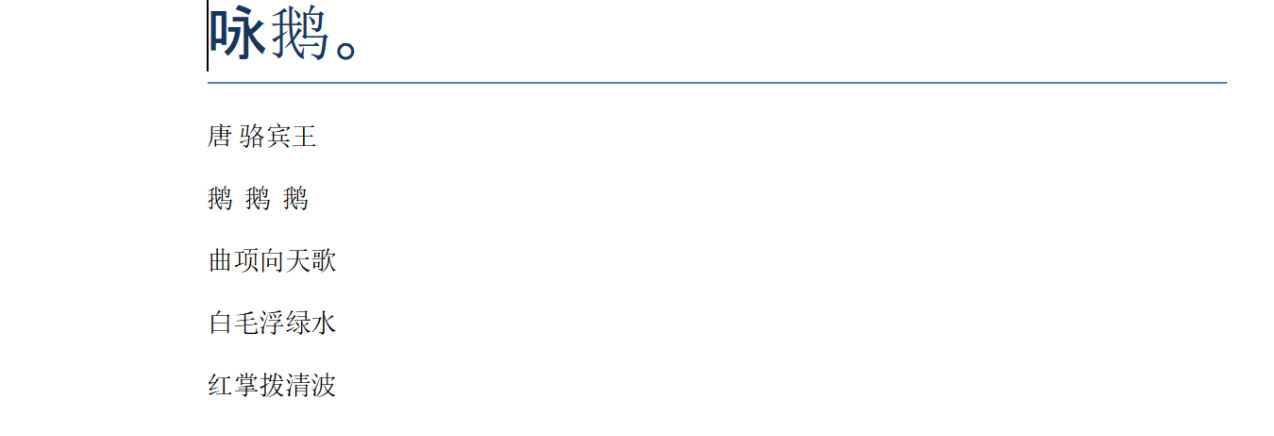
document.add_heading('咏鹅。', level=0)
document.add_paragraph("唐 骆宾王")
document.add_paragraph("鹅 鹅 鹅")
document.add_paragraph("曲项向天歌")
document.add_paragraph("白毛浮绿水")
document.add_paragraph("红掌拨清波")
document.save(file_name) # 保存文档到指定文件名
print("Word文档创建成功!")
if __name__ == '__main__':
file_name = "word02.docx"
create_paragraph(file_name)
对于段落,还有一些其他操作
import docx
def create_paragraph(file_name):
document = docx.Document() # 创建一个word文档对象
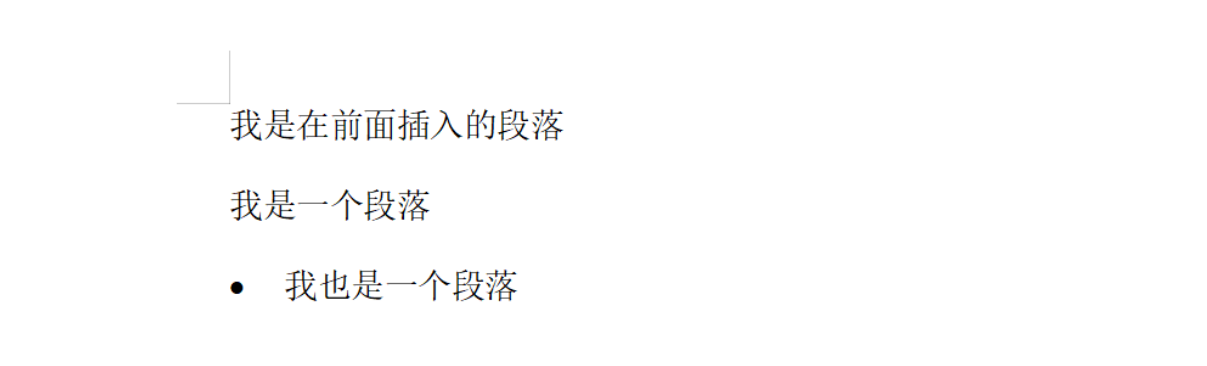
para = document.add_paragraph("我是一个段落")
para.insert_paragraph_before("我是在前面插入的段落")
document.add_paragraph(text="我也是一个段落", style="List Bullet")
document.save(file_name) # 保存文档到指定文件名
print("Word文档创建成功!")
if __name__ == '__main__':
file_name = "word02.docx"
create_paragraph(file_name)
4:run设置文本和字体
在Word文档中,Run是指一段连续的文本格式,包括字体、大小、颜色等。
Run是Word文档中的一个基本概念,用于表示文档中具有相同格式的文本段落中的一部分。
每个段落(Paragraph)可以包含多个Run,每个Run可以有不同的字体、字号、颜色等属性。
通过操作Run,可以实现对文档中特定文本的精细控制。
import docx

def create_run(file_name):
    document = docx.Document()  # 创建一个word文档对象
    para = document.add_paragraph()  # 创建一个段落
    run = para.add_run("我是一个运行对象")  # 创建一个运行对象
    run.bold = True  # 设置字体为粗体
    run.italic = True  # 设置字体为斜体
    run.underline = True  # 设置字体为下划线
    run.font.color.rgb = docx.shared.RGBColor(0x00, 0x00, 0xFF)  # 设置字体颜色为蓝色
    document.save(file_name)  # 保存文档到指定文件名
    print("Word文档创建成功!")


if __name__ == '__main__':
    file_name = "word03.docx"
    create_run(file_name)

run对象的font属性:
| 属性 | 描述 |
|---|---|
| alignment | 对齐的方式 |
| all_caps | 全部大写首字母 |
| bold | 文本通过粗体的方式出现 |
| color.rgb | 字体的颜色 |
| complex_script | 是否为复杂代码 |
| cs_bold | "复杂代码"加粗 |
| cs_italic | "复杂代码"斜体 |
| double_strike | 文本带双删除线 |
| emboss | 文本通过凸出页面的方式出现 |
| font | 文本字体属性 |
| hidden | 隐藏 |
| imprint | 文本以刻入页面的方式出现 |
| italic | 文本以斜体的方式出现 |
| name | 字体 |
| no_proof | 不验证语法错误 |
| outline | 文本以轮廓线出现,而不是实心的 |
| rtl | 文本从右边到左边书写 |
| shadow | 文本带有阴影 |
| small_caps | 小型大写字母 |
| snap_to_grid | 定义文档网格的时候对其网格 |
| strike | 文本带有删除线 |
| subscript | 下标 |
| superscript | 上标 |
| text | 具体的文本的内容 |
| underline | 文本带有下划线 |
import docx
from docx import document
from docx.shared import Pt
from docx.shared import RGBColor

# 1.新建 文档对象
doc = docx.Document()
# [可选] 代码提示。需增加下列代码
# print(type(doc))
assert isinstance(doc, document.Document)  # 格式:doc, doc 的类型

# 2.添加 文本(同 文本段落)
paragraph = doc.add_paragraph()
run = paragraph.add_run('这是一个文本')

# 3.设置字体
font = run.font
font.name = '微软雅黑'  # 字体名称
font.size = Pt(12)  # 字体大小
font.color.rgb = RGBColor(255, 0, 0)  # 红色
font.bold = True  # 加粗

# 4.保存文档
doc.save('test.docx')
5:插入图片
add_picture(pic_path, width, height)
import docx
from docx.shared import Cm

def create_picture(file_name):
    document = docx.Document()  # 创建一个word文档对象
    document.add_heading('这是一个带图片的段落。', level=0)
    document.add_paragraph('这是一个段落。')
    # 添加图片到文档中
    document.add_picture('1.png', width=Cm(10), height=Cm(10))  # 添加图片到文档中(图片路径,宽度,高度)
    document.add_paragraph('这是一个段落。')

    # 可以是run层控制
    para = document.add_paragraph("我是文字")
    r = para.add_run()
    r.add_picture('1.png', width=Cm(10), height=Cm(10))  # 添加图片到段落中(图片路径,宽度,高度)

    document.save(file_name)  # 保存文档到指定文件名
    print("Word文档创建成功!")


if __name__ == '__main__':
    file_name = "word04.docx"
    create_picture(file_name)
6:插入表格
add_table(rows=?? , cols=??)
import docx
def create_table(file_name):
document = docx.Document() # 创建一个word文档对象
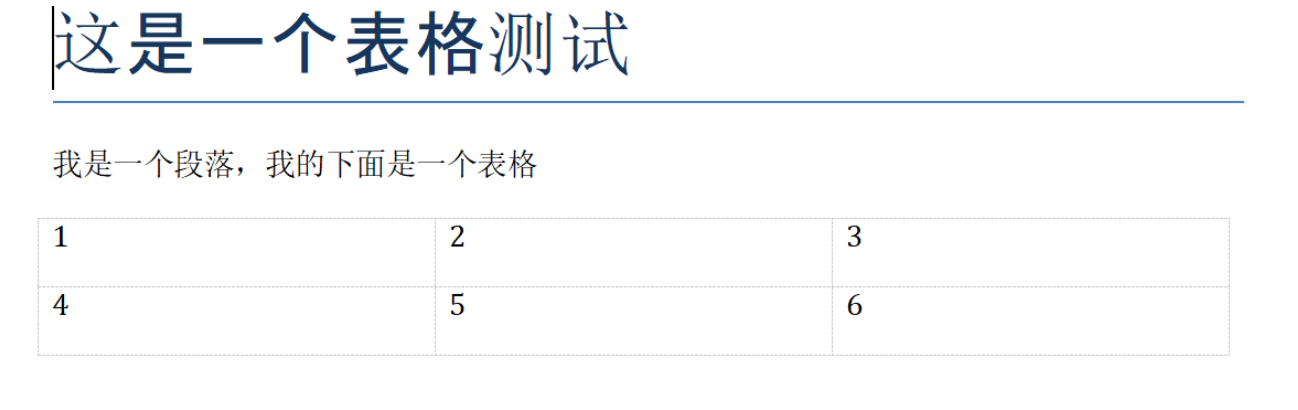
document.add_heading('这是一个表格测试', level=0)
document.add_paragraph("我是一个段落,我的下面是一个表格")
# 创建一个表格
table = document.add_table(rows=2, cols=3)
# 设置表格的单元格宽度
table.autofit = True
for i in range(2):
for j in range(3):
# 设置单元歌的内容
cell = table.cell(i, j)
cell.text = str(i * 3 + j + 1)
document.save(file_name) # 保存文档到指定文件名
print("Word文档创建成功!")
if __name__ == '__main__':
file_name = "word05.docx"
create_table(file_name)
二:解析现有的word
1:打开现有docx
from docx import Document

# 在构造函数中指定要打开docx的路径
doc = Document('example.docx')
2:段落读取
from docx import Document

def read_paras(file_name):
    # 读取外部的file
    doc = docx.Document(file_name)

    for para in doc.paragraphs:
        print(para.text)

    for index, para in enumerate(doc.paragraphs, 1):
        print("{}: {}".format(index, para.text))


if __name__ == '__main__':
    file_name = "word05.docx"
    read_paras(file_name)
3:表格读取
from docx import Document

def read_tables(file_name):
    # 读取外部的file
    doc = docx.Document(file_name)
    for table in doc.tables:
        for row in table.rows:
            for cell in row.cells:
                print(cell.text)


if __name__ == '__main__':
    file_name = "word05.docx"
    read_tables(file_name)
4:修改段落的内容
from docx import Document

def update_para(file_name, search_text, new_para_text):
    # 读取外部的file
    doc = docx.Document(file_name)
    for para in doc.paragraphs:
        if search_text in para.text:
            para.text = new_para_text


if __name__ == '__main__':
    file_name = "word05.docx"
    update_para(file_name, "段落", "替换的段落")
5:修改表格内容
def update_table(file_name, search_text, new_cell_text):
    # 读取外部的file
    doc = docx.Document(file_name)
    for table in doc.tables:  # 遍历所有表格
        for row in table.rows:  # 遍历表格的所有行
            for cell in row.cells:  # 遍历表格的所有单元格
                if int(cell.text) > search_text:  # 将所有的 > search_text的内容都替换成为new_cell_text
                    cell.text = cell.text.replace(cell.text, str(new_cell_text))

    # 查看更新后的结果
    for table in doc.tables:
        for row in table.rows:
            for cell in row.cells:
                print(cell.text)


if __name__ == '__main__':
    file_name = "word05.docx"
    update_table(file_name, 2, 9)
6:页面格式设置
我们可以使用Section对象来设置页面的格式。
import docx
from docx.shared import Pt

def set_section_style(file_name):
    # 读取外部的file
    doc = docx.Document(file_name)
    # 设置section格式
    section = doc.sections[0]
    section.page_height = Pt(11692)  # 页高是11692
    section.page_width = Pt(8268)  # 页宽是8268
    section.left_margin = Pt(720)  # 左边距是720
    section.right_margin = Pt(720)  # 右边距是720
    section.top_margin = Pt(720)  # 上边距是720
    section.bottom_margin = Pt(720)  # 下边距是720
    section.header_distance = Pt(360)  # 页眉距离是360
    section.footer_distance = Pt(360)  # 页脚距离是360
    section.gutter = Pt(0)  # 行距是0


if __name__ == '__main__':
    file_name = "word05.docx"
    set_section_style(file_name)


 6037
6037

 被折叠的 条评论
为什么被折叠?
被折叠的 条评论
为什么被折叠?
 到【灌水乐园】发言


