


OAuth2整合
文章目录
OAuth2是什么,如何把它应用到一个关注使用单点登录(SSO)进行身份验证的应用程序上
一:OAuth2介绍
“Auth” 表示 “授权” Authorization
“O” 是 Open 的简称,表示 “开放”
连在一起就表示 “开放授权”,OAuth2是一种开放授权协议。
OAuth2最简向导:The Simplest Guide To OAuth 2.0
1:授权服务器
在大多数情况下,OAuth2被称为授权框架(或规范框架或者有人叫做委托协议),其主要目的是允许第三方网站或应用程序访问资源。
OAuth2不是一个特定的实现或库。也可以将OAuth2流程定义应用于其他平台、工具或语言
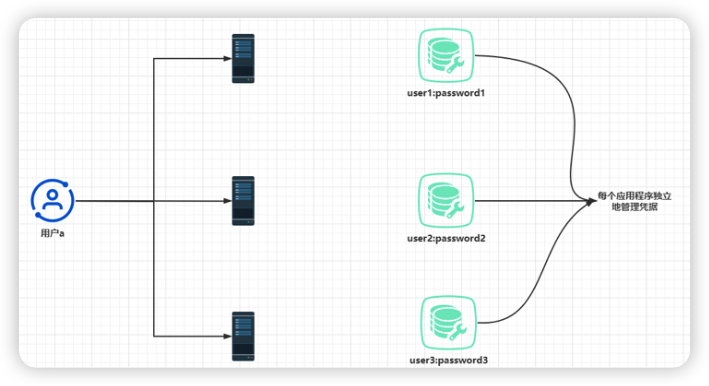
先回顾一下HTTP Basic身份认证的问题:
- 为每一个请求发送凭据
- 有单独的系统管理用户的凭据
为每个请求发送凭据可能只适用于隔离环境的情况,但这通常是不可取的,因为这意味着:
- 需要经常在网上共享凭据
- 让客户端(就Web应用程序而言就是浏览器)以某种方式存储凭据,以便于客户端可以将这些凭据发送给服务器,并请求进行身份验证
我们希望在应用程序的架构中去掉这两点,因为它们会使凭据变成漏洞,从而削弱安全性
通常,我们会希望有一个单独的系统管理系统用户凭据。
假设我们必须为组织中使用的所有应用程序配置和使用单独的凭据,此时用户需要记住多个密码,组织要管理多个凭据集合,这将是一项挑战
如果将凭据管理的职责隔离在系统的一个组件中会更好。目前,我们将其称为授权服务器
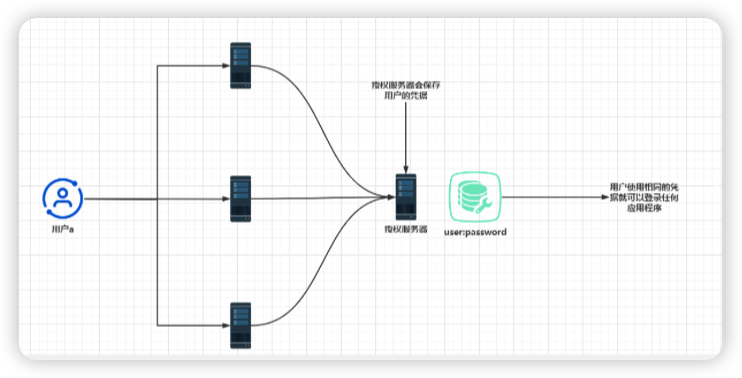
这种方式消除了表示同一个人的重复凭据。通过这种方式,架构将变得简单
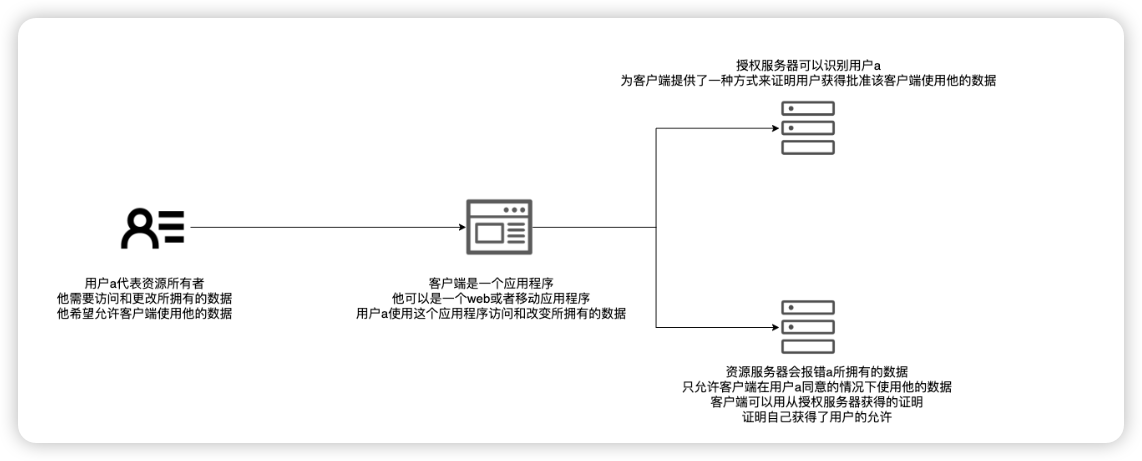
2:OAuth2身份验证架构的组件
资源服务器
托管用户所拥有的资源的应用程序。资源可以是用户的数据或他们被授权的操作。
用户(资源拥有者)
拥有由资源服务器暴露的资源的个体。用户通常有一个用户名和密码,他们用用户名和密码标识自己
客户端
以用户名义访问用户所拥有的资源的应用程序。客户端使用客户端ID和客户端密钥来标识自己
授权服务器
授权客户端访问由资源服务器暴露的用户资源的应用程序。
当授权服务器决定授权客户端已用户名义访问资源时,它会发出一个令牌。
客户端使用此令牌向资源服务器证明他已被授权服务器授权。
如果它有一个有效的令牌,则资源服务器将允许客户端访问它请求的资源
二:OAuth2实现
1:实现选项
OAuth2主要是指使用令牌进行授权。令牌就像门禁卡一样。一旦获得令牌,就可以访问特定的资源。
OAuth2提供了多种可能性以便获取令牌也称为授权。以下是可以选择的最常见的OAuth2授权方式。
- 授权码
- 密码
- 刷新令牌
- 客户端凭据
1.1:授权码方式
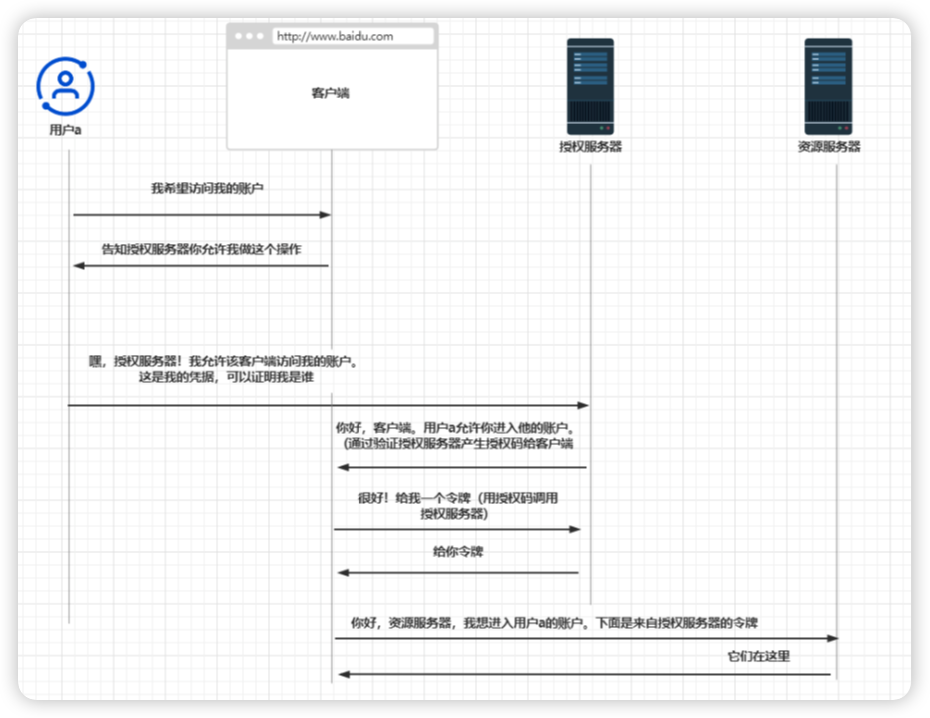
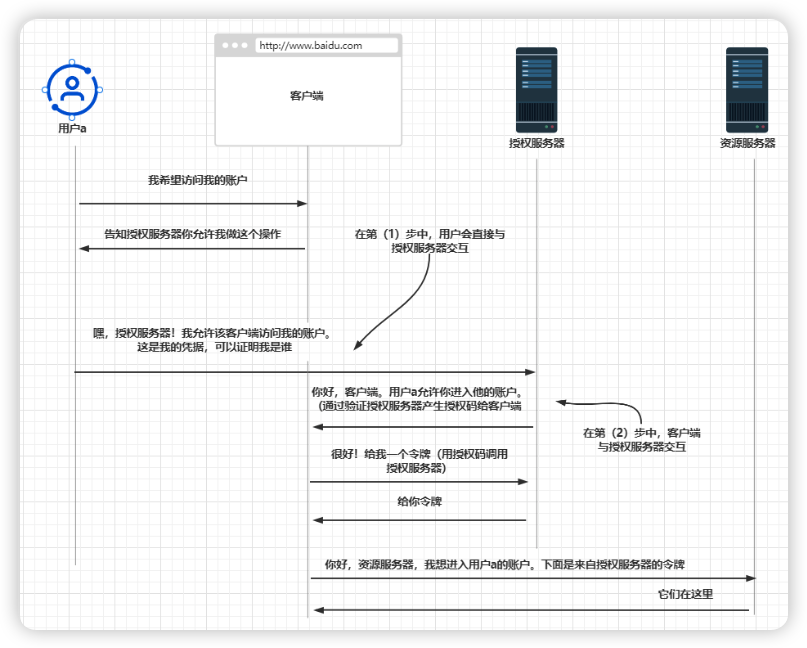
步骤1:使用授权码授权类型发出身份验证请求
客户端将用户重定向到需要进行身份验证的授权服务器端点。
假设我们正在使用应用程序X,并且需要访问一个受保护的资源。为了访问该资源,应用程序X需要我们进行身份验证。
它会打开一个授权服务器上的页面,其中包含登录表单,我们必须用凭据填写该表单。
步骤2:使用授权码授权类型获取访问令牌
为了允许用户访问资源,第(1)步所产生的授权码就是经过身份验证的用户的客户端证明。
没错,这就是它被称为授权码类型的原因。现在客户端将使用该授权码调用授权服务器以获取令牌。
[!IMPORTANT]
为什么流程需要对授权服务器进行两次调用并且得到两个不同的令牌——授权码和访问令牌?
授权服务器生成第一个授权码作为用户直接与之交互的证明。
客户端接收到此授权码,并且必须再次使用该授权码及其凭据进行身份验证,以获得访问令牌。
客户端使用第二个令牌访问资源服务器上的资源
那么授权服务器为什么不直接返回访问令牌呢?
OAuth2定义了一个被称为隐式授权类型的流程,授权服务器会在其中直接返回访问令牌。会降低流程的安全性。
通过首先发送授权码,客户端必须再次使用其凭据来证明其身份,以便获得令牌。
客户端会进行最后一次调用以获取访问令牌并在其中发送:
-
授权码,这会证明用户对客户端进行了授权
-
客户端的凭据,
这将证明它们确实是同一个客户端,而不是其他人截获了授权码。
步骤3:使用授权码授权类型调用受保护资源
在成功地从授权服务器获得访问令牌之后,客户端现在就可以调用受保护的资源了。
在调用资源服务器的端点时,客户端要在授权请求头中使用访问令牌
授权码授权类型的最大优点是让用户可以允许客户端执行特定的操作,而不需要与客户端共享其凭据
1.2:密码授权类型
此授权类型也被称为资源所有者凭据授权类型。
使用此流程的应用程序会假定客户端收集用户凭据,并使用这些凭据进行身份验证,然后从授权服务器获得访问令牌。
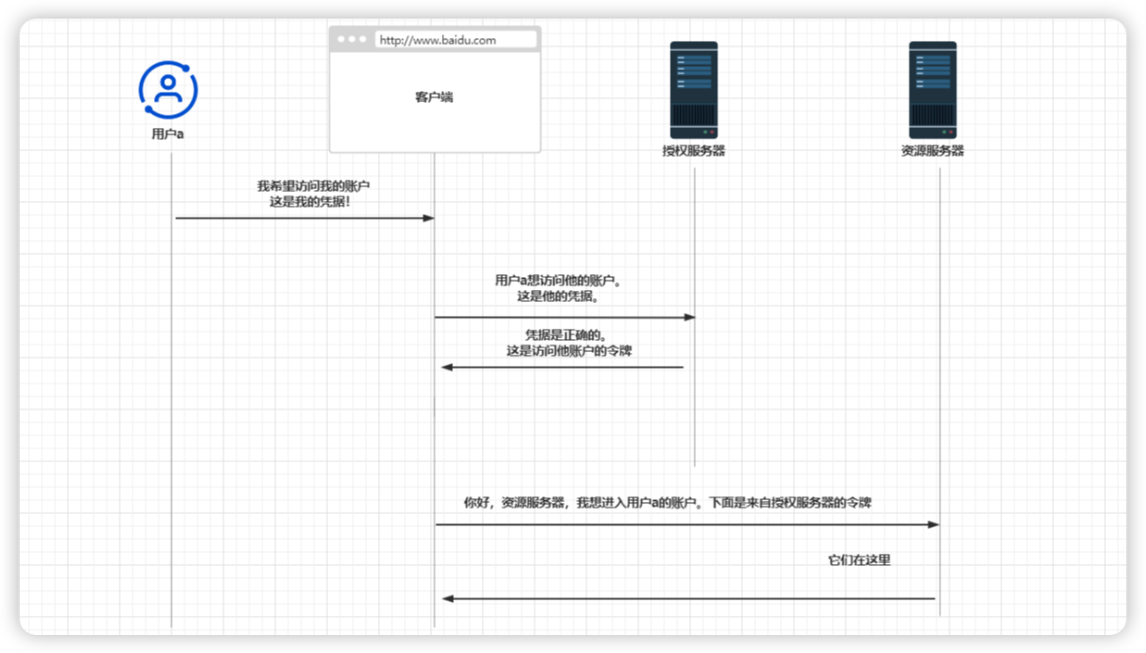
步骤1:使用密码授权类型时请求访问令牌
使用密码授权类型,流程会简单很多。客户端会收集用户凭据并调用授权服务器来获取访问令牌。
当请求访问令牌时,客户端还会在请求中发送以下详细信息:
- 具有password值的grant_type。
- client_id和client_secret,它们是客户端用于对其自身进行身份验证的凭据。
- scope:可以将其理解为已授权权限。
- username和password,它们是用户凭据。会以纯文本的形式将其作为请求头的值来发送。
客户端在响应中接收回一个访问令牌。接下来客户端就可以使用该访问令牌调用资源服务器的端点。
步骤2:使用密码授权类型时,需要使用访问令牌调用资源
一旦客户端有了访问令牌,它就可以使用该令牌调用资源服务器上的端点,这与授权码授权类型完全相同。
客户端要在授权请求头中将访问令牌添加到请求。
密码授权类型比授权码授权类型更不安全,主要是因为其前提是要与客户端应用程序共享用户凭据
虽然它确实比授权码授权类型更简单,但是我们仍需尽量不把它放到实际开发中
1.3:实现客户端凭据授权类型
这是OAuth2所描述的最简单的授权类型。可以在用户不参与的情况下使用它
在两个应用程序之间实现身份验证时不需要用户参与。
可以将客户端凭据授权类型看作密码授权类型和API密钥身份验证流程的组合。
假设有一个使用OAuth2实现身份验证的系统。现在需要允许外部服务器进行身份验证并调用服务器暴露的特定资源。
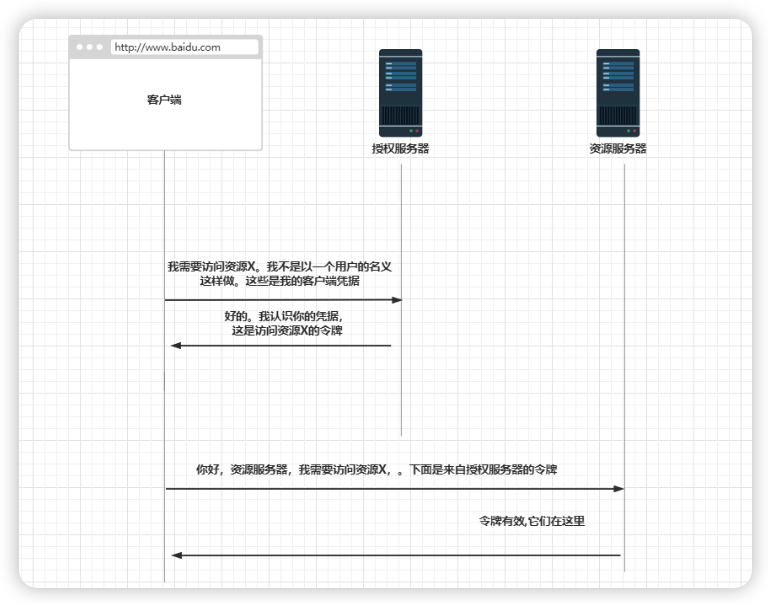
步骤1:使用客户端凭据授权类型请求访问令牌
为了获得访问令牌,客户端要向授权服务器发送一个包含以下详细信息的请求。
- 具有client_credentials值的grant_type;
- client_id和client_secret,它们代表了客户端凭据;
- scope,它表示已授权的权限。
作为响应,客户端将接收到一个访问令牌。接下来客户端可以使用该访问令牌调用资源服务器的端点。
步骤2:使用客户端凭据授权类型时,可访问令牌调用资源
一旦客户端有了访问令牌,它就可以使用该令牌调用资源服务器上的端点,这与授权码授权类型和密码授权类型完全相同。
客户端要在授权请求头中将访问令牌添加到请求。
2:使用刷新令牌获得新的访问令牌
无论如何实现,令牌都可能过期。
这并不是强制的——可以创建具有无限生命周期的令牌——但是,一般来说,都应该使其生命周期尽可能短。
刷新令牌代表了使用凭据获取新访问令牌的另一种选择。这里将展示在OAuth2中刷新令牌是如何工作的

假设在应用程序中实现了永不过期的令牌。这意味着客户端可以一次又一次地使用相同的令牌调用资源服务器上的资源。
不会过期的令牌太强大了。它变得几乎和用户凭据一样强大。应该避免这种情况,并缩短令牌的生命周期
过期的令牌就不能再使用了。客户端必须获得另一个访问令牌
要获得新的访问令牌,客户端可以根据所使用的的授权类型重新运行流程。例如,如果授权类型是身份验证授权码,则客户端会将用户重定向到授权服务器登录端点,用户必须再次填写他们的用户名和密码。这显然对用户不太友好
因此OAuth2中,当使用授权码或密码授权类型等流程时,授权服务器将返回一个刷新令牌和一个访问令牌。
对于客户端凭据授权,则不存在刷新令牌,因为此流程不需要用户凭据。
3:OAuth2的缺点
OAuth2并不是无懈可击的,它有其弱点
我们必须意识到这些弱点,并且在构建应用程序时必须考虑这些弱点,这里列举一些最常见的:
- CSRF攻击 -> 用户已登录时,如果应用程序没有应用任何CSRF防护机制,则可能会遇到CSRF
- 窃取客户端凭据 —> 存储或传输未受保护的凭据会造成损失,使攻击者得以窃取和使用他们。
- 重放令牌 -> 令牌时OAuth2身份验证和授权架构中用来访问资源的密钥。这些信息是通过网络发送的,但有时候,它们可能会被拦截。如果被截获,它们就被窃取了,并且可能再次使用。想象一下,如果你把你家大门钥匙弄丢了,会发生什么呢?其他人可以用它打开门,想打开多少次都可以(也就是所谓的令牌重放)
- 令牌劫持 -> 意味着有人入侵身份验证过程并窃取可以用来访问资源的令牌
4:实现一个简单的SSO
单点登录(SSO)应用程序是通过授权服务器进行身份验证的应用程序,然后将使用刷新令牌让用户保持登陆状态
在我们的示例中,它只代表来自OAuth2架构的客户端
在这个应用程序中,我们要使用Gitee作为授权和资源服务器,并重点关注使用授权码授权类型的组件之间的通信
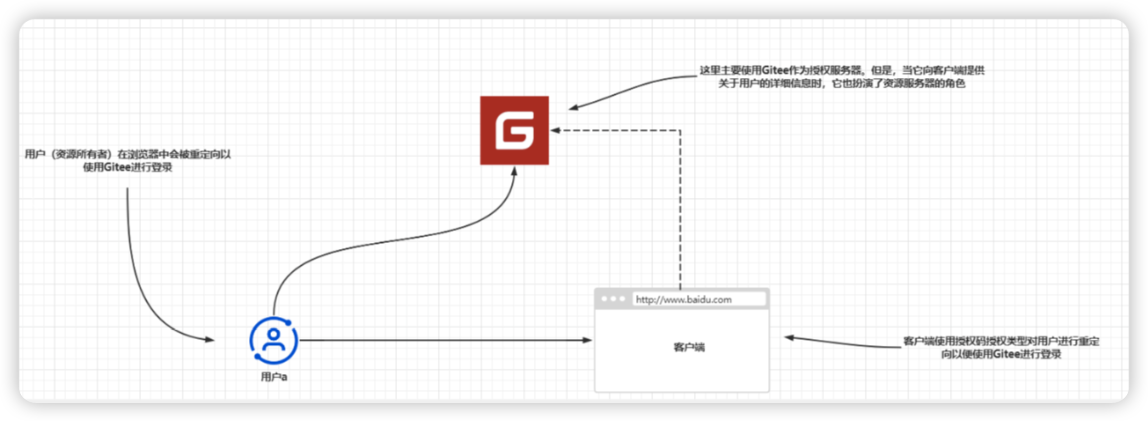
4.1:管理授权服务器
与其他授权服务器一样,Gitee需要知道它要向哪个客户端应用程序发出令牌。
因此,OAuth应用程序必须向Gitee授权服务器进行注册:https://gitee.com/oauth/applications/new
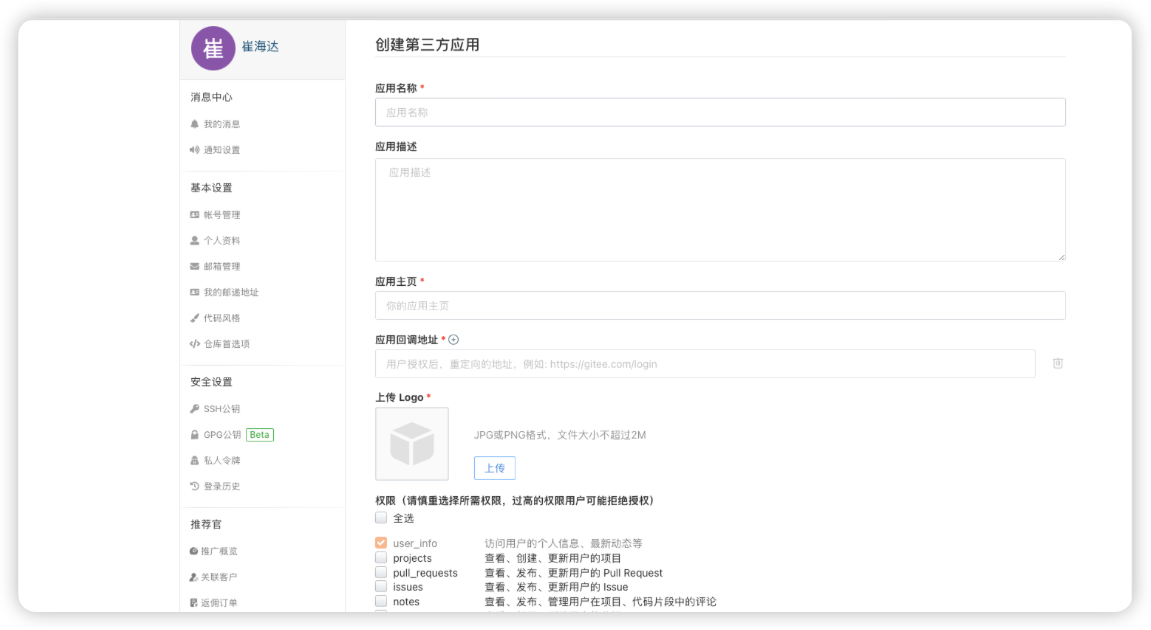
上图的“应用回调地址”就是我们注册的应用程序client(客户端)的接收授权码和access-token的地址
其中,/login/oauth2/code必须是这样,这是由Client引入的oauth2AuthenticationFilter的内部默认路径。
而后面的gitee是registrationid,与我们在自己的Client代码中配置的一致,Client的oauth2AuthenticationFilter要靠这个值去对应配置在程序中的clientid和clientSecret然后发给gitee认证服务器。
且将来gitee授权服务器收到授权请求后,会将配置的这个应用回调地址与请求参数中的redirect_uri匹配,正确才回传授权码以及access_token。否则会报无效的回调地址
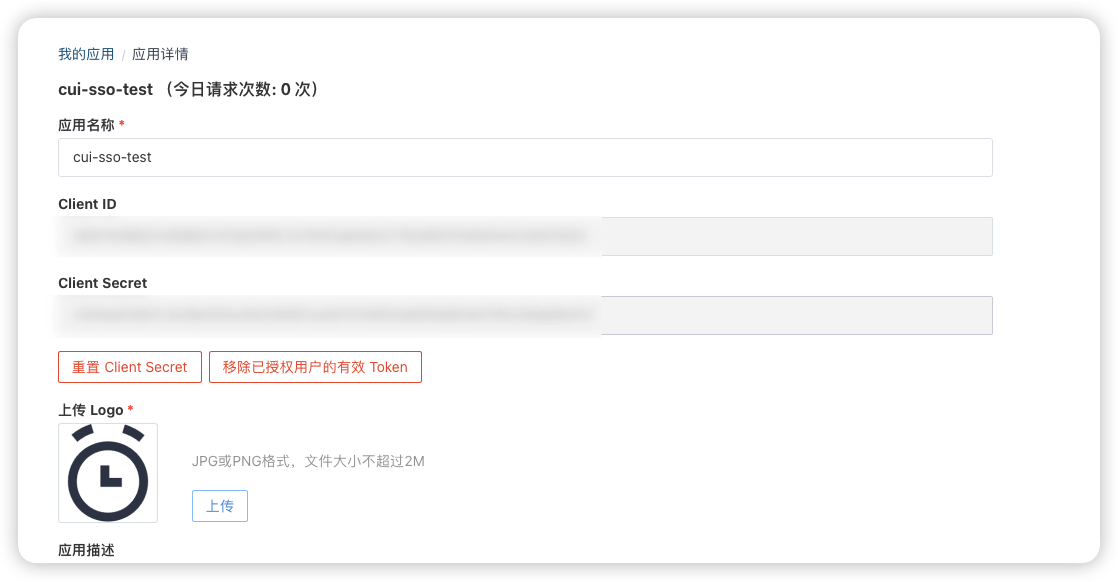
创建后会给我产生一个clientId和clientSecret,这个就是Gitee为我们提供的客户端ID和客户端密钥信息
这个配置就是需要为授权服务器做的所有处理。现在我们有了客户端凭据,可以开始处理应用程序了
4.2:开始实现
4.2.1:准备工作
<dependency>
      <groupId>org.springframework.boot</groupId>
      <artifactId>spring-boot-starter-oauth2-client</artifactId>
</dependency>
<dependency>
      <groupId>org.springframework.boot</groupId>
      <artifactId>spring-boot-starter-web</artifactId>
</dependency>
<dependency>
      <groupId>org.springframework.boot</groupId>
      <artifactId>spring-boot-starter-security</artifactId>
</dependency>
首先需要确保某些东西的安全:一个网页。
为此,要创建一个控制器类和一个表示应用程序的简单的HTML页面。
@Controller
@Slf4j
public class HomeController {
	@GetMapping("/")
	public String home(OAuth2AuthenticationToken token) {
		log.info(String.valueOf(token.getPrincipal()));
		return "home";
	}
}
这里的OAuth2AuthenticationToken你可以类比为UsernamePasswordAuthenticationToken
同样实现Authentication接口表示身份验证请求事件,并且会保存请求访问应用程序的实体的详细信息
OAuth2AuthenticationToken和AuthenticationToken一样,也是分为请求前和请求后 -> token.getPrincipal()
package com.mbw.security.config;

import org.springframework.beans.factory.annotation.Autowired;
import org.springframework.context.annotation.Bean;
import org.springframework.context.annotation.Configuration;
import org.springframework.security.config.annotation.web.builders.HttpSecurity;
import org.springframework.security.config.annotation.web.configuration.WebSecurityConfigurerAdapter;
import org.springframework.security.crypto.bcrypt.BCryptPasswordEncoder;
import org.springframework.security.crypto.password.DelegatingPasswordEncoder;
import org.springframework.security.crypto.password.NoOpPasswordEncoder;
import org.springframework.security.crypto.password.PasswordEncoder;
import org.springframework.security.crypto.scrypt.SCryptPasswordEncoder;

import java.util.HashMap;

@Configuration
public class ProjectConfig extends WebSecurityConfigurerAdapter {

	@Override
	protected void configure(HttpSecurity http) throws Exception {
		http.oauth2Login(); // 使用oauth2 login的方式进行登录
		http.authorizeRequests()
				.anyRequest().authenticated();
	}

	@Bean
	public PasswordEncoder passwordEncoder() {
		HashMap<String, PasswordEncoder> encoders = new HashMap<>();
		encoders.put("noop", NoOpPasswordEncoder.getInstance());
		encoders.put("bcrypt", new BCryptPasswordEncoder());
		encoders.put("scrypt", new SCryptPasswordEncoder());
		return new DelegatingPasswordEncoder("bcrypt", encoders);
	}
}
这里出现了一个新方法:oauth2Login(),但经过了之前的学习的你应该需要能反应过来其中进行了什么处理。
与httpBasic()和formLogin()一样,oauth2Login()只是将一个新的身份验证过滤器添加到过滤器链中。
OAuth2LoginAuthenticationFilter -> 这个过滤器会拦截请求,并应用OAuth2身份验证所需的逻辑

securityFilterChain中不再有usernamePasswordAuthenticationFilter和basicAuthenticationFitler
因为都交给oauth2管理了
4.2.2:实现ClientRegistration
如果现在就启动该应用程序,那么将无法访问主页。
因为指定了对于任何请求,用户都需要进行身份验证,但是这里还没有提供任何身份验证方法。
我们需要将gitee确立为授权服务器。为此Spring Security定义了ClientRegistration契约
ClientRegistration接口表示OAuth2架构中的客户端。对于该客户端,需要定义其所需的所有详情,其中包括:
- 客户端ID和密钥
- 用于身份验证的授权类型
- 重定向URI
- 作用域
你可能还记得在之前讲解授权码授权类型时,应用程序需要将所有这些详细信息用于身份验证过程中,Spring Security还提供了一种创建构建器实例的简单方法,类似于一开始构造UserDetails方法是一样的
下面代码展示了如何构建这样一个表示客户端实现的实例:
package com.mbw.security.client.gitee;

import org.springframework.security.oauth2.client.registration.ClientRegistration;
import org.springframework.security.oauth2.core.AuthorizationGrantType;
import org.springframework.stereotype.Component;

@Component
public class GiteeClient {

	public ClientRegistration clientRegistration(){
		return ClientRegistration.withRegistrationId("gitee")  //起个名字,代表client,如clientId和clientSecret
				.clientId("your clientId")  //此处要换成你在gitee上创建应用得到的
				.clientSecret("your clientSecret") //此处要换成你在gitee上创建应用得到的
				.scope(new String[]{"user_info"})    //读取用户权限,参见你gitee上创建应用时的授权勾选
				.authorizationUri("https://gitee.com/oauth/authorize")   //这要看gitee的api,是user认证以及client认证获取授权码的地址
				.tokenUri("https://gitee.com/oauth/token") //这要看gitee的api,是client得到授权码后去换token的gitee地址
				.userInfoUri("https://gitee.com/api/v5/user") //资源服务器api地址-也是client用access-token去获取用户user详情的“用户详情资源服务器地址”-这里也是gitee】】
				.userNameAttributeName("id")
				.clientName("gitee")  //为我们的应用client起了个名字
				.authorizationGrantType(AuthorizationGrantType.AUTHORIZATION_CODE)  //注是授权码模式
				.redirectUriTemplate("{baseUrl}/{action}/oauth2/code/{registrationId}")  //本应用配置的gitee发回授权码的地址
				.build();
	}
}
第一眼看上去要设置的东西有点多,但它只不过是设置客户端ID和密钥而已。
此外,还定义了作用域(授予的权限)、客户端名称和所选择的注册ID。除了这些信息,还必须提供授权服务器的URL。
- 授权URI:客户端将用户重定向到其进行身份验证的URI。
- 令牌URI:客户端为获取访问令牌和刷新令牌而调用的URI。
- 用户信息URI:客户端在获得访问令牌后可以调用的URI,以获得关于用户的更多详细信息。
这些URI是从哪里获得的?如果授权服务器不是由我们开发的,则需要从说明文档中获取它们。
以Gitee为例,可以在这里找到它们:https://gitee.com/api/v5/oauth_doc#/list-item-3
当然如果你的授权服务器提供者不是gitee,而是Github,Google,FaceBook,Okta这四个中的任意一个,那么Spring security给我们提供了CommonOAuth2Provider的类,这个类部分定义了可以用于身份验证的最常见提供程序的ClientRegistration实例,拿Github为例,你可以这样如下配置:
public ClientRegistration githubClient(){
    return CommonOAuth2Provider.GITHUB
            .getBuilder("github")
            .clientId("your clientId")
            .clientSecret("your clientSecret")
            .build();
}
public ClientRegistration githubClient(){
	return CommonOAuth2Provider.GITHUB
			.getBuilder("github")
			.clientId("your clientId")
			.clientSecret("your clientSecret")
			.build();
}
如上所示,这样更为清晰,并且我们不必手动查找和设置授权服务器的URL。当然,这只适用于公共提供程序。
如果授权服务器不在公共提供程序之列,则只能完全定义ClientRegistration。
然后我们之前定义的GiteeClient已经交由Spring容器进行管理,我们可以在配置类中注入它。
但是这样身份验证过滤器仍不能直接获取关于授权服务器客户端注册的详细信息,我们需要实现clientRegistrationRepository
4.2.3:实现ClientRegistrationRepository
我们之前讲到配置了ClientRegistration还不够,需要对其进行设置,以便将其用于身份验证。
为此,Spirng Security使用了类型为ClientRegistrationRepository的对象
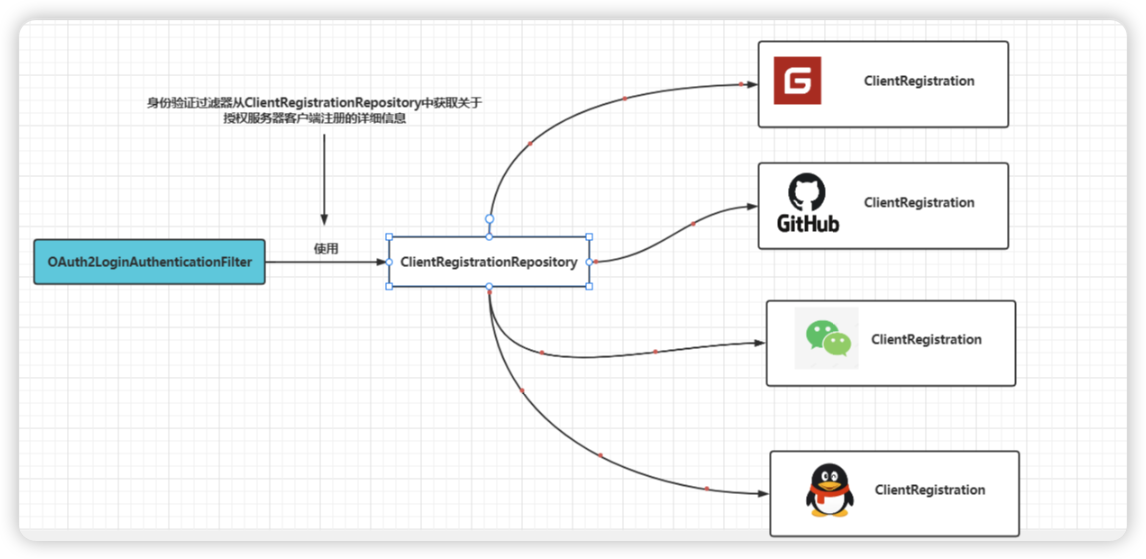
ClientRegistrationRepository会检索ClientRegistration详细信息(客户端ID、客户端密钥、URL、作用域等)。身份验证过滤器需要将这些详细信息用于身份验证流程。
ClientRegistrationRepository接口类似于前面介绍过的UserDetailsService接口。
与UserDetailsService对象通过其用户名查找UserDetails相同,ClientRegistrationRepository对象通过其注册ID查找ClientRegistration。
可以实现ClientRegistrationRepository接口来告知框架在哪里找到ClientRegistration实例。
Spring Security为ClientRegistrationRepository提供了一个实现,该实现会将ClientRegistration的实例存储在内存中,也就是InMemoryClientRegistrationRepository。
package com.mbw.security.config;

import com.mbw.security.client.gitee.GiteeClient;
import org.springframework.beans.factory.annotation.Autowired;
import org.springframework.context.annotation.Bean;
import org.springframework.context.annotation.Configuration;
import org.springframework.security.config.annotation.web.builders.HttpSecurity;
import org.springframework.security.config.annotation.web.configuration.WebSecurityConfigurerAdapter;
import org.springframework.security.crypto.bcrypt.BCryptPasswordEncoder;
import org.springframework.security.crypto.password.DelegatingPasswordEncoder;
import org.springframework.security.crypto.password.NoOpPasswordEncoder;
import org.springframework.security.crypto.password.PasswordEncoder;
import org.springframework.security.crypto.scrypt.SCryptPasswordEncoder;
import org.springframework.security.oauth2.client.registration.ClientRegistrationRepository;
import org.springframework.security.oauth2.client.registration.InMemoryClientRegistrationRepository;

import java.util.HashMap;

@Configuration
public class ProjectConfig extends WebSecurityConfigurerAdapter {
	@Autowired
	private GiteeClient giteeClient;

	@Override
	protected void configure(HttpSecurity http) throws Exception {
		http.oauth2Login(c->c.clientRegistrationRepository(clientRegistrationRepository()));
		http.authorizeRequests()
				.anyRequest().authenticated();
	}

	private ClientRegistrationRepository clientRegistrationRepository(){
		return new InMemoryClientRegistrationRepository(giteeClient.clientRegistration());
	}

	@Bean
	public PasswordEncoder passwordEncoder() {
		HashMap<String, PasswordEncoder> encoders = new HashMap<>();
		encoders.put("noop", NoOpPasswordEncoder.getInstance());
		encoders.put("bcrypt", new BCryptPasswordEncoder());
		encoders.put("scrypt", new SCryptPasswordEncoder());
		return new DelegatingPasswordEncoder("bcrypt", encoders);
	}
}
4.2.4:Spring boot配置的纯粹方式
Springboot旨在使用其纯粹的配置方式直接从属性文件构建ClientRegistration和ClientRegistrationRepository对象
这种方法在Spring Boot项目并不少见。
对于其他对象也是如此,例如数据源配置,下面代码展示了如何在yaml文件中为此处的示例设置客户端注册
spring:
  security:
    oauth2:
      client:
        registration:
          gitee:
            client-id: your clientId
            client-secret: 4your clientSecret
            authorization-grant-type: authorization_code
            redirect-uri: '{baseUrl}/{action}/oauth2/code/{registrationId}'
            client-name: gitee
            provider: gitee
            scope:
              - user_info
        provider:
          gitee:
            authorization-uri: https://gitee.com/oauth/authorize
            token-uri: https://gitee.com/oauth/token
            user-info-uri: https://gitee.com/api/v5/user
            user-name-attribute: id
package com.mbw.security.config;

import org.springframework.beans.factory.annotation.Autowired;
import org.springframework.context.annotation.Bean;
import org.springframework.context.annotation.Configuration;
import org.springframework.security.config.annotation.web.builders.HttpSecurity;
import org.springframework.security.config.annotation.web.configuration.WebSecurityConfigurerAdapter;
import org.springframework.security.crypto.bcrypt.BCryptPasswordEncoder;
import org.springframework.security.crypto.password.DelegatingPasswordEncoder;
import org.springframework.security.crypto.password.NoOpPasswordEncoder;
import org.springframework.security.crypto.password.PasswordEncoder;
import org.springframework.security.crypto.scrypt.SCryptPasswordEncoder;

import java.util.HashMap;

@Configuration
public class ProjectConfig extends WebSecurityConfigurerAdapter {

	@Override
	protected void configure(HttpSecurity http) throws Exception {
		http.oauth2Login();
		http.authorizeRequests()
				.anyRequest().authenticated();
	}

	@Bean
	public PasswordEncoder passwordEncoder() {
		HashMap<String, PasswordEncoder> encoders = new HashMap<>();
		encoders.put("noop", NoOpPasswordEncoder.getInstance());
		encoders.put("bcrypt", new BCryptPasswordEncoder());
		encoders.put("scrypt", new SCryptPasswordEncoder());
		return new DelegatingPasswordEncoder("bcrypt", encoders);
	}
}
5:实现授权服务器
5.1:搭建过程
1:在原来的基础上,新创建一个模块auth-service
<dependencies>
    <dependency>
        <groupId>org.springframework.boot</groupId>
        <artifactId>spring-boot-starter-web</artifactId>
    </dependency>

    <dependency>
        <groupId>org.springframework.boot</groupId>
        <artifactId>spring-boot-starter-security</artifactId>
    </dependency>
    <!--  OAuth2.0依赖,不再内置了,所以得我们自己指定一下版本  -->
    <dependency>
        <groupId>org.springframework.cloud</groupId>
        <artifactId>spring-cloud-starter-oauth2</artifactId>
        <version>2.2.5.RELEASE</version>
    </dependency>
</dependencies>
2:编写对应的配置文件
server:
  port: 8500
  servlet:
      #为了防止一会在服务之间跳转导致Cookie打架(因为所有服务地址都是localhost,都会存JSESSIONID)
      #这里修改一下context-path,这样保存的Cookie会使用指定的路径,就不会和其他服务打架了
      #但是注意之后的请求都得在最前面加上这个路径
    context-path: /sso
3:这里需要编写下配置,一共是两个配置类,一个是OAuth2的配置类,还有一个是SpringSecurity的配置类
// spring security的配置类
package com.test.config;

import org.springframework.context.annotation.Bean;
import org.springframework.context.annotation.Configuration;
import org.springframework.security.authentication.AuthenticationManager;
import org.springframework.security.config.annotation.authentication.builders.AuthenticationManagerBuilder;
import org.springframework.security.config.annotation.web.builders.HttpSecurity;
import org.springframework.security.config.annotation.web.configuration.WebSecurityConfigurerAdapter;
import org.springframework.security.core.userdetails.UserDetailsService;
import org.springframework.security.crypto.bcrypt.BCryptPasswordEncoder;

@Configuration
public class SecurityConfiguration extends WebSecurityConfigurerAdapter {

    @Override
    protected void configure(HttpSecurity http) throws Exception {
        http.authorizeRequests()
                .anyRequest().authenticated() // 所有路径都要鉴权
                .and()
                .formLogin().permitAll(); // 使用表单登录
    }

    /**
     * 不搞数据库了,直接userDetail
     */
    @Override
    protected void configure(AuthenticationManagerBuilder auth) throws Exception {
        BCryptPasswordEncoder encoder = new BCryptPasswordEncoder(); // 设置密码编码器
        auth.inMemoryAuthentication()
                .passwordEncoder(encoder)
                // 用户信息
                .withUser("test").password(encoder.encode("123456")).roles("USER");
    }

    // 这里需要将AuthenticationManager注册为Bean,在OAuth配置中使用
    @Bean
    @Override
    public AuthenticationManager authenticationManagerBean() throws Exception {
        return super.authenticationManagerBean();
    }

    // 将userDetailService注册成为Bean, 刷新令牌时会使用
    @Bean
    @Override
    public UserDetailsService userDetailsServiceBean() throws Exception {
        return super.userDetailsServiceBean();
    }
}
// oauth2配置
package com.test.config;

import org.springframework.context.annotation.Configuration;
import org.springframework.security.authentication.AuthenticationManager;
import org.springframework.security.core.userdetails.UserDetailsService;
import org.springframework.security.crypto.bcrypt.BCryptPasswordEncoder;
import org.springframework.security.oauth2.config.annotation.configurers.ClientDetailsServiceConfigurer;
import org.springframework.security.oauth2.config.annotation.web.configuration.AuthorizationServerConfigurerAdapter;
import org.springframework.security.oauth2.config.annotation.web.configuration.EnableAuthorizationServer;
import org.springframework.security.oauth2.config.annotation.web.configurers.AuthorizationServerEndpointsConfigurer;
import org.springframework.security.oauth2.config.annotation.web.configurers.AuthorizationServerSecurityConfigurer;

import javax.annotation.Resource;

@EnableAuthorizationServer
@Configuration
public class OAuth2Configuration extends AuthorizationServerConfigurerAdapter {

    @Resource
    private AuthenticationManager manager;

    @Resource
    private UserDetailsService service;

    private final BCryptPasswordEncoder encoder = new BCryptPasswordEncoder();

    @Override
    public void configure(ClientDetailsServiceConfigurer client) throws Exception {
        client
                .inMemory() // 这里我们直接硬编码创建,当然也可以像Security那样自定义或是使用JDBC从数据库读取
                .withClient("web") // 客户端名称,随便起就行
                .secret(encoder.encode("654321")) // 只与客户端分享的secret,随便写,但是注意要加密
                .autoApprove(false) // 自动审批,这里关闭,要的就是一会体验那种感觉
                .scopes("book", "user", "borrow") // 授权范围,这里我们使用全部all
                .redirectUris("http://localhost:8201/login") // 可以写多个,当有多个时需要在验证请求中指定使用哪个地址进行回调
                // 授权模式,一共支持5种,除了之前我们介绍的四种之外,还有一个刷新Token的模式
                .authorizedGrantTypes("client_credentials", "password", "implicit", "authorization_code", "refresh_token");
    }

    @Override
    public void configure(AuthorizationServerSecurityConfigurer security) {
        security
                .passwordEncoder(encoder)    //编码器设定为BCryptPasswordEncoder
                .allowFormAuthenticationForClients()  //允许客户端使用表单验证,一会我们POST请求中会携带表单信息
                .checkTokenAccess("permitAll()");     //允许所有的Token查询请求
    }

    /**
     * 由于SpringSecurity新版本的一些底层改动,这里需要配置一下authenticationManager,才能正常使用password模式
     */
    @Override
    public void configure(AuthorizationServerEndpointsConfigurer endpoints) {
        endpoints
                .userDetailsService(service)
                .authenticationManager(manager);
    }
}
5.2:验证过程
5.2.1:客户端模式验证
http://localhost:8500/sso/oauth/token
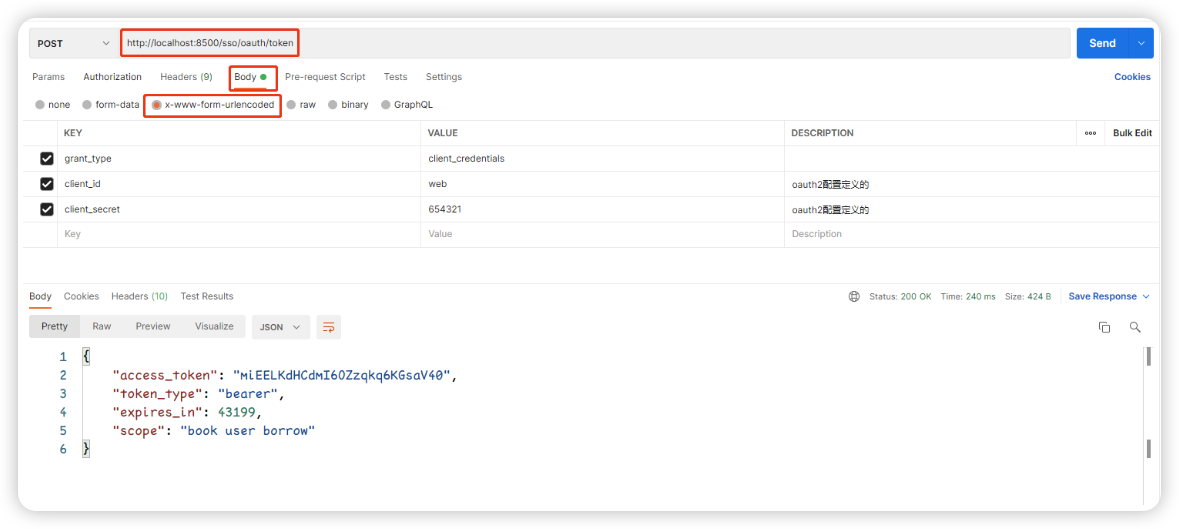
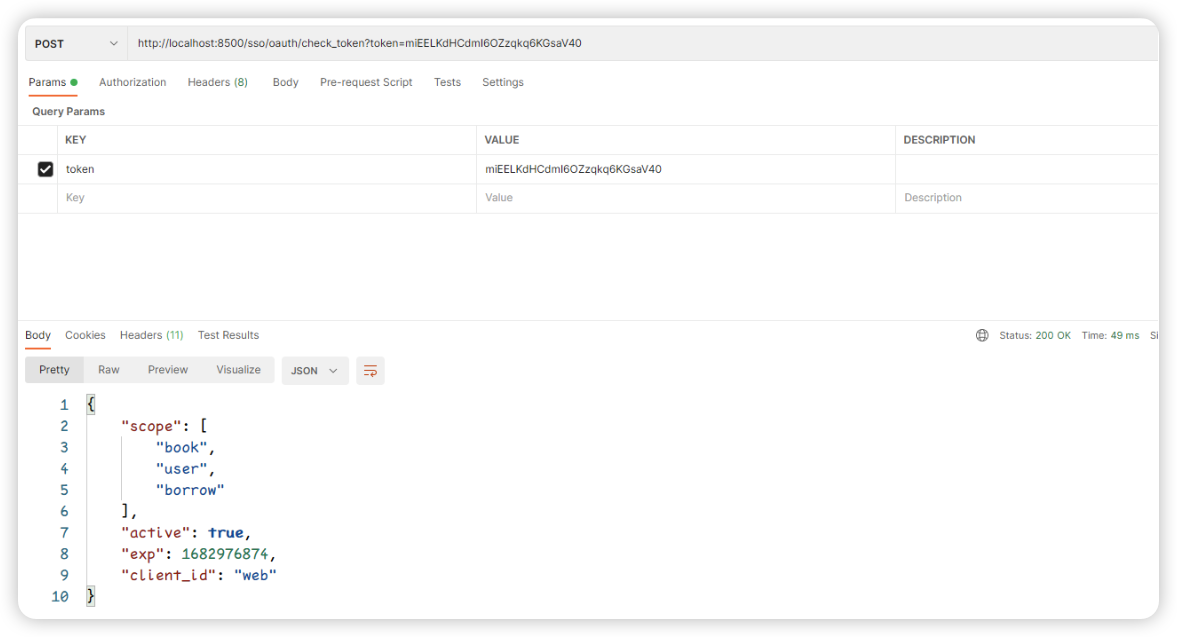
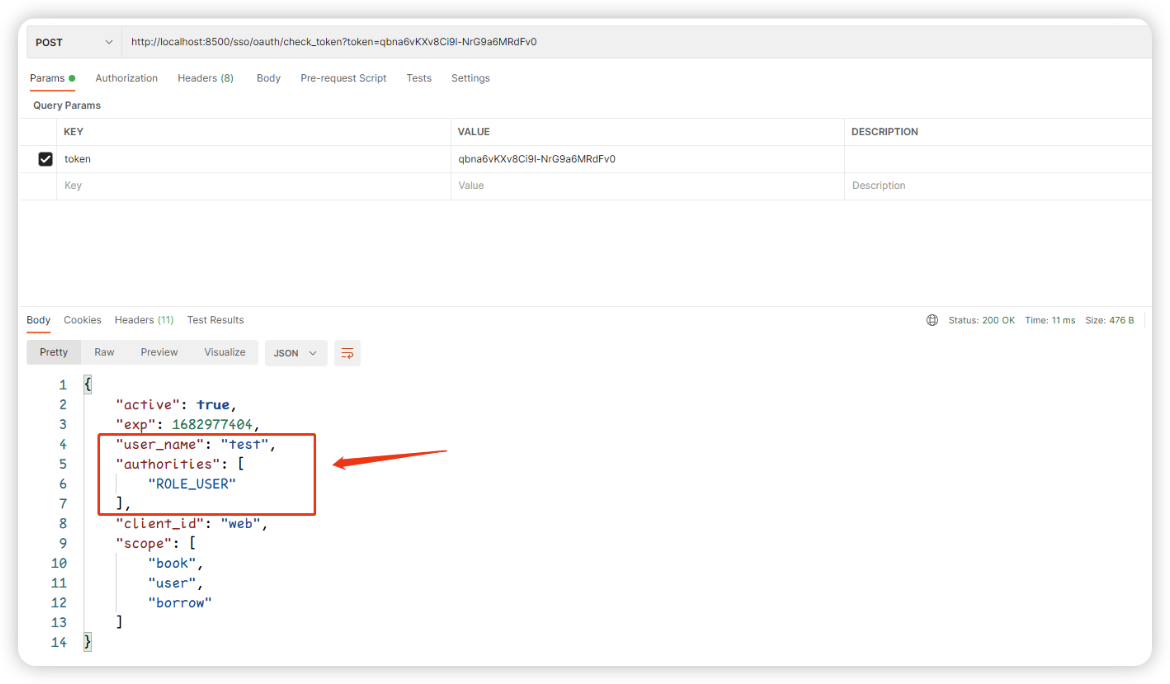
📔 可以使用check_token检验token是否有效
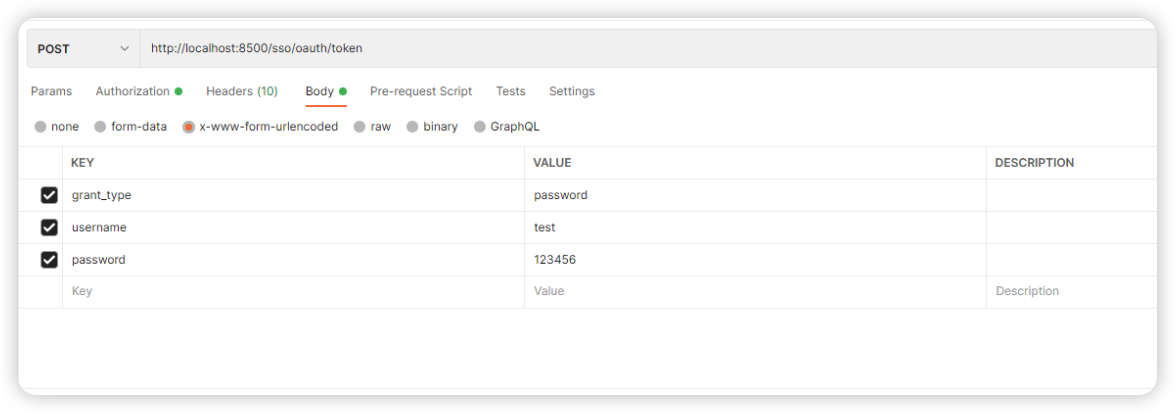
5.2.2:密码模式验证
http://localhost:8500/sso/oauth/token
1:在body指定用户名和密码
2:在请求头中添加Basic验证信息,这里我们直接填写id和secret即可
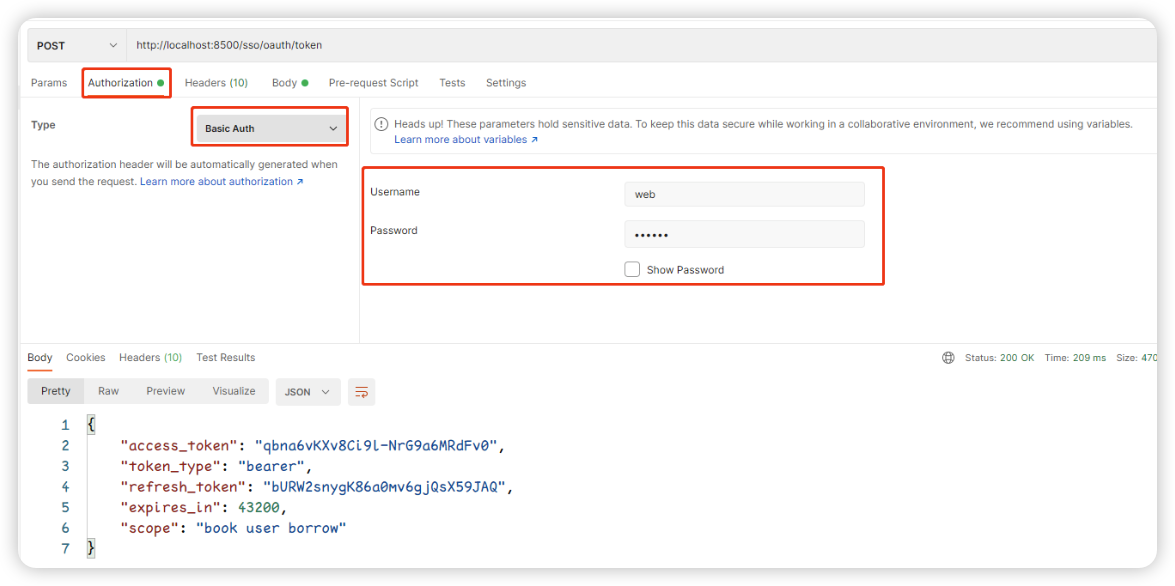
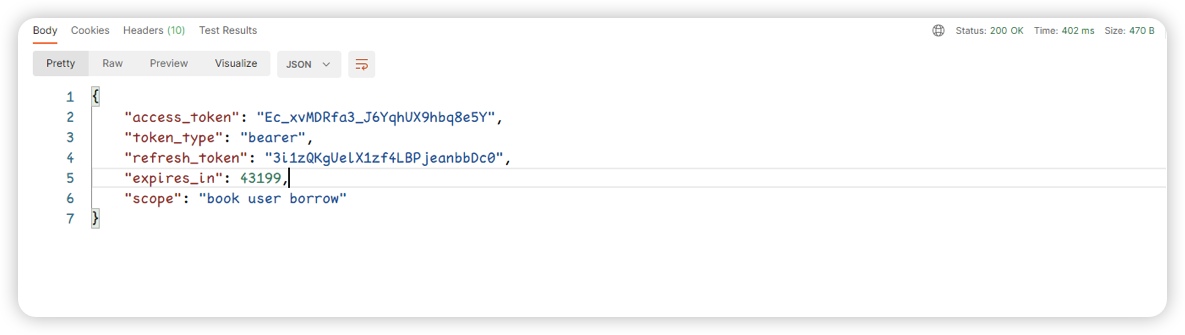
🎉 响应成功,得到Token信息,并且这里还多出了一个refresh_token,这是用于刷新Token的
🎉 token验证中,还多了一些关于用户的信息
5.2.3:隐式授权模式
http://localhost:8500/sso/oauth/authorize?client_id=web&response_type=token
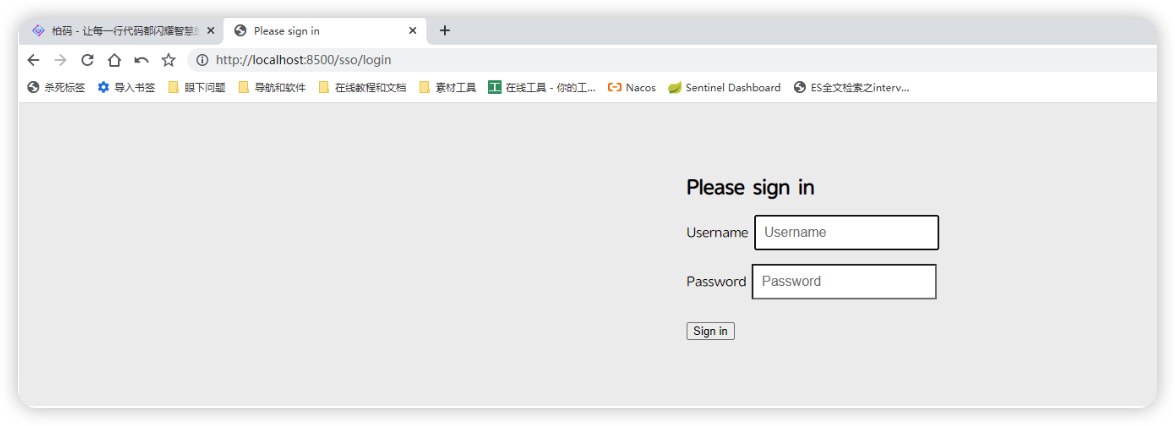
这种模式我们需要在验证服务器上进行登录操作,而不是直接请求Token,在浏览器上输出网址之后,将会弹出熟悉的security的登录界面:
填写用户名和密码之后,将会跳转到oauth2配置指定的回调网址,就是这个网址,跳转时,会携带这个token,所以说也不是很安全
.redirectUris("http://localhost:8201/login") // 可以写多个,当有多个时需要在验证请求中指定使用哪个地址进行回调

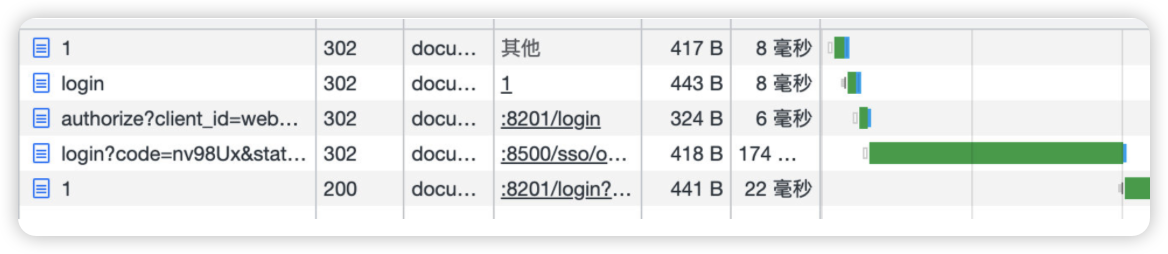
5.2.4:授权码模式
http://localhost:8500/sso/oauth/authorize?client_id=web&response_type=code
可以看到访问之后,依然会进入到回调地址,但是这时给的就是授权码了,而不是直接给Token
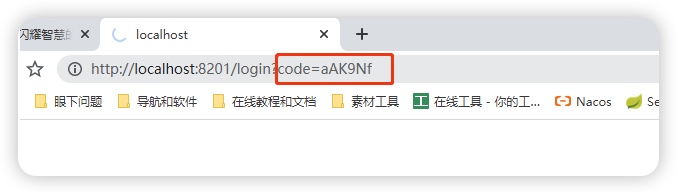
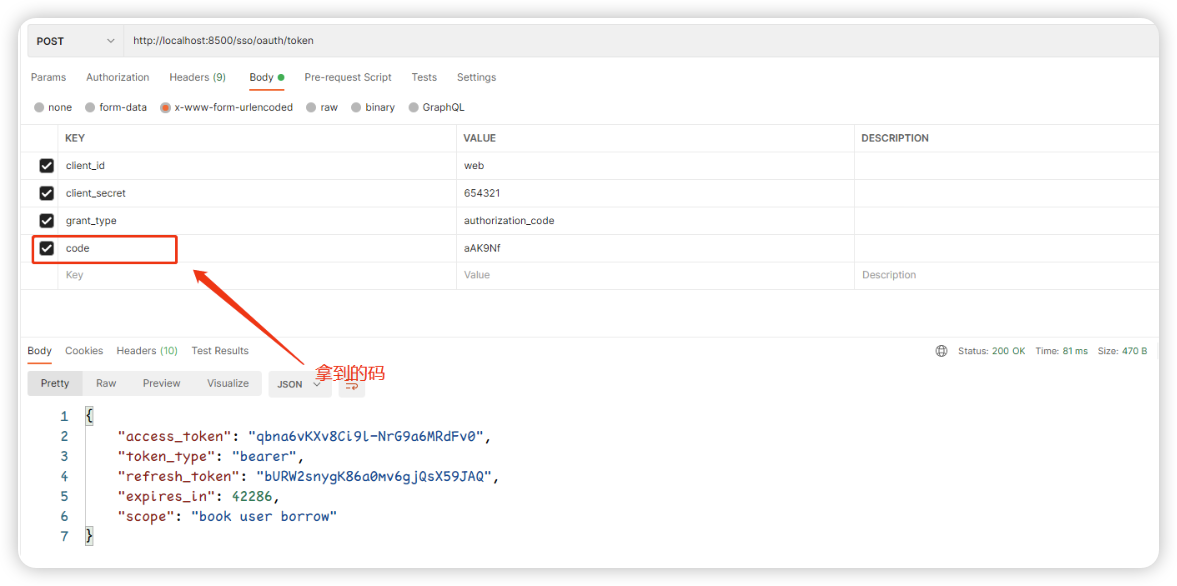
按照我们之前讲解的原理,我们需要携带授权码和secret一起请求,才能拿到Token
正常情况下是由回调的服务器进行处理,这里我们就在Postman中进行,我们复制刚刚得到的授权码
http://localhost:8500/sso/oauth/token
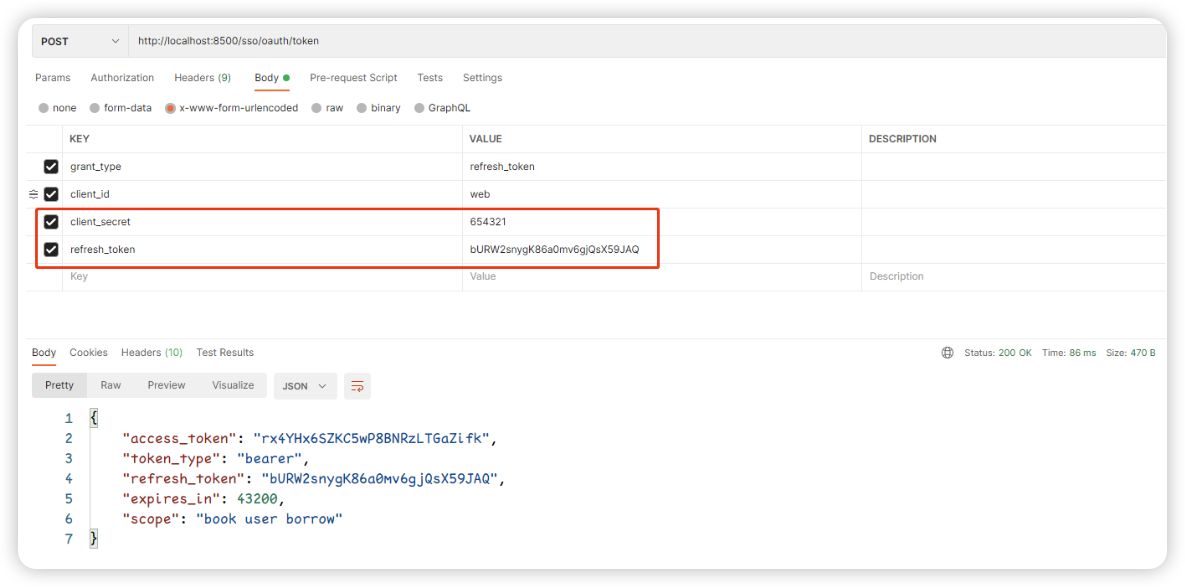
5.2.5:刷新令牌
http://localhost:8500/sso/oauth/token
最后还有一个是刷新令牌使用的,当我们的Token过期时,我们就可以使用这个refresh_token来申请一个新的Token:
6:实现资源服务器
6.1:@EnableOAuth2Sso
这种模式只是将验证方式由原本的默认登录形式改变为了统一在授权服务器登陆的形式
三个服务都加入依赖
<dependency>
    <groupId>org.springframework.boot</groupId>
    <artifactId>spring-boot-starter-security</artifactId>
</dependency>

<dependency>
    <groupId>org.springframework.cloud</groupId>
    <artifactId>spring-cloud-starter-oauth2</artifactId>
    <version>2.2.5.RELEASE</version>
</dependency>
直接在启动类上添加@EnableOAuth2Sso
@EnableOAuth2Sso // 加入这行注解
@SpringBootApplication
public class BookApplication {
    public static void main(String[] args) {
        SpringApplication.run(BookApplication.class, args);
    }
}
🎉 我们不需要进行额外的配置类,因为 @EnableOAuth2Sso 注解已经帮我们做了
// ============ @EnableOAuth2Sso注解源码 ===============
@Target({ElementType.TYPE})
@Retention(RetentionPolicy.RUNTIME)
@Documented
@EnableOAuth2Client
@EnableConfigurationProperties({OAuth2SsoProperties.class})
// 可以看到它直接注册了OAuth2SsoDefaultConfiguration,而这个类就是帮助我们对Security进行配置的
@Import({OAuth2SsoDefaultConfiguration.class, OAuth2SsoCustomConfiguration.class, ResourceServerTokenServicesConfiguration.class})
public @interface EnableOAuth2Sso {
}
// ============ OAuth2SsoDefaultConfiguration 源码 ====================
@Configuration
@Conditional({NeedsWebSecurityCondition.class})
public class OAuth2SsoDefaultConfiguration extends WebSecurityConfigurerAdapter {
    //直接继承的WebSecurityConfigurerAdapter,帮我们把验证设置都写好了
    private final ApplicationContext applicationContext;

    public OAuth2SsoDefaultConfiguration(ApplicationContext applicationContext) {
        this.applicationContext = applicationContext;
    }
    ...
}
配置文件中配置相关信息
security:
  oauth2:
    client:
      #注意和认证服务器中的oauth2配置中的对应上
      client-id: web
      client-secret: 654321
      #Token获取地址
      access-token-uri: http://localhost:8500/sso/oauth/token
      #验证页面地址
      user-authorization-uri: http://localhost:8500/sso/oauth/authorize
    resource:
      #Token信息获取和校验地址
      token-info-uri: http://localhost:8500/sso/oauth/check_token
加入三个服务的重定向地址
@Override
public void configure(ClientDetailsServiceConfigurer clients) throws Exception {
    clients.inMemory()
            .withClient("web")
            .secret(encoder.encode("654321"))
            .autoApprove(true)   // 这里把自动审批开了,就不用再去手动选同意了
            .scopes("book", "user", "borrow")
        	// 将三个地址都加上
            .redirectUris("http://localhost:8101/login", "http://localhost:8201/login", "http://localhost:8301/login")
            .authorizedGrantTypes("client_credentials", "password", "implicit", "authorization_code", "refresh_token");
}
问题:
由于SESSION不同步,每次切换不同的服务进行访问都会重新导验证服务器去验证一次:
- 像之前一样做SESSION统一存储
- 设置context-path路径,每个服务单独设置,就不会打架了
但是这样依然没法解决服务间调用的问题,所以仅仅依靠单点登陆的模式不太行。
6.2:@EnableResourceServer
前面@EnableOAuth2Sso将我们的服务作为单点登陆应用直接实现单点登陆,那么现在我们如果是以第三方应用进行访问呢?
这时我们就需要将我们的服务作为资源服务了
作为资源服务就不会再提供验证的过程,而是直接要求请求时携带Token,这才是我们常见的模式。
一句话来说,跟上面相比,我们只需要携带Token就能访问这些资源服务器了,客户端被独立了出来,用于携带Token去访问这些服务。
主启动类上添加
@EnableResourceServer
将当前的应用声明为资源服务
@SpringBootApplication
@EnableDiscoveryClient
@EnableResourceServer // 添加这个,该服务声明为资源服务
public class BookApplication {
    public static void main(String[] args) {
        SpringApplication.run(BookApplication.class, args);
    }
}
配置类修改
因为只做资源服务器,不要进行单点登录了,所以之前的方式一中的token获取地址和验证页面地址都不需要了
security:
  oauth2:
    client:
      # 基本信息
      client-id: web
      client-secret: 654321
    resource:
      # 因为资源服务器需要验证你的token是不是有访问这个资源的权限,所以只需要一个验证地址
      token-info-uri: http://localhost:8500/sso/oauth/check_token
配置完成后,我们启动服务器,直接访问会发现:
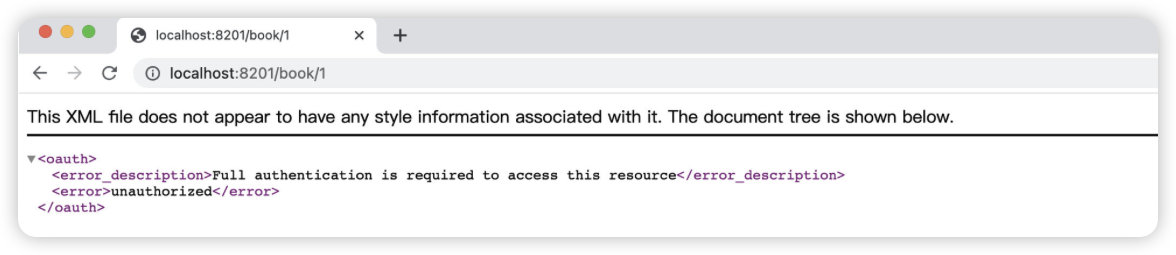
这是由于我们的请求头中没有携带Token信息,现在有两种方式可以访问此资源:
- 在URL后面添加
access_token请求参数,值为Token值 - 在请求头中添加
Authorization,值为Bearer +Token值
资源自定义
可以为资源服务编写一个配置类,比如现在希望用户授权了某一个Scope才能访问这个服务
package com.test.config;

import org.springframework.context.annotation.Configuration;
import org.springframework.security.config.annotation.web.builders.HttpSecurity;
import org.springframework.security.oauth2.config.annotation.web.configuration.ResourceServerConfigurerAdapter;

/**
 * 自定义一个配置类,指定格外的服务内容
 */
@Configuration
public class ResourceConfiguration extends ResourceServerConfigurerAdapter {
    @Override
    public void configure(HttpSecurity http) throws Exception {
        //这里也有HttpSecurity对象,方便我们配置SpringSecurity
        http.authorizeRequests()
                // Token必须要有我们自定义scope授权才可以访问此资源
                .anyRequest().access("#oauth2.hasScope('book')");  //添加自定义规则
    }
}
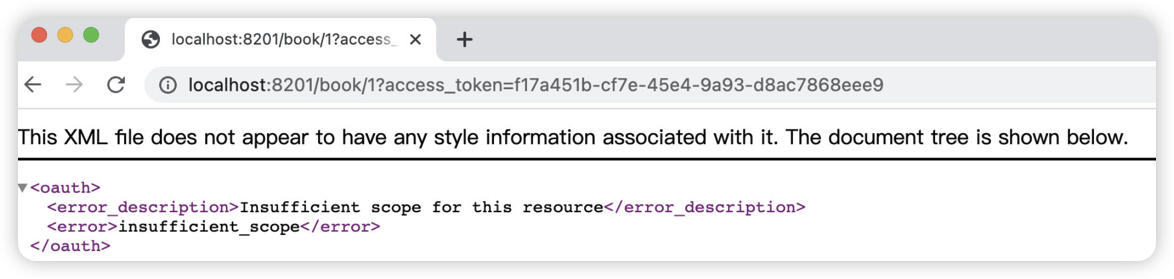
🎉 当没有对应的scope授权时,那么会直接返回insufficient_scope错误:
结合nacos进行远程调用
三个服务【book, user, borrow】加入对应的依赖负载均衡依赖
<!-- lb -->
<dependency>
    <groupId>org.springframework.cloud</groupId>
    <artifactId>spring-cloud-starter-loadbalancer</artifactId>
</dependency>
borrow服务加入feign对oauth2的支持,这样才能在feign调用时携带token
# --------- borrow的application.yml ---------
server:
  port: 8301

spring:
  application:
    name: borrow-service
  datasource:
    driver-class-name: com.mysql.cj.jdbc.Driver
    url: "jdbc:mysql://localhost:3306/cloudstudy?useUnicode=true&characterEncoding=UTF-8&serverTimezone=Asia/Shanghai"
    username: root
    password: 314159
  cloud:
    nacos:
      discovery:
        server-addr: 127.0.0.1:8848
# 监控器监控范围
management:
  endpoints:
    web:
      exposure:
        include: "*"
security:
  oauth2:
    client:
      #基本信息
      client-id: web
      client-secret: 654321
    resource:
      # 因为资源服务器需要验证你的token是不是有访问这个资源的权限,所以只需要一个验证地址
      token-info-uri: http://localhost:8500/sso/oauth/check_token
# ---------- 加上这个,支持远程调用中的token传递 ------------
feign:
  oauth2:
    enabled: true # 开启Oauth2支持,这样就会在请求头中携带Token了
    load-balanced: true # 开启负载均衡支持
验证
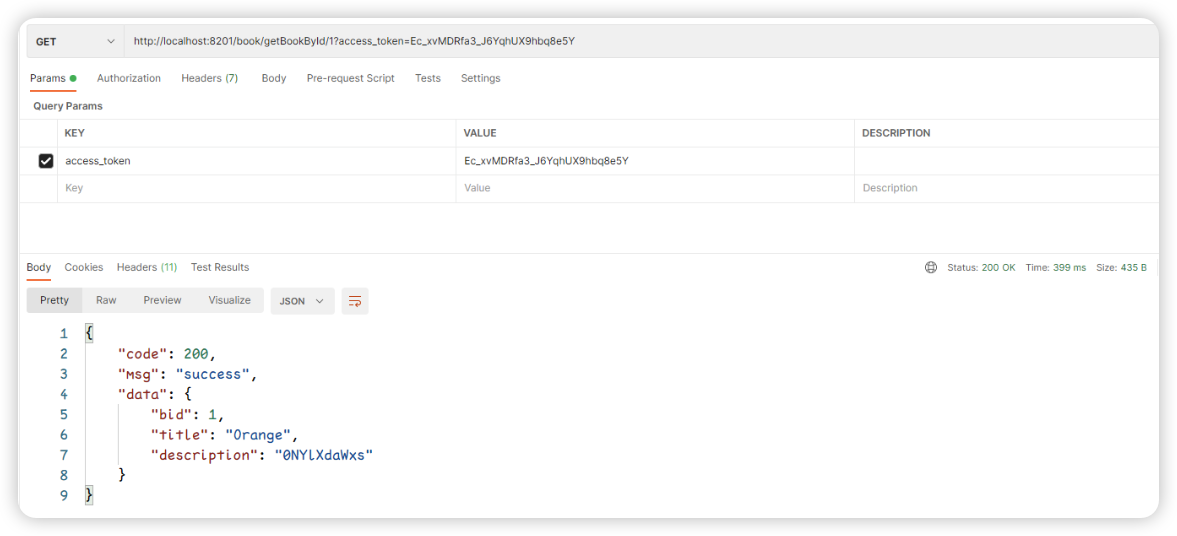
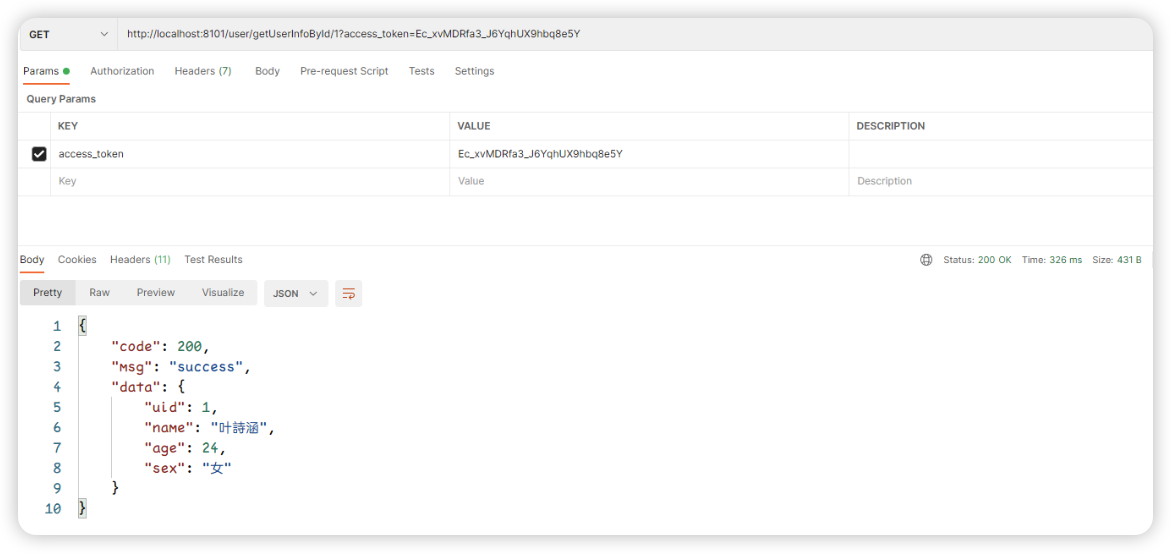
1:先拿到token,之前的那四种方式选一个
2:book & user验证
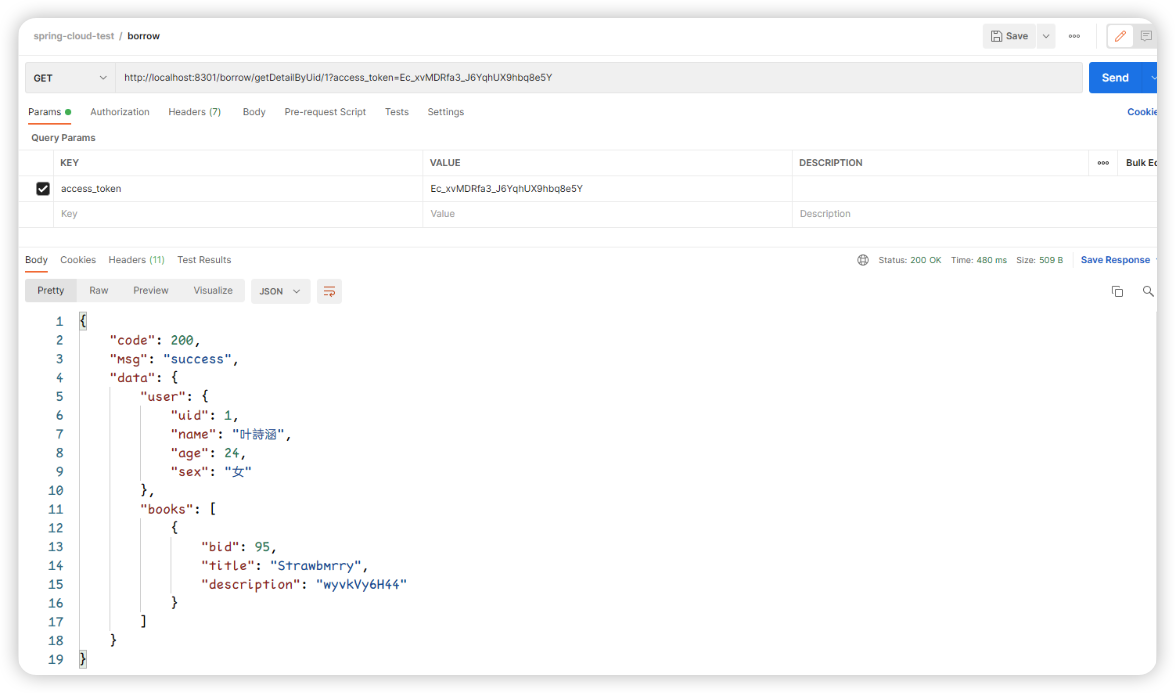
3:borrow验证
7:JWT和加密签名
7.1:JWT简介
JSON Web Token令牌(JWT)是一个开放标准(RFC 7519),它定义了一种紧凑和自成一体的方式,用于在各方之间作为JSON对象安全地传输信息。
这些信息可以被验证和信任,因为它是数字签名的。JWT可以使用密钥(使用HMAC算法)或使用RSA或ECDSA进行公钥/私钥对进行签名。
🎉 其实就是将用户信息存储到token中
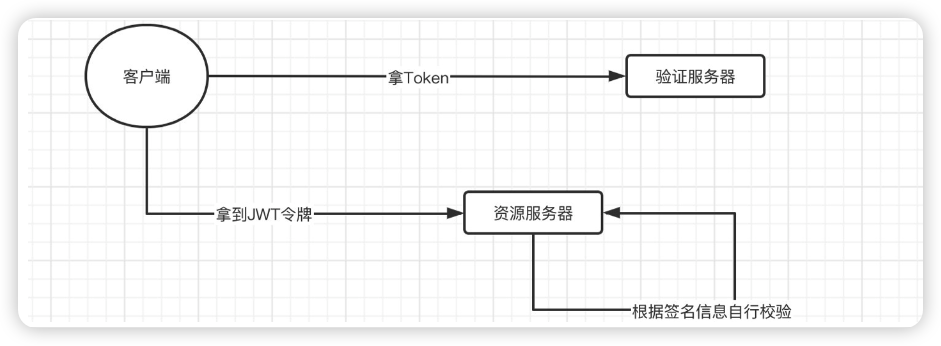
实际上,我们之前都是携带Token向资源服务器发起请求后,资源服务器由于不知道我们Token的用户信息,所以需要向验证服务器询问此Token的认证信息,这样才能得到Token代表的用户信息,但是各位是否考虑过,如果每次用户请求都去查询用户信息,那么在大量请求下,验证服务器的压力可能会非常的大。
而使用JWT之后,Token中会直接保存用户信息,这样资源服务器就不再需要询问验证服务器,自行就可以完成解析,我们的目标是不联系验证服务器就能直接完成验证。
JWT格式
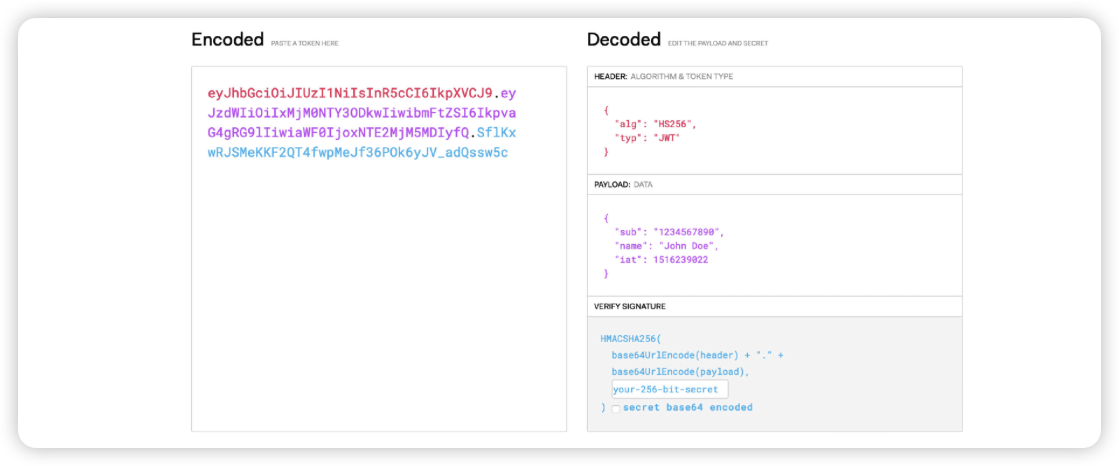
一个JWT令牌由3部分组成:标头(Header)、有效载荷(Payload)和签名(Signature)。
在传输的时候,会将JWT的3部分分别进行Base64编码后用.进行连接形成最终需要传输的字符串。
- 标头:包含一些元数据信息,比如JWT签名所使用的加密算法,还有类型,这里统一都是JWT。
- 有效载荷:包括用户名称、令牌发布时间、过期时间、JWT ID等,当然我们也可以自定义添加字段,我们的用户信息一般都在这里存放。
- 签名:首先需要指定一个密钥,该密钥仅仅保存在服务器中,保证不能让其他用户知道。然后使用Header中指定的算法对Header和Payload进行base64加密之后的结果通过密钥计算哈希值,然后就得出一个签名哈希。这个会用于之后验证内容是否被篡改。
base64
就是包括小写字母a-z、大写字母A-Z、数字0-9、符号"+“、”/"一共64个字符的字符集(末尾还有1个或多个=用来凑够字节数),任何的符号都可以转换成这个字符集中的字符,这个转换过程就叫做Base64编码,编码之后会生成只包含上述64个字符的字符串。相反,如果需要原本的内容,我们也可以进行Base64解码,回到原有的样子
public void test(){
    String str = "你们可能不知道只用20万赢到578万是什么概念";
      //Base64不只是可以对字符串进行编码,任何byte[]数据都可以,编码结果可以是byte[],也可以是字符串
    String encodeStr = Base64.getEncoder().encodeToString(str.getBytes());
    System.out.println("Base64编码后的字符串:"+encodeStr);
    System.out.println("解码后的字符串:"+new String(Base64.getDecoder().decode(encodeStr)));
}
这里我们就可以利用jwt,将我们的Token采用新的方式进行存储:
7.2:项目修改
7.2.1:验证服务器添加jwt支持
SecurityConfiguration
package com.test.config;

import org.springframework.context.annotation.Bean;
import org.springframework.context.annotation.Configuration;
import org.springframework.security.authentication.AuthenticationManager;
import org.springframework.security.config.annotation.authentication.builders.AuthenticationManagerBuilder;
import org.springframework.security.config.annotation.web.builders.HttpSecurity;
import org.springframework.security.config.annotation.web.configuration.WebSecurityConfigurerAdapter;
import org.springframework.security.core.userdetails.UserDetailsService;
import org.springframework.security.crypto.bcrypt.BCryptPasswordEncoder;
import org.springframework.security.oauth2.provider.token.TokenStore;
import org.springframework.security.oauth2.provider.token.store.JwtAccessTokenConverter;
import org.springframework.security.oauth2.provider.token.store.JwtTokenStore;

@Configuration
public class SecurityConfiguration extends WebSecurityConfigurerAdapter {

    @Override
    protected void configure(HttpSecurity http) throws Exception {
        http.authorizeRequests()
                .anyRequest().authenticated() // 所有路径都要鉴权
                .and()
                .formLogin().permitAll(); // 使用表单登录
    }

    /**
     * 不搞数据库了,直接userDetail
     */
    @Override
    protected void configure(AuthenticationManagerBuilder auth) throws Exception {
        BCryptPasswordEncoder encoder = new BCryptPasswordEncoder(); // 设置密码编码器
        auth
                .inMemoryAuthentication()
                .passwordEncoder(encoder)
                // 用户信息
                .withUser("test").password(encoder.encode("123456")).roles("USER");
    }

    @Bean
    @Override
    public AuthenticationManager authenticationManagerBean() throws Exception {
        return super.authenticationManagerBean();
    }

    @Bean
    @Override
    public UserDetailsService userDetailsServiceBean() throws Exception {
        return super.userDetailsServiceBean();
    }

    // ----------- 相较于之前加了这两部分 -------------
    @Bean
    public JwtAccessTokenConverter tokenConverter(){
        //Token转换器,将其转换为JWT
        JwtAccessTokenConverter converter = new JwtAccessTokenConverter();
        converter.setSigningKey("jjwt");   // 这个是对称密钥,一会资源服务器那边也要指定为这个
        return converter;
    }

    @Bean
    public TokenStore tokenStore(JwtAccessTokenConverter converter){
        //Token存储方式现在改为JWT存储
        return new JwtTokenStore(converter);  // 传入刚刚定义好的转换器
    }
}
OAuth2Configuration
package com.test.config;

import org.springframework.context.annotation.Configuration;
import org.springframework.security.authentication.AuthenticationManager;
import org.springframework.security.core.userdetails.UserDetailsService;
import org.springframework.security.crypto.bcrypt.BCryptPasswordEncoder;
import org.springframework.security.oauth2.config.annotation.configurers.ClientDetailsServiceConfigurer;
import org.springframework.security.oauth2.config.annotation.web.configuration.AuthorizationServerConfigurerAdapter;
import org.springframework.security.oauth2.config.annotation.web.configuration.EnableAuthorizationServer;
import org.springframework.security.oauth2.config.annotation.web.configurers.AuthorizationServerEndpointsConfigurer;
import org.springframework.security.oauth2.config.annotation.web.configurers.AuthorizationServerSecurityConfigurer;
import org.springframework.security.oauth2.provider.token.AuthorizationServerTokenServices;
import org.springframework.security.oauth2.provider.token.DefaultTokenServices;
import org.springframework.security.oauth2.provider.token.TokenStore;
import org.springframework.security.oauth2.provider.token.store.JwtAccessTokenConverter;

import javax.annotation.Resource;

@EnableAuthorizationServer
@Configuration
public class OAuth2Configuration extends AuthorizationServerConfigurerAdapter {

    @Resource
    private AuthenticationManager manager;

    @Resource
    private UserDetailsService service;

    private final BCryptPasswordEncoder encoder = new BCryptPasswordEncoder();

    @Override
    public void configure(ClientDetailsServiceConfigurer client) throws Exception {
        client
                .inMemory() // 这里我们直接硬编码创建,当然也可以像Security那样自定义或是使用JDBC从数据库读取
                .withClient("web") // 客户端名称,随便起就行
                .secret(encoder.encode("654321")) // 只与客户端分享的secret,随便写,但是注意要加密
                .autoApprove(true) // 自动审批开启
                .scopes("book", "user", "borrow") // 授权范围,这里我们使用全部all
                .redirectUris("http://localhost:8101/login", "http://localhost:8201/login", "http://localhost:8301/login") // 可以写多个,当有多个时需要在验证请求中指定使用哪个地址进行回调
                // 授权模式,一共支持5种,除了之前我们介绍的四种之外,还有一个刷新Token的模式
                .authorizedGrantTypes("client_credentials", "password", "implicit", "authorization_code", "refresh_token");
    }

    @Override
    public void configure(AuthorizationServerSecurityConfigurer security) {
        security
                .passwordEncoder(encoder)    //编码器设定为BCryptPasswordEncoder
                .allowFormAuthenticationForClients()  //允许客户端使用表单验证,一会我们POST请求中会携带表单信息
                .checkTokenAccess("permitAll()");     //允许所有的Token查询请求
    }

    // ---------------- new -----------------
    @Resource
    TokenStore store;

    @Resource
    JwtAccessTokenConverter converter;

    private AuthorizationServerTokenServices serverTokenServices(){  //这里对AuthorizationServerTokenServices进行一下配置
        DefaultTokenServices services = new DefaultTokenServices();
        services.setSupportRefreshToken(true);   //允许Token刷新
        services.setTokenStore(store);   //添加刚刚的TokenStore
        services.setTokenEnhancer(converter);   //添加Token增强,其实就是JwtAccessTokenConverter,增强是添加一些自定义的数据到JWT中
        return services;
    }

    @Override
    public void configure(AuthorizationServerEndpointsConfigurer endpoints) {
        endpoints
                .tokenServices(serverTokenServices())   //设定为刚刚配置好的AuthorizationServerTokenServices
                .userDetailsService(service)
                .authenticationManager(manager);
    }
}
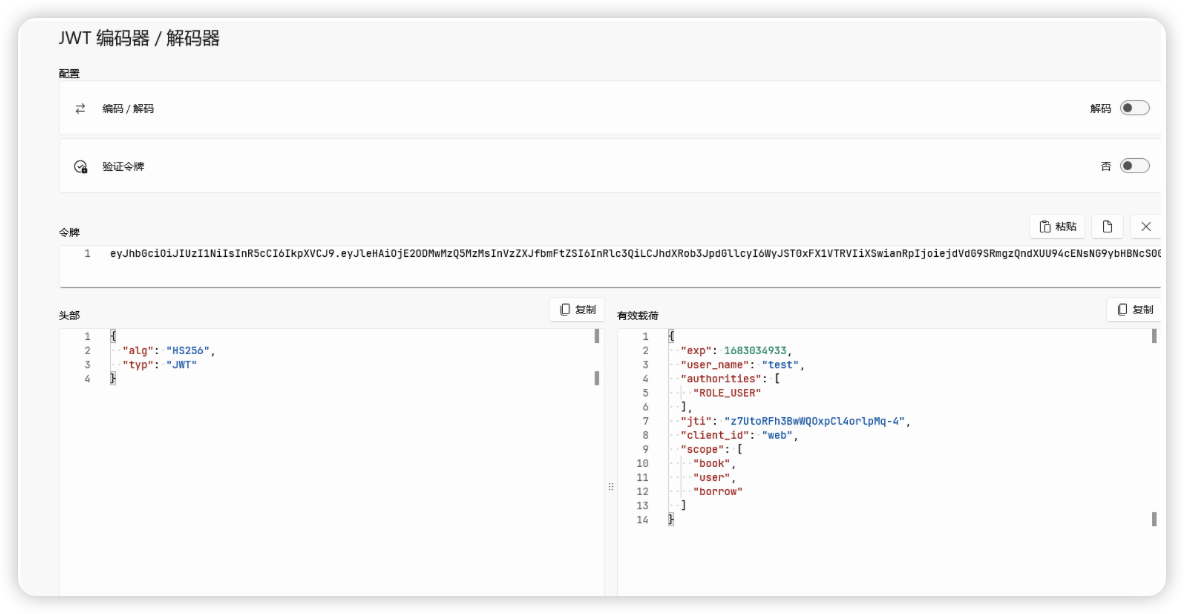
重启auth-service之后,再次获取token,发现已经编程了JWT格式的了
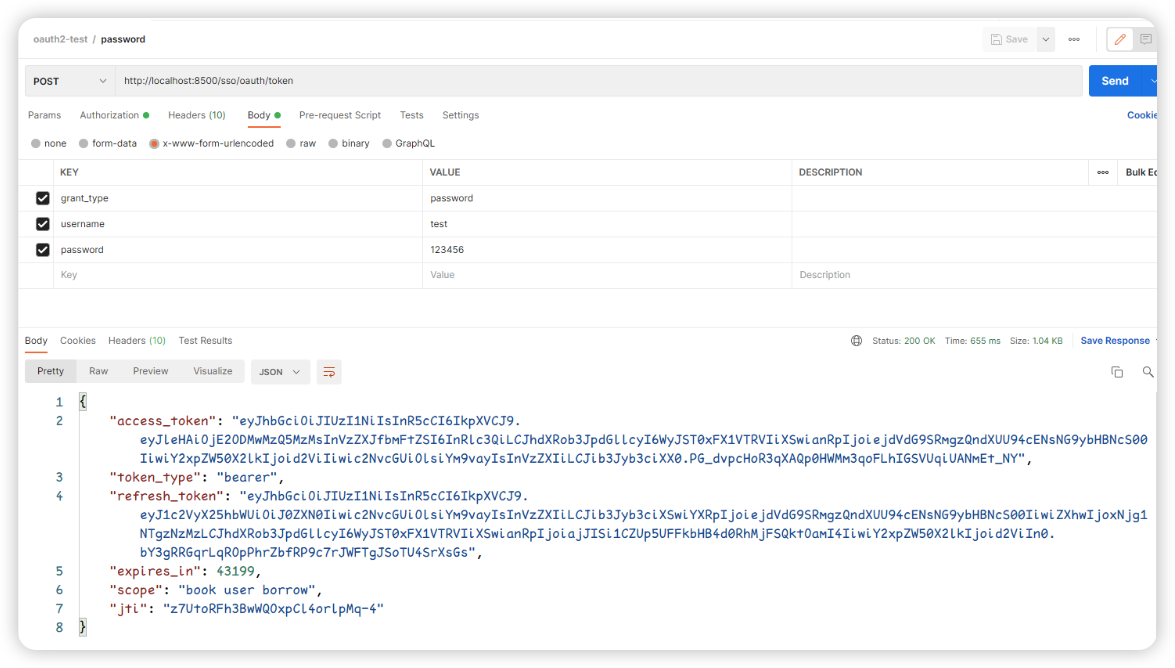
使用JWT解码工具发现access_token(JWT)中已经存储了用户的信息
7.3:总结
至此,单点登录已经完成。
1:用户进行登录的时候,会通过验证服务器的接口【不一定使用哪种验证方式】
2:然后通过用户输入的用户名和密码 + 数据库给定的权限得到对应的access_token(jwt)
3:生成了这个jwt,然后访问各个资源服务器都只要带上这个token就可以了


 被折叠的 条评论
为什么被折叠?
被折叠的 条评论
为什么被折叠?
 到【灌水乐园】发言


