


sspringboot相关面试题
文章目录
- sspringboot相关面试题
- 一:SpringBoot可以同时处理多少请求
- 二:SpringBoot如何优化启动速度
- 三:SpringBoot读取配置的方式
- 四:SpringBoot解决跨域问题
- 五:SpringBoot配置文件敏感信息加密
- 六:为什么SpringBoot的jar可以直接运行
- 七:核心注解@SpringBootApplication
- 八:SpringBoot自动配置原理
- 九:SpringBoot的启动原理
- 十:内置tomcat的启动原理
- 十一:外部tocmat的启动方式
- 十二:为什么使用CGLIB作为默认动态代理
- 十三:读取配置文件原理和加载顺序
- 十四:如何防止jar的反编译
- 十五:使用AOP优雅打印日志
- 十六:SpringBoot线程池完成百万数据存储
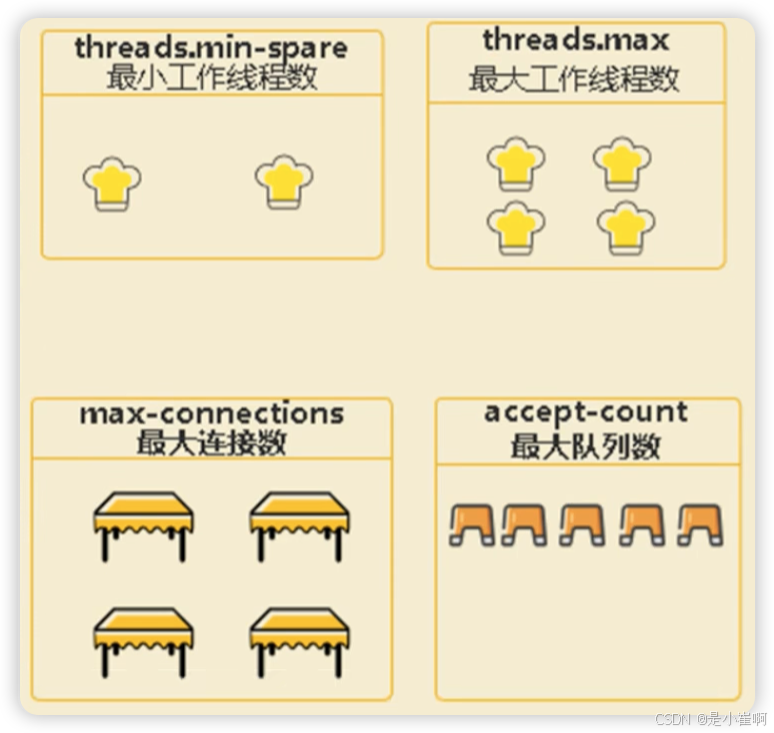
一:SpringBoot可以同时处理多少请求
先说结论,默认是8292个
可以通过设置server.tomcat相关的属性进行配置
server:
	tomcat:
		threads:
			# 最小线程数
			min-spare: 10
			# 最多线程数,默认是200
			max: 200
		# 最大连接数,默认是8192
		max-connections: 8192
		# 最大等待数,默认是100
		accept-count: 100
最多可以处理的请求 = 最大连接数 + 最大等待数
对于这几个的默认的配置在spring-configuration-metadata.json中
二:SpringBoot如何优化启动速度
延迟初始化bean
一般在 Spring Boot 中都拥有很多的耗时任务,比如数据库建立连接、初始线程池的创建等等
我们可以延迟这些操作的初始化,来达到优化启动速度的目的
Spring Boot 2.2 版本后引入spring.main.lazy-initialization属性,配置为 true 会将所有 Bean 延迟初始化。
spring:
  main:
    lazy-initialization: true # 懒加载,所有的bean都延迟初始化
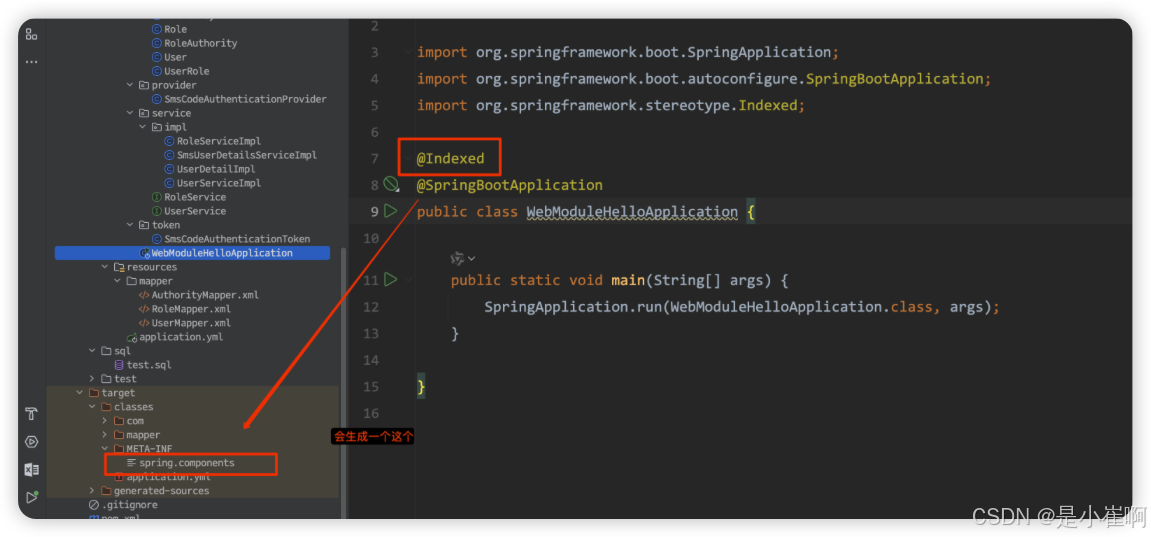
创建扫描索引
Spring5之后提供了spring-context indexer功能,可以通过在编译时创建一个静态候选列表来提高大型应用程序的启动性能。
在项目中使用了@Indexed之后,编译打包的时候会在项目中自动生成META-INF/spring.components文件。
当Spring执行ComponentScan扫描时,META-INF/spring.components将会被CandidateComponentslndexLoader 读取并加载,转换为CandidateComponentslndex对象
<!-- 加上这个依赖 -->
<dependency>
    <groupId>org.springframework</groupId>
    <artifactId>spring-context-indexer</artifactId>
    <optional>true< /optional>
< /dependency>
@Indexed // 加上这个注解
@SpringBootApplication
public class Test {
    public static void main(String[] args) {
        SpringApplicaiton.run(Test.class, args);
    }
}
还有一些其他的方法
- 减少@ComponentScan @SpringBootApplication扫描类时候的范围
- 关闭 Spring Boot 的 JMX 监控,设置
spring.jmx.enabled=false - 设置JVM参数
-noverify,不对类进行验证 - 对非必要启动时加载的Bean,延迟加载
- 使用SpringBoot的全局懒加载
- AOP切面尽量不使用注解方式,这会导致启动时扫描全部方法
- 关闭endpoint的一些监控功能
- 排除项目多余的依赖jar
- swagger扫描接口时,指定只扫描某个路径下的类
- Feign 客户端接口的扫描缩小包扫描范围
当然上面的优化都是杯水车薪,只能提升20%-30%最多,如果可以使用JDK17 + SpringBoot3将会大大不同
spring-graalvm-native是spring Boo6/Spring Boot3 非常重大的一个特性,支持使用 GraalVM 将 Spring Boot 的应用程序编译成本地可执行的镜像文件,可以显著提升启动速度、峰值性能以及减少内存使用。
内存占用多主要是内存占用后不会归还操作系统,这个正在逐步改善:
- G1 JDK12及之后 已支持
- ZGC JDK13及之后 已支持
所以如何可以选型JDK,最好使用JDK17 + SpringBoot3,启动速度会增加很多
三:SpringBoot读取配置的方式
@Value,不再多说
@Value("${app.name}")
private String name;
@ConfigurationProperties(“app”)
可以解决@Value只能一个个赋值的弊端,可以单独写一个读取配置的bean,然后在其他的地方调用即可
@Component
@ConfigurationProperties("app")
@Data
public class PropertiesConfig {
    private String name;
    private String code;
}
Environment
也是一个bean,可以通过其getProperty(property_name)读取到对应的配置
@SpringBootTest
@Slf4j
public class MyTest {
    @Resource
    private Environment env;

    public void m1 {
        String name = env.property("app.name");
        // todo...
    }
}
@PropertySources()指定外部配置文件并读取配置(只能获取properties文件后缀的配置文件)
package com.cui.webmodulehello.configure;

import lombok.Data;
import org.springframework.beans.factory.annotation.Value;
import org.springframework.context.annotation.Configuration;
import org.springframework.context.annotation.PropertySource;
import org.springframework.context.annotation.PropertySources;

/**
 * @author cui haida
 * 2025/4/7
 */
@Data
@Configuration
@PropertySources({
        @PropertySource(value = "classpath:my.properties", encoding = "utf-8")
})
public class ReadOtherProperty {
    @Value("${my.name}")
    private String name;
}
PropertySourcesPlaceholderConfigurer -> 这个可以指定yaml的后缀配置文件
package com.cui.webmodulehello.configure;

import org.springframework.context.annotation.Bean;
import org.springframework.context.annotation.Configuration;
import org.springframework.context.support.PropertySourcesPlaceholderConfigurer;
import org.springframework.core.io.ClassPathResource;

/**
 * 读取自定义的yaml配置
 * @author cui haida
 * 2025/4/7
 */
@Configuration
public class MyYamlConfig {
    @Bean
    public static PropertySourcesPlaceholderConfigurer propertySourcesPlaceholderConfigurer() {
        PropertySourcesPlaceholderConfigurer configurer = new PropertySourcesPlaceholderConfigurer();
        configurer.setLocation(new ClassPathResource("my.yml"));
        configurer.setIgnoreUnresolvablePlaceholders(true);
        return configurer;
    }
}
然后可以通过@Value获取到外部的yaml文件
四:SpringBoot解决跨域问题
跨域问题(Cross-Origin Resource Sharing, CORS)是浏览器的一种安全机制,用于限制从一个源(域名、协议、端口)加载的网页如何与来自另一个源的资源进行交互。这种机制是为了防止恶意网站通过脚本访问另一个网站的数据,从而保护用户的安全和隐私。
什么是跨域?
当一个网页试图从一个不同的源请求资源时,就会发生跨域请求。例如:
http://example.com尝试请求http://api.example.org/datahttp://example.com尝试请求https://example.com/data(协议不同)http://example.com尝试请求http://subdomain.example.com/data(子域名不同)http://example.com:8080尝试请求http://example.com:3000/data(端口不同)
⚠️ 跨域只会在前端发生,后端不会发生跨域调用异常,因为浏览器有一个叫同源策略(必须同源才能访问)
解决方式1:JSONP
非常的老,兼容性最强
原理是发送ajax请求的时候设置datatype=“jsonp”,此时就会在url上自动拼接一个值随机的callback参数
后端拿到这个参数之后,再给前端返回去,形成握手,以此解决跨域问题
jsonp已经淘汰,它只支持get请求
解决方式2:cors
- CORS从具体的代码实现上来说比较方便,前端几乎不需要写任何代码就可以支持。主要是靠服务端进行配置。
- CORS需要浏览器和服务器同时支持。目前所有浏览器都支持该功能,IE浏览器不能低于IE10。
- 浏览器一旦发现AJAX请求跨源,就会自动添加一些附加的头信息,有时还会多出一次附加的请求(option预检请求),但用户不会有感觉
在SpringBoot中实现有三种,根据不同的场景进行选择
@CrossOrigin注解,可以指定当前的接口支持跨域请求,同时可以指定跨域来源
@GetMapping("/id")
@CrossOrigin("http://localhost:8080") // 允许跨域访问, 允许的域名为 http://localhost:8080
public String getUserId(){
    return "haha";
}
WebMvcConfigurer#addCorsMappings增加对应的bean指定跨域
package com.cui.webmodulehello.configure;

import org.springframework.context.annotation.Configuration;
import org.springframework.web.servlet.config.annotation.CorsRegistry;
import org.springframework.web.servlet.config.annotation.WebMvcConfigurer;

/**
 * cors跨域配置
 * @author cui haida
 * 2025/4/7
 */
@Configuration
public class MyCorsConfig implements WebMvcConfigurer {
    /**
     * 添加跨域资源共享(CORS)的映射配置
     * 此方法用于配置HTTP请求的跨域支持,使得后端服务能够接受和响应来自不同域的请求
     *
     * @param registry CorsRegistry对象,用于注册CORS映射配置
     */
    @Override
    public void addCorsMappings(CorsRegistry registry) {
        registry.addMapping("/**")
                .allowedOrigins("*")
                .allowedMethods("GET", "HEAD", "POST", "PUT", "DELETE", "OPTIONS")
                .allowCredentials(true)
                .maxAge(3600)
                .allowedHeaders("*");
    }
}
CorsFilter的bean
package com.cui.webmodulehello.configure;

import org.springframework.context.annotation.Bean;
import org.springframework.context.annotation.Configuration;
import org.springframework.web.cors.CorsConfiguration;
import org.springframework.web.cors.UrlBasedCorsConfigurationSource;
import org.springframework.web.filter.CorsFilter;

/**
 * cors跨域配置
 * @author cui haida
 * 2025/4/7
 */
@Configuration
public class MyCorsConfig {
    /**
     * 配置跨域过滤器
     *
     * 由于Web应用程序可能需要从不同的域中请求资源,这通常会受到浏览器同源策略的限制
     * 为了允许跨域请求,我们需要配置CORS(跨域资源共享)设置
     * 此方法创建并配置一个CorsFilter实例,以处理所有的跨域请求
     *
     * @return CorsFilter 返回配置好的跨域过滤器实例
     */
    @Bean
    public CorsFilter corsFilter() {
        // 创建一个新的CORS配置实例
        CorsConfiguration config = new CorsConfiguration();
        // 允许所有域进行跨域调用
        config.addAllowedOrigin("*");
        // 允许携带凭证的请求
        config.setAllowCredentials(true);
        // 允许所有方法(GET、POST、PUT、DELETE等)
        config.addAllowedMethod("*");
        // 允许所有头部
        config.addAllowedHeader("*");

        // 创建一个新的URL基于的CORS配置源
        UrlBasedCorsConfigurationSource configSource = new UrlBasedCorsConfigurationSource();
        // 将CORS配置注册到所有路径
        configSource.registerCorsConfiguration("/**", config);

        // 根据配置源创建并返回一个新的CorsFilter实例
        return new CorsFilter(configSource);
    }
}
解决方式3:使用nginx进行代理即可实现跨域 -> proxy_pass
五:SpringBoot配置文件敏感信息加密
用三方轮子进行加解密操作
<dependency>
    <groupId>com.github.ulisesbocchio</groupId>
    <artifactId>jasypt-spring-boot-starter</artifactId>
    <version>3.0.5</version>
</dependency>
同时添加插件,方便命令行生成密文
<plugin>
    <groupId>com.github.ulisesbocchio</groupId>
    <artifactId>jasypt-maven-plugin</artifactId>
    <version>3.0.5</version>
</plugin>
在终端输入:
mvn jasypt:encrypt-value -Djasypt.encryptor.password="cuihaida" -Djasypt.plugin.value="bnm314159"
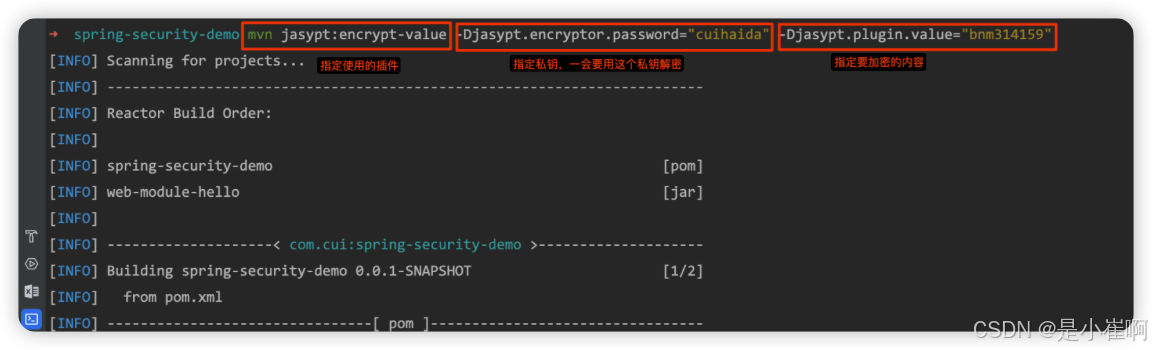
然后就能得到加密结果
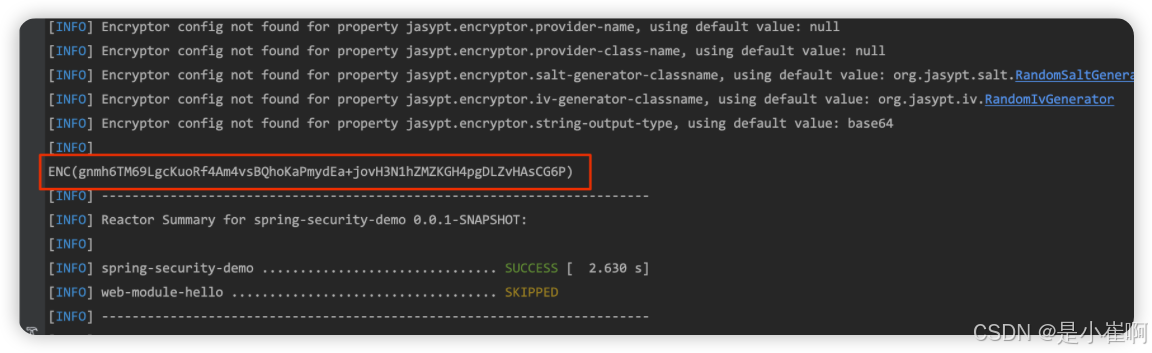
替换掉配置文件的对应信息之后,其他要加密的信息执行相同的操作即可
然后进行对应的解密,如果是本地运行:
-jasypt.encryptor.password=cuihaida
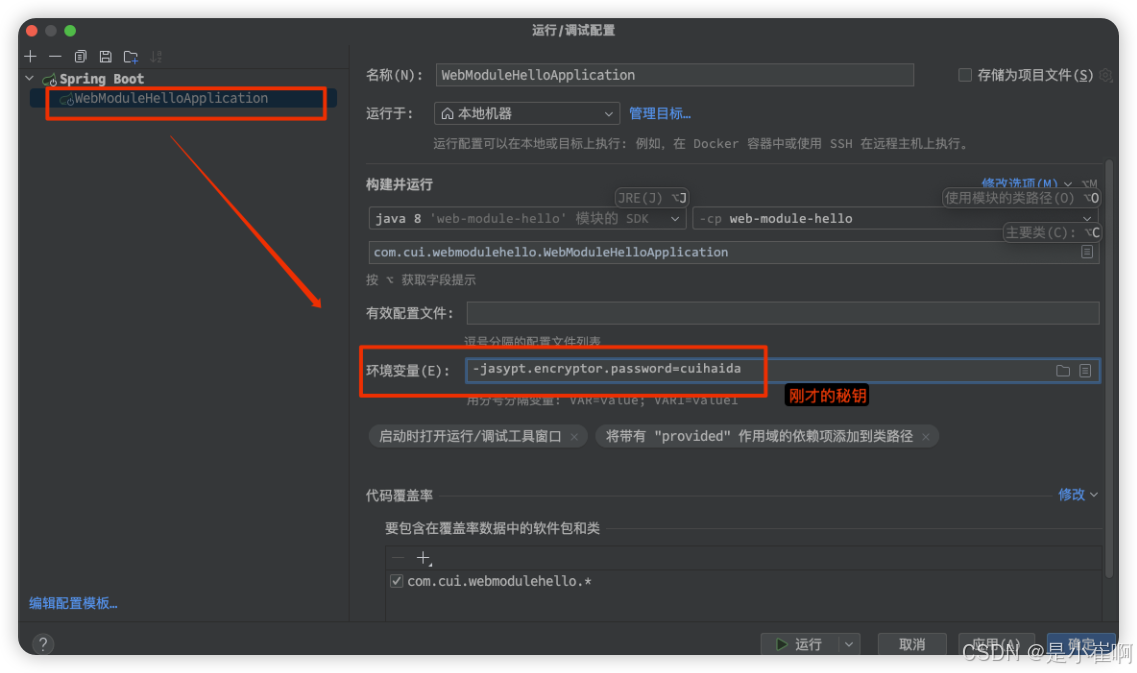
如果是线上jar方式,直接指定对应的环境变量属性即可
java -jar xxx-1.0.0.jar -jasypt.encryptor.password=cuihaida
六:为什么SpringBoot的jar可以直接运行
SpringBoot提供了一个插件spring-boot-maven-plugin用于把程序打包成一个可执行的jar包。
<!-- 打包插件配置 -->
<plugin>
    <groupId>org.springframework.boot</groupId>
    <artifactId>spring-boot-maven-plugin</artifactId>
    <version>${spring-boot.version}</version>
    <configuration>
        <mainClass>com.cui.springsecuritydemo.SpringSecurityDemoApplication</mainClass>
        <skip>true</skip>
    </configuration>
    <executions>
        <execution>
            <id>repackage</id>
            <goals>
                <goal>repackage</goal>
            </goals>
        </execution>
    </executions>
</plugin>
Spring Boot应用打包之后,生成一个Fat jar(jar包中包含jar),包含了应用依赖的jar包和SpringBoot loader相关的类。
java -jar会去找jar中的manifest文件,在那里面找到真正的启动类;
Fat jar的启动Main函数是JarLauncher,它负责创建一个LaunchedURLClassLoader来加载boot-lib下面的jar,并以一个新线程启动应用的Main函数。
七:核心注解@SpringBootApplication

这是一个复合注解,由三个注解构成:
@SpringBootConfiguration - 配置注解,主要将@Configuration,@Bean放入Spring容器
这个注解实际就是一个@Configuration,表示启动类也是一个配置类
@Conditional 也很关键,如果没有它我们无法在自定义应用中进行定制开发
- @ConditionalOnBean、
- @ConditionalOnClass、
- @ConditionalOnExpression
@EnableAutoConfiguration - 自动加载factories下的bean放入Spring 容器
向Spring容器中导入了一个Selector,用来加载ClassPath下SpringFactories中所定义的自动配置类,将这些自动加载为
配置Bean
@ComponentScan - 扫描注解,扫描我们项目中声明的那些@Service, @Component等等的bean放入Spring 容器
八:SpringBoot自动配置原理
通过 @SpringBootConfiguration 引入了@EnableAutoConfiguration(负责启动自动配置功能)
@EnableAutoConfiguration 引入了@Import注解,Spring容器在启动的时候,加载IoC容器的时候会解析@Import注解
@Import导入了一个deferredImportSelector,它会使SpringBoo的自动配置类的顺序在最后,这样方便我们扩展和覆盖
然后读取所有的/META-INF/spring.factories文件,过滤出所有AutoConfigurtionClass类型的类
最后通过@Condition排除无效的自动配置类

九:SpringBoot的启动原理
@SpringbootApplication
public class SimpleTest {
    public static void main(String[] args) {
        // 这个到底在执行什么??
        SpringApplication.run(SimpleTest.class, args);
    }
}
1️⃣ 初始化SpringApplication, 从spring.factories中读取listener-ApplicationContextInitializer
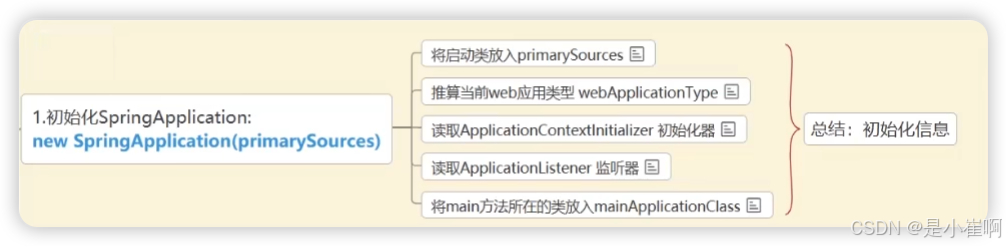
2️⃣ 运行run方法,读取 环境变量 配置信息…
3️⃣ 创建springApplication上下文:ServletWebServerApplicationContext
4️⃣ 预初始化上下文:读取启动类
5️⃣ 调用refresh 加载ioc容器 -> 加载所有的自动配置类 -> 创建(内置)servlet容器
6️⃣ 在这个过程中springboot会调用很多监听器对外进行扩展
7️⃣ 前后增加启动时间,最后算出启动的时间
/**
 * 运行Spring应用的主要方法
 *
 * @param args 命令行参数
 * @return 返回配置化的应用上下文
 */
public ConfigurableApplicationContext run(String... args) {
    // 记录启动时间
    long startTime = System.nanoTime();
    // 创建启动上下文
    DefaultBootstrapContext bootstrapContext = this.createBootstrapContext();
    ConfigurableApplicationContext context = null;
    // 配置是否为无头模式(不影响GUI)
    this.configureHeadlessProperty();
    // 获取运行监听器
    SpringApplicationRunListeners listeners = this.getRunListeners(args);
    listeners.starting(bootstrapContext, this.mainApplicationClass);

    try {
        // 解析应用参数
        ApplicationArguments applicationArguments = new DefaultApplicationArguments(args);
        // 准备环境
        ConfigurableEnvironment environment = this.prepareEnvironment(listeners, bootstrapContext, applicationArguments);
        this.configureIgnoreBeanInfo(environment);
        // 打印banner
        Banner printedBanner = this.printBanner(environment);
        // 创建应用上下文
        context = this.createApplicationContext();
        context.setApplicationStartup(this.applicationStartup);
        // 准备上下文
        this.prepareContext(bootstrapContext, context, environment, listeners, applicationArguments, printedBanner);
        // 刷新上下文
        this.refreshContext(context);
        // 上下文刷新后的一些操作
        this.afterRefresh(context, applicationArguments);
        // 计算启动时间
        Duration timeTakenToStartup = Duration.ofNanos(System.nanoTime() - startTime);
        if (this.logStartupInfo) {
            (new StartupInfoLogger(this.mainApplicationClass)).logStarted(this.getApplicationLog(), timeTakenToStartup);
        }
        // 通知监听器应用已启动
        listeners.started(context, timeTakenToStartup);
        // 调用Runner
        this.callRunners(context, applicationArguments);
    } catch (Throwable ex) {
        this.handleRunFailure(context, ex, listeners);
        throw new IllegalStateException(ex);
    }

    try {
        // 计算达到就绪状态的时间
        Duration timeTakenToReady = Duration.ofNanos(System.nanoTime() - startTime);
        listeners.ready(context, timeTakenToReady);
        return context;
    } catch (Throwable ex) {
        this.handleRunFailure(context, ex, (SpringApplicationRunListeners)null);
        throw new IllegalStateException(ex);
    }
}
十:内置tomcat的启动原理
1️⃣ 当依赖Spring-boot-starter-web依赖时会在SpringBoot中添加:ServletWebServerFactoryAutoConfiguration servlet容器自动配置类
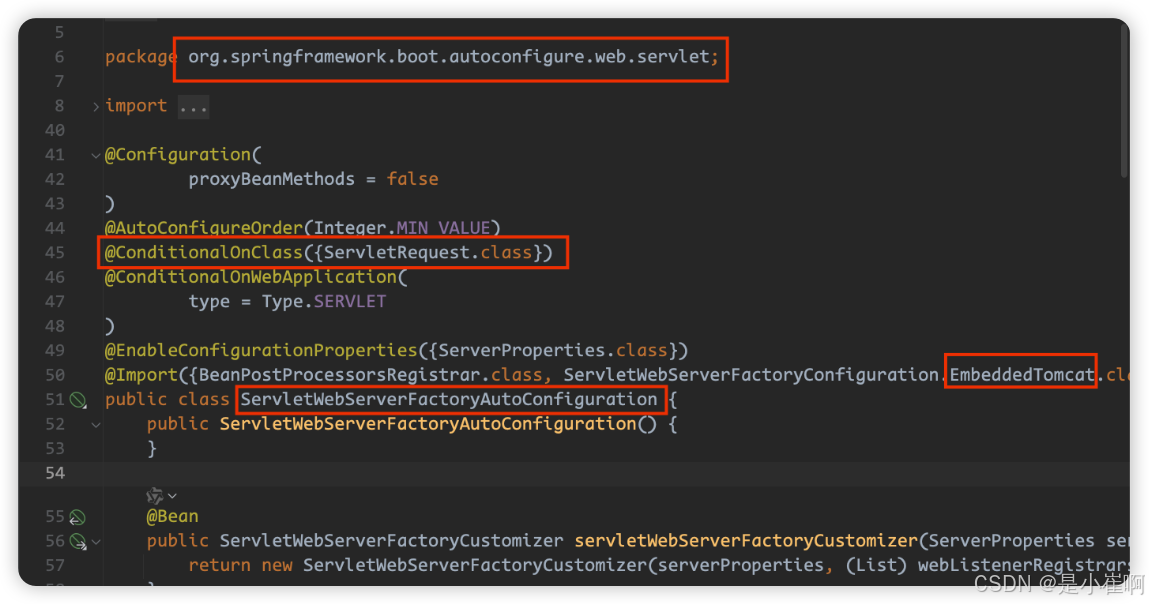
2️⃣ 该自动配置类通过@Import导入了可用(通过@ConditionalOnClass判断决定使用哪一个/的一个Web容器工厂
3️⃣ 在内嵌Tomcat类中配置了一个TomcatServletWebServerFactory的Bean(Web容器工厂)
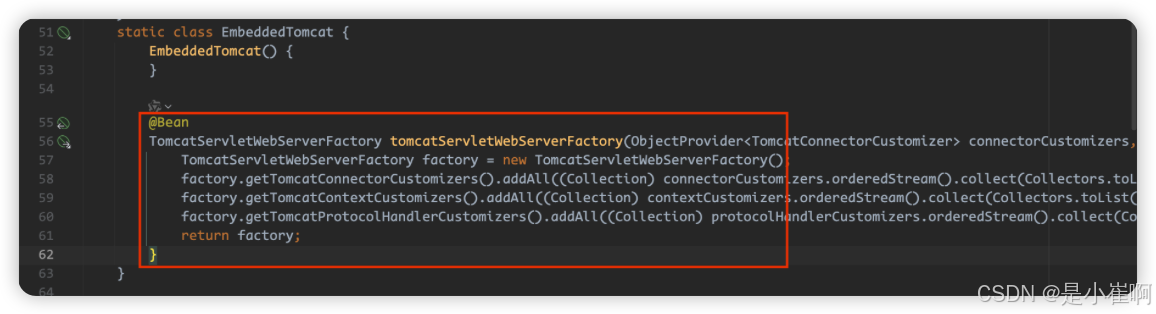
4️⃣ 它会在SpringBoot启动时加载IoC容器, OnRefersh创建内嵌的Tomcat并启动
十一:外部tocmat的启动方式
1:配置成为外部tomcat启动
1️⃣ 更改打包方式为war包
<packaging>war</packaging>
2️⃣ 排除内部tomat依赖
<dependency>
    <groupId>org.springframework.boot</groupId>
    <artifactId>spring-boot-starter-web</artifactId>
    <exclusions>
        <!-- 排除掉内置tomcat -->
        <exclusion>
            <groupId>org.springframework.boot</groupId>
            <artifactId>spring-boot-starter-tomcat</artifactId>
        </exclusion>
    </exclusions>
</dependency>
3️⃣ 编写配置类,让外部的tomcat可以找到main方法
package com.cui.webmodulehello;

import org.springframework.boot.builder.SpringApplicationBuilder;
import org.springframework.boot.web.servlet.support.SpringBootServletInitializer;

/**
 * 外部tomcat启动springboot
 * @author cui haida
 * 2025/4/8
 */
public class TomcatStartSpringBoot extends SpringBootServletInitializer {
    @Override
    protected SpringApplicationBuilder configure(SpringApplicationBuilder builder) {
        // 指定启动类,让外部的tomcat知道要启动哪个类
        return builder.sources(WebModuleHelloApplication.class);
    }
}
4️⃣ 如果要进行扩展,可以使用SPI机制
十二:为什么使用CGLIB作为默认动态代理
cglib相较于JDK动态代理有如下的优势:
- 支持无接口代理 -> 可以对类进行代理,而不仅仅是接口。这意味着即使目标对象没有实现任何接口,Spring AOP仍然可以对其进行代理;而JDK要求目标对象必须实现至少一个接口,否则无法进行代理
- 性能优势 —> 在某些情况下,CGLIB生成的代理类可能比JDK动态代理生成的代理类性能更好。这是因为CGLIB使用字节码操作库(如ASM)直接操作字节码,而JDK动态代理则是基于反射机制
- 功能更加的全面 -> CGLIB支持对类中的私有方法和构造函数进行代理,而JDK动态代理仅限于公共方法
- 默认行为 -> Spring Boot默认使用CGLIB是为了提供更广泛的适用性和灵活性,减少配置复杂性。开发者不需要担心目标对象是否实现了接口,就可以直接使用AOP
🎉 其实核心还是CGLIB不用关心代理类是否实现了接口和可以对私有方法进行代理,至于性能二者不一定谁快谁慢。
什么使用使用JDK动态代理呢?
- 目标对象已实现接口 -> 如果目标对象已经实现了接口,并且不需要代理私有方法或构造函数,使用JDK动态代理可以减少依赖
- 性能敏感的应用 -> 在性能要求极高的场景中,JDK动态代理的反射开销可能比CGLIB的字节码操作更低
- 简单的代理需求 -> 对于简单的AOP需求,JDK动态代理的配置和使用相对简单,易于理解和维护
十三:读取配置文件原理和加载顺序
SpringBoot通过事件监听的方式读取配置文件:ConfigFileApplicationListener
加载顺序优先级从高到低,高优先级的配置覆盖低优先级的配置,所有的配置会形成互补配置。
file:./config/file:./config/{@literal *}/file:./classpath:config/classpath:
十四:如何防止jar的反编译
1️⃣ 引入classfinal插件
<!-- 防止反编译插件 -->
<plugin>
    <groupId>net.roseboy</groupId>
    <artifactId>classfinal-maven-plugin</artifactId>
    <version>1.2.1</version>
    <configuration>
        <password>#</password> <!-- 启动时密码,默认为空,设为#为空 -->
        <packages>${groupId}</packages> <!-- 需要加密的包名,多个用逗号隔开 -->
        <cfgfiles>application.yaml</cfgfiles> <!-- 需要加密的配置文件,多个用逗号隔开 -->
        <libjars></libjars> <!-- jar包lib下需要加密的jar包,多个用逗号隔开 -->
    </configuration>
</plugin>
2️⃣ 打包之后使用加密的jar
3️⃣ 部署的时候通过指定探针启动jar包即可
java -javaragent:xxx.jar -jar xxx.jar
4️⃣ 如果担心这种探针方式会被解密,可以使用java-winter开源项目(https://gitee.com/JustryDeng/class-winter)。增加了代码混淆技术,增加了解密难度
十五:使用AOP优雅打印日志
1️⃣ 定义before注解和around注解
package com.cui.webmodulehello.anno;

import java.lang.annotation.ElementType;
import java.lang.annotation.Retention;
import java.lang.annotation.RetentionPolicy;
import java.lang.annotation.Target;

/**
 * @author cui haida
 * 2025/4/8
 */
@Retention(RetentionPolicy.RUNTIME) // 保留到运行时
@Target(ElementType.METHOD) // 作用位置是method上
public @interface BeforeLog {
}
package com.cui.webmodulehello.anno;

import java.lang.annotation.ElementType;
import java.lang.annotation.Retention;
import java.lang.annotation.RetentionPolicy;
import java.lang.annotation.Target;

/**
 * @author cui haida
 * 2025/4/8
 */
@Retention(RetentionPolicy.RUNTIME) // 保留到运行时
@Target(ElementType.METHOD) // 作用位置是method上
public @interface AroundLog {
}
2️⃣ 增加切面进行日志打印
package com.cui.webmodulehello.aop;

import cn.hutool.json.JSONUtil;
import lombok.extern.slf4j.Slf4j;
import org.aspectj.lang.JoinPoint;
import org.aspectj.lang.ProceedingJoinPoint;
import org.aspectj.lang.annotation.Aspect;
import org.aspectj.lang.annotation.Pointcut;
import org.springframework.stereotype.Component;
import org.springframework.web.context.request.RequestContextHolder;
import org.springframework.web.context.request.ServletRequestAttributes;
import org.springframework.web.multipart.MultipartFile;

import javax.servlet.http.HttpServletRequest;
import javax.servlet.http.HttpServletResponse;
import java.util.Arrays;
import java.util.List;
import java.util.stream.Collectors;

/**
 * @author cui haida
 * 2025/4/8
 */
@Slf4j
@Component
@Aspect
public class LogAspect {

    @Pointcut("@annotation(com.cui.webmodulehello.anno.BeforeLog)")
    public void beforePointcut(JoinPoint joinPoint) {
        try {
            addLog(joinPoint, "", 0);
        } catch (Exception e) {
            log.error("before log记录失败,原因是:", e);
        }
    }


    @Pointcut("@annotation(com.cui.webmodulehello.anno.AroundLog)")
    public Object aroundPointcut(ProceedingJoinPoint joinPoint) throws Throwable {
        Object[] args = joinPoint.getArgs();
        Object result;
        try {
            long start = System.currentTimeMillis();
            result = joinPoint.proceed(args);
            long end = System.currentTimeMillis();
            long time = end - start;
            addLog(joinPoint, JSONUtil.toJsonStr(result), time);
        } catch (Exception e) {
            log.error("around log记录失败,原因是:", e);
            throw e;
        }
        return result;
    }


    /**
     * 添加日志
     *
     * @param joinPoint  切点信息
     * @param outParam 格外参数说明
     * @param time 运行时间
     */
    public void addLog(JoinPoint joinPoint, String outParam, long time) {
        // 拿到http请求信息
        ServletRequestAttributes attributes = (ServletRequestAttributes) RequestContextHolder.getRequestAttributes();
        HttpServletRequest request = attributes.getRequest();

        log.info("\n\r==========================\n\r" +
                "请求地址: {} \n\r" +
                "请求方式:{} \n\r" +
                "请求类方法:{} \n\r" +
                "请求方法参数:{} \n\r" +
                "返回报文:{} \n\r" +
                "处理耗时:{}ms \n\r" +
                "==========================\n\r",
                request.getRequestURI(),
                request.getMethod(),
                joinPoint.getSignature(),
                JSONUtil.toJsonStr(filterArgs(joinPoint.getArgs())),
                outParam,
                time
        );
    }

    private List<Object> filterArgs(Object[] args) {
        return Arrays.stream(args).filter(param -> !(param instanceof MultipartFile)
                && !(param instanceof HttpServletRequest)
                && !(param instanceof HttpServletResponse)
        ).collect(Collectors.toList());
    }
}
3️⃣ 然后在方法写入@BeforeLog & @AroundLog即可
如果线上要求精细化配置,可以进行白名单方式设置
1️⃣ 在配置文件中配置白名单,配置那些接口需要进行日志打印
log:
	whitelist:
	 	- /user/** # 假设只有user的接口才进行日志打印
2️⃣ 修改切入的类是所有的类
@Autowired
private LogProperties logProperties;

private AntPathMatcher pathmatcher = new AntPathMatcher();

@Before("execution(* com.cui.webmodulehello.controller..*(..))")
public void doBefore(JoinPoint joinPoint) {
    // 拿到http请求信息
    ServletRequestAttributes attributes = (ServletRequestAttributes) RequestContextHolder.getRequestAttributes();
    HttpServletRequest request = attributes.getRequest();

    String url = request.getRequestURI();

    if (shouldLog(url)) {
        addLog(joinPoint, "", 0);
    }
}

// 白名单的放行
public boolean shouldLog(String url) {
    return logProperties.getWhitelist.stream().anymatch(pa -> pa.match(url));
}
十六:SpringBoot线程池完成百万数据存储
1️⃣ 定义线程池
package com.cui.webmodulehello.configure;

import org.springframework.context.annotation.Bean;
import org.springframework.context.annotation.Configuration;
import org.springframework.scheduling.concurrent.ThreadPoolTaskExecutor;

import java.util.concurrent.ThreadPoolExecutor;

/**
 * @author cui haida
 * 2025/4/8
 */
@Configuration
public class ThreadPollConfig {
    @Bean("asyncThreadPool")
    public ThreadPoolTaskExecutor asyncThreadPool() {
        ThreadPoolTaskExecutor threadPoolTaskExecutor = new ThreadPoolTaskExecutor();
        // 核心线程数,最大线程数,队列容量,线程前缀,拒绝策略
        threadPoolTaskExecutor.setCorePoolSize(10);
        threadPoolTaskExecutor.setMaxPoolSize(20);
        threadPoolTaskExecutor.setQueueCapacity(100);
        threadPoolTaskExecutor.setThreadNamePrefix("async-thread-");
        threadPoolTaskExecutor.setRejectedExecutionHandler(new ThreadPoolExecutor.AbortPolicy());
        // 初始化
        threadPoolTaskExecutor.initialize();
        return threadPoolTaskExecutor;
    }
}
2️⃣ 编写一个支持异步的saveAll方法
@Override
@Async("asyncThreadPool")
public void saveAll(List<Customer> list, CountDownLatch countDownLatch) {
    try {
        repository.saveAll(list);
    } finally {
        countDownLatch.countDown(); // 表示当前轮执行结束,门拴打开
    }
}
3️⃣ 对百万数据进行分割,分成100份,然后并行调用saveAll, 通过CountDownLatch控制防止主线程结束
List<Customer> list = new ArrayList<>();
for (int i = 0; i < 1000000; i++) {
    list.add(new Consumer("zhangsan" + i, 18, "内蒙古赤峰市"));
}

List<List<Customer>> lists = ListUtil.partition(list, 10000); // 分割,每份10000个,分成100份

CountDownLatch countDownLatch = new CountDownLatch(lists.size()); // 创建100个门拴

for (List<Customer> cus : lists) {
    customerServices.saveAll(cus, countDownLatch);
}

try {
    countDownLatch.awiat(); // 主线程阻塞,等待所有的门拴开放才能向下执行
}


 被折叠的 条评论
为什么被折叠?
被折叠的 条评论
为什么被折叠?
 到【灌水乐园】发言


