


3.Linux网络管理
3.1.查看网络配置(ip命令)
3.1.1.查看网卡信息
示例:
# 查看网络设备清单
[root@centos7 ~]# ip -br link
lo               UNKNOWN        00:00:00:00:00:00 <LOOPBACK,UP,LOWER_UP>
ens32            UP             00:0c:29:38:6d:bd <BROADCAST,MULTICAST,UP,LOWER_UP>
virbr0           DOWN           52:54:00:0f:b0:ac <NO-CARRIER,BROADCAST,MULTICAST,UP>
virbr0-nic       DOWN           52:54:00:0f:b0:ac <BROADCAST,MULTICAST>
... ...

# 查看单个网络设备信息
[root@centos7 ~]# ip link show ens32
2: ens32: <BROADCAST,MULTICAST,UP,LOWER_UP> mtu 1500 qdisc pfifo_fast state UP mode DEFAULT group default qlen 1000
    link/ether 00:0c:29:38:6d:bd brd ff:ff:ff:ff:ff:ff
3.1.2.查看IP地址
示例:
[root@centos7 ~]# ip -br a
lo               UNKNOWN        127.0.0.1/8 ::1/128
ens32            UP             10.1.8.10/24 fe80::6763:8ca5:3559:2caa/64
virbr0           DOWN           192.168.122.1/24
virbr0-nic       DOWN

[root@centos7 ~]# ip addr show ens32
2: ens32: <BROADCAST,MULTICAST,UP,LOWER_UP> mtu 1500 qdisc pfifo_fast state UP group default qlen 1000
    link/ether 00:0c:29:38:6d:bd brd ff:ff:ff:ff:ff:ff
    inet 10.1.8.10/24 brd 10.1.8.255 scope global noprefixroute ens32
       valid_lft forever preferred_lft forever
    inet6 fe80::6763:8ca5:3559:2caa/64 scope link noprefixroute
       valid_lft forever preferred_lft forever
3.1.3.查看路由
示例:
[root@centos7 ~]# ip route
default via 10.1.8.2 dev ens32 proto static metric 100
10.1.8.0/24 dev ens32 proto kernel scope link src 10.1.8.10 metric 100
192.168.122.0/24 dev virbr0 proto kernel scope link src 192.168.122.1

# 还可以使用以下命令
[root@centos7 ~]# route -n
或者
[root@centos7 ~]# netstat -nr
Kernel IP routing table
Destination     Gateway         Genmask         Flags Metric Ref    Use Iface
0.0.0.0         10.1.8.2        0.0.0.0         UG    100    0        0 ens32
10.1.8.0        0.0.0.0         255.255.255.0   U     100    0        0 ens32
192.168.122.0   0.0.0.0         255.255.255.0   U     0      0        0 virbr0
(注:default代表默认网关)
3.1.4.查看DNS
示例:
/etc/resolv.conf 文件中nameserver指明服务想哪个DNS服务器查询域名对应IP。
[root@centos7 ~]# cat /etc/resolv.conf
# Generated by NetworkManager
search laoma.cloud
nameserver 223.5.5.5
nameserver 223.6.6.6
3.2.网络连通性测试
3.2.1.ping测试
示例:
# ping 测试,选项-c控制ping次数,选项-w控制ping超时时间
[root@centos7 ~]# ping baidu.com -c 4 -w 2
PING baidu.com (110.242.68.66) 56(84) bytes of data.
64 bytes from 110.242.68.66 (110.242.68.66): icmp_seq=1 ttl=128 time=34.1 ms
64 bytes from 110.242.68.66 (110.242.68.66): icmp_seq=2 ttl=128 time=31.9 ms
64 bytes from 110.242.68.66 (110.242.68.66): icmp_seq=3 ttl=128 time=32.9 ms
64 bytes from 110.242.68.66 (110.242.68.66): icmp_seq=4 ttl=128 time=32.2 ms

--- baidu.com ping statistics ---
4 packets transmitted, 4 received, 0% packet loss, time 3006ms
rtt min/avg/max/mdev = 31.985/32.808/34.118/0.839 ms

# 说明:
# 1- 能够解析出ip 说明DNS配置正确
# 2- 能ping 通说明我们的网关配置正确
3.2.2.mtr路由跟踪
示例:
# ping 主机不通,此时跟踪路由,查看数据最远到达的位置
[root@centos7 ~]# mtr -n 1.1.1.1
3.2.3.ss查看网络套接字
示例:
查看系统中的网络服务的相关信息:
[root@server ~]# vim /etc/services
...
ftp-data        20/tcp
ftp-data        20/udp
# 21 is registered to ftp, but also used by fsp
ftp             21/tcp
ftp             21/udp          fsp fspd
ssh             22/tcp                          # The Secure Shell (SSH) Protocol
ssh             22/udp                          # The Secure Shell (SSH) Protocol
telnet          23/tcp
telnet          23/udp
...
domain          53/tcp                          # name-domain server
domain          53/udp
...
http            80/tcp          www www-http    # WorldWideWeb HTTP
http            80/udp          www www-http    # HyperText Transfer Protocol
...
https           443/tcp                         # http protocol over TLS/SSL
https           443/udp                         # http protocol over TLS/SSL
...
用ss 命令查看系统中网络状态信息:
# 默认显示是 ESTAB 状态
[root@server ~]# ss | grep :ssh
tcp   ESTAB  0      0         10.1.8.10:ssh             10.1.8.1:60081
tcp   ESTAB  0      36        10.1.8.10:ssh             10.1.8.1:60229

# 只看 LISTEN,包含IPv4和IPv6
[root@server ~]# ss -l |grep :ssh
tcp   LISTEN 0      128         0.0.0.0:ssh                       0.0.0.0:*
tcp   LISTEN 0      128            [::]:ssh                          [::]:*

# 查看 ipv4 所有(LISTEN和ESTAB)网络状态
[root@server ~]# ss -a4|grep :ssh
tcp   LISTEN 0      128           0.0.0.0:ssh                   0.0.0.0:*
tcp   ESTAB  0      0           10.1.8.10:ssh                  10.1.8.1:60081
tcp   ESTAB  0      36          10.1.8.10:ssh                  10.1.8.1:60229

# -n 将服务的名称显示为数字
[root@server ~]# ss -an4|grep :22
tcp   LISTEN 0      128           0.0.0.0:22           0.0.0.0:*
tcp   ESTAB  0      0           10.1.8.10:22          10.1.8.1:60081
tcp   ESTAB  0      36          10.1.8.10:22          10.1.8.1:60229

# -p 显示相应的进程
[root@server ~]# ss -lnp4|grep :22
tcp   LISTEN 0      128           0.0.0.0:22         0.0.0.0:*    users:(("sshd",pid=3186,fd=3)
3.3.配置网络连接
网络配置是由 NetworkManager 服务管理的,请确保该服务开机自启。
3.3.1.环境准备
-
虚拟机新增加一个NAT网卡。
-
自动获取的前提条件是直连的网络中有dhcp服务器。
对于 vmware workstations:
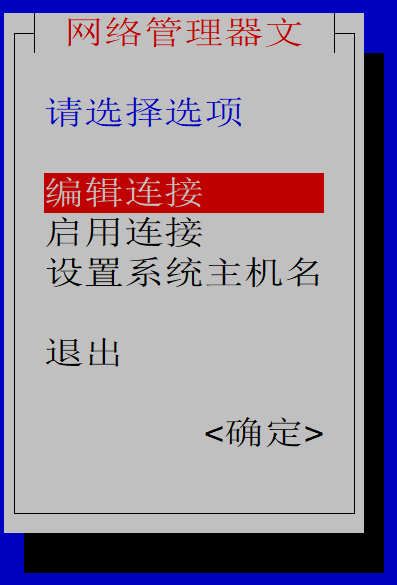
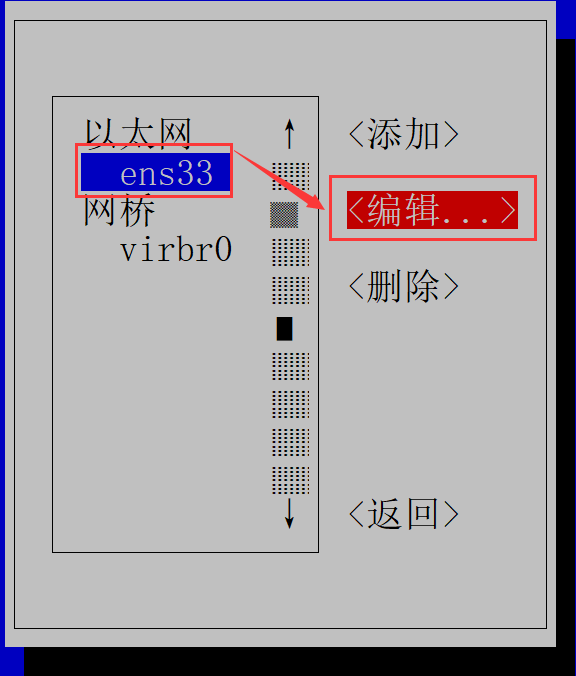
3.3.2.nmtui图形化工具
示例:
自动配置IP
# 服务器配置
[root@centos7 ~]# nmtui
使用上下键、tab进行移动,回车选中条目。
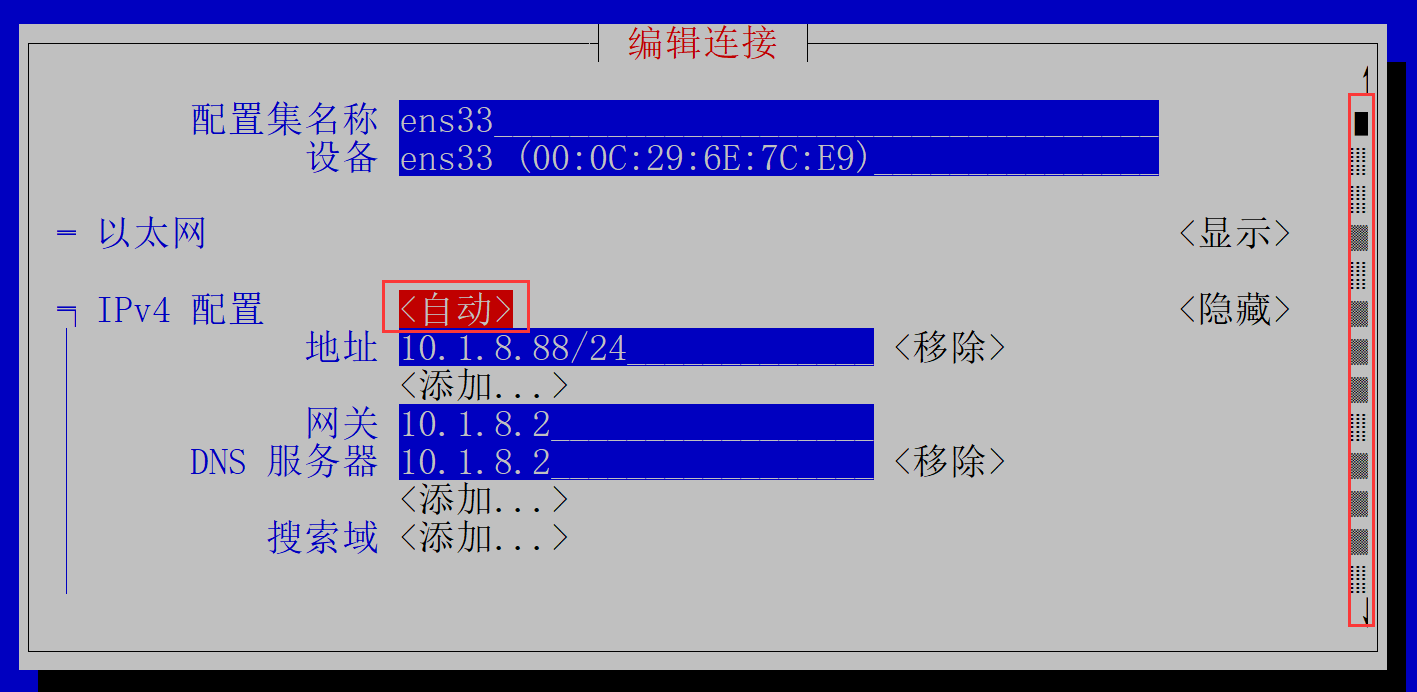
使用方向键,下移到最下面
返回
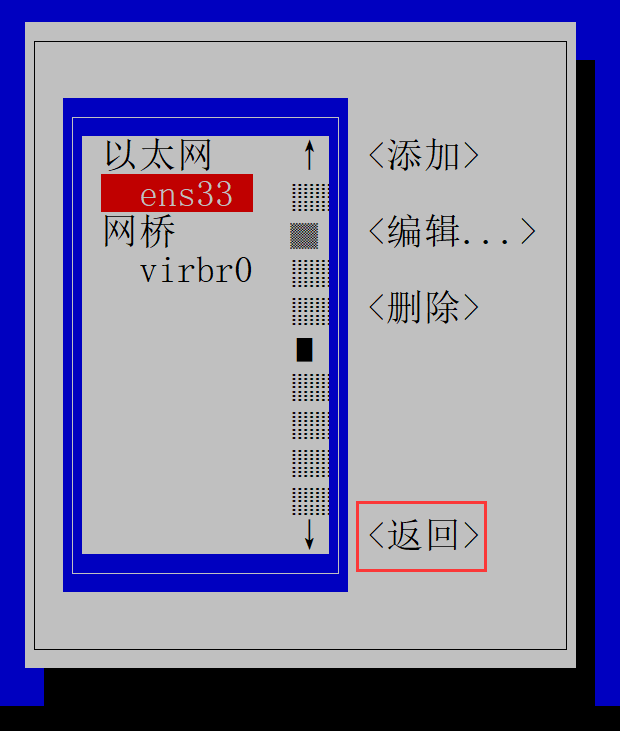

更改完成后,选择启用连接,重新激活ens192。
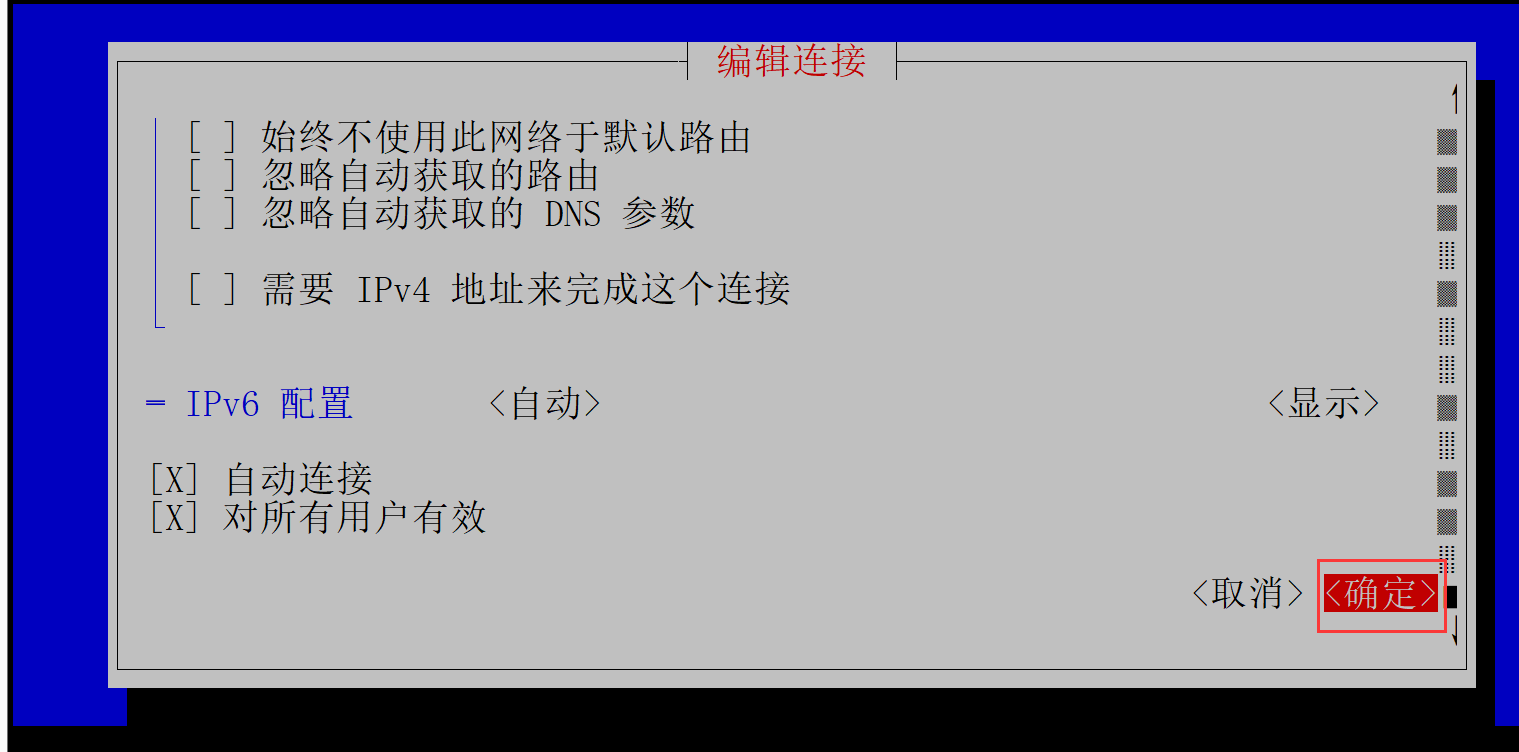
手动配置IP
部分截图
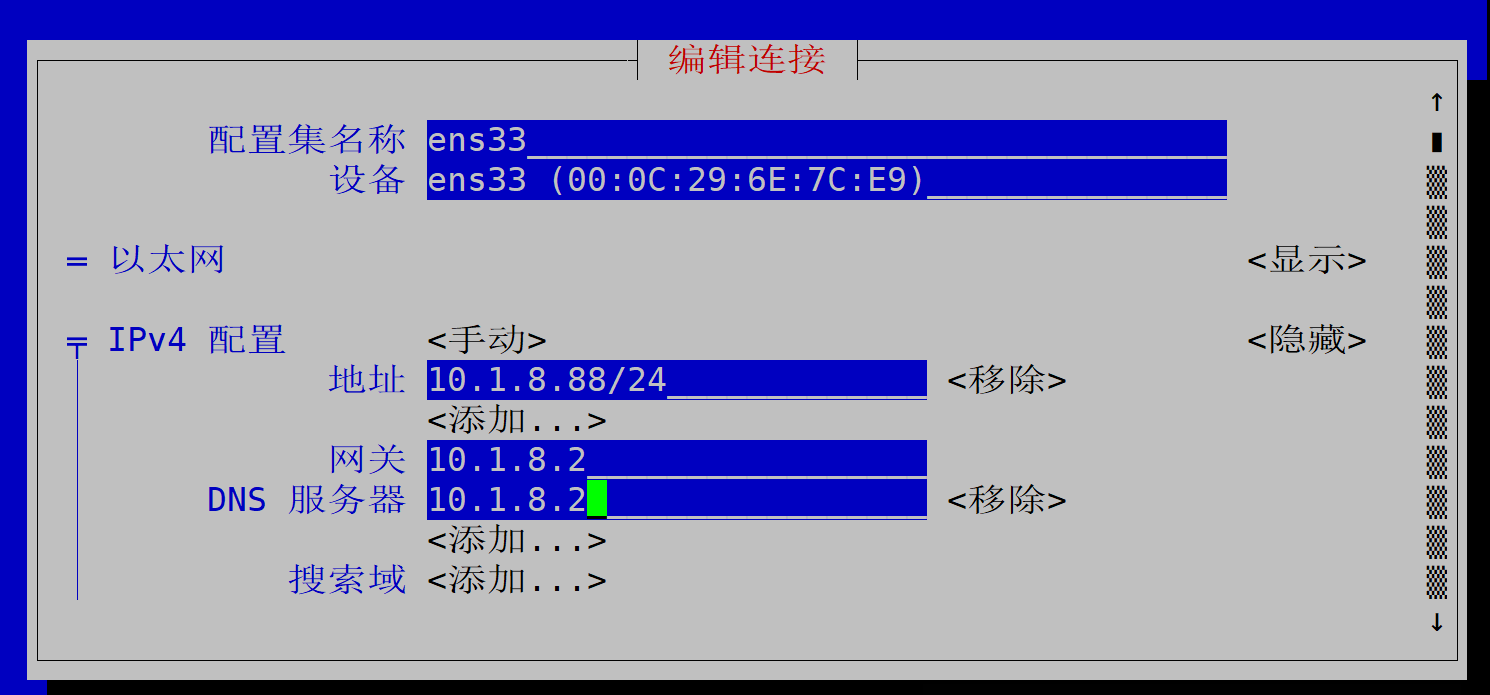
更改完成后,重新激活ens192。
3.3.3.nmcli命令行工具
示例:
网络启停
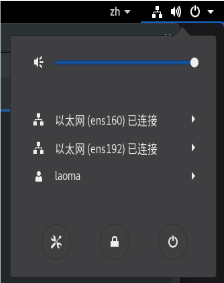
如果网络停用,右上角网络链接图标消失。图形化界面效果如下:
消失前 消失后

# 停用网络,并不会停止 NetworkManager 服务。
[root@server ~]# nmcli networking off
# 网卡状态变化:activated -> deactivating -> disconnected -> unmanaged -> unavailable

# 启用网络
[root@server ~]# nmcli networking on
# 网卡状态变化:unavailable -> disconnected -> auto-activating
设备控制
- DEVICE,是设备,也就是网卡。
- CONNECTION,是连接,也就是网卡的配置。
一个 DEVICE 可以有多个配置,同一时刻只能激活一个配置。
# 显示设备列表状态信息
[root@server ~]# nmcli device
DEVICE  TYPE      STATE   CONNECTION
ens160  ethernet  已连接   ens160
ens192  ethernet  已连接   ens192
virbr0  bridge    未托管   --
lo      loopback  未托管   --

# 断开设备链接
[root@server ~]# nmcli device disconnect ens192
成功断开设备 "ens192"。
[root@server ~]# nmcli device
DEVICE  TYPE      STATE   CONNECTION
ens160  ethernet  已连接  ens160
ens192  ethernet  已断开  --
virbr0  bridge    未托管  --
lo      loopback  未托管  --

# 连接设备
[root@server ~]# nmcli device connect ens192
成功用 "ens1920f5eac2c-9a92-494e-9cca-f97230d2314a" 激活了设备 ""。
[root@server ~]# nmcli device
DEVICE  TYPE      STATE   CONNECTION
ens160  ethernet  已连接  ens160
ens192  ethernet  已连接  ens192
virbr0  bridge    未托管  --
lo      loopback  未托管  --

# 显示特定设备详细信息
[root@server ~]# nmcli device show ens192
GENERAL.DEVICE:                         ens192
GENERAL.TYPE:                           ethernet
GENERAL.HWADDR:                         00:0C:29:08:CF:C7
GENERAL.MTU:                            1500
GENERAL.STATE:                          100(已连接)
GENERAL.CONNECTION:                     ens192
GENERAL.CON-PATH:                       /org/freedesktop/NetworkManager/ActiveConnection/15
WIRED-PROPERTIES.CARRIER:               开
IP4.ADDRESS[1]:                         10.1.8.10/24
IP4.GATEWAY:                            10.1.8.2
IP4.ROUTE[1]:                           dst = 10.1.8.0/24, nh = 0.0.0.0, mt = 101
IP4.ROUTE[2]:                           dst = 0.0.0.0/0, nh = 10.1.8.2, mt = 101
IP4.DNS[1]:                             223.5.5.5
IP4.DNS[2]:                             114.114.114.114
IP6.ADDRESS[1]:                         fe80::20c:29ff:fe08:cfc7/64
IP6.GATEWAY:                            --
IP6.ROUTE[1]:                           dst = fe80::/64, nh = ::, mt = 256
动态获取
# 查看connection清单
[root@server ~]# nmcli connection
NAME    UUID                                  TYPE      DEVICE
ens160  5f61d96b-a284-41e9-9bf6-5cf3de6250cd  ethernet  ens160
ens192  0f5eac2c-9a92-494e-9cca-f97230d2314a  ethernet  ens192

# 删除连接
[root@server ~]# nmcli connection delete ens192
成功删除连接 "ens192" (0f5eac2c-9a92-494e-9cca-f97230d2314a)。
[root@server ~]# nmcli connection
NAME    UUID                                  TYPE      DEVICE
ens160  5f61d96b-a284-41e9-9bf6-5cf3de6250cd  ethernet  ens160

# 添加配置网卡配置,模式是自动获取IP地址
[root@serv
连接 "ens192-dynamic" (27d7dd0a-a5d1-4ed8-81ad-1051f89f89d1) 已成功添加。

[root@server ~]# nmcli connection show
NAME            UUID                                  TYPE      DEVICE
ens160          5f61d96b-a284-41e9-9bf6-5cf3de6250cd  ethernet  ens160
ens192-dynamic  27d7dd0a-a5d1-4ed8-81ad-1051f89f89d1  ethernet  ens192

[root@server ~]# nmcli connection show ens192-dynamic
connection.id:                          ens192-dynamic
connection.uuid:                        27d7dd0a-a5d1-4ed8-81ad-1051f89f89d1
connection.stable-id:                   --
connection.type:                        802-3-ethernet
connection.interface-name:              ens192
...
ipv4.method:                            auto
...
ipv6.method:                            auto
...

# 修改配置指定获取IP方式
[root@server ~]# nmcli connection modify ens192-dynamic ipv4.method auto

# 激活配置
[root@server ~]# nmcli connection up ens192-dynamic
连接已成功激活(D-Bus 活动路径:/org/freedesktop/NetworkManager/ActiveConnection/18)
静态配置
# 添加一个静态配置的连接
[root@server ~]# nmcli connection add type ethernet ifname ens192 con-name ens192-static ipv4.method manual ipv4.addresses 10.1.8.10/24
连接 "ens192-static" (652c8436-ac91-4697-b4ad-43d8dac83f8f) 已成功添加。

# 修改 ipv4 相关属性
[root@server ~]# nmcli connection modify ens192-static ipv4.gateway 10.1.8.2 ipv4.dns 10.1.8.2

# 激活连接
[root@server ~]# nmcli connection up ens192-static
连接已成功激活(D-Bus 活动路径:/org/freedesktop/NetworkManager/ActiveConnection/19)

# 查看状态
[root@server ~]# nmcli connection
NAME             UUID                                  TYPE      DEVICE
ens160           5f61d96b-a284-41e9-9bf6-5cf3de6250cd  ethernet  ens160
ens192-static    652c8436-ac91-4697-b4ad-43d8dac83f8f  ethernet  ens192
ens192-dynamic   27d7dd0a-a5d1-4ed8-81ad-1051f89f89d1  ethernet  --
其他操作
# 停用连接
[root@server ~]# nmcli connection down ens192-static
成功停用连接 "ens192-static"(D-Bus 活动路径:/org/freedesktop/NetworkManager/ActiveConnection/20)

[root@server ~]# nmcli connection show
NAME             UUID                                  TYPE      DEVICE
ens160           5f61d96b-a284-41e9-9bf6-5cf3de6250cd  ethernet  ens160
ens192-dynamic   27d7dd0a-a5d1-4ed8-81ad-1051f89f89d1  ethernet  ens192
ens192-static    652c8436-ac91-4697-b4ad-43d8dac83f8f  ethernet  --

# 根据需要配置路由
[root@server ~]# nmcli connection modify ens192-static ipv4.routes "192.168.50.0/24 10.1.8.2"
3.4.配置主机名和名称解析
3.4.1配置主机名:
示例:
主机名规范:短名称+域名,例如centos7.bao.cloud。主机名是centos7,域名是bao.cloud。
# 查看主机名
[root@centos7 ~]# hostname
centos7.laoma.cloud

# hostnamectl命令修改主机名同时会同修改配置文件/etc/hostname
[root@centos7 ~]# hostnamectl set-hostname centos7.laoma.cloud
# 或者直接修改配置文件
[root@centos7 ~]# vim /etc/hostname
centos7.laoma.cloud

# 重启依然有效
[root@centos7 ~]# reboot

# hostname命令设置的主机名,重启将失效。
3.4.2.配置名称解析
示例:
当访问其他主机的时候,名称也会映射为IP地址,与目标主机通信。
linux服务器解析名称顺序如下:
- /etc/hosts 文件
- DNS 服务器
配置 /etc/hosts
[root@centos7 ~]# vim /etc/hosts
127.0.0.1   localhost localhost.localdomain localhost4 localhost4.localdomain4
::1         localhost localhost.localdomain localhost6 localhost6.localdomain6

10.1.8.10   centos7.bao.cloud centos7 abc haha

[root@centos7 ~]# ping -c2 centos7
PING centos7.bao.cloud (10.1.8.10) 56(84) bytes of data.
64 bytes from centos7.bao.cloud (10.1.8.10): icmp_seq=1 ttl=64 time=0.024 ms
64 bytes from centos7.bao.cloud (10.1.8.10): icmp_seq=2 ttl=64 time=0.054 ms

--- centos7.bao.cloud ping statistics ---
2 packets transmitted, 2 received, 0% packet loss, time 1023ms
rtt min/avg/max/mdev = 0.024/0.039/0.054/0.015 ms

[root@centos7 ~]# ping -c2 abc
PING centos7.bao.cloud (10.1.8.10) 56(84) bytes of data.
64 bytes from centos7.bao.cloud (10.1.8.10): icmp_seq=1 ttl=64 time=0.026 ms
64 bytes from centos7.bao.cloud (10.1.8.10): icmp_seq=2 ttl=64 time=0.043 ms

--- centos7.bao.cloud ping statistics ---
2 packets transmitted, 2 received, 0% packet loss, time 1034ms
rtt min/avg/max/mdev = 0.026/0.034/0.043/0.010 ms

[root@centos7 ~]# ping rocky9
ping: rocky9: 未知的名称或服务
配置 DNS 服务器
# 删除 DNS 服务器配置
[root@centos7 ~]# nmcli connection modify ens160 -ipv4.dns 223.5.5.5
[root@centos7 ~]# nmcli connection up ens160

# 断开另外一个网卡
[root@centos7 ~]# nmcli device disconnect ens192

# 确保以下文件中没有 nameserver 记录
[root@centos7 ~]# cat /etc/resolv.conf
# Generated by NetworkManager
search bao.cloud

[root@centos7 ~]# ping baidu.com
ping: baidu.com: 未知的名称或服务

# 配置DNS服务器,再验证
[root@centos7 ~]# nmcli connection modify ens160 ipv4.dns 223.5.5.5
[root@centos7 ~]# nmcli connection up ens160
连接已成功激活(D-Bus 活动路径:/org/freedesktop/NetworkManager/ActiveConnection/24)
[root@centos7 ~]# cat /etc/resolv.conf
# Generated by NetworkManager
search bao.cloud
nameserver 223.5.5.5

# ping公网服务器,通过 dns 服务器获取地址
[root@centos7 ~]# ping -c2 baidu.com
PING baidu.com (110.242.68.66) 56(84) bytes of data.
64 bytes from 110.242.68.66 (110.242.68.66): icmp_seq=1 ttl=128 time=35.5 ms
64 bytes from 110.242.68.66 (110.242.68.66): icmp_seq=2 ttl=128 time=34.6 ms

--- baidu.com ping statistics ---
2 packets transmitted, 2 received, 0% packet loss, time 1002ms
rtt min/avg/max/mdev = 34.667/35.115/35.563/0.448 ms

[root@centos7 ~]# ping -c2 www.baidu.com
PING www.a.shifen.com (180.101.50.242) 56(84) bytes of data.
64 bytes from 180.101.50.242 (180.101.50.242): icmp_seq=1 ttl=128 time=3.15 ms
64 bytes from 180.101.50.242 (180.101.50.242): icmp_seq=2 ttl=128 time=3.19 ms

--- www.a.shifen.com ping statistics ---
2 packets transmitted, 2 received, 0% packet loss, time 1002ms
rtt min/avg/max/mdev = 3.149/3.167/3.185/0.018 ms

# baidu.com 域中没有 hello 该主机,所以 找不到该主机
[root@centos7 ~]# ping hello.baidu.com
ping: hello.baidu.com: 未知的名称或服务


 1551
1551

 被折叠的 条评论
为什么被折叠?
被折叠的 条评论
为什么被折叠?
 到【灌水乐园】发言


