


Spring的简单总结
1.介绍
(1)官网:https://spring.io
(2)githup 源码: https://github.com/spring-projects/spring-framework/wiki/Spring-Framework-Versions
(3)下载: https://repo.spring.io/release/org/springframework/spring/
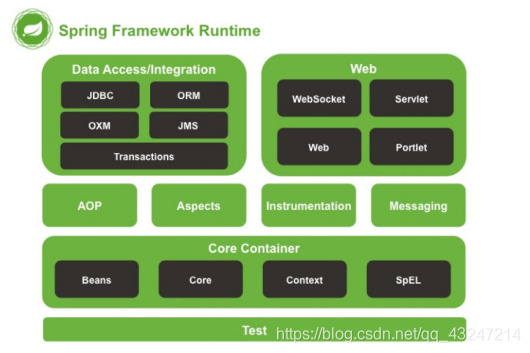
(4)spring体系
(6)特征
① 方便解耦,简化开发
② AOP编程的支持
③ 声明式事务的支持
④ 方便程序的测试
⑤ 方便集成各种优秀框架
⑥ 降低Java EE API的使用难度
⑦ Java 源码是经典学习范例
2.入门
(1)环境搭建:添加maven依赖
<dependency>
<groupId>org.springframework</groupId>
<artifactId>spring-context</artifactId>
<version>5.2.1.RELEASE</version>
</dependency>
(2)配置文件 配置bean.xml
<?xml version="1.0" encoding="UTF-8"?>
<beans xmlns="http://www.springframework.org/schema/beans"
       xmlns:xsi="http://www.w3.org/2001/XMLSchema-instance"
       xsi:schemaLocation="http://www.springframework.org/schema/beans
        https://www.springframework.org/schema/beans/spring-beans.xsd">


    <bean id="user" class="com.srzx.spring.entity.User"></bean>

</beans>
(3)获得对象
public static void main(String[] args) {

        ApplicationContext context = new ClassPathXmlApplicationContext("bean.xml");

        User u1 = (User)context.getBean("user");
        System.out.println("u1 = " + u1);

        User u2 = context.getBean("user",User.class);
        System.out.println("u2 = " + u2);

    }
3.两大核心
(1)IOC控制反转
① BeanFactory
ApplicationContext
ClassPathXmlApplicationContext
FileSystemXmlApplicationContext
AnnotationConfigApplicationContext
② 配置bean.xml
1)创建bean的方式
a.采用默认构造函数:
<bean id=” 类名” class=”类全名 ”></bean>
b.使用某个类的成员方法:
<bean id=”factory” class=”Factory ”></bean>
<bean id=”user” factory-bean=”factory ” factory-method=”getInstance></bean>
c.使用某个类的静态方法:
<bean id=”user” class=”factory” factory-method=”getInstance></bean>
2)bean的作用范围 scope
a.单例:singleton
b.多例:prototype
c.web的一次请求:request
d.web的一次会话:session
e.集群会话:global-session
3)bean的生命周期
a.单例:与容器同在
b.多例:用时出现,垃圾回收
③ DI依赖注入
1)基于构造器的注入
 <bean id="user" class="User" >
    		<constructor-arg name="name" value="赵六"></constructor-arg>
 </bean>
2)使用set方法注入
 <bean id="user" class="User" >
    		<property name="name" value="王五"></property>
 </bean>
3)负责对象注入
<bean id="people1" class="com.feicuiedu.demo.entity.People" >
    		<property name="name" value="张三"></property>
    		<property name="phone">
    				<bean id="phone1" class="com.feicuiedu.demo.entity.MobilePhone">
    						<property name="name" value="小米6X"></property>
    						<property name="price" value="1599"></property>
    				</bean>
    		</property>
</bean>
4)输入集合
5)自动注入:属性注入
(2)AOP面向切面编程
① 应用
1)日志记录
2)事务管理
3)权限限制
4)方法增强
② 代理
1)静态代理
2)动态代理
a.特点:用时创建加载
b.作用:不修改源代码,对原方法增强
c.分类:
a)基于接口:JDK的Proxy.newProxyInstance(被代理的ClassLoader,代理和被代理对象相同的接口Class[],增强的代码InvocationHandler),被代理类至少实现一个接口
b)基于子类:导入cglib(+asm),被代理类不能使用最终类,Enhancer.create(被代理对象的Class,new MethodInterceptor()的Callback)。
③ 术语
1)连接点Joinpoint(拦截到的方法,可能被增强的方法)
2)切入点Pointcut(哪些连接点进行拦截被增强的方法)
3)通知(增强)Advice(拦截后的操作)
a.前置通知:原方法之前
b.后置通知:原方法之后
c.异常通知:catch块
d.最终通知:finally块
e.环绕通知:整个方法的覆盖
4)引介Introduction:特殊的通知
5)目标对象:被代理对象
6)植入Weaving:把增强应用到目标对象的过程
7)代理Proxy:代理类
8)切面Aspect:切入点和通知的结合
④ 配置
1)导入jar包:aspectjweaver,支持切入点表达式
2)基于xml:bean.xml
<?xml version="1.0" encoding="UTF-8"?>
<beans xmlns="http://www.springframework.org/schema/beans"
    xmlns:xsi="http://www.w3.org/2001/XMLSchema-instance"
    xmlns:aop="http://www.springframework.org/schema/aop"
    xsi:schemaLocation="http://www.springframework.org/schema/beans
        https://www.springframework.org/schema/beans/spring-beans.xsd
        http://www.springframework.org/schema/aop
        https://www.springframework.org/schema/aop/spring-aop.xsd">

</beans>
a.配置代理对象(通知)的bean
<aop:config>开始配置AOP
     <aop:aspect id="切面id" ref="代理对象id">配置切面
           <aop:before method="代理对象的前置通知方法" pointcut="切入点表达式"></aop:before>配置前置通知
      </aop:aspect>
</aop:config>
b.切入点表达式
a)execution(访问修饰符 返回值 包名.包名.类名.方法名(参数名))
b)全部配置:* ….(…)
c)访问修饰符可以省略
d)返回值代表任意类型
e)包名有几层就写几个*,…代表当前包及子包
f)类名,方法名*
g)参数名*任意类型,不能省略(基本类型直接写,引用类型写类全名,…代表任意可以省略)
c.<aop:pointcut id=“切点id” expression=“表达式”>:在切面之前或在切面里配置
3)基于注解
a.bean.xml
<?xml version="1.0" encoding="UTF-8"?>
<beans xmlns="http://www.springframework.org/schema/beans"
    xmlns:xsi="http://www.w3.org/2001/XMLSchema-instance"
    xmlns:aop="http://www.springframework.org/schema/aop"
 xmlns:context="http://www.springframework.org/schema/context"
    xsi:schemaLocation="http://www.springframework.org/schema/beans
        https://www.springframework.org/schema/beans/spring-beans.xsd
        http://www.springframework.org/schema/aop
        https://www.springframework.org/schema/aop/spring-aop.xsd
   http://www.springframework.org/schema/context
        https://www.springframework.org/schema/context/spring-context.xsd">

<!--扫包-->
<context:component-scan base-package=""/>

<!--开启注解配置AOP-->
<aop:aspectj-autoproxy/>

</beans>
</beans>
b.切面:@Aspect
c.前置通知:@Before
d.后置通知:AfterReturning
e.异常通知:AfterThrowing
f.最终通知:After
g.环绕通知:Around
h.切入点:@Pointcut()@Pointcut(“execution(* ….*(…))”),private void pt1(){}
i.@EnableAspectJAutoProxy
4.spring-test
(1)spring整合Junit
@RunWith(SpringJUnit4ClassRunner.class)
@ContextConfiguration(classes = SpringConfig.class)
//@ContextConfiguration(locations = "classpath:bean.xml")
public class TestSpringTest {
    @Autowired
    AdminDaoInte adminDaoInte;
    @Test
    public void test01(){
        adminDaoInte.show("abc");
    }
}
(2)导入spring-test的maven依赖
 <dependency>
            <groupId>org.springframework</groupId>
            <artifactId>spring-test</artifactId>
            <version>5.2.1.RELEASE</version>
  </dependency>
(3)将Junit原有的运行器(main方法)换成spring的运行器:@RunWith(SpringJUnit4ClassRunner.class)
(4)告知spring运行器是用xml或注解的方式加载spring的配置信息
@ContextConfiguration( locations=“classpath:bean.xml” )
@ContextConfiguration( classes=SpringConfig.class )
5.spring-jdbc
(1)spring的持久层
(2)导入spring-jdbc,spring-text的maven依赖
 <dependency>
            <groupId>org.springframework</groupId>
            <artifactId>spring-jdbc</artifactId>
            <version>5.2.1.RELEASE</version>
  </dependency>
 <dependency>
            <groupId>org.springframework</groupId>
            <artifactId>spring-tx</artifactId>
            <version>5.2.1.RELEASE</version>
  </dependency>
(3)JdbcDaoSupport:仅支持配置文件,内置了一个JdbcTemplate
6.spring-tx
对事务的管理,导入spring-jdbc,spring-text的maven依赖


 被折叠的 条评论
为什么被折叠?
被折叠的 条评论
为什么被折叠?
 到【灌水乐园】发言


